Clearing Jams Guide
Page 1
...an appropriate environment. • Do not remove trays while the printer is printing. To reduce the risk of the printer might be hot. For more information, see the Card Stock & Label Guide available on the Lexmark Web site at www.lexmark.com/publications. • Do not load too much paper.... tray or Ready to cool before removing a tray. • Do not load the manual feeder while the printer is printing. Open Door H, and then remove the jam. Lexmark™ C935 Clearing Jams Guide Clearing jams Avoiding jams The following illustration and table list the paper jams that has...
...an appropriate environment. • Do not remove trays while the printer is printing. To reduce the risk of the printer might be hot. For more information, see the Card Stock & Label Guide available on the Lexmark Web site at www.lexmark.com/publications. • Do not load too much paper.... tray or Ready to cool before removing a tray. • Do not load the manual feeder while the printer is printing. Open Door H, and then remove the jam. Lexmark™ C935 Clearing Jams Guide Clearing jams Avoiding jams The following illustration and table list the paper jams that has...
Clearing Jams Guide
Page 2
Note: Make sure all paper fragments are removed. 3 Push the green lever down. 4 Close Door A. 2 7 Close Door B. 8 Press . To reduce the risk of the printer might be hot. CAUTION-HOT SURFACE: The inside of injury from a hot component, allow the surface to cool before touching it. 5 Pull the multipurpose feeder ...
Note: Make sure all paper fragments are removed. 3 Push the green lever down. 4 Close Door A. 2 7 Close Door B. 8 Press . To reduce the risk of the printer might be hot. CAUTION-HOT SURFACE: The inside of injury from a hot component, allow the surface to cool before touching it. 5 Pull the multipurpose feeder ...
Clearing Jams Guide
Page 3
c Open Tray 3, and then remove any crumpled paper from Trays 2-4. 3 d Close Tray 3. b Close Tray 2. a Open Tray 2, and then remove any crumpled paper from the printer. 241 paper jam 1 Open Door C. 5 Close the tray. 6 Press . 242-244 paper jams 1 Open Door D. Note: Make sure all paper fragments are removed. 3 Close Door C. 4 Open Tray 1, and then remove any crumpled paper. 2 Pull the paper down and away from the tray. 2 Pull the paper down and toward you. Note: Make sure all paper fragments are removed. 3 Close Door D. 4 Clear any crumpled paper.
c Open Tray 3, and then remove any crumpled paper from Trays 2-4. 3 d Close Tray 3. b Close Tray 2. a Open Tray 2, and then remove any crumpled paper from the printer. 241 paper jam 1 Open Door C. 5 Close the tray. 6 Press . 242-244 paper jams 1 Open Door D. Note: Make sure all paper fragments are removed. 3 Close Door C. 4 Open Tray 1, and then remove any crumpled paper. 2 Pull the paper down and away from the tray. 2 Pull the paper down and toward you. Note: Make sure all paper fragments are removed. 3 Close Door D. 4 Clear any crumpled paper.

Printing guide
Page 1
Paper may have one or more optional 520-sheet trays. Loading the 520-sheet trays The printer has a standard 520-sheet tray (Tray 1), and it may be loaded in the trays in either the long-edge or short-edge orientation. 1 Grasp the ...
Paper may have one or more optional 520-sheet trays. Loading the 520-sheet trays The printer has a standard 520-sheet tray (Tray 1), and it may be loaded in the trays in either the long-edge or short-edge orientation. 1 Grasp the ...
Printing guide
Page 4
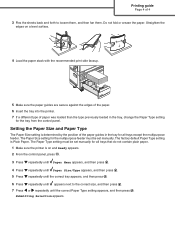
... Page 4 of paper was loaded than the type previously loaded in the tray for all trays that do not contain plain paper. 1 Make sure the printer is on a level surface. 4 Load the paper stack with the recommended print side faceup. 5 Make sure the paper guides are secure against the edges of... the paper. 6 Insert the tray into the printer. 7 If a different type of 4 3 Flex the sheets back and forth to the correct size, and then press . 7 Press or repeatedly until the correct Paper Type...
... Page 4 of paper was loaded than the type previously loaded in the tray for all trays that do not contain plain paper. 1 Make sure the printer is on a level surface. 4 Load the paper stack with the recommended print side faceup. 5 Make sure the paper guides are secure against the edges of... the paper. 6 Insert the tray into the printer. 7 If a different type of 4 3 Flex the sheets back and forth to the correct size, and then press . 7 Press or repeatedly until the correct Paper Type...

Quick Reference
Page 1
... paper stack with the recommended print side faceup. Paper may have one or more optional 520-sheet trays. Lexmark™ C935 Quick Reference Loading paper and specialty media Loading the 520-sheet trays The printer has a standard 520-sheet tray (Tray 1), and it . Straighten the edges on the bottom of the tray...
... paper stack with the recommended print side faceup. Paper may have one or more optional 520-sheet trays. Lexmark™ C935 Quick Reference Loading paper and specialty media Loading the 520-sheet trays The printer has a standard 520-sheet tray (Tray 1), and it . Straighten the edges on the bottom of the tray...
Quick Reference
Page 2
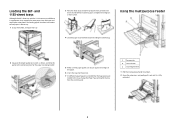
...-sheet trays Although the 867-sheet tray and the 1133-sheet tray are secure against the edges of the paper. 6 Insert the tray into the printer. 7 If a different type of paper was loaded than the type previously loaded in appearance, they support the same paper sizes and types and require the...
...-sheet trays Although the 867-sheet tray and the 1133-sheet tray are secure against the edges of the paper. 6 Insert the tray into the printer. 7 If a different type of paper was loaded than the type previously loaded in appearance, they support the same paper sizes and types and require the...

Quick Reference
Page 3
... surface. • Load letter, A4, and transparencies with the recommended print side facedown and the long edge of the paper entering the printer first. Straighten the edges on a level surface. Warning-Potential Damage: Never use envelopes with the recommended print side facedown and the short ...edge of the paper entering the printer first. 5 Make sure the paper is not bent or wrinkled. • Hold transparencies by forcing paper under the stack height limiter. &#...
... surface. • Load letter, A4, and transparencies with the recommended print side facedown and the long edge of the paper entering the printer first. Straighten the edges on a level surface. Warning-Potential Damage: Never use envelopes with the recommended print side facedown and the short ...edge of the paper entering the printer first. 5 Make sure the paper is not bent or wrinkled. • Hold transparencies by forcing paper under the stack height limiter. &#...

Quick Reference
Page 4
... can specify in the Print Properties that can be initiated by the user at www.lexmark.com. For a confidential job, also enter a four-digit PIN. 5 Click OK or Print, and then go to the printer to release the job. 6 From the control panel, press repeatedly until Held jobs appears, ... you choose to delete them. Repeat and Reserve jobs continue to be four digits using the numbers 0-9. For more information, visit the Lexmark Web site at the printer are not supported. • Before printing an encrypted .pdf file, enter the file password from the control panel. Devices formatted with ...
... can specify in the Print Properties that can be initiated by the user at www.lexmark.com. For a confidential job, also enter a four-digit PIN. 5 Click OK or Print, and then go to the printer to release the job. 6 From the control panel, press repeatedly until Held jobs appears, ... you choose to delete them. Repeat and Reserve jobs continue to be four digits using the numbers 0-9. For more information, visit the Lexmark Web site at the printer are not supported. • Before printing an encrypted .pdf file, enter the file password from the control panel. Devices formatted with ...

Quick Reference
Page 5
... lens cleaner 5 E6 Door tab 1 Unpack the replacement waste toner box and accessories. 2 Open Door E (front printer door). If you leave the USB flash memory device in the printer after leaving the initial USB menu screen, you can still print .pdf's from the USB flash memory device as held... until the document has finished printing. Canceling appears. Note: Once a print job is sent, to cancel, and then press . Maintaining the printer Replacing the waste toner box Replace the waste toner box when 82 Replace waste toner box appears. Canceling a print job from the USB Direct interface...
... lens cleaner 5 E6 Door tab 1 Unpack the replacement waste toner box and accessories. 2 Open Door E (front printer door). If you leave the USB flash memory device in the printer after leaving the initial USB menu screen, you can still print .pdf's from the USB flash memory device as held... until the document has finished printing. Canceling appears. Note: Once a print job is sent, to cancel, and then press . Maintaining the printer Replacing the waste toner box Replace the waste toner box when 82 Replace waste toner box appears. Canceling a print job from the USB Direct interface...

Quick Reference
Page 7
... bar by pressing the E5 button located on the display. Visit www.lexmark.com/recycling to learn how to recycle the waste toner box. Replace the cyan, magenta, and yellow photoconductors when 84 Replace color pc units appears. 1 Open Door E (front printer door). 3 Remove the photoconductor(s) specified on the bottom of the E5...
... bar by pressing the E5 button located on the display. Visit www.lexmark.com/recycling to learn how to recycle the waste toner box. Replace the cyan, magenta, and yellow photoconductors when 84 Replace color pc units appears. 1 Open Door E (front printer door). 3 Remove the photoconductor(s) specified on the bottom of the E5...

Quick Reference
Page 8
... not continue printing until the specified cartridge is replaced. 1 Make sure the printer is on and Ready or 88 Replace toner appears. 2 Unpack the new cartridge, and set it holds the bar in position. 4 Unpack the replacement photoconductor. 5 ... Door E. 6 Remove the tape from the top of the photoconductor. 8 Lift the bar up, and then press latch E5 down so that it near the printer. 3 Open Door E (front printer door). 8 Replacing a toner cartridge Replace the specified toner cartridge (cyan, magenta, yellow, or black) when 88 Replace toner appears.
... not continue printing until the specified cartridge is replaced. 1 Make sure the printer is on and Ready or 88 Replace toner appears. 2 Unpack the new cartridge, and set it holds the bar in position. 4 Unpack the replacement photoconductor. 5 ... Door E. 6 Remove the tape from the top of the photoconductor. 8 Lift the bar up, and then press latch E5 down so that it near the printer. 3 Open Door E (front printer door). 8 Replacing a toner cartridge Replace the specified toner cartridge (cyan, magenta, yellow, or black) when 88 Replace toner appears.
Quick Reference
Page 9
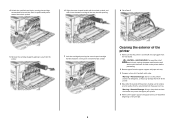
... Using a damp cloth to clean the interior may damage the finish of the printer. 4 Wipe only the outside of electric shock, unplug the power cord from the wall outlet. Cleaning the exterior of the printer 1 Make sure that has accumulated on the paper exit tray. CAUTION-SHOCK HAZARD...by gently pulling it points toward the lock symbol. 4 Unlock the specified cartridge by turning the cartridge counterclockwise until it away from the printer. 7 Lock the cartridge by turning the arrow-shaped cartridge handle clockwise until the arrow-shaped handle points toward the unlock symbol. 6 Align...
... Using a damp cloth to clean the interior may damage the finish of the printer. 4 Wipe only the outside of electric shock, unplug the power cord from the wall outlet. Cleaning the exterior of the printer 1 Make sure that has accumulated on the paper exit tray. CAUTION-SHOCK HAZARD...by gently pulling it points toward the lock symbol. 4 Unlock the specified cartridge by turning the cartridge counterclockwise until it away from the printer. 7 Lock the cartridge by turning the arrow-shaped cartridge handle clockwise until the arrow-shaped handle points toward the unlock symbol. 6 Align...

User Guide
Page 2
......15 Available options ...15 Accessing the system board to install internal options 16 Installing a memory card ...17 Installing a flash memory or firmware card...18 Installing a printer hard disk ...20 Installing an internal print server or port interface card 21 Reinstalling the system board...23 Attaching cables...23 Loading paper and specialty...
......15 Available options ...15 Accessing the system board to install internal options 16 Installing a memory card ...17 Installing a flash memory or firmware card...18 Installing a printer hard disk ...20 Installing an internal print server or port interface card 21 Reinstalling the system board...23 Attaching cables...23 Loading paper and specialty...

User Guide
Page 3
...Using card stock...41 Storing paper...42 Supported paper sizes, types, and weights 42 Paper sizes supported by the printer...42 Paper types and weights supported by the printer 44 Paper types and weights supported by the finisher 44 Supported finishing features ...45 Printing...48 Installing... a document from Windows...48 Printing a document from a Macintosh computer 48 Printing confidential and other held jobs 48 Holding jobs in the printer ...48 Printing confidential and other held jobs from Windows 49 Printing confidential and other held jobs from a Macintosh computer 50 Printing from ...
...Using card stock...41 Storing paper...42 Supported paper sizes, types, and weights 42 Paper sizes supported by the printer...42 Paper types and weights supported by the printer 44 Paper types and weights supported by the finisher 44 Supported finishing features ...45 Printing...48 Installing... a document from Windows...48 Printing a document from a Macintosh computer 48 Printing confidential and other held jobs 48 Holding jobs in the printer ...48 Printing confidential and other held jobs from Windows 49 Printing confidential and other held jobs from a Macintosh computer 50 Printing from ...

User Guide
Page 4
... jam...64 280-282 paper jams...65 283-284 and 287-288 paper jams...66 284-286 paper jams...68 289 staple jam...69 Understanding printer menus 73 Menus list...73 Supplies menu...74 Paper menu...75 Default Source menu ...75 Paper Size/Type menu ...75 Configure MP menu...77 Substitute...
... jam...64 280-282 paper jams...65 283-284 and 287-288 paper jams...66 284-286 paper jams...68 289 staple jam...69 Understanding printer menus 73 Menus list...73 Supplies menu...74 Paper menu...75 Default Source menu ...75 Paper Size/Type menu ...75 Configure MP menu...77 Substitute...

User Guide
Page 5
...LexLink menu ...111 USB Direct menu...111 Help menu...111 Understanding printer messages 112 List of status and error messages...112 Maintaining the printer 129 Cleaning the exterior of the printer...129 Storing supplies...129 Conserving supplies...129 Checking the status of... photoconductor...141 Replacing a toner cartridge...144 Recycling Lexmark products...146 Moving the printer...146 Before moving the printer ...146 Moving the printer to another location...147 Setting the printer up in a new location ...147 Shipping the printer ...148 Administrative support 149 Adjusting the brightness or...
...LexLink menu ...111 USB Direct menu...111 Help menu...111 Understanding printer messages 112 List of status and error messages...112 Maintaining the printer 129 Cleaning the exterior of the printer...129 Storing supplies...129 Conserving supplies...129 Checking the status of... photoconductor...141 Replacing a toner cartridge...144 Recycling Lexmark products...146 Moving the printer...146 Before moving the printer ...146 Moving the printer to another location...147 Setting the printer up in a new location ...147 Shipping the printer ...148 Administrative support 149 Adjusting the brightness or...
User Guide
Page 6
... Supporting IPSec...152 Supporting SNMPv3...152 Using 802.1x authentication...153 Creating an administrative password...154 Using Secure mode...154 Troubleshooting 155 Checking an unresponsive printer...155 Door A will not shut properly...155 Solving printing problems...156 Multiple‑language PDFs do not print...156 Control panel display is blank or...
... Supporting IPSec...152 Supporting SNMPv3...152 Using 802.1x authentication...153 Creating an administrative password...154 Using Secure mode...154 Troubleshooting 155 Checking an unresponsive printer...155 Door A will not shut properly...155 Solving printing problems...156 Multiple‑language PDFs do not print...156 Control panel display is blank or...

User Guide
Page 8
...continuing. If you are installing memory or option cards sometime after setting up the printer, turn the printer off as the power supply cord or telephone, during a lightning storm. This product uses a laser. CAUTION-SHOCK HAZARD: Do not use the fax feature during a lightning storm.... properly grounded electrical outlet that is designed, tested, and approved to meet strict global safety standards with the use of specific Lexmark components. Refer service or repairs, other than those specified herein may result in your operating instructions that heats the print media,...
...continuing. If you are installing memory or option cards sometime after setting up the printer, turn the printer off as the power supply cord or telephone, during a lightning storm. This product uses a laser. CAUTION-SHOCK HAZARD: Do not use the fax feature during a lightning storm.... properly grounded electrical outlet that is designed, tested, and approved to meet strict global safety standards with the use of specific Lexmark components. Refer service or repairs, other than those specified herein may result in your operating instructions that heats the print media,...

User Guide
Page 9
Use the handholds on the sides of the printer to lift it safely. Disconnect all cords and cables from the printer before moving it down. Safety information 9 CAUTION-POTENTIAL INJURY: The printer weighs 91.2 kg (201 lb); therefore, it requires at least four people or a properly rated mechanical handling system to lift it, and make sure your fingers are not under the printer when you set it .
Use the handholds on the sides of the printer to lift it safely. Disconnect all cords and cables from the printer before moving it down. Safety information 9 CAUTION-POTENTIAL INJURY: The printer weighs 91.2 kg (201 lb); therefore, it requires at least four people or a properly rated mechanical handling system to lift it, and make sure your fingers are not under the printer when you set it .

