
Printing guide
Page 1
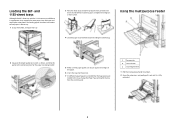
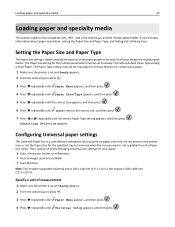
Loading the 520-sheet trays The printer has a standard 520-sheet tray (Tray 1), and it may be loaded in the trays in either the long-edge or short-edge orientation. 1 Grasp the ... may have one or more optional 520-sheet trays. It also includes information about setting the Paper Size and Paper Type. All 520-sheet trays support the same paper sizes and types.
Loading the 520-sheet trays The printer has a standard 520-sheet tray (Tray 1), and it may be loaded in the trays in either the long-edge or short-edge orientation. 1 Grasp the ... may have one or more optional 520-sheet trays. It also includes information about setting the Paper Size and Paper Type. All 520-sheet trays support the same paper sizes and types.

Printing guide
Page 3
...: 1 Grasp the handle, and open the tray. 2 Squeeze the length guide tab inward as shown, and slide the guide to load paper in appearance, they support the same paper sizes and types and require the same process for the tray from the control panel. Printing guide Page 3 of 4 8 If a different type...
...: 1 Grasp the handle, and open the tray. 2 Squeeze the length guide tab inward as shown, and slide the guide to load paper in appearance, they support the same paper sizes and types and require the same process for the tray from the control panel. Printing guide Page 3 of 4 8 If a different type...

Quick Reference
Page 1
All 520-sheet trays support the same paper sizes and types. Load the paper in either the long-edge or short-edge orientation. 1 Grasp the handle, and pull the tray ... to the correct position for the tray from the control panel. 1 Do not fold or crease the paper. Lexmark™ C935 Quick Reference Loading paper and specialty media Loading the 520-sheet trays The printer has a standard 520-sheet tray (Tray 1), and it . Note: Use the size indicators on a level surface. 5 Load...
All 520-sheet trays support the same paper sizes and types. Load the paper in either the long-edge or short-edge orientation. 1 Grasp the handle, and pull the tray ... to the correct position for the tray from the control panel. 1 Do not fold or crease the paper. Lexmark™ C935 Quick Reference Loading paper and specialty media Loading the 520-sheet trays The printer has a standard 520-sheet tray (Tray 1), and it . Note: Use the size indicators on a level surface. 5 Load...
Quick Reference
Page 2
...-sheet trays Although the 867-sheet tray and the 1133-sheet tray are secure against the edges of the paper. 6 Insert the tray into the printer. 7 If a different type of paper was loaded than the type previously loaded in either tray: 1 Grasp the handle, and open the tray. 3 Flex the ...sheets back and forth to the correct position for the paper size being loaded. 5 Make sure the paper guides are different in appearance, they support the same paper sizes and types and require the same process for the tray from the control panel. 1 Paper guides 2 Size indicators 3 Stack height limiter...
...-sheet trays Although the 867-sheet tray and the 1133-sheet tray are secure against the edges of the paper. 6 Insert the tray into the printer. 7 If a different type of paper was loaded than the type previously loaded in either tray: 1 Grasp the handle, and open the tray. 3 Flex the ...sheets back and forth to the correct position for the paper size being loaded. 5 Make sure the paper guides are different in appearance, they support the same paper sizes and types and require the same process for the tray from the control panel. 1 Paper guides 2 Size indicators 3 Stack height limiter...

Quick Reference
Page 4
... . 8 Press repeatedly until you start the job from the control panel. For more information, visit the Lexmark Web site at the printer are called held jobs. Devices formatted with the printer. If you enter an invalid PIN, the Invalid PIN screen appears. • To re-enter the PIN...copies as long as the job remains stored in memory. Insert a USB flash memory device to the printer, you must support the Full-speed standard. Devices only supporting USB Low-speed capabilities are not supported. • Before printing an encrypted .pdf file, enter the file password from a USB flash memory...
... . 8 Press repeatedly until you start the job from the control panel. For more information, visit the Lexmark Web site at the printer are called held jobs. Devices formatted with the printer. If you enter an invalid PIN, the Invalid PIN screen appears. • To re-enter the PIN...copies as long as the job remains stored in memory. Insert a USB flash memory device to the printer, you must support the Full-speed standard. Devices only supporting USB Low-speed capabilities are not supported. • Before printing an encrypted .pdf file, enter the file password from a USB flash memory...
Quick Reference
Page 9
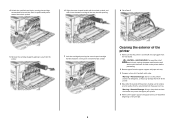
... accumulated on the paper exit tray. CAUTION-SHOCK HAZARD: To avoid the risk of the printer, making sure to remove any ink residue that the printer is turned off and unplugged from the paper support and paper exit tray. 3 Dampen a clean, lint-free cloth with the unlock symbol,... electric shock, unplug the power cord from the printer. 7 Lock the cartridge by turning the arrow-shaped cartridge handle clockwise until it points toward the lock symbol. Warning-Potential Damage: Using a damp cloth to your printer. 5 Make sure the paper support and paper exit tray are dry before proceeding....
... accumulated on the paper exit tray. CAUTION-SHOCK HAZARD: To avoid the risk of the printer, making sure to remove any ink residue that the printer is turned off and unplugged from the paper support and paper exit tray. 3 Dampen a clean, lint-free cloth with the unlock symbol,... electric shock, unplug the power cord from the printer. 7 Lock the cartridge by turning the arrow-shaped cartridge handle clockwise until it points toward the lock symbol. Warning-Potential Damage: Using a damp cloth to your printer. 5 Make sure the paper support and paper exit tray are dry before proceeding....

User Guide
Page 3
... labels...41 Using card stock...41 Storing paper...42 Supported paper sizes, types, and weights 42 Paper sizes supported by the printer...42 Paper types and weights supported by the printer 44 Paper types and weights supported by the finisher 44 Supported finishing features ...45 Printing...48 Installing printer software...48 Printing a document from Windows...48 Printing a document...
... labels...41 Using card stock...41 Storing paper...42 Supported paper sizes, types, and weights 42 Paper sizes supported by the printer...42 Paper types and weights supported by the printer 44 Paper types and weights supported by the finisher 44 Supported finishing features ...45 Printing...48 Installing printer software...48 Printing a document from Windows...48 Printing a document...

User Guide
Page 5
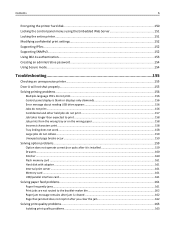
...LexLink menu ...111 USB Direct menu...111 Help menu...111 Understanding printer messages 112 List of status and error messages...112 Maintaining the printer 129 Cleaning the exterior of the printer...129 Storing supplies...129 Conserving supplies...129 Checking the status of ......141 Replacing a toner cartridge...144 Recycling Lexmark products...146 Moving the printer...146 Before moving the printer ...146 Moving the printer to another location...147 Setting the printer up in a new location ...147 Shipping the printer ...148 Administrative support 149 Adjusting the brightness or contrast of ...
...LexLink menu ...111 USB Direct menu...111 Help menu...111 Understanding printer messages 112 List of status and error messages...112 Maintaining the printer 129 Cleaning the exterior of the printer...129 Storing supplies...129 Conserving supplies...129 Checking the status of ......141 Replacing a toner cartridge...144 Recycling Lexmark products...146 Moving the printer...146 Before moving the printer ...146 Moving the printer to another location...147 Setting the printer up in a new location ...147 Shipping the printer ...148 Administrative support 149 Adjusting the brightness or contrast of ...
User Guide
Page 6
... panel menus using the Embedded Web Server 151 Locking the entire printer...151 Modifying confidential print settings...152 Supporting IPSec...152 Supporting SNMPv3...152 Using 802.1x authentication...153 Creating an administrative password...154 Using Secure mode...154 Troubleshooting 155 Checking an unresponsive printer...155 Door A will not shut properly...155 Solving printing problems...
... panel menus using the Embedded Web Server 151 Locking the entire printer...151 Modifying confidential print settings...152 Supporting IPSec...152 Supporting SNMPv3...152 Using 802.1x authentication...153 Creating an administrative password...154 Using Secure mode...154 Troubleshooting 155 Checking an unresponsive printer...155 Door A will not shut properly...155 Solving printing problems...

User Guide
Page 7
... have jagged or uneven edges ...164 Clipped images...164 Dark lines ...164 Gray background...165 Incorrect margins...165 Light colored line, white line, or incorrectly colored line 166 Paper curl...166 Print irregularities ...166 Print is too dark ...167 Print is too light...168 Repeating... rubs off ...170 Toner specks ...170 Transparency print quality is poor...171 Uneven print density ...171 Solving color quality problems...171 FAQ about color printing ...171 Contacting Customer Support...174 Notices...175 Edition notice...175 Industry Canada notices...177 Power consumption...184 Index...188
... have jagged or uneven edges ...164 Clipped images...164 Dark lines ...164 Gray background...165 Incorrect margins...165 Light colored line, white line, or incorrectly colored line 166 Paper curl...166 Print irregularities ...166 Print is too dark ...167 Print is too light...168 Repeating... rubs off ...170 Toner specks ...170 Transparency print quality is poor...171 Uneven print density ...171 Solving color quality problems...171 FAQ about color printing ...171 Contacting Customer Support...174 Notices...175 Edition notice...175 Industry Canada notices...177 Power consumption...184 Index...188
User Guide
Page 25
... setting is determined by the position of measure (inches or millimeters) • Portrait Height and Portrait Width • Feed Direction Note: The smallest supported Universal size is 305 x 483 mm (11.7 x 19 in the tray for all trays except the multipurpose feeder. The Paper Type setting must... the Paper Size and Paper Type, and linking and unlinking trays. Submitting Selection appears. the largest is 100 x 148 mm (3.9 x 5.8 in the printer menus. The Paper Size setting for the multipurpose feeder must be set manually for all trays that lets you want is on and Ready appears...
... setting is determined by the position of measure (inches or millimeters) • Portrait Height and Portrait Width • Feed Direction Note: The smallest supported Universal size is 305 x 483 mm (11.7 x 19 in the tray for all trays except the multipurpose feeder. The Paper Type setting must... the Paper Size and Paper Type, and linking and unlinking trays. Submitting Selection appears. the largest is 100 x 148 mm (3.9 x 5.8 in the printer menus. The Paper Size setting for the multipurpose feeder must be set manually for all trays that lets you want is on and Ready appears...

User Guide
Page 26
... width Defining a specific height and width measurement for the Universal paper size (in the portrait orientation) allows the printer to support the size, including support for Universal paper settings. The Feed Direction menu will enter the printer first. 1 From the Universal Setup menu, press repeatedly until Feed Direction appears, and then press . 2 Press repeatedly...
... width Defining a specific height and width measurement for the Universal paper size (in the portrait orientation) allows the printer to support the size, including support for Universal paper settings. The Feed Direction menu will enter the printer first. 1 From the Universal Setup menu, press repeatedly until Feed Direction appears, and then press . 2 Press repeatedly...

User Guide
Page 27
All 520‑sheet trays support the same paper sizes and types. Loading the 520‑sheet trays The printer has a standard 520‑sheet tray (Tray 1), and it may be loaded in the trays in either the long‑edge or short‑edge ...
All 520‑sheet trays support the same paper sizes and types. Loading the 520‑sheet trays The printer has a standard 520‑sheet tray (Tray 1), and it may be loaded in the trays in either the long‑edge or short‑edge ...
User Guide
Page 29
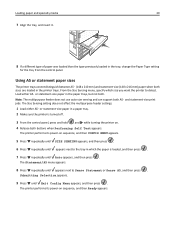
.... 3 From the control panel, press and hold and while turning the printer on. 4 Release both buttons when Performing Self Test appears. Note: The multipurpose feeder does not use auto‑size sensing and can support both . Submitting Selection appears. 9 Press until appears next to Sense Statement...either A5‑ or statement‑size paper in the paper trays, but not both A5‑ and statement‑size print jobs. The printer performs its power‑on sequence, and then CONFIG MENU appears. 5 Press repeatedly until SIZE SENSING appears, and then press . 6 Press ...
.... 3 From the control panel, press and hold and while turning the printer on. 4 Release both buttons when Performing Self Test appears. Note: The multipurpose feeder does not use auto‑size sensing and can support both . Submitting Selection appears. 9 Press until appears next to Sense Statement...either A5‑ or statement‑size paper in the paper trays, but not both A5‑ and statement‑size print jobs. The printer performs its power‑on sequence, and then CONFIG MENU appears. 5 Press repeatedly until SIZE SENSING appears, and then press . 6 Press ...

User Guide
Page 30
... slide the guide to the correct position for loading paper. Straighten the edges on a level surface. Use these instructions to load paper in appearance, they support the same paper sizes and types and require the same process for the paper size being loaded. 3 Flex the sheets back and forth to loosen...
... slide the guide to the correct position for loading paper. Straighten the edges on a level surface. Use these instructions to load paper in appearance, they support the same paper sizes and types and require the same process for the paper size being loaded. 3 Flex the sheets back and forth to loosen...

User Guide
Page 36
... to it properly. Paper lighter than 135 g/m2, grain short is exposed to moisture changes that can occur after the paper passes through the printer, where it is very different from 60 to 220 g/m2 (16 to feed the paper correctly. Excessive curl can cause paper feeding problems. ...storage or transportation environment is time to the alignment of paper. Note: Duplex is supported only for 24 to 48 hours before printing by storing it in its original wrapper until it is recommended. Weight The printer can cause paper feeding or print quality issues. For paper smaller than 182 x...
... to it properly. Paper lighter than 135 g/m2, grain short is exposed to moisture changes that can occur after the paper passes through the printer, where it is very different from 60 to 220 g/m2 (16 to feed the paper correctly. Excessive curl can cause paper feeding problems. ...storage or transportation environment is time to the alignment of paper. Note: Duplex is supported only for 24 to 48 hours before printing by storing it in its original wrapper until it is recommended. Weight The printer can cause paper feeding or print quality issues. For paper smaller than 182 x...

User Guide
Page 38
... of friction (0.4-0.6) • Sufficient bending resistance in the direction of feed Recycled paper, paper of lower weight ( Lexmark consistently tests its printers with recycled paper (20-100% post-consumer waste) and a variety of today's recycled office papers, but generally ... that recycled paper produced by major mills in laser (electrophotographic) printers. Paper and specialty media guide 38 Preprinted papers such as non-recycled paper. Using recycled paper As an environmentally conscious company, Lexmark supports the use of recycled office paper produced specifically...
... of friction (0.4-0.6) • Sufficient bending resistance in the direction of feed Recycled paper, paper of lower weight ( Lexmark consistently tests its printers with recycled paper (20-100% post-consumer waste) and a variety of today's recycled office papers, but generally ... that recycled paper produced by major mills in laser (electrophotographic) printers. Paper and specialty media guide 38 Preprinted papers such as non-recycled paper. Using recycled paper As an environmentally conscious company, Lexmark supports the use of recycled office paper produced specifically...

User Guide
Page 42
...18 to 24°C (65 to detect. This setting applies to simplex (one‑sided) printing only. Paper sizes supported by the printer Paper size Dimensions 520‑sheet trays High capacity (standard or feeder optional) Multipurpose feeder Duplex unit A3 297 x 420 ...184 x 267 mm X X (7.3 x 10.5 in .). Preprinting introduces semi‑liquid and volatile components into the printer. • Use grain long card stock when possible. Supported paper sizes, types, and weights The following tables provide information on standard and optional paper sources and the types of ...
...18 to 24°C (65 to detect. This setting applies to simplex (one‑sided) printing only. Paper sizes supported by the printer Paper size Dimensions 520‑sheet trays High capacity (standard or feeder optional) Multipurpose feeder Duplex unit A3 297 x 420 ...184 x 267 mm X X (7.3 x 10.5 in .). Preprinting introduces semi‑liquid and volatile components into the printer. • Use grain long card stock when possible. Supported paper sizes, types, and weights The following tables provide information on standard and optional paper sources and the types of ...

User Guide
Page 43
The multipurpose feeder can support both sizes. 2 Measurements apply to all automatic trays except the multipurpose feeder. For duplex (two‑sided) printing, the minimum size is 140 x 148 mm (5.5 x 5.8 in.) and the maximum size is 297 x 432 mm (11.7 x 17 in .) 1 The printer cannot simultaneously sense A5 and statement paper sizes. This... mm X X X (3.9 x 8.9 in.) 10 Envelope 105 x 241 mm X X X (4.1 x 9.5 in.) DL Envelope 110 x 220 mm X X X (4.3 x 8.7 in .). From the Size Sensing menu, specify which size you want the printer to detect.
The multipurpose feeder can support both sizes. 2 Measurements apply to all automatic trays except the multipurpose feeder. For duplex (two‑sided) printing, the minimum size is 140 x 148 mm (5.5 x 5.8 in.) and the maximum size is 297 x 432 mm (11.7 x 17 in .) 1 The printer cannot simultaneously sense A5 and statement paper sizes. This... mm X X X (3.9 x 8.9 in.) 10 Envelope 105 x 241 mm X X X (4.1 x 9.5 in.) DL Envelope 110 x 220 mm X X X (4.3 x 8.7 in .). From the Size Sensing menu, specify which size you want the printer to detect.

User Guide
Page 44
... X X X Paper types and weights supported by the printer The printer engine supports 60-220 g/m2 (16-60 lb) paper weights. Bin 1 of each output bin is listed in parentheses. Paper type Plain Paper 520‑sheet trays Bond Letterhead Preprinted Colored Paper Card stock Glossy paper X Paper ...labels* X Transparencies Envelopes X * Vinyl labels are calculated based on 75 g/m2 (20 lb) paper. Bin 2 (booklet‑maker) supports 60- 90 g/m2 (16-24 lb) ...
... X X X Paper types and weights supported by the printer The printer engine supports 60-220 g/m2 (16-60 lb) paper weights. Bin 1 of each output bin is listed in parentheses. Paper type Plain Paper 520‑sheet trays Bond Letterhead Preprinted Colored Paper Card stock Glossy paper X Paper ...labels* X Transparencies Envelopes X * Vinyl labels are calculated based on 75 g/m2 (20 lb) paper. Bin 2 (booklet‑maker) supports 60- 90 g/m2 (16-24 lb) ...


