

Setup Sheet
Page 1
... number and support times may change without notice. Connect the power supply. Lift the scanner unit. Make sure the power light is near the product and easily accessible. • Refer service or repairs, other than those described in the user documentation, to your computer on . X1100 Series All-In-One For more help: 1 Refer to a professional service person. Do not set up this product or the manufacturer's authorized replacement power supply. • Connect...
... number and support times may change without notice. Connect the power supply. Lift the scanner unit. Make sure the power light is near the product and easily accessible. • Refer service or repairs, other than those described in the user documentation, to your computer on . X1100 Series All-In-One For more help: 1 Refer to a professional service person. Do not set up this product or the manufacturer's authorized replacement power supply. • Connect...

User's Guide
Page 2
...replacement power supply. • Connect the power cord to an electrical outlet that is not intended to state or imply that only that product, program, or service may be made to the information herein; All rights reserved. Safety information • Use only the power supply... of their respective owners. © 2003 Lexmark International, Inc. References in this product or make these changes will be used . Evaluation and verification of publications related to this statement may be addressed to Lexmark International Ltd., Marketing and Services Department, Westhorpe House...
...replacement power supply. • Connect the power cord to an electrical outlet that is not intended to state or imply that only that product, program, or service may be made to the information herein; All rights reserved. Safety information • Use only the power supply... of their respective owners. © 2003 Lexmark International, Inc. References in this product or make these changes will be used . Evaluation and verification of publications related to this statement may be addressed to Lexmark International Ltd., Marketing and Services Department, Westhorpe House...
User's Guide
Page 5
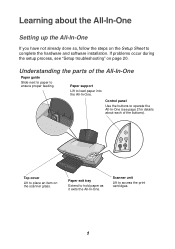
Paper support Lift to operate the All-In-One (see "Setup troubleshooting" on page 20. Control panel Use the buttons to load paper into the All-In-One. Top cover Lift to access the print cartridges. 1 Scanner unit Lift to place an item on the Setup Sheet to ensure proper feeding. If problems occur during the setup process, see page 2 for details about the All-In-One Setting up the All-In-One...
Paper support Lift to operate the All-In-One (see "Setup troubleshooting" on page 20. Control panel Use the buttons to load paper into the All-In-One. Top cover Lift to access the print cartridges. 1 Scanner unit Lift to place an item on the Setup Sheet to ensure proper feeding. If problems occur during the setup process, see page 2 for details about the All-In-One Setting up the All-In-One...
User's Guide
Page 7
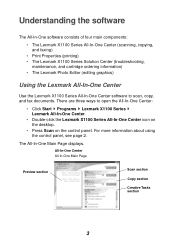
... Center (scanning, copying, and faxing) • Print Properties (printing) • The Lexmark X1100 Series Solution Center (troubleshooting, maintenance, and cartridge ordering information) • The Lexmark Photo Editor (editing graphics) Using the Lexmark All-In-One Center Use the Lexmark X1100 Series All-In-One Center software to open the All-In-One Center: • Click Start Programs Lexmark X1100 Series Lexmark All-In-One Center. • Double-click the Lexmark X1100 Series All-In...
... Center (scanning, copying, and faxing) • Print Properties (printing) • The Lexmark X1100 Series Solution Center (troubleshooting, maintenance, and cartridge ordering information) • The Lexmark Photo Editor (editing graphics) Using the Lexmark All-In-One Center Use the Lexmark X1100 Series All-In-One Center software to open the All-In-One Center: • Click Start Programs Lexmark X1100 Series Lexmark All-In-One Center. • Double-click the Lexmark X1100 Series All-In...
User's Guide
Page 8
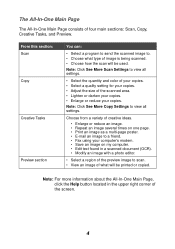
... the quantity and color of your copies. • Select a quality setting for your copies. • Adjust the size of the scanned area. • Lighten or darken your copies. • Enlarge or reduce your computer's modem. • Save an image on one page. • Print an image as a multi-page poster. • E-mail an image to scan. • View an image of what type of creative ideas...
... the quantity and color of your copies. • Select a quality setting for your copies. • Adjust the size of the scanned area. • Lighten or darken your copies. • Enlarge or reduce your computer's modem. • Save an image on one page. • Print an image as a multi-page poster. • E-mail an image to scan. • View an image of what type of creative ideas...

User's Guide
Page 9
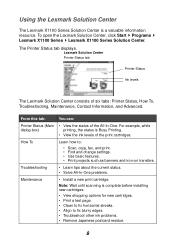
...; Maintain or fix quality problems • Troubleshoot All-In-One problems • Device status and ink levels • More printing ideas and how to . • Choose the quantity and color of the screen. 5 For help, see page 8. Creative Tasks You can: Select a program to send the saved image to 's • Contact information • Advanced (skin, voice, and communication options) • View the software version and...
...; Maintain or fix quality problems • Troubleshoot All-In-One problems • Device status and ink levels • More printing ideas and how to . • Choose the quantity and color of the screen. 5 For help, see page 8. Creative Tasks You can: Select a program to send the saved image to 's • Contact information • Advanced (skin, voice, and communication options) • View the software version and...
User's Guide
Page 10
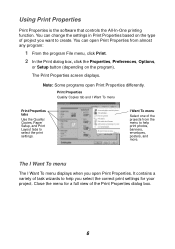
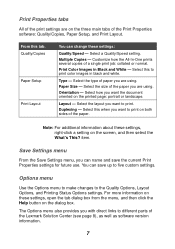
... menu to help print photos, banners, envelopes, posters, and more. Print Properties Quality Copies tab and I Want To menu Select one of the projects from almost any program: 1 From the program File menu, click Print. 2 In the Print dialog box, click the Properties, Preferences, Options, or Setup button (depending on the type of the Print Properties dialog box. 6 It contains a variety of task wizards to help you select the correct print settings...
... menu to help print photos, banners, envelopes, posters, and more. Print Properties Quality Copies tab and I Want To menu Select one of the projects from almost any program: 1 From the program File menu, click Print. 2 In the Print dialog box, click the Properties, Preferences, Options, or Setup button (depending on the type of the Print Properties dialog box. 6 It contains a variety of task wizards to help you select the correct print settings...
User's Guide
Page 11
... are using . Paper Size - Duplexing - From this when you want to print on both sides of the paper you with direct links to the Quality Options, Layout Options, and Printing Status Options settings. Multiple Copies - Layout - item. Options menu Use the Options menu to make changes to different parts of the Lexmark Solution Center (see page 8), as well as software version information. 7 Print Color Images in black and white. Select this tab: Quality/Copies Paper Setup Print Layout...
... are using . Paper Size - Duplexing - From this when you want to print on both sides of the paper you with direct links to the Quality Options, Layout Options, and Printing Status Options settings. Multiple Copies - Layout - item. Options menu Use the Options menu to make changes to different parts of the Lexmark Solution Center (see page 8), as well as software version information. 7 Print Color Images in black and white. Select this tab: Quality/Copies Paper Setup Print Layout...
User's Guide
Page 12
... new cartridges. • Print a test page. • Clean to fix horizontal streaks. • Align to : • Scan, copy, fax, and print. • Find and change settings. • Use basic features. • Print projects such as banners and iron-on transfers. To open the Lexmark Solution Center, click Start Programs Lexmark X1100 Series Lexmark X1100 Series Solution Center. How To Learn how to fix blurry edges. • Troubleshoot other ink problems. • Remove Japanese postcard residue. 8 The Printer Status tab displays. Troubleshooting...
... new cartridges. • Print a test page. • Clean to fix horizontal streaks. • Align to : • Scan, copy, fax, and print. • Find and change settings. • Use basic features. • Print projects such as banners and iron-on transfers. To open the Lexmark Solution Center, click Start Programs Lexmark X1100 Series Lexmark X1100 Series Solution Center. How To Learn how to fix blurry edges. • Troubleshoot other ink problems. • Remove Japanese postcard residue. 8 The Printer Status tab displays. Troubleshooting...
User's Guide
Page 14
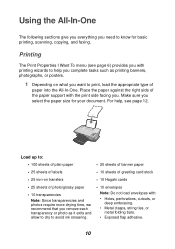
... dry to avoid ink smearing. • 10 envelopes Note: Do not load envelopes with the print side facing you. For help, see page 6) provides you with printing wizards to help you complete tasks such as printing banners, photographs, or posters. 1 Depending on transfers • 10 Hagaki cards • 25 sheets of paper into the All-In-One. Printing The Print Properties I Want To menu (see page 12. Using the All-In...
... dry to avoid ink smearing. • 10 envelopes Note: Do not load envelopes with the print side facing you. For help, see page 6) provides you with printing wizards to help you complete tasks such as printing banners, photographs, or posters. 1 Depending on transfers • 10 Hagaki cards • 25 sheets of paper into the All-In-One. Printing The Print Properties I Want To menu (see page 12. Using the All-In...
User's Guide
Page 21
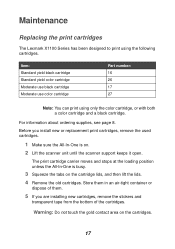
... about ordering supplies, see page 8. Store them in an air-tight container or dispose of them. 5 If you install new or replacement print cartridges, remove the used cartridges. 1 Make sure the All-In-One is busy. 3 Squeeze the tabs on . 2 Lift the scanner unit until the scanner support keeps it open. Maintenance Replacing the print cartridges The Lexmark X1100 Series has been designed to print using only the color cartridge, or with both a color cartridge and a black cartridge.
... about ordering supplies, see page 8. Store them in an air-tight container or dispose of them. 5 If you install new or replacement print cartridges, remove the used cartridges. 1 Make sure the All-In-One is busy. 3 Squeeze the tabs on . 2 Lift the scanner unit until the scanner support keeps it open. Maintenance Replacing the print cartridges The Lexmark X1100 Series has been designed to print using only the color cartridge, or with both a color cartridge and a black cartridge.
User's Guide
Page 23
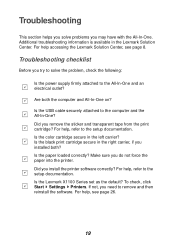
For help , see page 8. Did you need to remove and then reinstall the software. For help , refer to the All-In-One and an electrical outlet? To check, click Start Settings Printers. Is the color cartridge secure in the Lexmark Solution Center. Are both ? Is the paper loaded correctly? If not, you remove the sticker and transparent tape from the print cartridge? Troubleshooting This section helps you solve problems you installed both the computer...
For help , see page 8. Did you need to remove and then reinstall the software. For help , refer to the All-In-One and an electrical outlet? To check, click Start Settings Printers. Is the color cartridge secure in the Lexmark Solution Center. Are both ? Is the paper loaded correctly? If not, you remove the sticker and transparent tape from the print cartridge? Troubleshooting This section helps you solve problems you installed both the computer...
User's Guide
Page 24
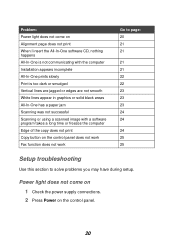
... smooth White lines appear in graphics or solid black areas All-In-One has a paper jam Scanning was not successful Scanning or using a scanned image with a software program takes a long time or freezes the computer Edge of the copy does not print Copy button on the control panel. 20 Problem: Power light does not come on 1 Check the power supply connections. 2 Press Power on the control panel does not work Fax function does not work Go to page: 20...
... smooth White lines appear in graphics or solid black areas All-In-One has a paper jam Scanning was not successful Scanning or using a scanned image with a software program takes a long time or freezes the computer Edge of the copy does not print Copy button on the control panel. 20 Problem: Power light does not come on 1 Check the power supply connections. 2 Press Power on the control panel does not work Fax function does not work Go to page: 20...
User's Guide
Page 25
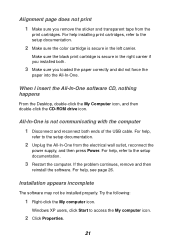
... be installed properly. Windows XP users, click Start to the setup documentation. 2 Unplug the All-In-One from the print cartridges. For help installing print cartridges, refer to the setup documentation. 3 Restart the computer. Alignment page does not print 1 Make sure you remove the sticker and transparent tape from the electrical wall outlet, reconnect the power supply, and then press Power. All-In-One is secure in the left carrier. Make sure the black print cartridge...
... be installed properly. Windows XP users, click Start to the setup documentation. 2 Unplug the All-In-One from the print cartridges. For help installing print cartridges, refer to the setup documentation. 3 Restart the computer. Alignment page does not print 1 Make sure you remove the sticker and transparent tape from the electrical wall outlet, reconnect the power supply, and then press Power. All-In-One is secure in the left carrier. Make sure the black print cartridge...
User's Guide
Page 26
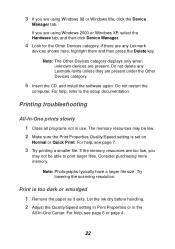
... setting in Print Properties or in use. The memory resources may not be low. 2 Make sure the Print Properties Quality/Speed setting is too dark or smudged 1 Remove the paper as it exits. For help , refer to print larger files. If you are too low, you are present. Do not restart the computer. For help , see page 7. 3 Try printing a smaller file. For help, see page 6 or page 4. 22 If the memory resources are using Windows...
... setting in Print Properties or in use. The memory resources may not be low. 2 Make sure the Print Properties Quality/Speed setting is too dark or smudged 1 Remove the paper as it exits. For help , refer to print larger files. If you are too low, you are present. Do not restart the computer. For help , see page 7. 3 Try printing a smaller file. For help, see page 6 or page 4. 22 If the memory resources are using Windows...
User's Guide
Page 27
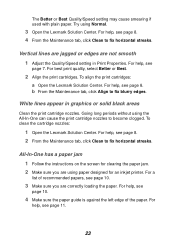
... instructions on the screen for clearing the paper jam. 2 Make sure you are not smooth 1 Adjust the Quality/Speed setting in graphics or solid black areas Clean the print cartridge nozzles. b From the Maintenance tab, click Align to fix horizontal streaks. For best print quality, select Better or Best. 2 Align the print cartridges. For a list of the paper. For help , see page 11. 23 For help , see page 7. For help , see page 8. To align the print cartridges: a Open the Lexmark Solution Center. Try using Normal. 3 Open...
... instructions on the screen for clearing the paper jam. 2 Make sure you are not smooth 1 Adjust the Quality/Speed setting in graphics or solid black areas Clean the print cartridge nozzles. b From the Maintenance tab, click Align to fix horizontal streaks. For best print quality, select Better or Best. 2 Align the print cartridges. For a list of the paper. For help , see page 11. 23 For help , see page 7. For help , see page 8. To align the print cartridges: a Open the Lexmark Solution Center. Try using Normal. 3 Open...
User's Guide
Page 28
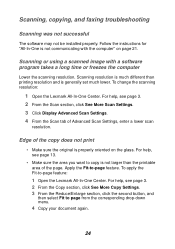
... than printing resolution and is much lower. Scanning or using a scanned image with the computer" on the glass. To change the scanning resolution: 1 Open the Lexmark All-In-One Center. For help, see page 3. 2 From the Scan section, click See More Scan Settings. 3 Click Display Advanced Scan Settings. 4 From the Scan tab of Advanced Scan Settings, enter a lower scan resolution. Scanning, copying, and faxing troubleshooting Scanning was not successful The software may not be installed properly...
... than printing resolution and is much lower. Scanning or using a scanned image with the computer" on the glass. To change the scanning resolution: 1 Open the Lexmark All-In-One Center. For help, see page 3. 2 From the Scan section, click See More Scan Settings. 3 Click Display Advanced Scan Settings. 4 From the Scan tab of Advanced Scan Settings, enter a lower scan resolution. Scanning, copying, and faxing troubleshooting Scanning was not successful The software may not be installed properly...
User's Guide
Page 30
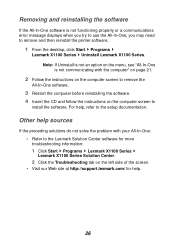
... instructions on the computer screen to remove and then reinstall the printer software. 1 From the desktop, click Start Programs Lexmark X1100 Series Uninstall Lexmark X1100 Series. Note: If Uninstall is not an option on the menu, see "All-In-One is not functioning properly or a communications error message displays when you try to use the All-In-One, you may need to install the software. Removing and reinstalling the software...
... instructions on the computer screen to remove and then reinstall the printer software. 1 From the desktop, click Start Programs Lexmark X1100 Series Uninstall Lexmark X1100 Series. Note: If Uninstall is not an option on the menu, see "All-In-One is not functioning properly or a communications error message displays when you try to use the All-In-One, you may need to install the software. Removing and reinstalling the software...
User's Guide
Page 33
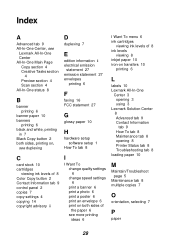
... paper 10 H hardware setup software setup 1 How To tab 8 I I Want To change quality settings 6 change speed settings 6 print a banner 6 print a photo 6 print a poster 6 print an envelope 6 print on both sides of the paper 6 see more printing ideas 6 I Want To menu 6 ink cartridges viewing ink levels of 8 ink levels viewing 8 inkjet paper 10 iron-on transfers 10 printing 6 L labels 10 Lexmark All-In-One Center 3 opening 3 using 3 Lexmark Solution Center 8 Advanced tab 9 Contact Information tab 9 How To tab 8 Maintenance tab 8 opening 8 Printer Status tab 8 Troubleshooting tab 8 loading paper...
... paper 10 H hardware setup software setup 1 How To tab 8 I I Want To change quality settings 6 change speed settings 6 print a banner 6 print a photo 6 print a poster 6 print an envelope 6 print on both sides of the paper 6 see more printing ideas 6 I Want To menu 6 ink cartridges viewing ink levels of 8 ink levels viewing 8 inkjet paper 10 iron-on transfers 10 printing 6 L labels 10 Lexmark All-In-One Center 3 opening 3 using 3 Lexmark Solution Center 8 Advanced tab 9 Contact Information tab 9 How To tab 8 Maintenance tab 8 opening 8 Printer Status tab 8 Troubleshooting tab 8 loading paper...
User's Guide
Page 34
... turning on the glass 13 settings, saving for future use 7 setup 1 setup troubleshooting 20 software reinstalling 26 removing 26 sound, see voice notification Status tab 8 T top cover 1 transparencies 10 troubleshooting copying problems 24 faxing problems 24 scanning problems 24 setup problems 20 troubleshooting checklist 19 Troubleshooting tab 8 V View Saved Images page 5 Open with... acceptable types of 10 loading 10 paper exit tray 1 Paper Feed button 2 paper guide adjusting 11 Paper Setup tab 7 parts of your All-In-One 1 photo paper 10 photos printing 6 scanning 13 poor quality printing...
... turning on the glass 13 settings, saving for future use 7 setup 1 setup troubleshooting 20 software reinstalling 26 removing 26 sound, see voice notification Status tab 8 T top cover 1 transparencies 10 troubleshooting copying problems 24 faxing problems 24 scanning problems 24 setup problems 20 troubleshooting checklist 19 Troubleshooting tab 8 V View Saved Images page 5 Open with... acceptable types of 10 loading 10 paper exit tray 1 Paper Feed button 2 paper guide adjusting 11 Paper Setup tab 7 parts of your All-In-One 1 photo paper 10 photos printing 6 scanning 13 poor quality printing...


