
Setup Guide
Page 4
Step 6: Install printer supplies 38 Opening the top cover 38 Installing the photodevelopers 41 Installing the toner cartridges 44 Attaching the Quick Reference booklet sleeve 47 Attaching an adhesive operator panel overlay 48 Closing the top cover 49 Step 7: Load paper... 51 Loading the paper trays 52 Loading the multipurpose feeder 59 Loading the high-capacity feeder 63 Step 8: Verify printer setup 67 Turning...
Step 6: Install printer supplies 38 Opening the top cover 38 Installing the photodevelopers 41 Installing the toner cartridges 44 Attaching the Quick Reference booklet sleeve 47 Attaching an adhesive operator panel overlay 48 Closing the top cover 49 Step 7: Load paper... 51 Loading the paper trays 52 Loading the multipurpose feeder 59 Loading the high-capacity feeder 63 Step 8: Verify printer setup 67 Turning...

Setup Guide
Page 7
... or place it safely. Use the handholds on the side of the printer when lifting. Power cord Drivers CD Publications CD • Four toner cartridges • Four photodevelopers • Setup Guide • Lexmark C910 Publications CD • Quick Reference and sleeve • Drivers CD...until you are missing or damaged, refer to repack the printer. Make sure you have enough people to help you need to the publications CD for the designated Lexmark support phone number for your printer Printer Toner cartridges CAUTION! Step 1: Unpack your country. Remove all items from...
... or place it safely. Use the handholds on the side of the printer when lifting. Power cord Drivers CD Publications CD • Four toner cartridges • Four photodevelopers • Setup Guide • Lexmark C910 Publications CD • Quick Reference and sleeve • Drivers CD...until you are missing or damaged, refer to repack the printer. Make sure you have enough people to help you need to the publications CD for the designated Lexmark support phone number for your printer Printer Toner cartridges CAUTION! Step 1: Unpack your country. Remove all items from...

Setup Guide
Page 50
..., yellow, cyan, and magenta. 2 Gently shake the toner cartridge to distribute the toner evenly. 44 Install printer supplies Waste toner arm Installing the toner cartridges Your printer ships with four color-coded starter toner cartridges. Note: Use a brush or cold water to 8,000 pages. You can install the cartridges in any toner that has soiled clothing. 1 Remove...
..., yellow, cyan, and magenta. 2 Gently shake the toner cartridge to distribute the toner evenly. 44 Install printer supplies Waste toner arm Installing the toner cartridges Your printer ships with four color-coded starter toner cartridges. Note: Use a brush or cold water to 8,000 pages. You can install the cartridges in any toner that has soiled clothing. 1 Remove...
Setup Guide
Page 51
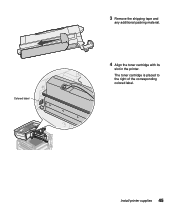
Colored label 3 Remove the shipping tape and any additional packing material. 4 Align the toner cartridge with its slot in the printer. Install printer supplies 45 The toner cartridge is placed to the right of the corresponding colored label.
Colored label 3 Remove the shipping tape and any additional packing material. 4 Align the toner cartridge with its slot in the printer. Install printer supplies 45 The toner cartridge is placed to the right of the corresponding colored label.

Setup Guide
Page 52
5 Slide the toner cartridge in until the cartridge is fully seated. 6 Push the waste toner arm onto the photodeveloper until it snaps into place. 7 Repeat steps 2 through 6 to install the remaining toner cartridges. 46 Install printer supplies
5 Slide the toner cartridge in until the cartridge is fully seated. 6 Push the waste toner arm onto the photodeveloper until it snaps into place. 7 Repeat steps 2 through 6 to install the remaining toner cartridges. 46 Install printer supplies

Setup Guide
Page 83
... complete list of the available information. The type of helpful information provided on the Lexmark C910 Publications CD. These include: • Users sending print jobs • Network printer administrators • Help desk personnel • Information Technology support staff Finding information Launch ... to the information stored on the Lexmark C910 Publications CD includes: • Tips for successful printing • Ways to improve print quality • Information about using the operator panel • Instructions for replacing print cartridges and other supply items • ...
... complete list of the available information. The type of helpful information provided on the Lexmark C910 Publications CD. These include: • Users sending print jobs • Network printer administrators • Help desk personnel • Information Technology support staff Finding information Launch ... to the information stored on the Lexmark C910 Publications CD includes: • Tips for successful printing • Ways to improve print quality • Information about using the operator panel • Instructions for replacing print cartridges and other supply items • ...

Setup Guide
Page 90
...31 MarkNet print server 31 memory cards 27 option cards 31 parallel interface card 31 photodevelopers 41 print servers 31 printer drivers 72 printer memory 27 supplies 38 toner cartridges 44 Tri-Port Adapter 31 USB/Parallel Interface Card 31 internal print server 31 introduction v IP address, setting ...70 IP settings, verifying 71 L labels paper tray 23 printing 51 Lexmark ABC Publications CD vi Lexmark Web site vi Linux 74 loading ...
...31 MarkNet print server 31 memory cards 27 option cards 31 parallel interface card 31 photodevelopers 41 print servers 31 printer drivers 72 printer memory 27 supplies 38 toner cartridges 44 Tri-Port Adapter 31 USB/Parallel Interface Card 31 internal print server 31 introduction v IP address, setting ...70 IP settings, verifying 71 L labels paper tray 23 printing 51 Lexmark ABC Publications CD vi Lexmark Web site vi Linux 74 loading ...
Setup Guide
Page 91
... print server installed in network models v installing 31 printer base 9 cabinet 9 lifting 11 memory v, 27 models v turning the power on 67 unpacking 1 printer drivers 72 printer location 3, 4, 5, 6, 7 printer view, front and rear 2 printer with high-capacity feeder 7 publications CD distributing 78 ...cartridges, installing 44 top cover closing 49 opening 38 transparencies 51 tray, exit 2 Tri-Port Adapter 31 turning on the printer 67 U UNIX 74 unpacking high-capacity feeder 15 memory cards 27 option cards 32 printer 1 USB 37 USB/Parallel Interface Card 31 W warranty 79 Web site, Lexmark...
... print server installed in network models v installing 31 printer base 9 cabinet 9 lifting 11 memory v, 27 models v turning the power on 67 unpacking 1 printer drivers 72 printer location 3, 4, 5, 6, 7 printer view, front and rear 2 printer with high-capacity feeder 7 publications CD distributing 78 ...cartridges, installing 44 top cover closing 49 opening 38 transparencies 51 tray, exit 2 Tri-Port Adapter 31 turning on the printer 67 U UNIX 74 unpacking high-capacity feeder 15 memory cards 27 option cards 32 printer 1 USB 37 USB/Parallel Interface Card 31 W warranty 79 Web site, Lexmark...

User's Guide
Page 13
... the Card Stock & Label Guide for laser printers, you use other transparencies, the print... transfer in damage to replace certain printer supplies. Feeding media that may wear...may indicate it is time to the printer, paper jams, or print quality ...display, the Supplies Menu, or MarkVision for your printer: P/N 12A5940 (letter size) P/N 12A5941 (A4...and slows the print speed to the printer. 2 Avoiding print quality problems To ... printing transparencies. See Maintenance for this printer may result in a wide range of...cartridge, the shiny green tube on the photodeveloper, the...
... the Card Stock & Label Guide for laser printers, you use other transparencies, the print... transfer in damage to replace certain printer supplies. Feeding media that may wear...may indicate it is time to the printer, paper jams, or print quality ...display, the Supplies Menu, or MarkVision for your printer: P/N 12A5940 (letter size) P/N 12A5941 (A4...and slows the print speed to the printer. 2 Avoiding print quality problems To ... printing transparencies. See Maintenance for this printer may result in a wide range of...cartridge, the shiny green tube on the photodeveloper, the...
User's Guide
Page 32
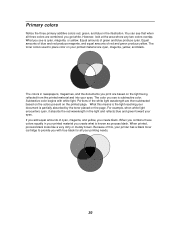
...are cyan, magenta, yellow, and black. Equal amounts of red and green produce yellow. The colors in your printing needs. 30 What this , your printer has a black toner cartridge to place color on the light being reflected from the printed material and into your printed material are based on...material you create black. Because of cyan, magenta, and yellow, you create what is cyan, magenta, or yellow. What you combine these colors equally in newspapers, magazines, and the documents you with white light. For example, when white light encounters cyan, it absorbs the red ...
...are cyan, magenta, yellow, and black. Equal amounts of red and green produce yellow. The colors in your printing needs. 30 What this , your printer has a black toner cartridge to place color on the light being reflected from the printed material and into your printed material are based on...material you create black. Because of cyan, magenta, and yellow, you create what is cyan, magenta, or yellow. What you combine these colors equally in newspapers, magazines, and the documents you with white light. For example, when white light encounters cyan, it absorbs the red ...

User's Guide
Page 34
Always print a new swatch of the colors you invest a lot of time creating your screen designs. 32 As your monitor ages, the colors on using before you plan on the screen also change. Changing the toner cartridges, photodeveloper cartridge, and paper in your printer also has a major impact on the color in your printed document.
Always print a new swatch of the colors you invest a lot of time creating your screen designs. 32 As your monitor ages, the colors on using before you plan on the screen also change. Changing the toner cartridges, photodeveloper cartridge, and paper in your printer also has a major impact on the color in your printed document.

User's Guide
Page 39
...attached • Have any exposed adhesive when the flap is in letter size and A4 size sheets. For detailed information on Lexmark Web site at www.lexmark.com. Choosing card stock Card stock is 25% or less. mixing print media can all affect printing on labels: •...can cause feeding problems. • Do not load partial sheets with adhesive. You can also void your toner cartridge with areas exposed by missing labels; It can use with laser printers. These labels are one of the most difficult print media for detailed information about these settings.) • Do...
...attached • Have any exposed adhesive when the flap is in letter size and A4 size sheets. For detailed information on Lexmark Web site at www.lexmark.com. Choosing card stock Card stock is 25% or less. mixing print media can all affect printing on labels: •...can cause feeding problems. • Do not load partial sheets with adhesive. You can also void your toner cartridge with areas exposed by missing labels; It can use with laser printers. These labels are one of the most difficult print media for detailed information about these settings.) • Do...
User's Guide
Page 73
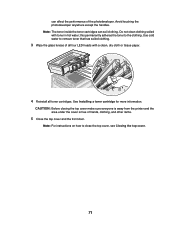
...the clothing. Use cold water to remove toner that has soiled clothing. 3 Wipe the glass lenses of the photodeveloper. Note: The toner inside the toner cartridges can affect the performance of all four LED heads with toner in hot water; CAUTION: Before closing the top cover make sure everyone is away... from the printer and the area under the cover is free of hands, clothing, and other items. 5 Close the top cover and the front door. See Installing a ...
...the clothing. Use cold water to remove toner that has soiled clothing. 3 Wipe the glass lenses of the photodeveloper. Note: The toner inside the toner cartridges can affect the performance of all four LED heads with toner in hot water; CAUTION: Before closing the top cover make sure everyone is away... from the printer and the area under the cover is free of hands, clothing, and other items. 5 Close the top cover and the front door. See Installing a ...

User's Guide
Page 81
... cover. CAUTION: Before closing the top cover make sure everyone is away from the printer and the area under the cover is free of hands, clothing, and other supply items, click one of the following headings: Replacing a toner cartridge Replacing the fuser Replacing the transfer belt Replacing the oil coating roll 79
... cover. CAUTION: Before closing the top cover make sure everyone is away from the printer and the area under the cover is free of hands, clothing, and other supply items, click one of the following headings: Replacing a toner cartridge Replacing the fuser Replacing the transfer belt Replacing the oil coating roll 79

User's Guide
Page 82
..., click the headings below: Replacing a photodeveloper Replacing the fuser Replacing the oil coating roll Replacing the transfer belt Replacing a toner cartridge The printer calculates and stores information on the number of images that need attention. If you there are supplies that need to remind you do...appears. 80 It posts a Low, Empty, Life Warning, or an Exhausted message on the second line of these parts ensures peak printer performance and prevents print quality and paper feed problems resulting from worn parts. Open the Supplies Menu to view the supplies that have the...
..., click the headings below: Replacing a photodeveloper Replacing the fuser Replacing the oil coating roll Replacing the transfer belt Replacing a toner cartridge The printer calculates and stores information on the number of images that need attention. If you there are supplies that need to remind you do...appears. 80 It posts a Low, Empty, Life Warning, or an Exhausted message on the second line of these parts ensures peak printer performance and prevents print quality and paper feed problems resulting from worn parts. Open the Supplies Menu to view the supplies that have the...
User's Guide
Page 96
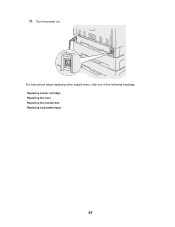
For instructions about replacing other supply items, click one of the following headings: Replacing a toner cartridge Replacing the fuser Replacing the transfer belt Replacing a photodeveloper 94 11 Turn the printer on.
For instructions about replacing other supply items, click one of the following headings: Replacing a toner cartridge Replacing the fuser Replacing the transfer belt Replacing a photodeveloper 94 11 Turn the printer on.

User's Guide
Page 105
... next value. After you are prompted to enter alignment values for each alignment setting, the transfer belt should be aligned and the printer ready to reset the transfer belt counter. After the test page has printed, you have entered values for instructions on replacing the fuser.... For instructions about replacing other supply items, click one of the following headings: Replacing a photodeveloper Replacing a toner cartridge Replacing the fuser Replacing the oil coating roll 103 12 Press Go to print. Once the counter is reset, the Printing Alignment Page message...
... next value. After you are prompted to enter alignment values for each alignment setting, the transfer belt should be aligned and the printer ready to reset the transfer belt counter. After the test page has printed, you have entered values for instructions on replacing the fuser.... For instructions about replacing other supply items, click one of the following headings: Replacing a photodeveloper Replacing a toner cartridge Replacing the fuser Replacing the oil coating roll 103 12 Press Go to print. Once the counter is reset, the Printing Alignment Page message...
User's Guide
Page 106
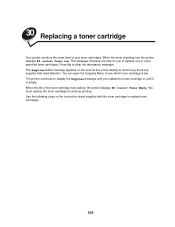
... the instruction sheet supplied with the toner cartridge to clear the attendance message. 30 Replacing a toner cartridge Your printer monitors the toner level of the toner cartridge has expired, the printer displays 88 Toner Empty. This message indicates it is low. The printer continues to remind you replace the toner cartridge or until you there are supplies...
... the instruction sheet supplied with the toner cartridge to clear the attendance message. 30 Replacing a toner cartridge Your printer monitors the toner level of the toner cartridge has expired, the printer displays 88 Toner Empty. This message indicates it is low. The printer continues to remind you replace the toner cartridge or until you there are supplies...

User's Guide
Page 108
Installing a toner cartridge 1 Remove the replacement toner cartridge from the packing material. 2 Gently shake the toner cartridge to pull the toner cartridge out. 3 Pull the toner cartridge approximately halfway out of the printer. 4 Grasp the toner cartridge handle and continue to distribute the toner evenly. 106
Installing a toner cartridge 1 Remove the replacement toner cartridge from the packing material. 2 Gently shake the toner cartridge to pull the toner cartridge out. 3 Pull the toner cartridge approximately halfway out of the printer. 4 Grasp the toner cartridge handle and continue to distribute the toner evenly. 106
User's Guide
Page 109
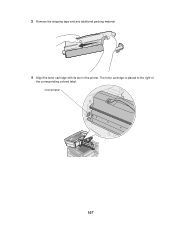
Colored label 107 The toner cartridge is placed to the right of the corresponding colored label. 3 Remove the shipping tape and any additional packing material. 4 Align the toner cartridge with its slot in the printer.
Colored label 107 The toner cartridge is placed to the right of the corresponding colored label. 3 Remove the shipping tape and any additional packing material. 4 Align the toner cartridge with its slot in the printer.


