Setup Guide
Page 2
..., program, or service may be obvious. This means the printer recognizes PostScript 3 commands used in applicable FAR provisions: Lexmark International, Inc., Lexington, KY 40550. Lexmark is NOT marked with local law: LEXMARK INTERNATIONAL, INC., PROVIDES THIS PUBLICATION "AS IS" WITHOUT WARRANTY...clause at any existing intellectual property right may not always be addressed to an electrical outlet that the printer emulates the functions corresponding to Lexmark International Ltd., Marketing and Services Department, Westhorpe House, Westhorpe, Marlow Bucks SL7 3RQ. A caution ...
..., program, or service may be obvious. This means the printer recognizes PostScript 3 commands used in applicable FAR provisions: Lexmark International, Inc., Lexington, KY 40550. Lexmark is NOT marked with local law: LEXMARK INTERNATIONAL, INC., PROVIDES THIS PUBLICATION "AS IS" WITHOUT WARRANTY...clause at any existing intellectual property right may not always be addressed to an electrical outlet that the printer emulates the functions corresponding to Lexmark International Ltd., Marketing and Services Department, Westhorpe House, Westhorpe, Marlow Bucks SL7 3RQ. A caution ...

Setup Guide
Page 3
Table of contents Introduction v About your printer v Other sources of information vi Step 1: Unpack your printer 1 Step 2: Select a location for your printer 3 Considering environmental issues 3 Allowing enough space 4 Step 3: Set up the printer and paper handling options . . . 8 Installing the printer base or cabinet 9 Installing a 550-sheet drawer 10 Positioning the printer 11 Installing an optional duplex unit...
Table of contents Introduction v About your printer v Other sources of information vi Step 1: Unpack your printer 1 Step 2: Select a location for your printer 3 Considering environmental issues 3 Allowing enough space 4 Step 3: Set up the printer and paper handling options . . . 8 Installing the printer base or cabinet 9 Installing a 550-sheet drawer 10 Positioning the printer 11 Installing an optional duplex unit...

Setup Guide
Page 4
...Load paper 51 Loading the paper trays 52 Loading the multipurpose feeder 59 Loading the high-capacity feeder 63 Step 8: Verify printer setup 67 Turning on the printer 67 Printing a menu settings page 68 Printing a network setup page 69 Step 9: Configure for TCP/IP 70 Setting the... printer IP address 70 Verifying the IP settings 71 Configuring for Pull Printing 71 Network printing 72 Local printing 75 Identifying printer users 77 Finding information 77 Distributing the information 78 Storing the Quick Reference ...
...Load paper 51 Loading the paper trays 52 Loading the multipurpose feeder 59 Loading the high-capacity feeder 63 Step 8: Verify printer setup 67 Turning on the printer 67 Printing a menu settings page 68 Printing a network setup page 69 Step 9: Configure for TCP/IP 70 Setting the... printer IP address 70 Verifying the IP settings 71 Configuring for Pull Printing 71 Network printing 72 Local printing 75 Identifying printer users 77 Finding information 77 Distributing the information 78 Storing the Quick Reference ...

Setup Guide
Page 5
... part of a multifunction device, refer to the documentation that came with duplexing capabilities. To customize your Lexmark C910 printer you purchased your printer Lexmark C910n Lexmark C910dn Your printer is available in four models: • Lexmark C910 printer, with 2400 IQ resolution, 64MB of standard memory, one 550-sheet tray, multipurpose feeder, and USB and parallel connectors. •...
... part of a multifunction device, refer to the documentation that came with duplexing capabilities. To customize your Lexmark C910 printer you purchased your printer Lexmark C910n Lexmark C910dn Your printer is available in four models: • Lexmark C910 printer, with 2400 IQ resolution, 64MB of standard memory, one 550-sheet tray, multipurpose feeder, and USB and parallel connectors. •...

Setup Guide
Page 6
... fonts, and additional documentation. Quick Reference The Quick Reference provides easy access to the other printer documentation. It also provides general information for updated printer drivers, utilities, and other printer documentation. Depending on the Lexmark Web site at www.lexmark.com for administrators. vi The information on the CD is also available on which version...
... fonts, and additional documentation. Quick Reference The Quick Reference provides easy access to the other printer documentation. It also provides general information for updated printer drivers, utilities, and other printer documentation. Depending on the Lexmark Web site at www.lexmark.com for administrators. vi The information on the CD is also available on which version...

Setup Guide
Page 7
... lifting. Remove all items from the box except the printer. Anytime you move or lift the printer make sure you have the following items: • Printer • Power cord Note: Leave the printer in case you have enough people to the publications CD for the designated Lexmark support phone number for your country. Power cord...
... lifting. Remove all items from the box except the printer. Anytime you move or lift the printer make sure you have the following items: • Printer • Power cord Note: Leave the printer in case you have enough people to the publications CD for the designated Lexmark support phone number for your country. Power cord...
Setup Guide
Page 8
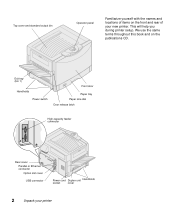
Top cover and standard output bin Operator panel Familiarize yourself with the names and locations of items on the publications CD. We use the same terms throughout this book and on the front and rear of your printer Exit tray (bin 1) Handholds Power switch Front door Paper tray Paper size dial Door release latch High-capacity feeder connector Rear cover Parallel or Ethernet connector Option slot cover USB connector Power cord Duplex unit Handholds socket cover 2 Unpack your new printer. This will help you during printer setup.
Top cover and standard output bin Operator panel Familiarize yourself with the names and locations of items on the publications CD. We use the same terms throughout this book and on the front and rear of your printer Exit tray (bin 1) Handholds Power switch Front door Paper tray Paper size dial Door release latch High-capacity feeder connector Rear cover Parallel or Ethernet connector Option slot cover USB connector Power cord Duplex unit Handholds socket cover 2 Unpack your new printer. This will help you during printer setup.

Setup Guide
Page 9
...- Away from the direct airflow of space required for your printer and all its options Considering environmental issues When choosing a place to set up the printer, look for your printer 3 Step 2: Select a location for your printer Choosing the correct location for : • A firm, ... Consider these factors when selecting a place to set up your printer: • The type of environment necessary for optimum printer performance • The amount of heaters, air conditioners, or ventilators Select a location for your new Lexmark C910 is : - Free of dust - Away from direct...
...- Away from the direct airflow of space required for your printer and all its options Considering environmental issues When choosing a place to set up the printer, look for your printer 3 Step 2: Select a location for your printer Choosing the correct location for : • A firm, ... Consider these factors when selecting a place to set up your printer: • The type of environment necessary for optimum printer performance • The amount of heaters, air conditioners, or ventilators Select a location for your new Lexmark C910 is : - Free of dust - Away from direct...
Setup Guide
Page 10
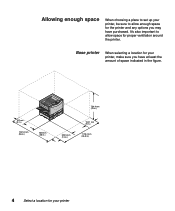
Base printer When selecting a location for your printer, make sure you may have at least the amount of space indicated in the figure. 102 mm (5 in.) 1241.8 mm (56 in.) 508 mm (26 in.) 734.9 mm (29 in.) 329.5 mm (13 in.) 152.1 mm (6 in.) 1178.4 mm (46.5 in.) 4 Select a location for proper ventilation around the printer. It's also important to allow space for your printer, be sure to set up your printer Allowing enough space When choosing a place to allow enough space for the printer and any options you have purchased.
Base printer When selecting a location for your printer, make sure you may have at least the amount of space indicated in the figure. 102 mm (5 in.) 1241.8 mm (56 in.) 508 mm (26 in.) 734.9 mm (29 in.) 329.5 mm (13 in.) 152.1 mm (6 in.) 1178.4 mm (46.5 in.) 4 Select a location for proper ventilation around the printer. It's also important to allow space for your printer, be sure to set up your printer Allowing enough space When choosing a place to allow enough space for the printer and any options you have purchased.
Setup Guide
Page 11
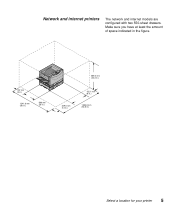
Make sure you have at least the amount of space indicated in the figure. 102 mm (5 in.) 1241.8 mm (56 in.) 508 mm (26 in.) 869.2 mm (34.3 in.) 329.5 mm (13 in.) 152.1 mm (6 in.) 1355.8 mm (53.5 in.) Select a location for your printer 5 Network and internet printers The network and internet models are configured with two 550-sheet drawers.
Make sure you have at least the amount of space indicated in the figure. 102 mm (5 in.) 1241.8 mm (56 in.) 508 mm (26 in.) 869.2 mm (34.3 in.) 329.5 mm (13 in.) 152.1 mm (6 in.) 1355.8 mm (53.5 in.) Select a location for your printer 5 Network and internet printers The network and internet models are configured with two 550-sheet drawers.
Setup Guide
Page 12
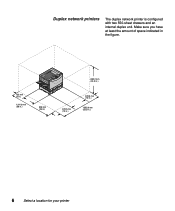
Make sure you have at least the amount of space indicated in the figure. 102 mm (5 in.) 1241.8 mm (56 in.) 508 mm (26 in.) 869.2 mm (34.3 in.) 329.5 mm (13 in.) 329.5 mm (13 in.) 1355.8 mm (53.5 in.) 6 Select a location for your printer Duplex network printers The duplex network printer is configured with two 550-sheet drawers and an internal duplex unit.
Make sure you have at least the amount of space indicated in the figure. 102 mm (5 in.) 1241.8 mm (56 in.) 508 mm (26 in.) 869.2 mm (34.3 in.) 329.5 mm (13 in.) 329.5 mm (13 in.) 1355.8 mm (53.5 in.) 6 Select a location for your printer Duplex network printers The duplex network printer is configured with two 550-sheet drawers and an internal duplex unit.
Setup Guide
Page 13
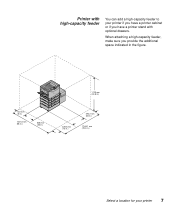
When attaching a high-capacity feeder, make sure you have a printer stand with optional drawers. Printer with high-capacity feeder You can add a high-capacity feeder to your printer if you have a printer cabinet or if you provide the additional space indicated in the figure. 102 mm (5 in.) 1241.8 mm (56 in.) 508 mm (26 in.) 1110 mm (43.8 in.) 329.5 mm (13 in.) 494.2 mm (30 in.) 17.84.1 mm (70.4 in.) Select a location for your printer 7
When attaching a high-capacity feeder, make sure you have a printer stand with optional drawers. Printer with high-capacity feeder You can add a high-capacity feeder to your printer if you have a printer cabinet or if you provide the additional space indicated in the figure. 102 mm (5 in.) 1241.8 mm (56 in.) 508 mm (26 in.) 1110 mm (43.8 in.) 329.5 mm (13 in.) 494.2 mm (30 in.) 17.84.1 mm (70.4 in.) Select a location for your printer 7
Setup Guide
Page 14
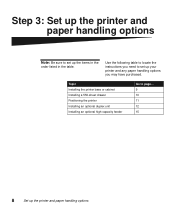
Use the following table to locate the instructions you need to set up the items in the order listed in the table. Step 3: Set up the printer and paper handling options Note: Be sure to set up your printer and any paper handling options you may have purchased. Topic Installing the printer base or cabinet Installing a 550-sheet drawer Positioning the printer Installing an optional duplex unit Installing an optional high-capacity feeder Go to page... 9 10 11 12 15 8 Set up the printer and paper handling options
Use the following table to locate the instructions you need to set up the items in the order listed in the table. Step 3: Set up the printer and paper handling options Note: Be sure to set up your printer and any paper handling options you may have purchased. Topic Installing the printer base or cabinet Installing a 550-sheet drawer Positioning the printer Installing an optional duplex unit Installing an optional high-capacity feeder Go to page... 9 10 11 12 15 8 Set up the printer and paper handling options
Setup Guide
Page 15
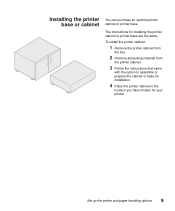
To install the printer cabinet: 1 Remove the printer cabinet from the box. 2 Remove all packing material from the printer cabinet. 3 Follow the instructions that came with the option to assemble or prepare the cabinet or base for installation. 4 Place the printer cabinet in the location you have chosen for installing the printer cabinet or printer base are the same. Set up the printer and paper handling options 9 Installing the printer base or cabinet You can purchase an optional printer cabinet or printer base. The instructions for your printer.
To install the printer cabinet: 1 Remove the printer cabinet from the box. 2 Remove all packing material from the printer cabinet. 3 Follow the instructions that came with the option to assemble or prepare the cabinet or base for installation. 4 Place the printer cabinet in the location you have chosen for installing the printer cabinet or printer base are the same. Set up the printer and paper handling options 9 Installing the printer base or cabinet You can purchase an optional printer cabinet or printer base. The instructions for your printer.

Setup Guide
Page 16
... drawers. 1 Unpack the 550-sheet drawer and remove any packing material. 2 Place the 550-sheet drawer on the optional printer cabinet, optional printer base, or in the location you have chosen for your printer. 3 If you have additional 550-sheet drawers: a Align the positioning posts on page 11. 10 Set up to "Positioning...
... drawers. 1 Unpack the 550-sheet drawer and remove any packing material. 2 Place the 550-sheet drawer on the optional printer cabinet, optional printer base, or in the location you have chosen for your printer. 3 If you have additional 550-sheet drawers: a Align the positioning posts on page 11. 10 Set up to "Positioning...
Setup Guide
Page 17
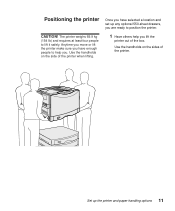
Anytime you move or lift the printer make sure you have selected a location and set up the printer and paper handling options 11 Use the handholds on the sides of the box. Set up any optional 550-sheet drawers, you are ready to position the printer. Use the handholds on the side of the printer when lifting. 1 Have others help you lift the printer out of the printer. The printer weighs 69.9 kg (154 Ib) and requires at least four people to lift it safely. Positioning the printer Once you have enough people to help you . CAUTION!
Anytime you move or lift the printer make sure you have selected a location and set up the printer and paper handling options 11 Use the handholds on the sides of the box. Set up any optional 550-sheet drawers, you are ready to position the printer. Use the handholds on the side of the printer when lifting. 1 Have others help you lift the printer out of the printer. The printer weighs 69.9 kg (154 Ib) and requires at least four people to lift it safely. Positioning the printer Once you have enough people to help you . CAUTION!

Setup Guide
Page 18
...-sheet drawer, align the positioning posts on the option. 3 Remove any shipping tape and additional packing material from the outside of the printer. Installing an optional duplex unit Your printer supports an optional duplex unit that provides two-sided printing. If you have chosen. To install the duplex unit: 1 Remove the duplex... unit from its packing material. 2 Remove any tape or packing material from the duplex unit. 12 Set up the printer and paper handling options Make sure the printer is seated securely on the option with the holes in the...
...-sheet drawer, align the positioning posts on the option. 3 Remove any shipping tape and additional packing material from the outside of the printer. Installing an optional duplex unit Your printer supports an optional duplex unit that provides two-sided printing. If you have chosen. To install the duplex unit: 1 Remove the duplex... unit from its packing material. 2 Remove any tape or packing material from the duplex unit. 12 Set up the printer and paper handling options Make sure the printer is seated securely on the option with the holes in the...
Setup Guide
Page 19
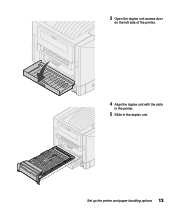
3 Open the duplex unit access door on the left side of the printer. 4 Align the duplex unit with the slots in the printer. 5 Slide in the duplex unit. Set up the printer and paper handling options 13
3 Open the duplex unit access door on the left side of the printer. 4 Align the duplex unit with the slots in the printer. 5 Slide in the duplex unit. Set up the printer and paper handling options 13

Setup Guide
Page 20
6 Align the thumbscrews on the duplex unit with the holes in the printer. 7 Tighten the thumbscrews . 8 Close the duplex unit door. 14 Set up the printer and paper handling options
6 Align the thumbscrews on the duplex unit with the holes in the printer. 7 Tighten the thumbscrews . 8 Close the duplex unit door. 14 Set up the printer and paper handling options

Setup Guide
Page 21
... holder - Four docking frame screws - High-capacity feeder - Power cord - Interface cable - Installing an optional high-capacity feeder Your printer supports an optional highcapacity feeder. Wrench If any items are missing or damaged, refer to 3,000 sheets of paper in the highcapacity feeder.... Set up to the publications CD for the designated Lexmark support phone number for your country. Note: You must have the following items: - You can load up the printer and paper handling options 15 High-capacity feeder Docking frame Guide rail Interface...
... holder - Four docking frame screws - High-capacity feeder - Power cord - Interface cable - Installing an optional high-capacity feeder Your printer supports an optional highcapacity feeder. Wrench If any items are missing or damaged, refer to 3,000 sheets of paper in the highcapacity feeder.... Set up to the publications CD for the designated Lexmark support phone number for your country. Note: You must have the following items: - You can load up the printer and paper handling options 15 High-capacity feeder Docking frame Guide rail Interface...

