User Manual
Page 5
...to do first 44 Checkout guide 45 Diagnostics using PC-Doctor for DOS . . . . 45 Lenovo ThinkVantage Toolbox (Lenovo System Toolbox 48 PC-Doctor for Windows 48 PC-Doctor for Rescue and Recovery . . . ... ECA information . . . 79 Removing and replacing a FRU . . . . 81 Before servicing ThinkPad X301 82 1010 Battery pack 83 1020 Optical drive or second battery or travel cover 84 1030 Solid state ... or palm rest with fingerprint reader 102 1110 Bluetooth daughter card (BDC-2) . . . . . 104 1120 Keyboard bezel 105 1130 Audio FPC and audio sub card. . . . . . 108 1140 Speaker assembly 110 1150...
...to do first 44 Checkout guide 45 Diagnostics using PC-Doctor for DOS . . . . 45 Lenovo ThinkVantage Toolbox (Lenovo System Toolbox 48 PC-Doctor for Windows 48 PC-Doctor for Rescue and Recovery . . . ... ECA information . . . 79 Removing and replacing a FRU . . . . 81 Before servicing ThinkPad X301 82 1010 Battery pack 83 1020 Optical drive or second battery or travel cover 84 1030 Solid state ... or palm rest with fingerprint reader 102 1110 Bluetooth daughter card (BDC-2) . . . . . 104 1120 Keyboard bezel 105 1130 Audio FPC and audio sub card. . . . . . 108 1140 Speaker assembly 110 1150...

User Manual
Page 6
Parts list 137 Overall 138 LCD FRUs 148 Keyboard 150 Miscellaneous parts 151 AC adapters 153 Power cords 154 Recovery discs 155 Windows XP Professional (32 bit) DVDs . . . 155 Windows Vista Home Basic (32 ... (64 bit) DVDs . . 164 Windows 7 Professional (32 bit) DVDs . . . . 165 Windows 7 Professional (64 bit) DVDs . . . . 166 Common service tools 167 Notices 169 Trademarks 170 iv ThinkPad X301 Hardware Maintenance Manual
Parts list 137 Overall 138 LCD FRUs 148 Keyboard 150 Miscellaneous parts 151 AC adapters 153 Power cords 154 Recovery discs 155 Windows XP Professional (32 bit) DVDs . . . 155 Windows Vista Home Basic (32 ... (64 bit) DVDs . . 164 Windows 7 Professional (32 bit) DVDs . . . . 165 Windows 7 Professional (64 bit) DVDs . . . . 166 Common service tools 167 Notices 169 Trademarks 170 iv ThinkPad X301 Hardware Maintenance Manual

User Manual
Page 52
What to do first When you do return a FRU, you attach to excessive force, or dropped. 44 ThinkPad X301 Hardware Maintenance Manual Date on laptop products The following symptoms might indicate damage caused by the customer. Failure symptoms, error codes ... Fuses blown by attachment of a nonsupported device v Forgotten computer password (making the computer unusable) v Sticky keys caused by spilling a liquid onto the keyboard v Use of an incorrect AC adapter on which the failing FRU was caused by misuse, accident, modification, unsuitable physical or operating environment, or improper ...
What to do first When you do return a FRU, you attach to excessive force, or dropped. 44 ThinkPad X301 Hardware Maintenance Manual Date on laptop products The following symptoms might indicate damage caused by the customer. Failure symptoms, error codes ... Fuses blown by attachment of a nonsupported device v Forgotten computer password (making the computer unusable) v Sticky keys caused by spilling a liquid onto the keyboard v Use of an incorrect AC adapter on which the failing FRU was caused by misuse, accident, modification, unsuitable physical or operating environment, or improper ...

User Manual
Page 55
... Test v Run Quick Test v CPU/Coprocessor v Systemboard v Video Adapter v Serial Ports v Fixed Disks v Diskette Drives v Other Devices v ThinkPad Devices v Communication v Wireless LAN v Advanced Memory Tests v Keyboard v Video v Internal Speaker v Mouse v Diskette v System Load v Optical Drive Test v Intel WLAN Radio Test Notes: v In the... v Benchmark System v DOS Shell v Tech Support Form v Battery Rundown General checkout 47 Follow the instructions on the ThinkPad computer. Exit Diag. Note: After running PC-Doctor for at least 2 seconds; The options on the test menu are incorrect.
... Test v Run Quick Test v CPU/Coprocessor v Systemboard v Video Adapter v Serial Ports v Fixed Disks v Diskette Drives v Other Devices v ThinkPad Devices v Communication v Wireless LAN v Advanced Memory Tests v Keyboard v Video v Internal Speaker v Mouse v Diskette v System Load v Optical Drive Test v Intel WLAN Radio Test Notes: v In the... v Benchmark System v DOS Shell v Tech Support Form v Battery Rundown General checkout 47 Follow the instructions on the ThinkPad computer. Exit Diag. Note: After running PC-Doctor for at least 2 seconds; The options on the test menu are incorrect.
User Manual
Page 58
... board Power LCD unit Audio Speaker Keyboard Hard disk drive or solid state drive Diskette drive Optical drive Memory Fan Applicable test 1. Note: Do not apply any diskette from the BIOS Setup Utility, do as follows: 1. Remove any physical shock to Compatibility, and run Diagnostics --> ThinkPad Devices --> HDD Active Protection Test. Press... shows the test for each FRU. While the message, "To interrupt normal startup, press the blue ThinkVangate button," is heard this test again. 1. Run Diagnostics --> ThinkPad Devices --> Fan. 50 ThinkPad X301 Hardware Maintenance Manual
... board Power LCD unit Audio Speaker Keyboard Hard disk drive or solid state drive Diskette drive Optical drive Memory Fan Applicable test 1. Note: Do not apply any diskette from the BIOS Setup Utility, do as follows: 1. Remove any physical shock to Compatibility, and run Diagnostics --> ThinkPad Devices --> HDD Active Protection Test. Press... shows the test for each FRU. While the message, "To interrupt normal startup, press the blue ThinkVangate button," is heard this test again. 1. Run Diagnostics --> ThinkPad Devices --> Fan. 50 ThinkPad X301 Hardware Maintenance Manual
User Manual
Page 68
...from sleep (standby) mode and resume operation, do any key. To end screen blank mode and resume normal operation, press any operation with the keyboard, the TrackPoint, the hard disk, the parallel connector, or the diskette drive within that the battery power is low, and then the computer ... enter sleep (standby) mode, press Fn+F4. To put the computer into screen blank mode, do not set on the power switch. 60 ThinkPad X301 Hardware Maintenance Manual Screen blank mode If the time set the low-battery alarm, the charge indicator notifies you when the battery is low.
...from sleep (standby) mode and resume operation, do any key. To end screen blank mode and resume normal operation, press any operation with the keyboard, the TrackPoint, the hard disk, the parallel connector, or the diskette drive within that the battery power is low, and then the computer ... enter sleep (standby) mode, press Fn+F4. To put the computer into screen blank mode, do not set on the power switch. 60 ThinkPad X301 Hardware Maintenance Manual Screen blank mode If the time set the low-battery alarm, the charge indicator notifies you when the battery is low.

User Manual
Page 69
... setup data are using the APM operating system and have set on the timer, and if the user does not do any operation with the keyboard, the TrackPoint, the hard disk drive, the parallel connector, or the diskette drive within that action. - v If you are satisfied in the boot record on...
... setup data are using the APM operating system and have set on the timer, and if the user does not do any operation with the keyboard, the TrackPoint, the hard disk drive, the parallel connector, or the diskette drive within that action. - v If you are satisfied in the boot record on...

User Manual
Page 71
... sequence 0187 EAIA data access error-The access to reset the time and date. or press Esc to continue. 1. Remove one of the keyboard and the auxiliary input device. 0220 Monitor type error-Monitor type does not match the one of them . 1. System board. 0200 Hard ... devices are found . Load Setup Defaults in BIOS Setup Utility. 0230 Shadow RAM error-Shadow RAM fails at offset nnnn. 1. System board. 021x Keyboard error. Invalid RFID Serialization Information Area. 0189 System board. Run BIOS Setup Utility, and then save current setting by pressing F10. 2. Remove the...
... sequence 0187 EAIA data access error-The access to reset the time and date. or press Esc to continue. 1. Remove one of the keyboard and the auxiliary input device. 0220 Monitor type error-Monitor type does not match the one of them . 1. System board. 0200 Hard ... devices are found . Load Setup Defaults in BIOS Setup Utility. 0230 Shadow RAM error-Shadow RAM fails at offset nnnn. 1. System board. 021x Keyboard error. Invalid RFID Serialization Information Area. 0189 System board. Run BIOS Setup Utility, and then save current setting by pressing F10. 2. Remove the...

User Manual
Page 80
... disable the keypad, press and hold the Shift key, and press the NumLk (ScrLk) key. 7 Wireless WAN Green: The wireless WAN is on the keyboard is enabled. Blinking green: Data is being transmitted. 10 Caps lock Green: Caps Lock mode is enabled. Sudden physical shock could cause drive errors. 6...is charged between 5% to 100% of the capacity, and being charged. To enable or disable Caps Lock mode, press the Caps Lock key. 72 ThinkPad X301 Hardware Maintenance Manual Orange: The battery is ready for use light is on , and the radio link is in the Optical bay device. Note: ...
... disable the keypad, press and hold the Shift key, and press the NumLk (ScrLk) key. 7 Wireless WAN Green: The wireless WAN is on the keyboard is enabled. Blinking green: Data is being transmitted. 10 Caps lock Green: Caps Lock mode is enabled. Sudden physical shock could cause drive errors. 6...is charged between 5% to 100% of the capacity, and being charged. To enable or disable Caps Lock mode, press the Caps Lock key. 72 ThinkPad X301 Hardware Maintenance Manual Orange: The battery is ready for use light is on , and the radio link is in the Optical bay device. Note: ...

User Manual
Page 103
... 1a should have been removed when you need to remove it before removing the screw that secures the keyboard. Removal steps of keyboard Attention: If a travel cover is installed on page 84 Table 15. 1070 Keyboard For access, remove these FRUs in order: v "1010 Battery pack" on page 83 v "1020 Optical drive or...
... 1a should have been removed when you need to remove it before removing the screw that secures the keyboard. Removal steps of keyboard Attention: If a travel cover is installed on page 84 Table 15. 1070 Keyboard For access, remove these FRUs in order: v "1010 Battery pack" on page 83 v "1020 Optical drive or...

User Manual
Page 104
Removal steps of keyboard (continued) 3 3 2 3 Lift the keyboard a little in the direction shown by arrow 4 , and then detach the connector 5 . 4 5 96 ThinkPad X301 Hardware Maintenance Manual Table 15.
Removal steps of keyboard (continued) 3 3 2 3 Lift the keyboard a little in the direction shown by arrow 4 , and then detach the connector 5 . 4 5 96 ThinkPad X301 Hardware Maintenance Manual Table 15.

User Manual
Page 105
Installation of the keyboard 1. a a a Removing and replacing a FRU 97 Attach the keyboard so that the keyboard edges a are under the frame as follows: Table 16. When installing the keyboard, do as shown in this figure. Attach the keyboard connector. 2.
Installation of the keyboard 1. a a a Removing and replacing a FRU 97 Attach the keyboard so that the keyboard edges a are under the frame as follows: Table 16. When installing the keyboard, do as shown in this figure. Attach the keyboard connector. 2.

User Manual
Page 106
Table 16. Installation of the keyboard is housed firmly, gently press the keys with your thumbs and try to slide the keyboard toward you. 4. To make sure that the front side of the keyboard (continued) 3. Secure the keyboard by tightening the screws from the bottom side of the computer. 98 ThinkPad X301 Hardware Maintenance Manual
Table 16. Installation of the keyboard is housed firmly, gently press the keys with your thumbs and try to slide the keyboard toward you. 4. To make sure that the front side of the keyboard (continued) 3. Secure the keyboard by tightening the screws from the bottom side of the computer. 98 ThinkPad X301 Hardware Maintenance Manual

User Manual
Page 107
Any other battery could ignite or explode. Removal steps of backup battery 1 2 When installing: Make sure that the battery connector is attached firmly. For access, remove these FRUs in the parts list for your computer. 1080 Backup battery DANGER Use only the battery specified in order: v "1010 Battery pack" on page 83 v "1020 Optical drive or second battery or travel cover" on page 84 v "1070 Keyboard" on page 95 Table 17. Removing and replacing a FRU 99
Any other battery could ignite or explode. Removal steps of backup battery 1 2 When installing: Make sure that the battery connector is attached firmly. For access, remove these FRUs in the parts list for your computer. 1080 Backup battery DANGER Use only the battery specified in order: v "1010 Battery pack" on page 83 v "1020 Optical drive or second battery or travel cover" on page 84 v "1070 Keyboard" on page 95 Table 17. Removing and replacing a FRU 99

User Manual
Page 108
Removal steps of the arrow. 2 2 1 Step 2 Screw (quantity) M2 × 3 mm, small-head, nylon-coated (2) Color Silver Torque 0.167 Nm (1.7 kgfcm) 100 ThinkPad X301 Hardware Maintenance Manual 1090 PCI Express Mini Card for wireless WAN In step 1 , unplug the jacks by using the removal tool antenna RF connector (P/N: 08K7159) ... access, remove these FRUs in order: v "1010 Battery pack" on page 83 v "1020 Optical drive or second battery or travel cover" on page 84 v "1070 Keyboard" on page 95 Table 18.
Removal steps of the arrow. 2 2 1 Step 2 Screw (quantity) M2 × 3 mm, small-head, nylon-coated (2) Color Silver Torque 0.167 Nm (1.7 kgfcm) 100 ThinkPad X301 Hardware Maintenance Manual 1090 PCI Express Mini Card for wireless WAN In step 1 , unplug the jacks by using the removal tool antenna RF connector (P/N: 08K7159) ... access, remove these FRUs in order: v "1010 Battery pack" on page 83 v "1020 Optical drive or second battery or travel cover" on page 84 v "1070 Keyboard" on page 95 Table 18.

User Manual
Page 110
... Optical drive or second battery or travel cover" on page 84 v "1030 Solid state drive (SSD) or hard disk drive (HDD)" on page 85 v "1070 Keyboard" on page 95 Note: In models with or without a fingerprint reader. Removal steps of palm rest 2 2 1 4 3 3 4 3 2 3 2 Step 1 Screw (quantity) M2 × 3 mm, small-head, nylon...; 4 mm, bind-head, nylon-coated (4) Black 4 M2, shoulder, nylon-coated (2) Black Torque 0.167 Nm (1.7 kgfcm) 0.167 Nm (1.7 kgfcm) 0.167 Nm (1.7 kgfcm) 0.167 Nm (1.7 kgfcm) 102 ThinkPad X301 Hardware Maintenance Manual Table 19.
... Optical drive or second battery or travel cover" on page 84 v "1030 Solid state drive (SSD) or hard disk drive (HDD)" on page 85 v "1070 Keyboard" on page 95 Note: In models with or without a fingerprint reader. Removal steps of palm rest 2 2 1 4 3 3 4 3 2 3 2 Step 1 Screw (quantity) M2 × 3 mm, small-head, nylon...; 4 mm, bind-head, nylon-coated (4) Black 4 M2, shoulder, nylon-coated (2) Black Torque 0.167 Nm (1.7 kgfcm) 0.167 Nm (1.7 kgfcm) 0.167 Nm (1.7 kgfcm) 0.167 Nm (1.7 kgfcm) 102 ThinkPad X301 Hardware Maintenance Manual Table 19.

User Manual
Page 112
Removal steps of BDC-2 1 2 Step 1 Screw (quantity) M2 × 6 mm, bind-head, nylon-coated (1) Color Black Torque 0.167 Nm (1.7 kgfcm) When installing: Make sure that connector is attached firmly. 104 ThinkPad X301 Hardware Maintenance Manual 1110 Bluetooth daughter card (BDC-2) For access, remove these FRUs in order: v "1010 Battery pack" on page 83 v "1020 Optical drive or second battery or travel cover" on page 84 v "1070 Keyboard" on page 95 v "1100 Palm rest or palm rest with fingerprint reader" on page 102 Table 20.
Removal steps of BDC-2 1 2 Step 1 Screw (quantity) M2 × 6 mm, bind-head, nylon-coated (1) Color Black Torque 0.167 Nm (1.7 kgfcm) When installing: Make sure that connector is attached firmly. 104 ThinkPad X301 Hardware Maintenance Manual 1110 Bluetooth daughter card (BDC-2) For access, remove these FRUs in order: v "1010 Battery pack" on page 83 v "1020 Optical drive or second battery or travel cover" on page 84 v "1070 Keyboard" on page 95 v "1100 Palm rest or palm rest with fingerprint reader" on page 102 Table 20.
User Manual
Page 113
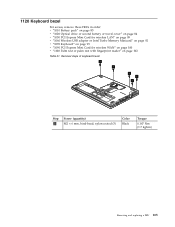
... 84 v "1050 PCI Express Mini Card for wireless LAN" on page 89 v "1060 Wireless USB adapter or Intel Turbo Memory Minicard" on page 92 v "1070 Keyboard" on page 95 v "1090 PCI Express Mini Card for wireless WAN" on page 100 v "1100 Palm rest or palm rest with fingerprint reader" on page... 102 Table 21. Removal steps of keyboard bezel 1 1 1 1 1 Step 1 Screw (quantity) M2 × 6 mm, bind-head, nylon-coated (5) Color Black Torque 0.167 Nm (1.7 kgfcm) Removing and replacing a FRU 105...
... 84 v "1050 PCI Express Mini Card for wireless LAN" on page 89 v "1060 Wireless USB adapter or Intel Turbo Memory Minicard" on page 92 v "1070 Keyboard" on page 95 v "1090 PCI Express Mini Card for wireless WAN" on page 100 v "1100 Palm rest or palm rest with fingerprint reader" on page... 102 Table 21. Removal steps of keyboard bezel 1 1 1 1 1 Step 1 Screw (quantity) M2 × 6 mm, bind-head, nylon-coated (5) Color Black Torque 0.167 Nm (1.7 kgfcm) Removing and replacing a FRU 105...

User Manual
Page 114
Removal steps of keyboard bezel (continued) 22 3 Step 2 Screw (quantity) M2 × 6 mm, bind-head, nylon-coated (2) Color Black 3 M2 × 4 mm, bind-head, nylon-coated (1) Black Torque 0.167 Nm (1.7 kgfcm) 0.167 Nm (1.7 kgfcm) 4 5 5 106 ThinkPad X301 Hardware Maintenance Manual Table 21.
Removal steps of keyboard bezel (continued) 22 3 Step 2 Screw (quantity) M2 × 6 mm, bind-head, nylon-coated (2) Color Black 3 M2 × 4 mm, bind-head, nylon-coated (1) Black Torque 0.167 Nm (1.7 kgfcm) 0.167 Nm (1.7 kgfcm) 4 5 5 106 ThinkPad X301 Hardware Maintenance Manual Table 21.

User Manual
Page 115
a 8 7 Removing and replacing a FRU 107 Table 21. Removal steps of keyboard bezel (continued) 6 Note: Before step 8 , pull the cables out from the cable guide hole of the keyboard bezel as shown in a in this figure.
a 8 7 Removing and replacing a FRU 107 Table 21. Removal steps of keyboard bezel (continued) 6 Note: Before step 8 , pull the cables out from the cable guide hole of the keyboard bezel as shown in a in this figure.


