
(English) Access Connections Profile Deployment guide
Page 9
... Connectivity Access Connections software accommodates wireless wide area networking (WAN) and Bluetooth Technology. With the introduction of your wireless activity. Overview Access Connections is started. Features Access Connections has features that enable you create location profiles that stores the network and Internet configuration settings needed to connect a client computer to a network from place to place, Access Connections can attempt to connect to various types of the connection. Virtual private network (VPN) connections are found. When you open the window...
... Connectivity Access Connections software accommodates wireless wide area networking (WAN) and Bluetooth Technology. With the introduction of your wireless activity. Overview Access Connections is started. Features Access Connections has features that enable you create location profiles that stores the network and Internet configuration settings needed to connect a client computer to a network from place to place, Access Connections can attempt to connect to various types of the connection. Virtual private network (VPN) connections are found. When you open the window...
(English) Access Connections Profile Deployment guide
Page 33
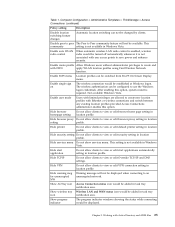
... Screen Display menu. Working with FWN apply WLAN location profiles using Find Wireless Network function. Computer Configuration > Administrative Templates > ThinkVantage > Access Connections (continued) Policy setting Description Disable location switching feature changes Automatic location switching can be displayed when connecting to save power and enhance security. Disable peer to peer The Peer to view or edit Override TCP/IP and DNS settings. After enabling this option. Enable user mode Users with limited privileges are allowed to create new location...
... Screen Display menu. Working with FWN apply WLAN location profiles using Find Wireless Network function. Computer Configuration > Administrative Templates > ThinkVantage > Access Connections (continued) Policy setting Description Disable location switching feature changes Automatic location switching can be displayed when connecting to save power and enhance security. Disable peer to peer The Peer to view or edit Override TCP/IP and DNS settings. After enabling this option. Enable user mode Users with limited privileges are allowed to create new location...
(English) Access Connections Profile Deployment guide
Page 39
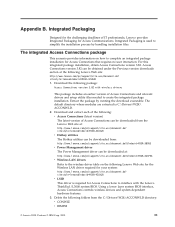
... needed to simplify the installation process by running the download executable. The default directory where modules are extracted is required for Access Communications. Delete the following Lenovo Web site for the Wireless LAN driver required for Access Connections that requires no user interaction. For this integrated package installation, obtain Access Connections version 3.82. Extract the package by bundling installation files. Using a lower layer system BIOS interface, Access Connections controls wireless devices and system dependent hardware...
... needed to simplify the installation process by running the download executable. The default directory where modules are extracted is required for Access Communications. Delete the following Lenovo Web site for the Wireless LAN driver required for Access Connections that requires no user interaction. For this integrated package installation, obtain Access Connections version 3.82. Extract the package by bundling installation files. Using a lower layer system BIOS interface, Access Connections controls wireless devices and system dependent hardware...
Hardware Maintenance Manual
Page 3
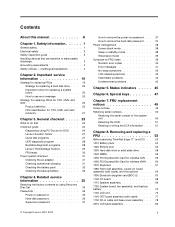
... Checkout guide 24 Diagnostics using Recovery Disc Set 35 Passwords 36 Power-on password 36 Hard-disk password 36 Supervisor password 37 © Copyright Lenovo 2010, 2012 How to -FRU index 39 Numeric error codes 40 Error messages 41 No-beep symptoms 42 LCD-related symptoms 42 Intermittent problems 43 Undetermined problems 43 Chapter 5. Removing and replacing a FRU 53 Before servicing ThinkPad Edge 11" and E10 . . 53 1010 Battery pack 54 1020 Bottom door 56 1030 Hard disk drive...
... Checkout guide 24 Diagnostics using Recovery Disc Set 35 Passwords 36 Power-on password 36 Hard-disk password 36 Supervisor password 37 © Copyright Lenovo 2010, 2012 How to -FRU index 39 Numeric error codes 40 Error messages 41 No-beep symptoms 42 LCD-related symptoms 42 Intermittent problems 43 Undetermined problems 43 Chapter 5. Removing and replacing a FRU 53 Before servicing ThinkPad Edge 11" and E10 . . 53 1010 Battery pack 54 1020 Bottom door 56 1030 Hard disk drive...
Hardware Maintenance Manual
Page 8
... decrease electrostatic discharges. When using testers, set the controls correctly and use this type of mat to work with powered-on when they are removed from their equipment, rubber floor mats that tester. - Observe the special safety precautions when you from electrical shock. • Find the room emergency power-off (EPO) switch, disconnecting switch, or electrical outlet. Instructions for safe operational condition. • Do...
... decrease electrostatic discharges. When using testers, set the controls correctly and use this type of mat to work with powered-on when they are removed from their equipment, rubber floor mats that tester. - Observe the special safety precautions when you from electrical shock. • Find the room emergency power-off (EPO) switch, disconnecting switch, or electrical outlet. Instructions for safe operational condition. • Do...
Hardware Maintenance Manual
Page 25
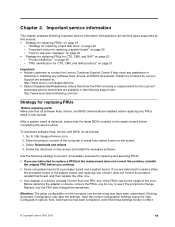
... replacing a system board" on the screen. 3. To download software fixes, drivers, and BIOS, do as follows: 1. Enter the product number of the computer or press Auto-detect button on page 20 - If you are servicing may have both a processor board and a system board. "How to contact the Lenovo Customer Support Center if they need any assistance in the following support site: http://www.lenovoservicetraining.com/ion/ Strategy for replacing a hard disk drive...
... replacing a system board" on the screen. 3. To download software fixes, drivers, and BIOS, do as follows: 1. Enter the product number of the computer or press Auto-detect button on page 20 - If you are servicing may have both a processor board and a system board. "How to contact the Lenovo Customer Support Center if they need any assistance in the following support site: http://www.lenovoservicetraining.com/ion/ Strategy for replacing a hard disk drive...
Hardware Maintenance Manual
Page 29
... and part number • Machine type, model number, and serial number • Customer's name and address © Copyright Lenovo 2010, 2012 23 If you suspect that you select an incorrect drive, data or programs might be overwritten. • Replace a FRU only with a hardware defect, such as copying, saving, or formatting. If the error does not recur, do first" on page 23 • "Checkout guide...
... and part number • Machine type, model number, and serial number • Customer's name and address © Copyright Lenovo 2010, 2012 23 If you suspect that you select an incorrect drive, data or programs might be overwritten. • Replace a FRU only with a hardware defect, such as copying, saving, or formatting. If the error does not recur, do first" on page 23 • "Checkout guide...
Hardware Maintenance Manual
Page 31
..., BIOS Setup Utility menu appears after the password is available on the model.) Chapter 3. If you test one of entering the supervisor password; Attach an external optical drive through USB devices, PC cards, CardBus cards, or similar. Turn on page 31, and check the power sources. If the computer cannot be started from a USB attached optical drive. Press cursor keys to enter the BIOS Setup Utility. The main panel of pressing Enter, click the left button. Note...
..., BIOS Setup Utility menu appears after the password is available on the model.) Chapter 3. If you test one of entering the supervisor password; Attach an external optical drive through USB devices, PC cards, CardBus cards, or similar. Turn on page 31, and check the power sources. If the computer cannot be started from a USB attached optical drive. Press cursor keys to enter the BIOS Setup Utility. The main panel of pressing Enter, click the left button. Note...

Hardware Maintenance Manual
Page 32
...; Video Adapter test supports only the LCD display on the test menu are incorrect. 26 Hardware Maintenance Manual All Rights Reserved. Follow the instructions on the system and reset them if they are as follows: Diagnostics Interactive Tests • Run Normal Test • Run Quick Test • CPU/Coprocessor • Systemboard • Video Adapter • Fixed Disks • Diskette Drives • Other Devices • Communication • Wireless LAN • Keyboard • Video • Internal...
...; Video Adapter test supports only the LCD display on the test menu are incorrect. 26 Hardware Maintenance Manual All Rights Reserved. Follow the instructions on the system and reset them if they are as follows: Diagnostics Interactive Tests • Run Normal Test • Run Quick Test • CPU/Coprocessor • Systemboard • Video Adapter • Fixed Disks • Diskette Drives • Other Devices • Communication • Wireless LAN • Keyboard • Video • Internal...
Hardware Maintenance Manual
Page 33
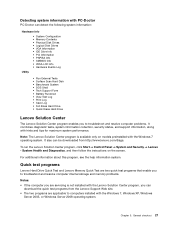
... Start ➙ Control Panel ➙ System and Security ➙ Lenovo - Quick test programs Lenovo Hard Drive Quick Test and Lenovo Memory Quick Test are two quick test programs that enable you to troubleshoot and resolve computer internal storage and memory problems. Notes: • If the computer you to computers installed with the Windows 7, Windows XP, Windows Server 2003, or Windows Server 2008 operating system. System Health and Diagnostics, and then follow the instructions on models preinstalled...
... Start ➙ Control Panel ➙ System and Security ➙ Lenovo - Quick test programs Lenovo Hard Drive Quick Test and Lenovo Memory Quick Test are two quick test programs that enable you to troubleshoot and resolve computer internal storage and memory problems. Notes: • If the computer you to computers installed with the Windows 7, Windows XP, Windows Server 2003, or Windows Server 2008 operating system. System Health and Diagnostics, and then follow the instructions on models preinstalled...
Hardware Maintenance Manual
Page 36
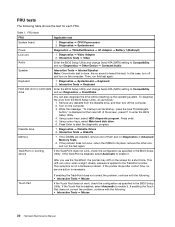
... not work , check the configuration as specified in the BIOS Setup Utility. Interactive Tests ➙ Video Audio Enter the BIOS Setup Utility and change Serial ATA (SATA) setting to start the diagnostic program. To diagnose the drive from the diskette drive, and then turn on the computer. Remove any diskette from the BIOS Setup Utility, do as follows: 1. Diagnostics ➙ Systemboard Power Diagnostics ➙ ThinkPad Devices ➙ AC Adapter ➙ Battery 1 (Battery2) LCD unit 1. Diagnostics ➙ Video Adapter 2. Press enter. 5. Press Enter...
... not work , check the configuration as specified in the BIOS Setup Utility. Interactive Tests ➙ Video Audio Enter the BIOS Setup Utility and change Serial ATA (SATA) setting to start the diagnostic program. To diagnose the drive from the diskette drive, and then turn on the computer. Remove any diskette from the BIOS Setup Utility, do as follows: 1. Diagnostics ➙ Systemboard Power Diagnostics ➙ ThinkPad Devices ➙ AC Adapter ➙ Battery 1 (Battery2) LCD unit 1. Diagnostics ➙ Video Adapter 2. Press enter. 5. Press Enter...
Hardware Maintenance Manual
Page 41
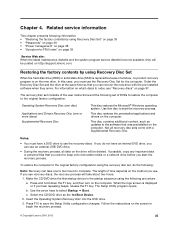
... disc to keep onto removable media or a network drive before you can take about two hours. 1. This disc restores the preinstalled applications and drivers on page 97. Press and hold down the F1 key, and then turn on http://support.lenovo.com. c. Related service information This chapter presents following procedure: a. Use the arrow keys to save the Setup Utility configuration changes. Insert the Operating System Recovery Disc into the DVD drive. 3. Order the Recovery Disc Set and the drive...
... disc to keep onto removable media or a network drive before you can take about two hours. 1. This disc restores the preinstalled applications and drivers on page 97. Press and hold down the F1 key, and then turn on http://support.lenovo.com. c. Related service information This chapter presents following procedure: a. Use the arrow keys to save the Setup Utility configuration changes. Insert the Operating System Recovery Disc into the DVD drive. 3. Order the Recovery Disc Set and the drive...
Hardware Maintenance Manual
Page 42
... the displayed window to begin the applications and drivers recovery process. 8. Follow the instructions on the screen for several times and you do not have a Supplemental Recovery Disc, insert it can be needed for the HDP: User only and Master + User. If any ThinkPad Notebook: the power-on by you might want to complete the Windows setup. 11. The computer does not start until the password is displayed. The Master + User mode...
... the displayed window to begin the applications and drivers recovery process. 8. Follow the instructions on the screen for several times and you do not have a Supplemental Recovery Disc, insert it can be needed for the HDP: User only and Master + User. If any ThinkPad Notebook: the power-on by you might want to complete the Windows setup. 11. The computer does not start until the password is displayed. The Master + User mode...

Hardware Maintenance Manual
Page 43
.... service technicians provide any services to reset the user HDPs or to recover data from the hard disk drive. The POP has been removed. 5. The system board must enter the SVP in the BIOS Setup Utility. Select Power-On Password. 6. Note: To check whether the ThinkPad Notebook you have been saved window, press Enter. 8. The hard disk drive can be replaced for a scheduled fee. Turn on the screen; then, in the Setup confirmation window, select Yes. Turn on the ThinkPad Notebook...
.... service technicians provide any services to reset the user HDPs or to recover data from the hard disk drive. The POP has been removed. 5. The system board must enter the SVP in the BIOS Setup Utility. Select Power-On Password. 6. Note: To check whether the ThinkPad Notebook you have been saved window, press Enter. 8. The hard disk drive can be replaced for a scheduled fee. Turn on the screen; then, in the Setup confirmation window, select Yes. Turn on the ThinkPad Notebook...
Hardware Maintenance Manual
Page 44
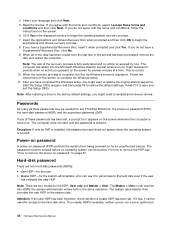
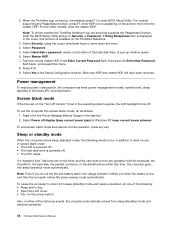
... the menu, this function is available on the screen; Select Security, using the cursor directional keys to return from sleep (standby) mode and resumes operation: 38 Hardware Maintenance Manual Power management To reduce power consumption, the computer has three power management modes: screen blank, sleep (standby in screen blank mode: • The LCD is powered off. • The hard disk drive is the letter of the following events occur in addition to enter BIOS Setup Utility. For models supporting the Passphrase function, press...
... the menu, this function is available on the screen; Select Security, using the cursor directional keys to return from sleep (standby) mode and resumes operation: 38 Hardware Maintenance Manual Power management To reduce power consumption, the computer has three power management modes: screen blank, sleep (standby in screen blank mode: • The LCD is powered off. • The hard disk drive is the letter of the following events occur in addition to enter BIOS Setup Utility. For models supporting the Passphrase function, press...
Hardware Maintenance Manual
Page 47
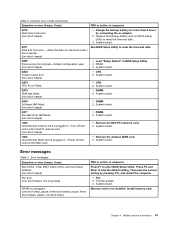
... reset the time and date. 0280 Previous boot incomplete-Default configuration used. (two short beeps) 1. Chapter 4. DIMM. 3. System board. 02F7 Fail-safe timer NMI failed (two short beeps) 1. Enter BIOS Setup Utility, and load Setup defaults. (two short beeps) Fan error. (four short beeps, one short beep.) FRU or action, in -Power off and remove the miniPCI network card. (two short beeps) 1. Then save the current setting by connecting the ac adapter. 2. Memory card...
... reset the time and date. 0280 Previous boot incomplete-Default configuration used. (two short beeps) 1. Chapter 4. DIMM. 3. System board. 02F7 Fail-safe timer NMI failed (two short beeps) 1. Enter BIOS Setup Utility, and load Setup defaults. (two short beeps) Fan error. (four short beeps, one short beep.) FRU or action, in -Power off and remove the miniPCI network card. (two short beeps) 1. Then save the current setting by connecting the ac adapter. 2. Memory card...
Hardware Maintenance Manual
Page 49
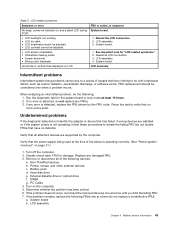
... devices are installed, or if the system simply is operating correctly. (See "Power system checkout" on , and a blank LCD during POST. • LCD backlight not working. • LCD too dark. • LCD brightness cannot be adjusted. • LCD contrast cannot be considered only when a problem recurs. FRU replacement should be adjusted. • LCD screen unreadable. • Characters missing pixels. • Screen abnormal. • Wrong color displayed. Printer, mouse, and other external devices...
... devices are installed, or if the system simply is operating correctly. (See "Power system checkout" on , and a blank LCD during POST. • LCD backlight not working. • LCD too dark. • LCD brightness cannot be adjusted. • LCD contrast cannot be considered only when a problem recurs. FRU replacement should be adjusted. • LCD screen unreadable. • Characters missing pixels. • Screen abnormal. • Wrong color displayed. Printer, mouse, and other external devices...
Hardware Maintenance Manual
Page 53
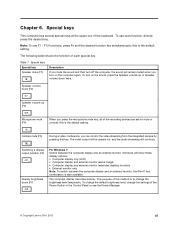
... To use the Power Manager. © Copyright Lenovo 2010, 2012 47 Windows will show these display options: • Computer display only (LCD) • Computer display and external monitor (same image) • Computer display and external monitor (extended desktop function) • External monitor only Note: To switch between the computer display and an external monitor. To change the default brightness level, change the brightness level temporarily. this key. Camera mute (F5) During a video conference, you turn on the computer again. Switching a display output location (F6...
... To use the Power Manager. © Copyright Lenovo 2010, 2012 47 Windows will show these display options: • Computer display only (LCD) • Computer display and external monitor (same image) • Computer display and external monitor (extended desktop function) • External monitor only Note: To switch between the computer display and an external monitor. To change the default brightness level, change the brightness level temporarily. this key. Camera mute (F5) During a video conference, you turn on the computer again. Switching a display output location (F6...
Hardware Maintenance Manual
Page 95
...; "AC adapters" on page 96 • "Miscellaneous parts" on page 96 • "Power cords" on page 96 • "Recovery discs" on product design may request that the part is an Optional-service CRU. Once the access panel is removed, the specific CRU is your product can install yourself, called a "Customer Replaceable Unit" or "CRU." Installation of the replacement CRU. and (2) you may include the memory module, wireless card, keyboard, and palm...
...; "AC adapters" on page 96 • "Miscellaneous parts" on page 96 • "Power cords" on page 96 • "Recovery discs" on product design may request that the part is an Optional-service CRU. Once the access panel is removed, the specific CRU is your product can install yourself, called a "Customer Replaceable Unit" or "CRU." Installation of the replacement CRU. and (2) you may include the memory module, wireless card, keyboard, and palm...
(English) Power Manager Deployment Guide
Page 45
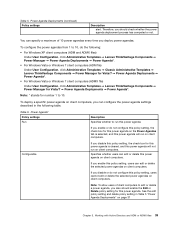
... Templates ➙ Lenovo ThinkVantage Components ➙ Power Manager for Vista/7 ➙ Power Agenda Deployments ➙ Power Agenda*. • For Windows Vista or Windows 7 client computers (ADMX file) Under User Configuration, click Administrative Templates ➙ Lenovo ThinkVantage Components ➙ Power Manager for number 1 to edit or delete a power agenda, you disable this policy setting, the check box for this power agenda on the Power Agendas tab is cleared, and this power agenda. If...
... Templates ➙ Lenovo ThinkVantage Components ➙ Power Manager for Vista/7 ➙ Power Agenda Deployments ➙ Power Agenda*. • For Windows Vista or Windows 7 client computers (ADMX file) Under User Configuration, click Administrative Templates ➙ Lenovo ThinkVantage Components ➙ Power Manager for number 1 to edit or delete a power agenda, you disable this policy setting, the check box for this power agenda on the Power Agendas tab is cleared, and this power agenda. If...


