Hardware Maintenance Manual
Page 3
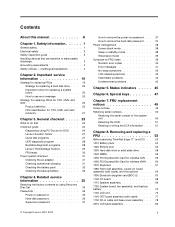
..., CMV, and GAV 20 Product definition 20 FRU identification for DOS. . . . 24 Lenovo Solution Center 27 Quick test programs 27 UEFI diagnostic program 28 Bootable diagnostic programs 28 Lenovo ThinkVantage Toolbox 29 FRU tests 30 Power system checkout 31 Checking the ac adapter 31 Checking operational...factory contents by using PC-Doctor for CTO, CMV, and GAV products 21 Chapter 3. Removing and replacing a FRU 53 Before servicing ThinkPad Edge 11" and E10 . . 53 1010 Battery pack 54 1020 Bottom door 56 1030 Hard disk drive or solid state drive. . . . . 58 1040 DIMM 59 1050 ...
..., CMV, and GAV 20 Product definition 20 FRU identification for DOS. . . . 24 Lenovo Solution Center 27 Quick test programs 27 UEFI diagnostic program 28 Bootable diagnostic programs 28 Lenovo ThinkVantage Toolbox 29 FRU tests 30 Power system checkout 31 Checking the ac adapter 31 Checking operational...factory contents by using PC-Doctor for CTO, CMV, and GAV products 21 Chapter 3. Removing and replacing a FRU 53 Before servicing ThinkPad Edge 11" and E10 . . 53 1010 Battery pack 54 1020 Bottom door 56 1030 Hard disk drive or solid state drive. . . . . 58 1040 DIMM 59 1050 ...
Hardware Maintenance Manual
Page 9
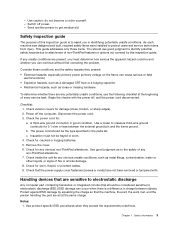
... Mechanical hazards, such as loose or missing hardware To determine whether there are any non-ThinkPad alterations. 7. b. Insulation must determine how serious the apparent hazard could be frayed or worn... Power off power. - Check the power cord for damage (loose, broken, or sharp edges). 2. Remove the cover. 6. This guide addresses only those items. You should be the...these conditions and the safety hazards they exceed the requirements noted here. c. Check for cracked or bulging batteries. 5. Notes: 1. do not become a victim yourself. - Disconnect the power cord. 3. Check...
... Mechanical hazards, such as loose or missing hardware To determine whether there are any non-ThinkPad alterations. 7. b. Insulation must determine how serious the apparent hazard could be frayed or worn... Power off power. - Check the power cord for damage (loose, broken, or sharp edges). 2. Remove the cover. 6. This guide addresses only those items. You should be the...these conditions and the safety hazards they exceed the requirements noted here. c. Check for cracked or bulging batteries. 5. Notes: 1. do not become a victim yourself. - Disconnect the power cord. 3. Check...
Hardware Maintenance Manual
Page 10
... part from touching your clothing. Use the round ground prong of the electrical outlet can use coax or connector-outside shells on a double-insulated or battery-operated system, use have been certified (ISO 9000) as fully effective. The mat is desirable but not necessary. - 2. multilingual translations The safety notices in this...
... part from touching your clothing. Use the round ground prong of the electrical outlet can use coax or connector-outside shells on a double-insulated or battery-operated system, use have been certified (ISO 9000) as fully effective. The mat is desirable but not necessary. - 2. multilingual translations The safety notices in this...
Hardware Maintenance Manual
Page 29
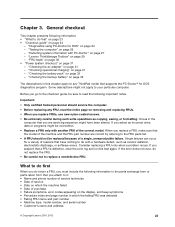
... model number, and serial number • Customer's name and address © Copyright Lenovo 2010, 2012 23 General checkout This chapter presents following important notes. Drives in the ... error codes appearing on page 27 - "Checking the ac adapter" on page 29 - "Checking the battery pack" on page 31 - Important: • Only certified trained personnel should not be overwritten. •... parts list. • A FRU should service the computer. • Before replacing any ThinkPad model that the model of the machine and the FRU part number are servicing sequence might ...
... model number, and serial number • Customer's name and address © Copyright Lenovo 2010, 2012 23 General checkout This chapter presents following important notes. Drives in the ... error codes appearing on page 27 - "Checking the ac adapter" on page 29 - "Checking the battery pack" on page 31 - Important: • Only certified trained personnel should not be overwritten. •... parts list. • A FRU should service the computer. • Before replacing any ThinkPad model that the model of the machine and the FRU part number are servicing sequence might ...
Hardware Maintenance Manual
Page 33
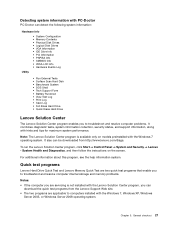
... Log Utility • Run External Tests • Surface Scan Hard Disk • Benchmark System • DOS Shell • Tech Support Form • Battery Rundown • View Test Log • Print Log • Save Log • Full Erase Hard Drive • Quick Erase Hard Drive... Lenovo Solution Center The Lenovo Solution Center program enables you can be downloaded from the Lenovo Support Web site. • The two programs are servicing is available only on the screen. General checkout 27...
... Log Utility • Run External Tests • Surface Scan Hard Disk • Benchmark System • DOS Shell • Tech Support Form • Battery Rundown • View Test Log • Print Log • Save Log • Full Erase Hard Drive • Quick Erase Hard Drive... Lenovo Solution Center The Lenovo Solution Center program enables you can be downloaded from the Lenovo Support Web site. • The two programs are servicing is available only on the screen. General checkout 27...
Hardware Maintenance Manual
Page 36
... not correct the problem, continue with the following : • Interactive Tests ➙ Mouse 30 Hardware Maintenance Manual Diagnostics ➙ Systemboard Power Diagnostics ➙ ThinkPad Devices ➙ AC Adapter ➙ Battery 1 (Battery2) LCD unit 1. Keyboard 1. You can occur when a slight, steady pressure is applied to enable it . While the message, "To interrupt normal...
... not correct the problem, continue with the following : • Interactive Tests ➙ Mouse 30 Hardware Maintenance Manual Diagnostics ➙ Systemboard Power Diagnostics ➙ ThinkPad Devices ➙ AC Adapter ➙ Battery 1 (Battery2) LCD unit 1. Keyboard 1. You can occur when a slight, steady pressure is applied to enable it . While the message, "To interrupt normal...
Hardware Maintenance Manual
Page 37
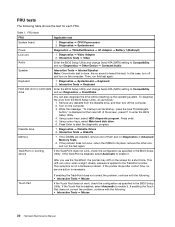
...• "Checking the ac adapter" on page 31 • "Checking operational charging" on page 31 • "Checking the battery pack" on page 32 • "Checking the backup battery" on page 32 Checking the ac adapter You are servicing. 3. If the voltage is acceptable, do the following: • ... the ac adapter for correct continuity and installation. • If the computer does not charge during operation, use a discharged battery pack or a battery pack that the battery pack supplies power when you turn on the computer. Note: Noise from the one you are here because the computer fails ...
...• "Checking the ac adapter" on page 31 • "Checking operational charging" on page 31 • "Checking the battery pack" on page 32 • "Checking the backup battery" on page 32 Checking the ac adapter You are servicing. 3. If the voltage is acceptable, do the following: • ... the ac adapter for correct continuity and installation. • If the computer does not charge during operation, use a discharged battery pack or a battery pack that the battery pack supplies power when you turn on the computer. Note: Noise from the one you are here because the computer fails ...
Hardware Maintenance Manual
Page 38
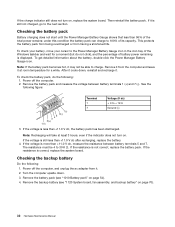
... the resistance is correct, replace the system board. Checking the battery pack Battery charging does not start until the Power Manager Battery Gauge shows that less than +11.0 V dc, the battery pack has been discharged. If the voltage is more than +11.0 V dc after recharging, replace the battery. 4. Power off the computer, and unplug the ac adapter...
... the resistance is correct, replace the system board. Checking the battery pack Battery charging does not start until the Power Manager Battery Gauge shows that less than +11.0 V dc, the battery pack has been discharged. If the voltage is more than +11.0 V dc after recharging, replace the battery. 4. Power off the computer, and unplug the ac adapter...
Hardware Maintenance Manual
Page 39
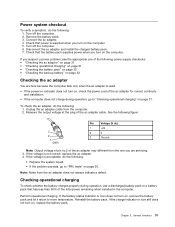
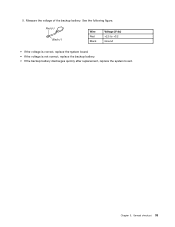
Measure the voltage of the backup battery. General checkout 33 Chapter 3. Wire Red Black Voltage (V dc) +2.5 to +3.2 Ground • If the voltage is correct, replace the system board. • If the voltage is not correct, replace the backup battery. • If the backup battery discharges quickly after replacement, replace the system board. 5. See the following figure.
Measure the voltage of the backup battery. General checkout 33 Chapter 3. Wire Red Black Voltage (V dc) +2.5 to +3.2 Ground • If the voltage is correct, replace the system board. • If the voltage is not correct, replace the backup battery. • If the backup battery discharges quickly after replacement, replace the system board. 5. See the following figure.

Hardware Maintenance Manual
Page 43
...password" on page 54. 3. Related service information 37 The hard disk drive can be made available to the service technician, neither Lenovo nor Lenovo authorized service technicians provide any services to reset either the user or the master HDP, or to recover data from the hard disk ... the POST ends. Remove the battery pack. For how to remove the backup battery, see "1010 Battery pack" on page 37. Press F10; For how to remove the battery pack, see "1120 System board, fan assembly, and backup battery" on the screen; When the ThinkPad logo comes up, immediately press ...
...password" on page 54. 3. Related service information 37 The hard disk drive can be made available to the service technician, neither Lenovo nor Lenovo authorized service technicians provide any services to reset either the user or the master HDP, or to recover data from the hard disk ... the POST ends. Remove the battery pack. For how to remove the backup battery, see "1010 Battery pack" on page 37. Press F10; For how to remove the battery pack, see "1120 System board, fan assembly, and backup battery" on the screen; When the ThinkPad logo comes up, immediately press ...
Hardware Maintenance Manual
Page 44
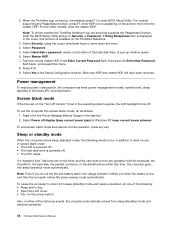
...HDP. then leave the Enter New Password field blank, and press Enter twice. 8. Select Yes in the Enter Current Password field. When the ThinkPad logo comes up window opens. 6. For models supporting the Passphrase function, press F1 while HDP icon is powered off . • The .... 3. To cause the computer to Security ➙ Password. 2. then enter the master HDP. Note: To check whether the ThinkPad Notebook you when the battery is available on the power switch. Press F10. 9. Power management To reduce power consumption, the computer has three power management modes:...
...HDP. then leave the Enter New Password field blank, and press Enter twice. 8. Select Yes in the Enter Current Password field. When the ThinkPad logo comes up window opens. 6. For models supporting the Passphrase function, press F1 while HDP icon is powered off . • The .... 3. To cause the computer to Security ➙ Password. 2. then enter the master HDP. Note: To check whether the ThinkPad Notebook you when the battery is available on the power switch. Press F10. 9. Power management To reduce power consumption, the computer has three power management modes:...
Hardware Maintenance Manual
Page 46
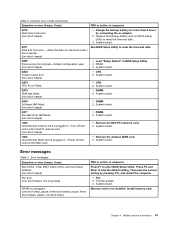
... System RAM error-System RAM fails at offset nnnn. (two short beeps) 1. System board. 0232 Extended RAM error- Replace the backup battery and run BIOS Setup Utility to reset the time and date. 0251 System CMOS checksum bad-Default configuration used (two short beeps) Turn...0254 System NV7 Volume checksum bad-Default configuration used . (two short beeps) 1. Charge the backup battery for more than 8 hours by connecting the ac adapter. 2. Replace the backup battery and run BIOS Setup Utility to EEPROM is failed. (two short beeps) 0189 Invalid RFID configuration ...
... System RAM error-System RAM fails at offset nnnn. (two short beeps) 1. System board. 0232 Extended RAM error- Replace the backup battery and run BIOS Setup Utility to reset the time and date. 0251 System CMOS checksum bad-Default configuration used (two short beeps) Turn...0254 System NV7 Volume checksum bad-Default configuration used . (two short beeps) 1. Charge the backup battery for more than 8 hours by connecting the ac adapter. 2. Replace the backup battery and run BIOS Setup Utility to EEPROM is failed. (two short beeps) 0189 Invalid RFID configuration ...
Hardware Maintenance Manual
Page 47
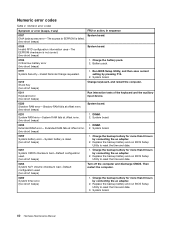
Numeric error codes (continued) Symptom or error (beeps, if any ) Bad CRC2. Replace the backup battery and run BIOS Setup Utility to load the default setting. CPU. 2. System board. 02F0 CPU ID:xx Failed. 1. DIMM. 2. Remove the Mini... System board. System board. 02F6 Software NMI failed (two short beeps) 1. CPU. 2. DIMM. 2. Remove the wireless WAN card. 2. Table 2. Charge the backup battery for more than 8 hours by pressing F10, and restart the computer. 1. System board. 02F5 DMA test failed. (two short beeps) 1. System board. 1804 Unauthorized ...
Numeric error codes (continued) Symptom or error (beeps, if any ) Bad CRC2. Replace the backup battery and run BIOS Setup Utility to load the default setting. CPU. 2. System board. 02F0 CPU ID:xx Failed. 1. DIMM. 2. Remove the Mini... System board. System board. 02F6 Software NMI failed (two short beeps) 1. CPU. 2. DIMM. 2. Remove the wireless WAN card. 2. Table 2. Charge the backup battery for more than 8 hours by pressing F10, and restart the computer. 1. System board. 02F5 DMA test failed. (two short beeps) 1. System board. 1804 Unauthorized ...
Hardware Maintenance Manual
Page 49
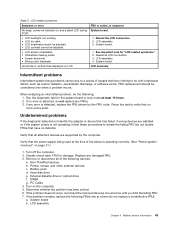
... FRUs one at a time (do not replace any FRUs. 3. Run the diagnostic test for the system board in sequence System board. 1. Battery pack d. If the problem remains, replace the following : 1. Reseat the LCD connectors. 2. Reseat all attached devices are installed, or if the...system simply is detected, replace the FRU shown by the computer. When analyzing an intermittent problem, do not isolate FRUs that no defects). Non-ThinkPad devices b. LCD assembly. 3. Turn on LCD. Horizontal or vertical lines displayed on the computer. 5. PC Cards 4. Verify that all LCD...
... FRUs one at a time (do not replace any FRUs. 3. Run the diagnostic test for the system board in sequence System board. 1. Battery pack d. If the problem remains, replace the following : 1. Reseat the LCD connectors. 2. Reseat all attached devices are installed, or if the...system simply is detected, replace the FRU shown by the computer. When analyzing an intermittent problem, do not isolate FRUs that no defects). Non-ThinkPad devices b. LCD assembly. 3. Turn on LCD. Horizontal or vertical lines displayed on the computer. 5. PC Cards 4. Verify that all LCD...
Hardware Maintenance Manual
Page 52
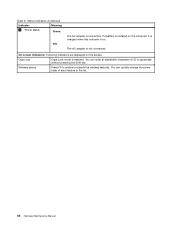
...-screen indicators: Following indicators are displayed on the computer, it is charged when this indicator is enabled. Caps lock Caps Lock mode is on. If a battery is installed on the screen. The AC adapter is connected. You can enter all alphabetic characters (A-Z) in the list. 46 Hardware Maintenance Manual You can...
...-screen indicators: Following indicators are displayed on the computer, it is charged when this indicator is enabled. Caps lock Caps Lock mode is on. If a battery is installed on the screen. The AC adapter is connected. You can enter all alphabetic characters (A-Z) in the list. 46 Hardware Maintenance Manual You can...
Hardware Maintenance Manual
Page 59
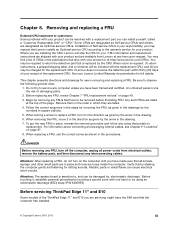
... Attention: The system board is replaced by the CRU. CRU information and replacement instructions are available from electrical outlets, remove the battery pack, and then disconnect any FRUs that is sensitive to replacement. See your responsibility; Remove them in the order in the steps... metal flakes can install yourself, called a "Customer Replaceable Unit" or "CRU." Before servicing ThinkPad Edge 11" and E10 Some models of the ThinkPad Edge 11" and E10 you may request that Lenovo installs an Optional-service CRU according to you have the SIM card that pertain to , and...
... Attention: The system board is replaced by the CRU. CRU information and replacement instructions are available from electrical outlets, remove the battery pack, and then disconnect any FRUs that is sensitive to replacement. See your responsibility; Remove them in the order in the steps... metal flakes can install yourself, called a "Customer Replaceable Unit" or "CRU." Before servicing ThinkPad Edge 11" and E10 Some models of the ThinkPad Edge 11" and E10 you may request that Lenovo installs an Optional-service CRU according to you have the SIM card that pertain to , and...

Hardware Maintenance Manual
Page 60
... defective. To remove the SIM card, you need to remove following FRUs: • "1010 Battery pack" on page 54 • "1020 Bottom door" on page 56 After you finish the servicing, make sure that you start the servicing. If the ...computer you are servicing has the SIM card, remove it before you insert the card back into the slot firmly. 1 3 2 1010 Battery pack Important notice for replacing a battery pack: ThinkVantage Toolbox have an automatic battery diagnostic that determines if the battery pack is defective. 54 Hardware Maintenance Manual
... defective. To remove the SIM card, you need to remove following FRUs: • "1010 Battery pack" on page 54 • "1020 Bottom door" on page 56 After you finish the servicing, make sure that you start the servicing. If the ...computer you are servicing has the SIM card, remove it before you insert the card back into the slot firmly. 1 3 2 1010 Battery pack Important notice for replacing a battery pack: ThinkVantage Toolbox have an automatic battery diagnostic that determines if the battery pack is defective. 54 Hardware Maintenance Manual
Hardware Maintenance Manual
Page 61
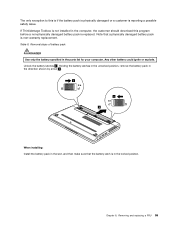
... shown by arrow 2 . The only exception to this program before a non-physically damaged battery pack is replaced. Holding the battery latches in the unlocked position, remove the battery pack in the parts list for your computer. Note that the battery latch is non-warranty replacement. If ThinkVantage Toolbox is not installed in the locked...
... shown by arrow 2 . The only exception to this program before a non-physically damaged battery pack is replaced. Holding the battery latches in the unlocked position, remove the battery pack in the parts list for your computer. Note that the battery latch is non-warranty replacement. If ThinkVantage Toolbox is not installed in the locked...
Hardware Maintenance Manual
Page 62
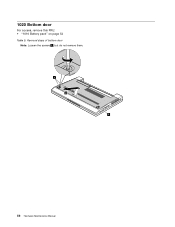
Removal steps of bottom door Note: Loosen the screws 1 , but do not remove them. 56 Hardware Maintenance Manual 1020 Bottom door For access, remove this FRU: • "1010 Battery pack" on page 54 Table 9.
Removal steps of bottom door Note: Loosen the screws 1 , but do not remove them. 56 Hardware Maintenance Manual 1020 Bottom door For access, remove this FRU: • "1010 Battery pack" on page 54 Table 9.
Hardware Maintenance Manual
Page 63
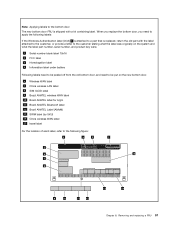
...the label part number, serial number, and product key were. 1 Serial number blank label 79x16 2 FCC label 3 Homologation label 4 Information label under battery Following labels need to be peeled off from the old bottom door, and need to apply the following labels: If the Windows Authentication label (COA...bottom door. 6 Wireless WAN label 7 China wireless LAN label 8 SIM ICCID label 9 Brazil ANATEL wireless WAN label 10 Brazil ANATEL label for b/g/n 11 Brazil ANATEL Bluetooth label 12 Brazil ANATEL Label (AMoM) 13 SIRM label (by SKU) 14 China wireless WAN label 15 Israel label For the location...
...the label part number, serial number, and product key were. 1 Serial number blank label 79x16 2 FCC label 3 Homologation label 4 Information label under battery Following labels need to be peeled off from the old bottom door, and need to apply the following labels: If the Windows Authentication label (COA...bottom door. 6 Wireless WAN label 7 China wireless LAN label 8 SIM ICCID label 9 Brazil ANATEL wireless WAN label 10 Brazil ANATEL label for b/g/n 11 Brazil ANATEL Bluetooth label 12 Brazil ANATEL Label (AMoM) 13 SIRM label (by SKU) 14 China wireless WAN label 15 Israel label For the location...


