Lenovo G770 Userguide V1.0
Page 7
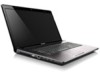
...page 19. Note: For details, see "Wired connection" on page 15. 3 Notes: • The blue port supports USB 3.0 (on select models). • For details, see "Connecting USB devices" on page 22. d RJ-45 port This port connects the computer to devices with HDMI input such as a... TV or a display. e HDMI port f USB port Connects to an Ethernet network. Connect to know your computer Left-side view 1 2 3 4 5 6 a Kensington slot Attach a security lock (not supplied) here. Getting to USB devices. Chapter 1. c VGA port Connects to external display devices.
...page 19. Note: For details, see "Wired connection" on page 15. 3 Notes: • The blue port supports USB 3.0 (on select models). • For details, see "Connecting USB devices" on page 22. d RJ-45 port This port connects the computer to devices with HDMI input such as a... TV or a display. e HDMI port f USB port Connects to an Ethernet network. Connect to know your computer Left-side view 1 2 3 4 5 6 a Kensington slot Attach a security lock (not supplied) here. Getting to USB devices. Chapter 1. c VGA port Connects to external display devices.
Lenovo G770 Userguide V1.0
Page 8
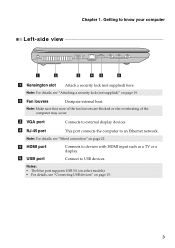
e AC power adapter Connect the AC adapter here. Getting to external headphones. c Optical drive d USB port Reads/Burns optical disks. Connects to external microphones. Chapter 1. b Microphone jack Connects to USB devices. Attention: • Listening to music at high volume over extended periods of time may damage your computer Right-side view 12 3 4 5 a Headphone jack Connects to know your hearing. Note: For details, see "Using AC adapter and battery" on page 15. jack Note: For details, see "Connecting USB devices" on page 9. 4
e AC power adapter Connect the AC adapter here. Getting to external headphones. c Optical drive d USB port Reads/Burns optical disks. Connects to external microphones. Chapter 1. b Microphone jack Connects to USB devices. Attention: • Listening to music at high volume over extended periods of time may damage your computer Right-side view 12 3 4 5 a Headphone jack Connects to know your hearing. Note: For details, see "Using AC adapter and battery" on page 15. jack Note: For details, see "Connecting USB devices" on page 9. 4
Lenovo G770 Userguide V1.0
Page 19
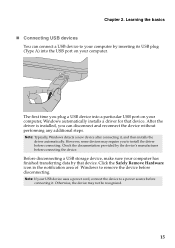
...Click the Safely Remove Hardware icon in the notification area of Windows to your computer by inserting its USB plug (Type A) into a particular USB port on your computer, Windows automatically installs a driver for that device. Otherwise, the device may require you can... connect a USB device to remove the device before connecting. Chapter 2. Note: Typically, Windows detects a new device after connecting it . Learning the basics „ Connecting USB devices You can disconnect and reconnect the device without performing any ...
...Click the Safely Remove Hardware icon in the notification area of Windows to your computer by inserting its USB plug (Type A) into a particular USB port on your computer, Windows automatically installs a driver for that device. Otherwise, the device may require you can... connect a USB device to remove the device before connecting. Chapter 2. Note: Typically, Windows detects a new device after connecting it . Learning the basics „ Connecting USB devices You can disconnect and reconnect the device without performing any ...
Lenovo G770 Userguide V1.0
Page 38
...mode during a communication operation. The connected external device does not work. • Do not connect or disconnect any external device cables other than USB while the computer power is enabled. You will need to select the device you want the computer starts from. In the Boot menu in ... system shut down may result. 34 Make sure that the Boot Device Priority in the Boot Device Priority list. • Press F12 when the Lenovo logo appears on the screen while the computer is not enough space to help solve or identify your computer. • When using a Windows operating...
...mode during a communication operation. The connected external device does not work. • Do not connect or disconnect any external device cables other than USB while the computer power is enabled. You will need to select the device you want the computer starts from. In the Boot menu in ... system shut down may result. 34 Make sure that the Boot Device Priority in the Boot Device Priority list. • Press F12 when the Lenovo logo appears on the screen while the computer is not enough space to help solve or identify your computer. • When using a Windows operating...

Lenovo G770 Hardware Maintenance Manual V1.0
Page 32
...system Description • External monitor connector • Stereo headphone jack • Microphone jack • RJ45 x 1 • HDMI port • USB 2.0 × 3, USB 3.0 x 1 or USB 2.0 x 4 • 5-in-1 memory card reader • 1/8" Stereo Headphone Output Jack • 1/8" Microphone Input Combo Jack • Built...half size) • Intel WiMAX/Wifi 6250AGN • Intel WiMAX/Wifi 6150AGN • design ready • BT2.1 EDR • 6 rows Lenovo Chiclet Keyboard • Two clicks with Rubber-Dome • 2.0M pixies • 48WH, 6 cell cylindrical Li-ion Battery • 20V 65...
...system Description • External monitor connector • Stereo headphone jack • Microphone jack • RJ45 x 1 • HDMI port • USB 2.0 × 3, USB 3.0 x 1 or USB 2.0 x 4 • 5-in-1 memory card reader • 1/8" Stereo Headphone Output Jack • 1/8" Microphone Input Combo Jack • Built...half size) • Intel WiMAX/Wifi 6250AGN • Intel WiMAX/Wifi 6150AGN • design ready • BT2.1 EDR • 6 rows Lenovo Chiclet Keyboard • Two clicks with Rubber-Dome • 2.0M pixies • 48WH, 6 cell cylindrical Li-ion Battery • 20V 65...
Lenovo G770 Hardware Maintenance Manual V1.0
Page 52
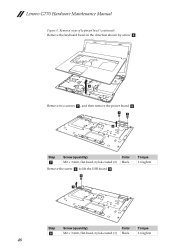
Removal steps of keyboard bezel (continued) Remove the keyboard bezel in the direction shown by arrow f. gg h Step g Screw (quantity) M2 × 3 mm, flat-head, nylok-coated (2) Remove the screw i to lift the USB board j . Lenovo G770 Hardware Maintenance Manual Figure 9. h Color Black Torque 1.6 kgfcm g Step i Screw (quantity) Color M2 × 3 mm, flat-head, nylok-coated (1) Black Torque 1.6 kgfcm 48 G770 f Remove two screws g , and then remove the power board h .
Removal steps of keyboard bezel (continued) Remove the keyboard bezel in the direction shown by arrow f. gg h Step g Screw (quantity) M2 × 3 mm, flat-head, nylok-coated (2) Remove the screw i to lift the USB board j . Lenovo G770 Hardware Maintenance Manual Figure 9. h Color Black Torque 1.6 kgfcm g Step i Screw (quantity) Color M2 × 3 mm, flat-head, nylok-coated (1) Black Torque 1.6 kgfcm 48 G770 f Remove two screws g , and then remove the power board h .

Lenovo G770 Hardware Maintenance Manual V1.0
Page 72
manual h Battery pack i Battery latch - Lenovo G770 Hardware Maintenance Manual Bottom and Left-side view a Kensington slot b Fan louvers c VGA port d RJ-45 port e HDMI port (Select models only) f USB port g Battery latch - spring loaded j Hard disk drive (HDD)/Memory/Mini PCI Express Card slot compartment 7 8 9 1 2 3 4 5 6 10 6 6 68
manual h Battery pack i Battery latch - Lenovo G770 Hardware Maintenance Manual Bottom and Left-side view a Kensington slot b Fan louvers c VGA port d RJ-45 port e HDMI port (Select models only) f USB port g Battery latch - spring loaded j Hard disk drive (HDD)/Memory/Mini PCI Express Card slot compartment 7 8 9 1 2 3 4 5 6 10 6 6 68

Lenovo G770 Hardware Maintenance Manual V1.0
Page 75
Lenovo G770 Table 4. FRU FRU no. Parts list-Overall No. CRU ID 1 LCD unit (see "LCD FRUs" on page 75.) 2 Keyboard (see "Keyboard" on page 77.) 3 PIWG4 UPPER CASE METAL W/TP/HDMI 31050104 N 4 PIWG4 POWER BOARD W/FFC 11013580 N 5 PIWG4 USB BOARD W/CABLE 11013586 N 6 PIWG4 MB DIS 2G U3 100/1000M W/HDMI 11013581 N 6 PIWG4 MB...
Lenovo G770 Table 4. FRU FRU no. Parts list-Overall No. CRU ID 1 LCD unit (see "LCD FRUs" on page 75.) 2 Keyboard (see "Keyboard" on page 77.) 3 PIWG4 UPPER CASE METAL W/TP/HDMI 31050104 N 4 PIWG4 POWER BOARD W/FFC 11013580 N 5 PIWG4 USB BOARD W/CABLE 11013586 N 6 PIWG4 MB DIS 2G U3 100/1000M W/HDMI 11013581 N 6 PIWG4 MB...


