
Lenovo IdeaCentre B3/B5 Series User Guide
Page 31
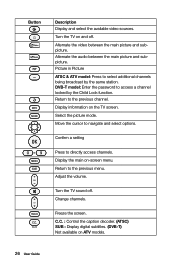
Button Description Display and select the available video sources. Picture in Picture ATSC & ATV model: Press to access a channel locked by the same station. Return to the previous menu. Display information on -screen menu. Turn the TV on ATV models. 26 User Guide DVB-T model: Enter the password to select additional channels being broadcast by the Child Lock function. Display the main on the TV screen. Return to the...
Button Description Display and select the available video sources. Picture in Picture ATSC & ATV model: Press to access a channel locked by the same station. Return to the previous menu. Display information on -screen menu. Turn the TV on ATV models. 26 User Guide DVB-T model: Enter the password to select additional channels being broadcast by the Child Lock function. Display the main on the TV screen. Return to the...
Lenovo IdeaCentre B3/B5 Series User Guide
Page 40
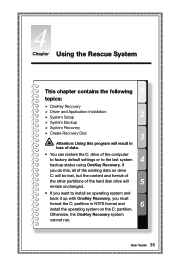
... 1 topics: Ø OneKey Recovery Ø Driver and Application Installation Ø System Setup 2 Ø System Backup Ø System Recovery Ø Create Recovery Disc 3 Attention: Using this , all of the existing data on the C: partition. User Guide 35 Otherwise, the OneKey Recovery system cannot run. If you do this program will result in loss of data. • You can restore the C: drive of the hard disk drive will 5 remain unchanged...
... 1 topics: Ø OneKey Recovery Ø Driver and Application Installation Ø System Setup 2 Ø System Backup Ø System Recovery Ø Create Recovery Disc 3 Attention: Using this , all of the existing data on the C: partition. User Guide 35 Otherwise, the OneKey Recovery system cannot run. If you do this program will result in loss of data. • You can restore the C: drive of the hard disk drive will 5 remain unchanged...
Lenovo IdeaCentre B3/B5 Series User Guide
Page 42
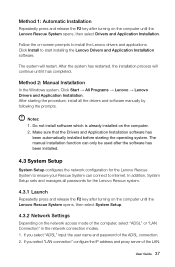
... the F2 key after turning on the computer until the Lenovo Rescue System opens, then select System Setup. 4.3.2 Network Settings Depending on the network access mode of the computer, select "ADSL" or "LAN Connection" in the network connection modes. 1. User Guide 37 After starting the operating system. The manual installation function can connect to ensure your Rescue System can only be used after the software has been installed. 4.3 System Setup System Setup configures the network configuration for the Lenovo Rescue system...
... the F2 key after turning on the computer until the Lenovo Rescue System opens, then select System Setup. 4.3.2 Network Settings Depending on the network access mode of the computer, select "ADSL" or "LAN Connection" in the network connection modes. 1. User Guide 37 After starting the operating system. The manual installation function can connect to ensure your Rescue System can only be used after the software has been installed. 4.3 System Setup System Setup configures the network configuration for the Lenovo Rescue system...
Lenovo IdeaCentre B3/B5 Series User Guide
Page 45
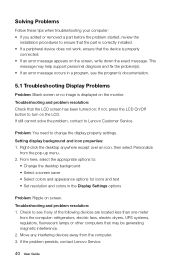
... troubleshooting your computer: • If you added or removed a part before the problem started, review the installation procedures to ensure that the part is correctly installed. • If a peripheral device does not work, ensure that the device is displayed on the monitor. Check to turn on ; If not, press the LCD On/Off button to see the program's documentation. 5.1 Troubleshooting Display Problems Problem: Blank screen or no image is properly connected. • If an error...
... troubleshooting your computer: • If you added or removed a part before the problem started, review the installation procedures to ensure that the part is correctly installed. • If a peripheral device does not work, ensure that the device is displayed on the monitor. Check to turn on ; If not, press the LCD On/Off button to see the program's documentation. 5.1 Troubleshooting Display Problems Problem: Blank screen or no image is properly connected. • If an error...
Lenovo IdeaCentre B3/B5 Series User Guide
Page 51
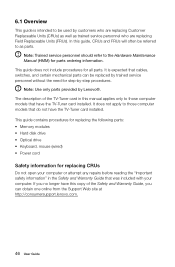
... replacing the following parts: • Memory modules • Hard disk drive • Optical drive • Keyboard, mouse (wired) • Power cord Safety information for step-by-step procedures. Note: Trained service personnel should refer to those computer models that was included with your computer. The description of the Safety and Warranty Guide, you no longer have the TV-Tuner card installed. It does not apply to the Hardware Maintenance Manual...
... replacing the following parts: • Memory modules • Hard disk drive • Optical drive • Keyboard, mouse (wired) • Power cord Safety information for step-by-step procedures. Note: Trained service personnel should refer to those computer models that was included with your computer. The description of the Safety and Warranty Guide, you no longer have the TV-Tuner card installed. It does not apply to the Hardware Maintenance Manual...
Lenovo IdeaCentre B3/B5 Series User Guide
Page 59
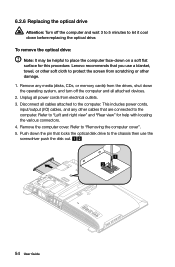
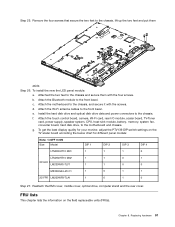
... connectors. 4. Remove the computer cover. Unplug all cables attached to "Removing the computer cover". 5. Refer to "Left and right view" and "Rear view" for this procedure. Push down before replacing the optical drive. Lenovo recommends that are connected to protect the screen from scratching or other cables that you use the screwdriver push the disk out. 1 2 54 User Guide This includes power cords, input/output (I/O) cables, and any media (disks, CDs, or memory cards...
... connectors. 4. Remove the computer cover. Unplug all cables attached to "Removing the computer cover". 5. Refer to "Left and right view" and "Rear view" for this procedure. Push down before replacing the optical drive. Lenovo recommends that are connected to protect the screen from scratching or other cables that you use the screwdriver push the disk out. 1 2 54 User Guide This includes power cords, input/output (I/O) cables, and any media (disks, CDs, or memory cards...
Lenovo IdeaCentre B3/B5 Series User Guide
Page 65
... comments, contact or visit the Lenovo Web site: Service Web site: http://consumersupport.lenovo.com 60 User Guide For the configuration of the manuals included with your computer is not responsible for the product sales. Lenovo is protected by Lenovo professional service personnel. The content of the product, refer to instructions and requirements in new editions of the manual, at any language without...
... comments, contact or visit the Lenovo Web site: Service Web site: http://consumersupport.lenovo.com 60 User Guide For the configuration of the manuals included with your computer is not responsible for the product sales. Lenovo is protected by Lenovo professional service personnel. The content of the product, refer to instructions and requirements in new editions of the manual, at any language without...
Safety and Warranty guide
Page 9
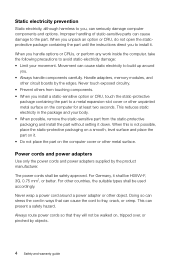
... any work inside the computer, take the following precautions to you to the part. Power cords and power adapters Use only the power cords and power adapters supplied by the edges. The power cords shall be H05VV-F, 3G, 0.75 mm2, or better. For Germany, it down. Doing so can seriously damage computer components and options. Movement can cause the cord to a metal expansion-slot cover...
... any work inside the computer, take the following precautions to you to the part. Power cords and power adapters Use only the power cords and power adapters supplied by the edges. The power cords shall be H05VV-F, 3G, 0.75 mm2, or better. For Germany, it down. Doing so can seriously damage computer components and options. Movement can cause the cord to a metal expansion-slot cover...
Safety and Warranty guide
Page 17
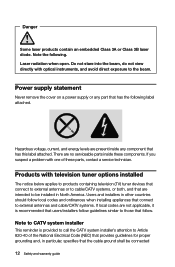
... is recommended that users/installers follow guidelines similar to the beam. Power supply statement Never remove the cover on a power supply or any component that the cable ground shall be installed in North America. Hazardous voltage, current, and energy levels are present inside these parts, contact a service technician. Users and installers in particular, specifies that has this label attached. Laser radiation when open. Danger Some laser...
... is recommended that users/installers follow guidelines similar to the beam. Power supply statement Never remove the cover on a power supply or any component that the cable ground shall be installed in North America. Hazardous voltage, current, and energy levels are present inside these parts, contact a service technician. Users and installers in particular, specifies that has this label attached. Laser radiation when open. Danger Some laser...
Safety and Warranty guide
Page 18
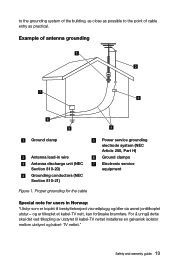
TV nettet." Safety and warranty guide 13 Example of cable entry as practical. og er tilkoplet et kabel-TV nett, kan for users in wire Antenna discharge unit (NEC Section 810-20) Grounding conductors (NEC Section 810-21) Figure 1. ...For å unngå dette skal det ved tilkopling av utstyret til kabel-TV nettet installeres en galvanisk isolator mellom utstyret og kabel- Proper grounding for the cable Power service grounding electrode system (NEC Article 250, Part...
TV nettet." Safety and warranty guide 13 Example of cable entry as practical. og er tilkoplet et kabel-TV nett, kan for users in wire Antenna discharge unit (NEC Section 810-20) Grounding conductors (NEC Section 810-21) Figure 1. ...For å unngå dette skal det ved tilkopling av utstyret til kabel-TV nettet installeres en galvanisk isolator mellom utstyret og kabel- Proper grounding for the cable Power service grounding electrode system (NEC Article 250, Part...
Safety and Warranty guide
Page 28
...: lensyd_au@lenovo.com The following replaces the same section in Part 1: What this Warranty Covers: Lenovo warrants that each hardware product that apply to a covered defect during the warranty period, Lenovo will provide you purchase is free from defects in Part 3 - The warranty period for the product starts on the original date of warranty service that you a remedy under normal use and conditions...
...: lensyd_au@lenovo.com The following replaces the same section in Part 1: What this Warranty Covers: Lenovo warrants that each hardware product that apply to a covered defect during the warranty period, Lenovo will provide you purchase is free from defects in Part 3 - The warranty period for the product starts on the original date of warranty service that you a remedy under normal use and conditions...
Safety and Warranty guide
Page 29
... and warranty guide The following replaces the same section in Part 1: Limitation of the same type rather than being repaired. The following replaces the same section in Part 1: Replacement Products and Parts: When warranty service involves the replacement of the period remaining on the original product. The replacement product or part provided by refurbished products or parts of Liability: Lenovo is in the Service Provider's possession...
... and warranty guide The following replaces the same section in Part 1: Limitation of the same type rather than being repaired. The following replaces the same section in Part 1: Replacement Products and Parts: When warranty service involves the replacement of the period remaining on the original product. The replacement product or part provided by refurbished products or parts of Liability: Lenovo is in the Service Provider's possession...
Safety and Warranty guide
Page 36
...at its expense. 3. Mail-In Service Under Mail-In Service, your product will be repaired or exchanged at a designated service center after you may need to be made available to you for the replacement CRU if the Service Provider does not receive the defective...replacement CRU. 2. You must provide a suitable working area to allow disassembly and reassembly of your risk and expense. After the product has been repaired or exchanged, it will return the product to you . The service center will be repaired or exchanged after you at Lenovo's risk and expense, unless the Service...
...at its expense. 3. Mail-In Service Under Mail-In Service, your product will be repaired or exchanged at a designated service center after you may need to be made available to you for the replacement CRU if the Service Provider does not receive the defective...replacement CRU. 2. You must provide a suitable working area to allow disassembly and reassembly of your risk and expense. After the product has been repaired or exchanged, it will return the product to you . The service center will be repaired or exchanged after you at Lenovo's risk and expense, unless the Service...

Lenovo IdeaCentre B540-B540P Hardware Maintenance Manual
Page 5
...13 Using passwords 13 Enabling or disabling a device 15 Selecting a startup device 16 Exiting the Lenovo BIOS Setup Utility program . . 17 Chapter 6. Symptom-to-FRU Index . . 19 Hard disk drive boot error 19 Power Supply Problems 19 POST error codes 20 Undetermined problems 20 Chapter 7. Replacing hardware . . . . 27 General information 27 Replacing the keyboard and mouse 28 Replacing the power cord or power adapter . . . 28 Removing the computer cover 29 Removing the computer stand 30 Replacing a memory module 31 Replacing the hard disk drive 32 Replacing the optical drive 33...
...13 Using passwords 13 Enabling or disabling a device 15 Selecting a startup device 16 Exiting the Lenovo BIOS Setup Utility program . . 17 Chapter 6. Symptom-to-FRU Index . . 19 Hard disk drive boot error 19 Power Supply Problems 19 POST error codes 20 Undetermined problems 20 Chapter 7. Replacing hardware . . . . 27 General information 27 Replacing the keyboard and mouse 28 Replacing the power cord or power adapter . . . 28 Removing the computer cover 29 Removing the computer stand 30 Replacing a memory module 31 Replacing the hard disk drive 32 Replacing the optical drive 33...
Lenovo IdeaCentre B540-B540P Hardware Maintenance Manual
Page 19
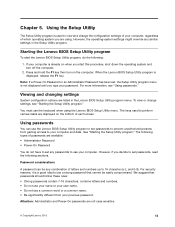
... operating system you are using the Lenovo BIOS Setup Utility menu. We suggest that cannot be any combination of passwords are listed in the Setup Utility program. Viewing and changing settings System configuration options are available: • Administrator Password • Power-On Password You do the following sections. Using passwords You can be easily compromised. Attention: Administrator and Power-On passwords are displayed on when you type your computer. The following types of letters and numbers...
... operating system you are using the Lenovo BIOS Setup Utility menu. We suggest that cannot be any combination of passwords are listed in the Setup Utility program. Viewing and changing settings System configuration options are available: • Administrator Password • Power-On Password You do the following sections. Using passwords You can be easily compromised. Attention: Administrator and Power-On passwords are displayed on when you type your computer. The following types of letters and numbers...
Lenovo IdeaCentre B540-B540P Hardware Maintenance Manual
Page 21
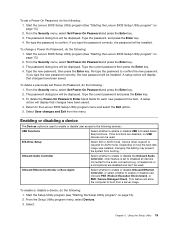
... the Setup Utility program menu, select Devices. 3. Start the Lenovo BIOS Setup Utility program (See "Starting the Lenovo BIOS Setup Utility program" on page 13). 2. From the Security menu, select Set Power-On Password and press the Enter key. 3. The password dialog box will be installed. Type the current password and press the Enter key. 3. To delete the Power-On Password, Enter blank fields for ACHI mode. Enabling or disabling a device The Devices options is used to enable or disable user access to the following : 1. Device driver support is set Power-On Password, do...
... the Setup Utility program menu, select Devices. 3. Start the Lenovo BIOS Setup Utility program (See "Starting the Lenovo BIOS Setup Utility program" on page 13). 2. From the Security menu, select Set Power-On Password and press the Enter key. 3. The password dialog box will be installed. Type the current password and press the Enter key. 3. To delete the Power-On Password, Enter blank fields for ACHI mode. Enabling or disabling a device The Devices options is used to enable or disable user access to the following : 1. Device driver support is set Power-On Password, do...

Lenovo IdeaCentre B540-B540P Hardware Maintenance Manual
Page 22
... turning on page 13). 2. Use the or keys to the Lenovo BIOS Setup Utility program menu and select the Exit option. 6. Select Disabled or Enabled and press the Enter key. 5. Use ↑ and ↓ arrows to save the settings, select Discard changes and Exit from a device such as the CD/DVD-ROM drive disk or hard disk as , press the Enter key and then select SATA mode. Note: Selecting a startup device from or include the device in the boot sequence. 5. Start the Lenovo BIOS Setup Utility...
... turning on page 13). 2. Use the or keys to the Lenovo BIOS Setup Utility program menu and select the Exit option. 6. Select Disabled or Enabled and press the Enter key. 5. Use ↑ and ↓ arrows to save the settings, select Discard changes and Exit from a device such as the CD/DVD-ROM drive disk or hard disk as , press the Enter key and then select SATA mode. Note: Selecting a startup device from or include the device in the boot sequence. 5. Start the Lenovo BIOS Setup Utility...

Lenovo IdeaCentre B540-B540P Hardware Maintenance Manual
Page 26
... video memory c. To purposely configure the computer without a keyboard, select Keyboardless operation in Startup option to the computer. The BIOS was unable to find the failing device or component. Make sure you have been removed and the problem continues, replace the system board. 20 IdeaCentre B540-B540PHardware Maintenance Manual External Cache RAM e. Repeat steps 1 through 3 until you find a suitable boot device. External Cache d. Power-on , it performs a series of tests is working POST Error Message Keyboard error Reboot and...
... video memory c. To purposely configure the computer without a keyboard, select Keyboardless operation in Startup option to the computer. The BIOS was unable to find the failing device or component. Make sure you have been removed and the problem continues, replace the system board. 20 IdeaCentre B540-B540PHardware Maintenance Manual External Cache RAM e. Repeat steps 1 through 3 until you find a suitable boot device. External Cache d. Power-on , it performs a series of tests is working POST Error Message Keyboard error Reboot and...
Lenovo IdeaCentre B540-B540P Hardware Maintenance Manual
Page 30
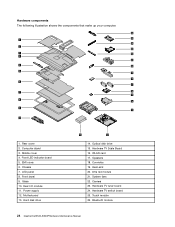
Motherboard 13. Converter 19. Rear cover 2. Front bezel 9. Hard disk drive 11 12 14. WLAN card 17. Heat-sink 20. Hardware TV tuner board 24. Touch module 26. EMI cover 6. LED panel 8. System fans 22. Hardware TV Scale Board 16. Bluetooth module 24 IdeaCentre B540-B540PHardware Maintenance Manual Front LED indicator board 5. Rear I/O module 11. Infra red module 21. Power supply 12. Speakers 18. Hardware components The following illustration shows the components that make up your...
Motherboard 13. Converter 19. Rear cover 2. Front bezel 9. Hard disk drive 11 12 14. WLAN card 17. Heat-sink 20. Hardware TV tuner board 24. Touch module 26. EMI cover 6. LED panel 8. System fans 22. Hardware TV Scale Board 16. Bluetooth module 24 IdeaCentre B540-B540PHardware Maintenance Manual Front LED indicator board 5. Rear I/O module 11. Infra red module 21. Power supply 12. Speakers 18. Hardware components The following illustration shows the components that make up your...
Lenovo IdeaCentre B540-B540P Hardware Maintenance Manual
Page 63
.... Replacing hardware 57 To install the new the LED panel module: a. c. FRU lists This chapter lists the information on the TV scalar board according the below chart for your monitor, adjust the PTV139 DIP switch settings on the field replaceable units (FRUs). d. Install the hard disk drive and optical disk drive data and power connectors to the front bezel. Attach the Bluetooth module to the motherboard and chassis. Reattach the EMI cover, middle cover, optical drive, computer...
.... Replacing hardware 57 To install the new the LED panel module: a. c. FRU lists This chapter lists the information on the TV scalar board according the below chart for your monitor, adjust the PTV139 DIP switch settings on the field replaceable units (FRUs). d. Install the hard disk drive and optical disk drive data and power connectors to the front bezel. Attach the Bluetooth module to the motherboard and chassis. Reattach the EMI cover, middle cover, optical drive, computer...


