Lenovo A600 Will Not Power Up - IdeaCentre 3011 6DU All in One PC
Lenovo A600 Will Not Power Up

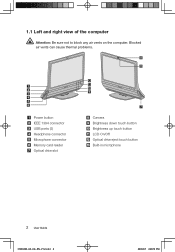
Related Manual Pages


Related Videos

Lenovo IdeaCentre A600 Video Review
Duration: 2:16
Total Views: 5,595
Duration: 2:16
Total Views: 5,595
Lenovo A600 all-in-one Desktop
Duration: 5:33
Total Views: 2,447
Duration: 5:33
Total Views: 2,447
Similar Questions

Several Days Ago My H330 Wouldn't Power On At All. Dead. No Sound, No Lights.
Several days ago my H330 wouldn't power on at all. Dead. No sound, no lights. Moved her to another s...
Several days ago my H330 wouldn't power on at all. Dead. No sound, no lights. Moved her to another s...
(Posted by lasoniret 7 years ago)

Power Supply
want to update power supply , wanted to know what to get ?
want to update power supply , wanted to know what to get ?
(Posted by babyleverton 11 years ago)

Power Saving Mode For B5 All In One Pc
My pc won't come out of power saving mode and screen stays blank, how do I rectify this problem? I h...
My pc won't come out of power saving mode and screen stays blank, how do I rectify this problem? I h...
(Posted by douglasroe 12 years ago)
My 2 Yr Old A600 Will Not Power Up? Suggestions??
(Posted by rolandhouser 12 years ago)