Hardware Maintenance Manual
Page 3
...messages 43 Beep symptoms 44 No-beep symptoms 44 LCD-related symptoms 45 Intermittent problems 46 Undetermined problems 46 ThinkPad T61 and T61p (15.4-inch widescreen 47 Specifications 47 Status indicators 50 FRU tests 53 Fn key combinations 55 FRU... replacement notices 58 Screw notices 58 Retaining serial numbers 59 Removing and replacing a FRU 61 1010 Battery pack 62 1020 Ultrabay Slim device 63 1030 Hard disk drive (HDD) cover, HDD and HDD rubber rails or...view 121 Rear view 122 Bottom view 122 Parts list 123 © Copyright Lenovo 2007, 2011 iii
...messages 43 Beep symptoms 44 No-beep symptoms 44 LCD-related symptoms 45 Intermittent problems 46 Undetermined problems 46 ThinkPad T61 and T61p (15.4-inch widescreen 47 Specifications 47 Status indicators 50 FRU tests 53 Fn key combinations 55 FRU... replacement notices 58 Screw notices 58 Retaining serial numbers 59 Removing and replacing a FRU 61 1010 Battery pack 62 1020 Ultrabay Slim device 63 1030 Hard disk drive (HDD) cover, HDD and HDD rubber rails or...view 121 Rear view 122 Bottom view 122 Parts list 123 © Copyright Lenovo 2007, 2011 iii

Hardware Maintenance Manual
Page 11
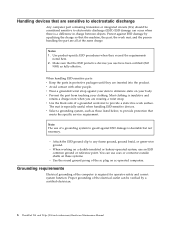
... missing hardware To determine whether there are present, you must not be the type specified in good condition. Check exterior covers for cracked or bulging batteries. 5. Power off , and the power cord disconnected. Check for damage (loose, broken, or sharp edges). 2. Check for : a. Check ...continue without first correcting the problem. Remove the cover. 6. Use a meter to measure third-wire ground continuity for any obvious non-ThinkPad alterations. Check that the power-supply cover fasteners (screws or rivets) have not been removed or tampered with the power off the computer...
... missing hardware To determine whether there are present, you must not be the type specified in good condition. Check exterior covers for cracked or bulging batteries. 5. Power off , and the power cord disconnected. Check for damage (loose, broken, or sharp edges). 2. Check for : a. Check ...continue without first correcting the problem. Remove the cover. 6. Use a meter to measure third-wire ground continuity for any obvious non-ThinkPad alterations. Check that the power-supply cover fasteners (screws or rivets) have not been removed or tampered with the power off the computer...
Hardware Maintenance Manual
Page 12
...Use the black side of the ac plug on your body. You can use coax or connector-outside shells on a double-insulated or battery-operated system, use an ESD common ground or reference point. Use the round ground prong of a grounded work mat, and the person...the computer is especially useful when handling ESD-sensitive devices. v Wear a grounded wrist strap against ESD damage by a certified electrician. 6 ThinkPad T61 and T61p (15.4-inch widescreen) Hardware Maintenance Manual Protect against your clothing. Attach the ESD ground clip to provide protection that meets the specific...
...Use the black side of the ac plug on your body. You can use coax or connector-outside shells on a double-insulated or battery-operated system, use an ESD common ground or reference point. Use the round ground prong of a grounded work mat, and the person...the computer is especially useful when handling ESD-sensitive devices. v Wear a grounded wrist strap against ESD damage by a certified electrician. 6 ThinkPad T61 and T61p (15.4-inch widescreen) Hardware Maintenance Manual Protect against your clothing. Attach the ESD ground clip to provide protection that meets the specific...
Hardware Maintenance Manual
Page 35
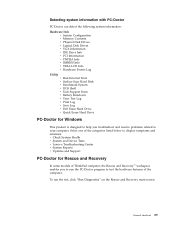
Select one of the categories listed below to display symptoms and solutions: v Check System Health v System and Device Tests v Lenovo Troubleshooting Center v System Reports v Updates and Support PC-Doctor for Windows This product is designed to help you to run the test, click ...Info v SMBIOS Info v VESA LCD Info v Hardware Events Log Utility v Run External Tests v Surface Scan Hard Disk v Benchmark System v DOS Shell v Tech Support Form v Battery Rundown v View Test Log v Print Log v Save Log v Full Erase Hard Drive v Quick Erase Hard Drive PC-Doctor for Rescue and Recovery In some models...
Select one of the categories listed below to display symptoms and solutions: v Check System Health v System and Device Tests v Lenovo Troubleshooting Center v System Reports v Updates and Support PC-Doctor for Windows This product is designed to help you to run the test, click ...Info v SMBIOS Info v VESA LCD Info v Hardware Events Log Utility v Run External Tests v Surface Scan Hard Disk v Benchmark System v DOS Shell v Tech Support Form v Battery Rundown v View Test Log v Print Log v Save Log v Full Erase Hard Drive v Quick Erase Hard Drive PC-Doctor for Rescue and Recovery In some models...
Hardware Maintenance Manual
Page 36
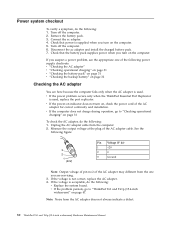
..." v "Checking operational charging" on page 31 v "Checking the battery pack" on page 31 v "Checking the backup battery" on the computer. If the voltage is used . Remove the battery pack. 3. Unplug the AC adapter cable from the AC adapter does not always indicate a defect. 30 ThinkPad T61 and T61p (15.4-inch widescreen) Hardware Maintenance Manual If...
..." v "Checking operational charging" on page 31 v "Checking the battery pack" on page 31 v "Checking the backup battery" on the computer. If the voltage is used . Remove the battery pack. 3. Unplug the AC adapter cable from the AC adapter does not always indicate a defect. 30 ThinkPad T61 and T61p (15.4-inch widescreen) Hardware Maintenance Manual If...

Hardware Maintenance Manual
Page 37
... or from the computer and leave it at least 3 hours, even if the indicator does not turn on , replace the battery pack. Note: If the battery pack becomes hot, it is still not charged, go to + 12.6 Ground (-) 3. After it cools down, reinstall and... recharge it return to 100% of its capacity. If the voltage is more than +11.0 V dc, measure the resistance between battery terminals 1 (+) and 7 (-). Note: Recharging will take at room temperature for a moment (but do the following figure: 7(-) 3 4 5 6(-) 2(+) 1(+) Terminal 1 7 Voltage (V dc) +...
... or from the computer and leave it at least 3 hours, even if the indicator does not turn on , replace the battery pack. Note: If the battery pack becomes hot, it is still not charged, go to + 12.6 Ground (-) 3. After it cools down, reinstall and... recharge it return to 100% of its capacity. If the voltage is more than +11.0 V dc, measure the resistance between battery terminals 1 (+) and 7 (-). Note: Recharging will take at room temperature for a moment (but do the following figure: 7(-) 3 4 5 6(-) 2(+) 1(+) Terminal 1 7 Voltage (V dc) +...
Hardware Maintenance Manual
Page 38
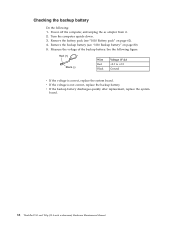
... board. Checking the backup battery Do the following figure. Remove the backup battery (see "1010 Battery pack" on page 80). 5. See the following : 1. Turn the computer upside down. 3. Remove the battery pack (see "1110 Backup battery" on page 62). 4. v If the backup battery discharges quickly after replacement, replace the system board. 32 ThinkPad T61 and T61p (15.4-inch...
... board. Checking the backup battery Do the following figure. Remove the backup battery (see "1010 Battery pack" on page 80). 5. See the following : 1. Turn the computer upside down. 3. Remove the battery pack (see "1110 Backup battery" on page 62). 4. v If the backup battery discharges quickly after replacement, replace the system board. 32 ThinkPad T61 and T61p (15.4-inch...
Hardware Maintenance Manual
Page 41
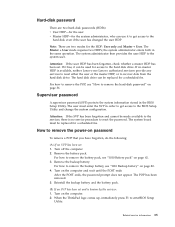
...the power-on page 80. 4. For how to remove the backup battery, see "1110 Backup battery" on password To remove a POP that you have forgotten, do the following: (A) If no master HDP is available, neither Lenovo nor Lenovo authorized servicers provide any services to reset either the user or the ...master HDP, or to reset the password. For how to remove the battery pack, see "How to the hard disk drive. When the ThinkPad logo comes up, immediately press F1 to...
...the power-on page 80. 4. For how to remove the backup battery, see "1110 Backup battery" on password To remove a POP that you have forgotten, do the following: (A) If no master HDP is available, neither Lenovo nor Lenovo authorized servicers provide any services to reset either the user or the ...master HDP, or to reset the password. For how to remove the battery pack, see "How to the hard disk drive. When the ThinkPad logo comes up, immediately press F1 to...
Hardware Maintenance Manual
Page 43
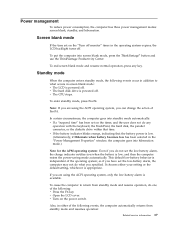
... operation with the keyboard, the TrackPoint, the hard disk, the parallel connector, or the diskette drive within that the battery power is low. (Alternatively, if Hibernate when battery becomes low has been selected in either your setting or the default setting, whichever is independent of the following: v ...Press the Fn key. Note: If you are using the ACPI operating system, you can change the action of Fn+F4. This default low-battery behavior is appropriate. v Turn on the "Turn off monitor" timer in the operating system expires, the LCD backlight turns off. Also, in the...
... operation with the keyboard, the TrackPoint, the hard disk, the parallel connector, or the diskette drive within that the battery power is low. (Alternatively, if Hibernate when battery becomes low has been selected in either your setting or the default setting, whichever is independent of the following: v ...Press the Fn key. Note: If you are using the ACPI operating system, you can change the action of Fn+F4. This default low-battery behavior is appropriate. v Turn on the "Turn off monitor" timer in the operating system expires, the LCD backlight turns off. Also, in the...

Hardware Maintenance Manual
Page 44
... has been set the mode to restart the system. v If you are using the APM operating system and have to Hibernate when battery becomes low, and the battery charge becomes critically low. v If you are using the ACPI operating system and have set on the hard disk. Also, the ...immediately after it and then try to resume normal operation, you will have set on , the computer returns from the hard disk drive. 38 ThinkPad T61 and T61p (15.4-inch widescreen) Hardware Maintenance Manual Note: The computer does not accept any operation with the keyboard, the TrackPoint, the hard ...
... has been set the mode to restart the system. v If you are using the APM operating system and have to Hibernate when battery becomes low, and the battery charge becomes critically low. v If you are using the ACPI operating system and have set on the hard disk. Also, the ...immediately after it and then try to resume normal operation, you will have set on , the computer returns from the hard disk drive. 38 ThinkPad T61 and T61p (15.4-inch widescreen) Hardware Maintenance Manual Note: The computer does not accept any operation with the keyboard, the TrackPoint, the hard ...
Hardware Maintenance Manual
Page 46
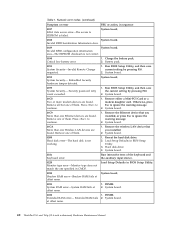
... RAM error-Shadow RAM fails at offset nnnn. 40 ThinkPad T61 and T61p (15.4-inch widescreen) Hardware Maintenance Manual Reseat the hard disk drive. 2. Load Setup Defaults in CMOS. DIMM. Charge the battery pack. 2. Embedded Security hardware tamper detected. Otherwise, ... Keyboard error. DIMM. 2. at offset nnnn. System board. 0188 System board. Invalid RFID Serialization Information Area. 0189 System board. Battery pack. 0191 System Security-Invalid Remote Change requested. 1. Security password retry count exceeded. 1. System board. 0200 Hard disk error-The...
... RAM error-Shadow RAM fails at offset nnnn. 40 ThinkPad T61 and T61p (15.4-inch widescreen) Hardware Maintenance Manual Reseat the hard disk drive. 2. Load Setup Defaults in CMOS. DIMM. Charge the battery pack. 2. Embedded Security hardware tamper detected. Otherwise, ... Keyboard error. DIMM. 2. at offset nnnn. System board. 0188 System board. Invalid RFID Serialization Information Area. 0189 System board. Battery pack. 0191 System Security-Invalid Remote Change requested. 1. Security password retry count exceeded. 1. System board. 0200 Hard disk error-The...
Hardware Maintenance Manual
Page 47
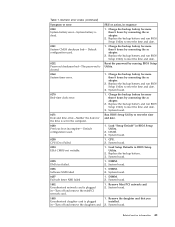
... run BIOS Setup Utility to reset the time and date. 0252 Password checksum bad-The password is cleared. Charge the backup battery for more than 8 hours by connecting the ac adapter. 2. System board. 0271 Date and time error-Neither the date nor the time is ... 02F4 EISA CMOS not writable. 1. System board. 02F7 Fail-safe timer NMI failed 1. in BIOS Setup Utility. 2. Related service information 41 Charge the backup battery for more than 8 hours by connecting the ac adapter. 2. Reset the password by connecting the ac adapter. 2. Run BIOS Setup Utility to reset the time...
... run BIOS Setup Utility to reset the time and date. 0252 Password checksum bad-The password is cleared. Charge the backup battery for more than 8 hours by connecting the ac adapter. 2. System board. 0271 Date and time error-Neither the date nor the time is ... 02F4 EISA CMOS not writable. 1. System board. 02F7 Fail-safe timer NMI failed 1. in BIOS Setup Utility. 2. Related service information 41 Charge the backup battery for more than 8 hours by connecting the ac adapter. 2. Reset the password by connecting the ac adapter. 2. Run BIOS Setup Utility to reset the time...
Hardware Maintenance Manual
Page 49
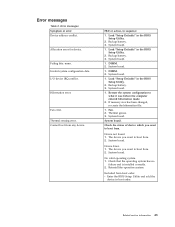
... "Setup Defaults" in sequence 1. System board. Error messages Symptom or error Device address conflict. Backup battery. 3. System board. 1. System board. System board. Device not found. 1. System board. No valid operating system. 1. System board..... Failing bits: nnnn. I/O device IRQ conflict. Hibernation error. Fan error. System board. 1. System board. 1. System board. 1. DIMM. 2. Backup battery. 3. If memory size has been changed, re-create the hibernation file. 1. The device you want to boot from . Device Error. 1. The device ...
... "Setup Defaults" in sequence 1. System board. Error messages Symptom or error Device address conflict. Backup battery. 3. System board. 1. System board. System board. Device not found. 1. System board. No valid operating system. 1. System board..... Failing bits: nnnn. I/O device IRQ conflict. Hibernation error. Fan error. System board. 1. System board. 1. System board. 1. DIMM. 2. Backup battery. 3. If memory size has been changed, re-create the hibernation file. 1. The device you want to boot from . Device Error. 1. The device ...
Hardware Maintenance Manual
Page 52
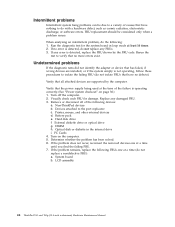
...detected, do not replace a nondefective FRU): a. Verify that the power supply being used at a time (do not replace any damaged FRU. 3. Non-ThinkPad devices b. External diskette drive or optical drive g. Turn on page 30.) 1. PC Cards 4. FRU replacement should be due to a variety of causes that... system hang problems can be considered only when a problem recurs. Verify that no defects). Printer, mouse, and other external devices d. Battery pack e. System board b. LCD assembly 46 ThinkPad T61 and T61p (15.4-inch widescreen) Hardware Maintenance Manual
...detected, do not replace a nondefective FRU): a. Verify that the power supply being used at a time (do not replace any damaged FRU. 3. Non-ThinkPad devices b. External diskette drive or optical drive g. Turn on page 30.) 1. PC Cards 4. FRU replacement should be due to a variety of causes that... system hang problems can be considered only when a problem recurs. Verify that no defects). Printer, mouse, and other external devices d. Battery pack e. System board b. LCD assembly 46 ThinkPad T61 and T61p (15.4-inch widescreen) Hardware Maintenance Manual
Hardware Maintenance Manual
Page 55
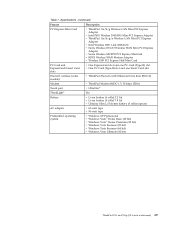
... Slim Li Polymer battery (3 cells) (option) AC adapter v 65-watt type v 90-watt type Preinstalled operating system v Windows XP Professional v Windows Vista™ Home Basic (32 bit) v Windows Vista™ Home Premium (32 bit) v Windows Vista Business (32 bit) v Windows Vista Business (64 bit) v Windows Vista Ultimate (32 bit) ThinkPad T61 and T61p...
... Slim Li Polymer battery (3 cells) (option) AC adapter v 65-watt type v 90-watt type Preinstalled operating system v Windows XP Professional v Windows Vista™ Home Basic (32 bit) v Windows Vista™ Home Premium (32 bit) v Windows Vista Business (32 bit) v Windows Vista Business (64 bit) v Windows Vista Ultimate (32 bit) ThinkPad T61 and T61p...

Hardware Maintenance Manual
Page 57
...is on and not in use Green: Data is being transmitted. 4 Num lock Green: The numeric keypad on . Blinking green: Data is enabled. ThinkPad T61 and T61p (15.4-inch widescreen) 51 To enable or disable the keypad, press and hold the Shift key, and press the NumLk (ScrLk) key. ...power supply. 10 Standby status Green: The computer is charged between 20% to 80% of the capacity, and being transmitted. Blinking orange (rapid): The battery is charged between 0% to 5% of the capacity. 9 AC power status Green: The computer is ready for use . Green: Wireless PAN (Bluetooth ...
...is on and not in use Green: Data is being transmitted. 4 Num lock Green: The numeric keypad on . Blinking green: Data is enabled. ThinkPad T61 and T61p (15.4-inch widescreen) 51 To enable or disable the keypad, press and hold the Shift key, and press the NumLk (ScrLk) key. ...power supply. 10 Standby status Green: The computer is charged between 20% to 80% of the capacity, and being transmitted. Blinking orange (rapid): The battery is charged between 0% to 5% of the capacity. 9 AC power status Green: The computer is ready for use . Green: Wireless PAN (Bluetooth ...
Hardware Maintenance Manual
Page 59
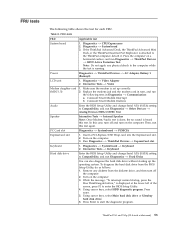
...from the BIOS Setup Utility, do as follows: 1. Power Diagnostics --> ThinkPad Devices --> AC Adapter, Battery 1 (Battery2) LCD unit 1. Diagnostics --> Video Adapter 2. Make sure the modem is heard this test. Run Diagnostics --> ThinkPad Devices --> ExpressCard slot. 1. While the message, "To interrupt normal ...running. Press Enter to enter the BIOS Setup Utility. 4. Insert a PCI-Express/USB Wrap card into the ExpressCard slot. 2. ThinkPad T61 and T61p (15.4-inch widescreen) 53 Diagnostics --> Systemboard 3. Replace the modem jack and the modem card in turn, and run...
...from the BIOS Setup Utility, do as follows: 1. Power Diagnostics --> ThinkPad Devices --> AC Adapter, Battery 1 (Battery2) LCD unit 1. Diagnostics --> Video Adapter 2. Make sure the modem is heard this test. Run Diagnostics --> ThinkPad Devices --> ExpressCard slot. 1. While the message, "To interrupt normal ...running. Press Enter to enter the BIOS Setup Utility. 4. Insert a PCI-Express/USB Wrap card into the ExpressCard slot. 2. ThinkPad T61 and T61p (15.4-inch widescreen) 53 Diagnostics --> Systemboard 3. Replace the modem jack and the modem card in turn, and run...
Hardware Maintenance Manual
Page 67
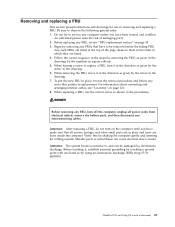
...the computer. To put the new FRU in place, reverse the removal procedure and follow any computer unless you have been trained and certified. ThinkPad T61 and T61p (15.4-inch widescreen) 61 When replacing a FRU, use in removing and replacing a FRU. Metallic parts or metal flakes can ...connecting and arranging internal cables, see "Locations" on the computer until you have made sure that all power cords from electrical outlets, remove the battery pack, and then disconnect any FRU, review "FRU replacement notices" on page 58. 3. Be sure to , and can cause electrical short ...
...the computer. To put the new FRU in place, reverse the removal procedure and follow any computer unless you have been trained and certified. ThinkPad T61 and T61p (15.4-inch widescreen) 61 When replacing a FRU, use in removing and replacing a FRU. Metallic parts or metal flakes can ...connecting and arranging internal cables, see "Locations" on the computer until you have made sure that all power cords from electrical outlets, remove the battery pack, and then disconnect any FRU, review "FRU replacement notices" on page 58. 3. Be sure to , and can cause electrical short ...

Hardware Maintenance Manual
Page 68
Table 11. 1010 Battery pack DANGER Use only the battery specified in the locked position. 62 ThinkPad T61 and T61p (15.4-inch widescreen) Hardware Maintenance Manual Then make sure that the battery release lever is in the parts list for your computer. Holding the battery release lever in the unlocked position 2 , remove the battery pack in the direction shown by arrow 3. 1 2 3 When installing: Install the battery pack along the slide rails of battery pack Unlock the battery release lever 1 . Removal steps of the slot. Any other battery could ignite or explode.
Table 11. 1010 Battery pack DANGER Use only the battery specified in the locked position. 62 ThinkPad T61 and T61p (15.4-inch widescreen) Hardware Maintenance Manual Then make sure that the battery release lever is in the parts list for your computer. Holding the battery release lever in the unlocked position 2 , remove the battery pack in the direction shown by arrow 3. 1 2 3 When installing: Install the battery pack along the slide rails of battery pack Unlock the battery release lever 1 . Removal steps of the slot. Any other battery could ignite or explode.
Hardware Maintenance Manual
Page 70
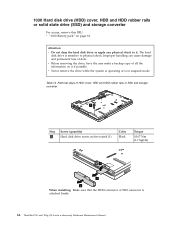
v Never remove the drive while the system is operating or is attached firmly. 64 ThinkPad T61 and T61p (15.4-inch widescreen) Hardware Maintenance Manual Removal steps of HDD cover, HDD and HDD rubber rails or SSD and storage converter 1 Step 1 Screw (.... 1030 Hard disk drive (HDD) cover, HDD and HDD rubber rails or solid state drive (SSD) and storage converter For access, remove this FRU: v "1010 Battery pack" on it .
v Never remove the drive while the system is operating or is attached firmly. 64 ThinkPad T61 and T61p (15.4-inch widescreen) Hardware Maintenance Manual Removal steps of HDD cover, HDD and HDD rubber rails or SSD and storage converter 1 Step 1 Screw (.... 1030 Hard disk drive (HDD) cover, HDD and HDD rubber rails or solid state drive (SSD) and storage converter For access, remove this FRU: v "1010 Battery pack" on it .


