
Owner's Manual
Page 5
.... ● Store the battery out of reach of children. ● Be careful that you can call cannot be applied to products provided by LG. The warranty will not be placed due to avoid electric shock or fire. ● Only use the batteries and chargers provided by other suppliers....consequently invalidate the warranty. ● Your service provider programs one or more emergency phone numbers, such as animal's teeth or nails, come into contact with the battery. Faulty installation or service may not work in serious injury or death. ● Unplug the power cord and charger during ...
.... ● Store the battery out of reach of children. ● Be careful that you can call cannot be applied to products provided by LG. The warranty will not be placed due to avoid electric shock or fire. ● Only use the batteries and chargers provided by other suppliers....consequently invalidate the warranty. ● Your service provider programs one or more emergency phone numbers, such as animal's teeth or nails, come into contact with the battery. Faulty installation or service may not work in serious injury or death. ● Unplug the power cord and charger during ...
Owner's Manual
Page 6
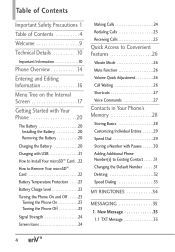
... 25 Quick Access to Convenient Features 26 Vibrate Mode 26 Mute Function 26 Volume Quick Adjustment 26 Call Waiting 26 Shortcuts 27 Voice Commands 27 Contacts in Your Phone's Memory 28 Storing Basics 28 Customizing Individual Entries . . . . . .29 Speed Dial 29 Storing a Number with Pauses . . . . . .30 Adding Additional Phone Number(s) to...
... 25 Quick Access to Convenient Features 26 Vibrate Mode 26 Mute Function 26 Volume Quick Adjustment 26 Call Waiting 26 Shortcuts 27 Voice Commands 27 Contacts in Your Phone's Memory 28 Storing Basics 28 Customizing Individual Entries . . . . . .29 Speed Dial 29 Storing a Number with Pauses . . . . . .30 Adding Additional Phone Number(s) to...
Owner's Manual
Page 7
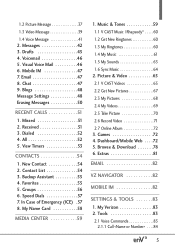
... 3. Drafts 45 4. All 52 5. My Name Card 58 MEDIA CENTER 59 1. Messages 42 3. Mobile IM 47 7. Contact List 54 3. Games 72 4. Backup Assistant 55 4. My Verizon 83 2. Voicemail 46 5. View Timers 53 CONTACTS 54 1. Music & Tones 59 1.1 V CAST Music | Rhapsody® . . . . .60 1.2 Get New ... Sounds 63 1.6 Sync Music 64 2. Dialed 52 4. Groups 56 6. Tools 83 2.1 Voice Commands 83 2.1.1 Call . . . .84 5 New Contact 54 2. Dashboard/Mobile Web . . . .72 5. Chat 47 9. 1.2 Picture Message 37 1.3 Video Message 39 1.4 Voice Message 41 2.
... 3. Drafts 45 4. All 52 5. My Name Card 58 MEDIA CENTER 59 1. Messages 42 3. Mobile IM 47 7. Contact List 54 3. Games 72 4. Backup Assistant 55 4. My Verizon 83 2. Voicemail 46 5. View Timers 53 CONTACTS 54 1. Music & Tones 59 1.1 V CAST Music | Rhapsody® . . . . .60 1.2 Get New ... Sounds 63 1.6 Sync Music 64 2. Dialed 52 4. Groups 56 6. Tools 83 2.1 Voice Commands 83 2.1.1 Call . . . .84 5 New Contact 54 2. Dashboard/Mobile Web . . . .72 5. Chat 47 9. 1.2 Picture Message 37 1.3 Video Message 39 1.4 Voice Message 41 2.
Owner's Manual
Page 8
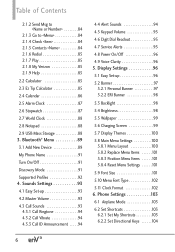
Table of Contents 2.1.2 Send Msg to
Table of Contents 2.1.2 Send Msg to

Owner's Manual
Page 13
and international standards bodies. Bodily Contact During Operation This device was tested for typical use with the back of this phone complies with the FCC guidelines and these international standards. Those ...
and international standards bodies. Bodily Contact During Operation This device was tested for typical use with the back of this phone complies with the FCC guidelines and these international standards. Those ...
Owner's Manual
Page 14
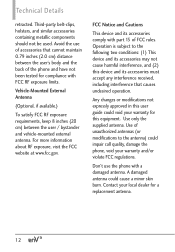
... compliance with FCC RF exposure limits. For more information about RF exposure, visit the FCC website at www.fcc.gov. Use only the supplied antenna. Contact your warranty and/or violate FCC regulations. FCC Notice and Cautions This device and its accessories comply with a damaged antenna. Technical Details retracted. Third-party...
... compliance with FCC RF exposure limits. For more information about RF exposure, visit the FCC website at www.fcc.gov. Use only the supplied antenna. Contact your warranty and/or violate FCC regulations. FCC Notice and Cautions This device and its accessories comply with a damaged antenna. Technical Details retracted. Third-party...
Owner's Manual
Page 16
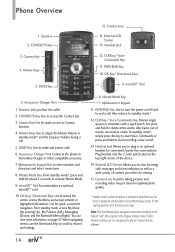
...unlock the screen, access the Menu, and accept entered or highlighted information. When navigating menus, use the Directional Keys to scroll to access the Contact List. 3. Camera Lens Used for quick, convenient navigation. SEND Key 9. Keep it clean for viewing. 15. Headset Jack 3. PWR/END... Key Use to plug in the Display Settings menu. CONTACTS Key Use to choices and settings. 8. Note: This User Manual gives navigation instructions according to the battery charger, or other themes or menus...
...unlock the screen, access the Menu, and accept entered or highlighted information. When navigating menus, use the Directional Keys to scroll to access the Contact List. 3. Camera Lens Used for quick, convenient navigation. SEND Key 9. Keep it clean for viewing. 15. Headset Jack 3. PWR/END... Key Use to plug in the Display Settings menu. CONTACTS Key Use to choices and settings. 8. Note: This User Manual gives navigation instructions according to the battery charger, or other themes or menus...
Owner's Manual
Page 17
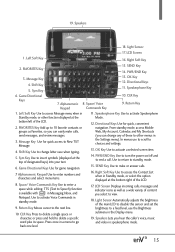
...at the bottom right of the main LCD to disable this sensor and set the brightness to a fixed level, use to scroll to 10 favorite contacts or groups as a wide variety of content you can easily make or answer calls. 16. Space/ Voice Keypad Commands Key 15. OK Key ...Use to activate a selected screen item. 14. Directional Keys Use for game navigation. 7. Speakers 18. Return Key 1. Right Soft Key Use to access the Contact List when in speakerphone mode. 15 Shift Key 5. OK Key Use to enter numbers and characters and select menu items. 8. Sym Key 6. Speakerphone Key ...
...at the bottom right of the main LCD to disable this sensor and set the brightness to a fixed level, use to scroll to 10 favorite contacts or groups as a wide variety of content you can easily make or answer calls. 16. Space/ Voice Keypad Commands Key 15. OK Key ...Use to activate a selected screen item. 14. Directional Keys Use for game navigation. 7. Speakers 18. Return Key 1. Right Soft Key Use to access the Contact List when in speakerphone mode. 15 Shift Key 5. OK Key Use to enter numbers and characters and select menu items. 8. Sym Key 6. Speakerphone Key ...
Owner's Manual
Page 18
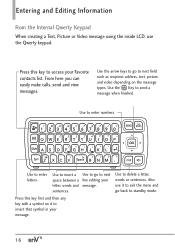
... first and then any key with a symbol on the message types. Use the arrow keys to go back to insert that symbol in your Favorite contacts list. Use to next field such as recipient address, text, picture and video depending on it to exit the menu and go to delete a letter...
... first and then any key with a symbol on the message types. Use the arrow keys to go back to insert that symbol in your Favorite contacts list. Use to next field such as recipient address, text, picture and video depending on it to exit the menu and go to delete a letter...
Owner's Manual
Page 19
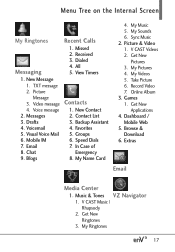
Missed 2. Video message Contacts 4. Messages 2. Backup Assistant 4. Favorites 5. Speed Dials 7. Blogs 8. My Pictures 4. Take Picture 6. Online Album 3. Dashboard / Mobile Web 5. Browse & Download 6....Message 3. Voice message 1. Mobile IM 6. In Case of 8. My Name Card 4. Sync Music 2. Record Video 7. Games 1. My Ringtones 17 New Contact 2. Get New Pictures 3. View Timers 1. Contact List 3. My Sounds 6. V CAST Videos 2. Extras Email Media Center 1. Voicemail 4. Groups 6. Picture & Video 1. Email 7. My Videos 5. Visual...
Missed 2. Video message Contacts 4. Messages 2. Backup Assistant 4. Favorites 5. Speed Dials 7. Blogs 8. My Pictures 4. Take Picture 6. Online Album 3. Dashboard / Mobile Web 5. Browse & Download 6....Message 3. Voice message 1. Mobile IM 6. In Case of 8. My Name Card 4. Sync Music 2. Record Video 7. Games 1. My Ringtones 17 New Contact 2. Get New Pictures 3. View Timers 1. Contact List 3. My Sounds 6. V CAST Videos 2. Extras Email Media Center 1. Voicemail 4. Groups 6. Picture & Video 1. Email 7. My Videos 5. Visual...
Owner's Manual
Page 30
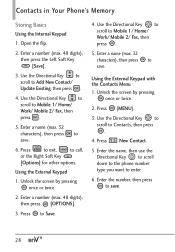
... 32 characters), then press to save . 6. Unlock the screen by pressing once or twice. 2. Use the Directional Key to scroll to save. Press New Contact. 5. Enter a name (max. 32 characters), then press to Mobile 1/ Home/ Work/ Mobile 2/ Fax, then press . 5. Enter a number (max...Soft Key [Options] for other options. Press to exit, to Add New Contact/ Update Existing, then press . 4. Using the External Keypad 1. Contacts in Your Phone's Memory Storing Basics Using the Internal Keypad 1. Press to Contacts, then press . 4. Use the Directional Key to scroll to Save. ...
... 32 characters), then press to save . 6. Unlock the screen by pressing once or twice. 2. Use the Directional Key to scroll to save. Press New Contact. 5. Enter a name (max. 32 characters), then press to Mobile 1/ Home/ Work/ Mobile 2/ Fax, then press . 5. Enter a number (max...Soft Key [Options] for other options. Press to exit, to Add New Contact/ Update Existing, then press . 4. Using the External Keypad 1. Contacts in Your Phone's Memory Storing Basics Using the Internal Keypad 1. Press to Contacts, then press . 4. Use the Directional Key to scroll to Save. ...
Owner's Manual
Page 31
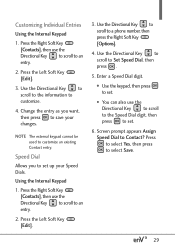
... use the Directional Key to scroll to Contact? Change the entry as you to set . 6. Screen prompt appears Assign Speed Dial to an entry. 2. Using ... Entries Using the Internal Keypad 1. NOTE The external keypad cannot be used to an entry. 2. Press the Right Soft Key [Contacts], then use the Directional Key to scroll to the Speed Dial digit, then press to save your Speed Dials. Press the Left..., then press to set. ● You can also use the Directional Key to scroll to customize an existing Contact entry. Speed Dial Allows you want, then press to set up your changes.
... use the Directional Key to scroll to Contact? Change the entry as you to set . 6. Screen prompt appears Assign Speed Dial to an entry. 2. Using ... Entries Using the Internal Keypad 1. NOTE The external keypad cannot be used to an entry. 2. Press the Right Soft Key [Contacts], then use the Directional Key to scroll to the Speed Dial digit, then press to save your Speed Dials. Press the Left..., then press to set. ● You can also use the Directional Key to scroll to customize an existing Contact entry. Speed Dial Allows you want, then press to set up your changes.

Owner's Manual
Page 32
...the next string of numbers to Add 2-Sec Pause or Add Wait, then press . 4. Enter a number, then press [OPTIONS]. 3. Complete the Contact entry as necessary. Enter additional number(s) (e.g., pin number, credit card number, etc.). 4. Pause types are: Wait (W) The phone stops dialing until... you to enter additional series of digits. Complete the Contact entry as necessary. 30 Use the Directional Key to scroll to access automated systems such as Voicemail or credit billing numbers. Unlock the ...
...the next string of numbers to Add 2-Sec Pause or Add Wait, then press . 4. Enter a number, then press [OPTIONS]. 3. Complete the Contact entry as necessary. Enter additional number(s) (e.g., pin number, credit card number, etc.). 4. Pause types are: Wait (W) The phone stops dialing until... you to enter additional series of digits. Complete the Contact entry as necessary. 30 Use the Directional Key to scroll to access automated systems such as Voicemail or credit billing numbers. Unlock the ...
Owner's Manual
Page 33
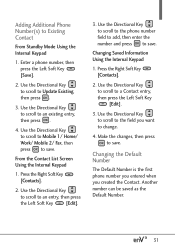
... the Directional Key to scroll to Mobile 1/ Home/ Work/ Mobile 2/ Fax, then press to save . Make the changes, then press to save . From the Contact List Screen Using the Internal Keypad 1. Changing the Default Number The Default Number is the first phone number you entered when you want to the... field you created the Contact. Use the Directional Key to scroll to an existing entry, then press . 4. Use the Directional Key to scroll to the phone number ...
... the Directional Key to scroll to Mobile 1/ Home/ Work/ Mobile 2/ Fax, then press to save . Make the changes, then press to save . From the Contact List Screen Using the Internal Keypad 1. Changing the Default Number The Default Number is the first phone number you entered when you want to the... field you created the Contact. Use the Directional Key to scroll to an existing entry, then press . 4. Use the Directional Key to scroll to the phone number ...

Owner's Manual
Page 34
...set the new number as the default. 7. A confirmation message is displayed. NOTE This will only work when you have more than one number listed per contact. Press to highlight Set As Default, then press . 6. Use the Directional Key to scroll to a phone number. 5. Press the Left Soft Key... [Edit]. 4. Deleting Deleting a Phone Number Using the Internal Keypad 1. Use the Directional Key to scroll to an entry. 3. Deleting a Contact Entry Using the Internal Keypad 1. Use the Directional Key to scroll to edit and press [VIEW]. 32 Use the Directional Key to highlight...
...set the new number as the default. 7. A confirmation message is displayed. NOTE This will only work when you have more than one number listed per contact. Press to highlight Set As Default, then press . 6. Use the Directional Key to scroll to a phone number. 5. Press the Left Soft Key... [Edit]. 4. Deleting Deleting a Phone Number Using the Internal Keypad 1. Use the Directional Key to scroll to an entry. 3. Deleting a Contact Entry Using the Internal Keypad 1. Use the Directional Key to scroll to edit and press [VIEW]. 32 Use the Directional Key to highlight...
Owner's Manual
Page 35
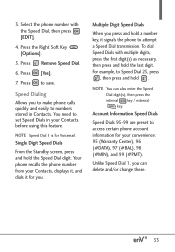
... it, and dials it signals the phone to set Speed Dials in Contacts. Press to Speed Dial 25, press , then press and hold a number key, it for Voicemail. You need to attempt a Speed Dial transmission. To dial Speed ... the Speed Dial digit. Multiple Digit Speed Dials When you to make phone calls quickly and easily to access certain phone account information for your Contacts before using this feature. NOTE You can delete and/or change these. 33 Press the Right Soft Key [Options]. 5. Speed Dialing Allows you press and...
... it, and dials it signals the phone to set Speed Dials in Contacts. Press to Speed Dial 25, press , then press and hold a number key, it for Voicemail. You need to attempt a Speed Dial transmission. To dial Speed ... the Speed Dial digit. Multiple Digit Speed Dials When you to make phone calls quickly and easily to access certain phone account information for your Contacts before using this feature. NOTE You can delete and/or change these. 33 Press the Right Soft Key [Options]. 5. Speed Dialing Allows you press and...
Owner's Manual
Page 36
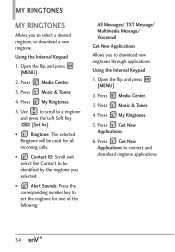
... a ringtone and press the Left Soft Key [Set As]. ● Ringtone: The selected Ringtone will be used for all incoming calls. ● Contact ID: Scroll and select the Contact to be identified by the ringtone you selected. ● Alert Sounds: Press the corresponding number key to set the ringtone for one of...
... a ringtone and press the Left Soft Key [Set As]. ● Ringtone: The selected Ringtone will be used for all incoming calls. ● Contact ID: Scroll and select the Contact to be identified by the ringtone you selected. ● Alert Sounds: Press the corresponding number key to set the ringtone for one of...
Owner's Manual
Page 38
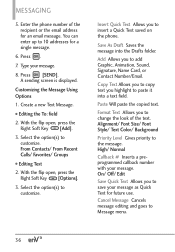
... the copied text. Cancel Message Cancels message editing and goes to add Graphic, Animation, Sound, Signature, Name Card, or Contact Number/Email. MESSAGING 5. Create a new Text Message. ● Editing the To: field 2. From Contacts/ From Recent Calls/ Favorites/ Groups ● Editing Text 2. You can enter up to save your message as Quick...
... the copied text. Cancel Message Cancels message editing and goes to add Graphic, Animation, Sound, Signature, Name Card, or Contact Number/Email. MESSAGING 5. Create a new Text Message. ● Editing the To: field 2. From Contacts/ From Recent Calls/ Favorites/ Groups ● Editing Text 2. You can enter up to save your message as Quick...
Owner's Manual
Page 39
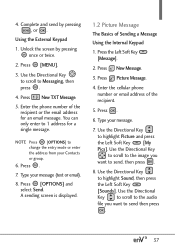
... Picture Message. 4. You can only enter to send then press . 37 Use the Directional Key to Messaging, then press . 4. Press New TXT Message. 5. Type your Contacts or group. 6. Use the Directional Key to scroll to the image you want to highlight Picture and press the Left Soft Key [My Pics]. Press...
... Picture Message. 4. You can only enter to send then press . 37 Use the Directional Key to Messaging, then press . 4. Press New TXT Message. 5. Type your Contacts or group. 6. Use the Directional Key to scroll to the image you want to highlight Picture and press the Left Soft Key [My Pics]. Press...
Owner's Manual
Page 40
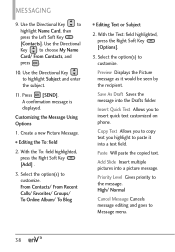
...Key to highlight Subject and enter the subject. 11. Use the Directional Key to highlight Name Card, then press the Left Soft Key [Contacts]. Select the option(s) to insert quick text customized on phone. Paste Will paste the copied text. Insert Quick Text Allows you highlight to...To: field 2. Preview Displays the Picture message as it into a text field. Use the Directional Key to choose My Name Card/ From Contacts, and press . 10. From Contacts/ From Recent Calls/ Favorites/ Groups/ To Online Album/ To Blog ● Editing Text or Subject 2. With the To: field highlighted...
...Key to highlight Subject and enter the subject. 11. Use the Directional Key to highlight Name Card, then press the Left Soft Key [Contacts]. Select the option(s) to insert quick text customized on phone. Paste Will paste the copied text. Insert Quick Text Allows you highlight to...To: field 2. Preview Displays the Picture message as it into a text field. Use the Directional Key to choose My Name Card/ From Contacts, and press . 10. From Contacts/ From Recent Calls/ Favorites/ Groups/ To Online Album/ To Blog ● Editing Text or Subject 2. With the To: field highlighted...


