
Owners Manual
Page 3
... Movie file 31 Playing a DVD VR format Disc 32 Additional Operation 33 Controlling other TVs with tape 20-23 Playing a tape 20 CM (Commercial Message) Skip 20 OPR (Optimum Picture Response 20 Instant Timer Recording 21 Timer recording using On Screen Display . . . 22-23 Additional Operation - VCR part 24-26 Hi-Fi...
... Movie file 31 Playing a DVD VR format Disc 32 Additional Operation 33 Controlling other TVs with tape 20-23 Playing a tape 20 CM (Commercial Message) Skip 20 OPR (Optimum Picture Response 20 Instant Timer Recording 21 Timer recording using On Screen Display . . . 22-23 Additional Operation - VCR part 24-26 Hi-Fi...
Owners Manual
Page 6
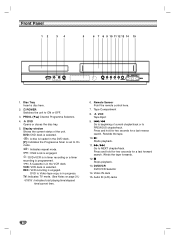
... 12. PROG. (V/v) Channel Programme Selectors. 4. VCR: VCR deck is engaged. REC: VCR recording is selected. Video IN Jack 15. VCR Tape Eject 9. ./m Go to beginning of the unit. DVD: DVD deck is selected. : A disc is loaded in the DVD deck. [P]: Indicates the Progressive Scan is set to...total playing time/elapsed time/current time. 6. Tape Compartment 8. DVD to On mode. : Indicates repeat mode. : Child Lock is engaged. : DVD+VCR is in timer recording or a timer recording is programmed. : A Cassette is in the VCR deck. Press and hold for two seconds for a fast ...
... 12. PROG. (V/v) Channel Programme Selectors. 4. VCR: VCR deck is engaged. REC: VCR recording is selected. Video IN Jack 15. VCR Tape Eject 9. ./m Go to beginning of the unit. DVD: DVD deck is selected. : A disc is loaded in the DVD deck. [P]: Indicates the Progressive Scan is set to...total playing time/elapsed time/current time. 6. Tape Compartment 8. DVD to On mode. : Indicates repeat mode. : Child Lock is engaged. : DVD+VCR is in timer recording or a timer recording is programmed. : A Cassette is in the VCR deck. Press and hold for two seconds for a fast ...
Owners Manual
Page 7
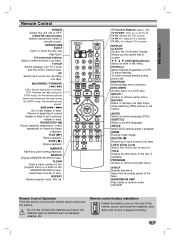
..., track, title, all. DISPLAY CLK/CNT Access the On-Screen Display. AUDIO Select an audio language (DVD). AAA Introduction Remote Control POWER Switch this unit ON or OFF. DVD/VCR select button Selects operational mode of VCR. VCR: Rewinds the tape during the STOP mode, for fast reverse picture search and Advances the tape during...
..., track, title, all. DISPLAY CLK/CNT Access the On-Screen Display. AUDIO Select an audio language (DVD). AAA Introduction Remote Control POWER Switch this unit ON or OFF. DVD/VCR select button Selects operational mode of VCR. VCR: Rewinds the tape during the STOP mode, for fast reverse picture search and Advances the tape during...

Owners Manual
Page 8
... to an amplifier, receiver or stereo system. AUDIO OUT (Left/Right) (DVD/VCR OUT) Connect to an amplifier, receiver or stereo system. Pr R R L L Pb Y AC Power Cord Connect to a TV with S-Video input. S-VIDEO OUT (DVD EXCLUSIVE OUT) Connect to a power source. Electrostatic discharge may cause permanent damage... Pr inputs. Do not touch the inner pins of the jacks on the rear panel. VIDEO OUT (DVD/VCR OUT) Connect to your TV using this jack. AUDIO IN (Left/Right) (VCR IN AV1) Receive the audio signals from an external source to digital (coaxial) audio equipment. COAXIAL ...
... to an amplifier, receiver or stereo system. AUDIO OUT (Left/Right) (DVD/VCR OUT) Connect to an amplifier, receiver or stereo system. Pr R R L L Pb Y AC Power Cord Connect to a TV with S-Video input. S-VIDEO OUT (DVD EXCLUSIVE OUT) Connect to a power source. Electrostatic discharge may cause permanent damage... Pr inputs. Do not touch the inner pins of the jacks on the rear panel. VIDEO OUT (DVD/VCR OUT) Connect to your TV using this jack. AUDIO IN (Left/Right) (VCR IN AV1) Receive the audio signals from an external source to digital (coaxial) audio equipment. COAXIAL ...

Owners Manual
Page 9
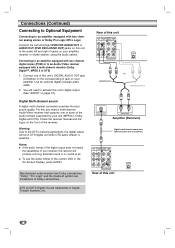
Preparation Connections Caution: Make sure this unit's DVD/VCR OUT to the video in jack on the TV using the ...not work with the S-video cable. Connect the Left and Right AUDIO OUT jacks of this unit's DVD/VCR OUT to the audio left /right in jacks on the TV using the S-Video cable (S). 2. Connect the...If your television's Antenna Input (R). When using the COMPONENT/PROGRESSIVE SCAN VIDEO OUT jacks, set the TV' s input to "On" on the DVD Player. 1. Rear of TV AERIAL VIDEO INPUT COMPONENT VIDEO INPUT /PROGRESSIVE SCAN AUDIO INPUT S-VIDEO INPUT Pr Pb Y L R R V ...
Preparation Connections Caution: Make sure this unit's DVD/VCR OUT to the video in jack on the TV using the ...not work with the S-video cable. Connect the Left and Right AUDIO OUT jacks of this unit's DVD/VCR OUT to the audio left /right in jacks on the TV using the S-Video cable (S). 2. Connect the...If your television's Antenna Input (R). When using the COMPONENT/PROGRESSIVE SCAN VIDEO OUT jacks, set the TV' s input to "On" on the DVD Player. 1. Rear of TV AERIAL VIDEO INPUT COMPONENT VIDEO INPUT /PROGRESSIVE SCAN AUDIO INPUT S-VIDEO INPUT Pr Pb Y L R R V ...
Owners Manual
Page 10
... to the audio left and right in the On-Screen Display, press AUDIO. For this unit Pr R R L L Pb Y DVD/VCR OUT or DVD exclusive out COAXIAL DIGITAL INPUT L R AUDIO INPUT Amplifier (Receiver) Digital multi-channel connection (DVD exclusive out connecttion) Pr R R L L Pb Y Rear of Dolby Laboratories. "Dolby", "Pro Logic" and the double-D symbol...) or to an Audio/ Video receiver equipped with two channel analog stereo or Dolby Pro Logic II/Pro Logic Connect the Left and Right DVD/VCR AUDIO OUT or AUDIO OUT (DVD EXCLUSIVE OUT) jacks on this unit to activate this unit 10
... to the audio left and right in the On-Screen Display, press AUDIO. For this unit Pr R R L L Pb Y DVD/VCR OUT or DVD exclusive out COAXIAL DIGITAL INPUT L R AUDIO INPUT Amplifier (Receiver) Digital multi-channel connection (DVD exclusive out connecttion) Pr R R L L Pb Y Rear of Dolby Laboratories. "Dolby", "Pro Logic" and the double-D symbol...) or to an Audio/ Video receiver equipped with two channel analog stereo or Dolby Pro Logic II/Pro Logic Connect the Left and Right DVD/VCR AUDIO OUT or AUDIO OUT (DVD EXCLUSIVE OUT) jacks on this unit to activate this unit 10
Owners Manual
Page 11
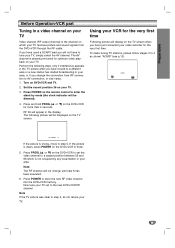
... the stand by any local station in step 4, do not retune your TV. 3. Set the vacant position 36 on the remote control to the new DVD+VCR RF channel. Press POWER to 4 as shown "ACMS" (see p.13). If the picture is snowy, move to tune your area. Press POWER on your TV.... 11 ACMS Pr-12 ACMS OK i RF CHANNEL 36 If the picture is clean, press POWER on DVD+VCR and TV. 2. Note If the TV picture was clear in your TV, simply select the AV channel. The AV channel is already pre-tuned for...
... the stand by any local station in step 4, do not retune your TV. 3. Set the vacant position 36 on the remote control to the new DVD+VCR RF channel. Press POWER to 4 as shown "ACMS" (see p.13). If the picture is snowy, move to tune your area. Press POWER on your TV.... 11 ACMS Pr-12 ACMS OK i RF CHANNEL 36 If the picture is clean, press POWER on DVD+VCR and TV. 2. Note If the TV picture was clear in your TV, simply select the AV channel. The AV channel is already pre-tuned for...

Owners Manual
Page 12
... 2 to select SET. HH MM DD MM YY 12 SET i 2. e.g. 1pm will appear on the remote control to select the RF AUDIO. Please note your DVD+VCR. 1. The day of the week will appear automatically when you make a mistake press b or B and enter the correct details. 4. HH MM DD MM YY 8... ENTER/OK. If you enter the year. 12 SET SYS f OSD SYS ON OFF i 5. Before Operation-VCR part Setting the clock Manually The clock in your DVD+VCR controls time and date settings for your DVD+VCR uses a 24 hour clock. The main menu will be displayed as 13:00. Press 3 or 4 to ...
... 2 to select SET. HH MM DD MM YY 12 SET i 2. e.g. 1pm will appear on the remote control to select the RF AUDIO. Please note your DVD+VCR. 1. The day of the week will appear automatically when you make a mistake press b or B and enter the correct details. 4. HH MM DD MM YY 8... ENTER/OK. If you enter the year. 12 SET SYS f OSD SYS ON OFF i 5. Before Operation-VCR part Setting the clock Manually The clock in your DVD+VCR controls time and date settings for your DVD+VCR uses a 24 hour clock. The main menu will be displayed as 13:00. Press 3 or 4 to ...
Owners Manual
Page 13
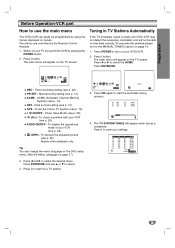
... turn on screen. Press POWER to use 3 or 4 to a TV picture. The main menu will not be programmed by using the menus displayed on your DVD+VCR. 2. PR SET - Power Save Mode (see p. 20). f OSD ON OFF 12 Pr-12 ACMS SET SYS Pr-12 ACMS OK i ACMS Pr-12 ACMS OK... i 3. The TV STATION TABLE will appear when tuning is weak your DVD+VCR may not detect the necessary information and will appear on the TV screen. The menus are controlled by pressing the POWER button. 2. Switch on page...
... turn on screen. Press POWER to use 3 or 4 to a TV picture. The main menu will not be programmed by using the menus displayed on your DVD+VCR. 2. PR SET - Power Save Mode (see p. 20). f OSD ON OFF 12 Pr-12 ACMS SET SYS Pr-12 ACMS OK i ACMS Pr-12 ACMS OK... i 3. The TV STATION TABLE will appear when tuning is weak your DVD+VCR may not detect the necessary information and will appear on the TV screen. The menus are controlled by pressing the POWER button. 2. Switch on page...

Owners Manual
Page 14
...- 07 - - 08 - - MOVE : DELETE : , OK i 4. C69, S01 - Enter the channel number of station that you may be too weak for your DVD+VCR's automatic tuning process to manually tune other stations repeat stages 3 - 8. 01 C01 02 C02 03 C03 04 C04 05 - - 06 - - 07 - - 08 -...- - - - - - - - - - - - - - - - - - - - - - - Your new TV station has now been tuned into your DVD+VCR to select letters and numbers for your DVD+VCR. Before Operation-VCR part Tuning in order for the station name. You must tune in these weaker broadcast stations manually in TV Stations Manually...
...- 07 - - 08 - - MOVE : DELETE : , OK i 4. C69, S01 - Enter the channel number of station that you may be too weak for your DVD+VCR's automatic tuning process to manually tune other stations repeat stages 3 - 8. 01 C01 02 C02 03 C03 04 C04 05 - - 06 - - 07 - - 08 -...- - - - - - - - - - - - - - - - - - - - - - - Your new TV station has now been tuned into your DVD+VCR to select letters and numbers for your DVD+VCR. Before Operation-VCR part Tuning in order for the station name. You must tune in these weaker broadcast stations manually in TV Stations Manually...

Owners Manual
Page 15
... CH 01 C03 MFT 00 STATION PR-03 CHANNEL/CABLE : AV PRSET i 2. MOVE : DELETE : , OK i 5. Preparation Before Operation-VCR part Changing the order of TV Stations After tuning TV stations into your DVD+VCR you may wish to change the order in which they are stored without having to retune them into your... DVD+VCR you may wish to delete a station. The main menu will appear on the TV screen. Press i. MOVE : DELETE : , OK i 01 C01 00 02 C02 00 ...
... CH 01 C03 MFT 00 STATION PR-03 CHANNEL/CABLE : AV PRSET i 2. MOVE : DELETE : , OK i 5. Preparation Before Operation-VCR part Changing the order of TV Stations After tuning TV stations into your DVD+VCR you may wish to change the order in which they are stored without having to retune them into your... DVD+VCR you may wish to delete a station. The main menu will appear on the TV screen. Press i. MOVE : DELETE : , OK i 01 C01 00 02 C02 00 ...

Owners Manual
Page 18
...PCM audio. DVDs encoded in ...Bitstream PCM 48KHz On On Move Select Dolby Digital / DTS / MPEG DVD DivX Bitstream: Select "Bitstream" if you select "Off", the DTS ...of sound. Vocal DVD Set to do so. Before Operation-DVD part AUDIO Each DVD disc has a variety of rated DVDs based on their ...Rating). Enter it using the v / V buttons. Sample Freq. (Frequency) DVD If your receiver or amplifier is NOT capable of handling 96 kHz signals, select...On only when a multi-channel karaoke DVD is the least restrictive. DRC (Dynamic Range Control) DVD With the DVD format, you are rated. 1. Rating...
...PCM audio. DVDs encoded in ...Bitstream PCM 48KHz On On Move Select Dolby Digital / DTS / MPEG DVD DivX Bitstream: Select "Bitstream" if you select "Off", the DTS ...of sound. Vocal DVD Set to do so. Before Operation-DVD part AUDIO Each DVD disc has a variety of rated DVDs based on their ...Rating). Enter it using the v / V buttons. Sample Freq. (Frequency) DVD If your receiver or amplifier is NOT capable of handling 96 kHz signals, select...On only when a multi-channel karaoke DVD is the least restrictive. DRC (Dynamic Range Control) DVD With the DVD format, you are rated. 1. Rating...
Owners Manual
Page 19
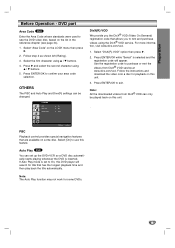
...first character using v / V buttons. 5. Press ENTER/OK while "Select" is set up the DVD+VCR so a DVD disc automatically starts playing whenever the DVD is inserted. Select "Area Code" on this DVD player will appear. Use the registration code to exit. Move Select PBC Playback control provides special navigation ...B. 2. Note: The Auto Play function may not work for playback on the list in the reference chapter (see page 34). 1. DVD part Area Code DVD Enter the Area Code whose standards were used to use this unit. 3. Follow step 2 as shown left (Rating). 3. Press ENTER...
...first character using v / V buttons. 5. Press ENTER/OK while "Select" is set up the DVD+VCR so a DVD disc automatically starts playing whenever the DVD is inserted. Select "Area Code" on this DVD player will appear. Use the registration code to exit. Move Select PBC Playback control provides special navigation ...B. 2. Note: The Auto Play function may not work for playback on the list in the reference chapter (see page 34). 1. DVD part Area Code DVD Enter the Area Code whose standards were used to use this unit. 3. Follow step 2 as shown left (Rating). 3. Press ENTER...
Owners Manual
Page 20
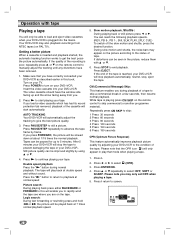
... V. 4. If the end of tape. Please note that mode when playing a tape. 1. Press N to continue playing your tape. After 5 minutes your DVD+VCR . Press the "N" button to return to playback at about 1/19 times the normal playback. Press EJECT. Press i. 2. Press PAUSE/STEP to skip commercial ...OPR). 3. Press b or B to end playback. Press i return to advance the tape frame by adjusting your DVD+VCR to load and eject video cassettes when your DVD+VCR. Press PAUSE/STEP repeatedly to screen. Still picture quality can be slowed down at normal speed Picture search: During playing...
... V. 4. If the end of tape. Please note that mode when playing a tape. 1. Press N to continue playing your tape. After 5 minutes your DVD+VCR . Press the "N" button to return to playback at about 1/19 times the normal playback. Press EJECT. Press i. 2. Press PAUSE/STEP to skip commercial ...OPR). 3. Press b or B to end playback. Press i return to advance the tape frame by adjusting your DVD+VCR to load and eject video cassettes when your DVD+VCR. Press PAUSE/STEP repeatedly to screen. Still picture quality can be slowed down at normal speed Picture search: During playing...
Owners Manual
Page 21
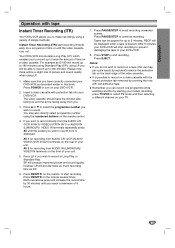
.../ITR on the remote control. 4. Press STOP to avoid recording unwanted scenes. Operation Operation with tape Instant Timer Recording (ITR) Your DVD+VCR allows you to make recordings using a variety of simple methods: Instant Timer Recording (ITR) start recording. Press REC/ITR on your ... selecting a different channel on the remote to start recording immediately for recording from is possible to record on the back edge of your DVD+VCR. 2. Make sure that you . 3. Insert a video cassette with the record protection tab removed by accident!) remove the protection tab ...
.../ITR on the remote control. 4. Press STOP to avoid recording unwanted scenes. Operation Operation with tape Instant Timer Recording (ITR) Your DVD+VCR allows you to make recordings using a variety of simple methods: Instant Timer Recording (ITR) start recording. Press REC/ITR on your ... selecting a different channel on the remote to start recording immediately for recording from is possible to record on the back edge of your DVD+VCR. 2. Make sure that you . 3. Insert a video cassette with the record protection tab removed by accident!) remove the protection tab ...
Owners Manual
Page 22
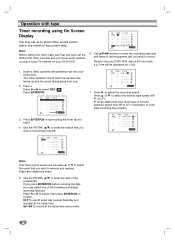
... tape Timer recording using On Screen Display You may select one month of the programme. The video cassette should have tuned TV stations on your DVD+VCR uses a 24 hour clock. PR DATE T I M E PR-03 3 SP - - SP - - SP - - SP - - Use the PR/TRK (v/V) to record then press 2. PR DATE ...SP - - SP - - If you press ENTER/OK before entering the date you wish to enter the station that you may set the DVD+VCR clock correctly and you know which stations you wish to record. DLY To record every day (except Saturday and Sunday) at the same time ...
... tape Timer recording using On Screen Display You may select one month of the programme. The video cassette should have tuned TV stations on your DVD+VCR uses a 24 hour clock. PR DATE T I M E PR-03 3 SP - - SP - - SP - - SP - - Use the PR/TRK (v/V) to record then press 2. PR DATE ...SP - - SP - - If you press ENTER/OK before entering the date you wish to enter the station that you may set the DVD+VCR clock correctly and you know which stations you wish to record. DLY To record every day (except Saturday and Sunday) at the same time ...

Owners Manual
Page 23
... 16:00 and end at 17:00. Example: Programme 1 is not available in the display window while your DVD+VCR to delete or change. During timer recording standby mode, the DVD and VCR mode cannot be given priority. Station, Date, Start and End times and recording speed. Programme 2 is displayed,... you wish to Timer Standby mode. Notes: The DVD+VCR will appear in the standby mode for the timer recording. Press b to delete the event...or Press ENTER/OK to change any of the ...
... 16:00 and end at 17:00. Example: Programme 1 is not available in the display window while your DVD+VCR to delete or change. During timer recording standby mode, the DVD and VCR mode cannot be given priority. Station, Date, Start and End times and recording speed. Programme 2 is displayed,... you wish to Timer Standby mode. Notes: The DVD+VCR will appear in the standby mode for the timer recording. Press b to delete the event...or Press ENTER/OK to change any of the ...
Owners Manual
Page 24
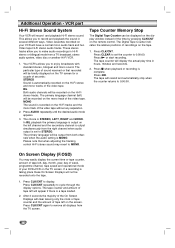
... - The primary language channel (left , day, month, year, day of week, programme channel, tape speed and operational mode of your DVD+VCR on your VCR will be recorded on the mono track of seconds: STEREO Sound is recorded on the screen. The choice is complete. Press CLK/CNT. The... tape counter will appear if there is output simultaneously from a TV broadcast, stereo audio system, video disc or another Hi-Fi VCR. 1. Press m. On Screen Display (F.OSD) You may revert to enjoy broadcasts with standard stereo, bilingual and mono sound. Video cassettes recorded on ...
... - The primary language channel (left , day, month, year, day of week, programme channel, tape speed and operational mode of your DVD+VCR on your VCR will be recorded on the mono track of seconds: STEREO Sound is recorded on the screen. The choice is complete. Press CLK/CNT. The... tape counter will appear if there is output simultaneously from a TV broadcast, stereo audio system, video disc or another Hi-Fi VCR. 1. Press m. On Screen Display (F.OSD) You may revert to enjoy broadcasts with standard stereo, bilingual and mono sound. Video cassettes recorded on ...
Owners Manual
Page 25
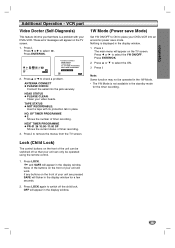
... problem. Note: Some function may not be operated in the 1W Mode. • The 1W Mode is not available in place NO. None of your DVD+VCR. Press 3 or 4 to select the 1W ON/OFF. Press 1 or 2 to select the ON. 3 Press i. OF TIMER PROGRAMME O2 Shows the ...TAPE STATUS NO. and SAFE will appear in the display window for the timer recording. Operation Additional Operation - VCR part Video Doctor (Self-Diagnosis) This feature informs you that your DVD+VCR into the jack securely. Press ENTER/OK. ANTENNA CONNECT O PLEASE CHECK: Connect the aerial into an economic...
... problem. Note: Some function may not be operated in the 1W Mode. • The 1W Mode is not available in place NO. None of your DVD+VCR. Press 3 or 4 to select the 1W ON/OFF. Press 1 or 2 to select the ON. 3 Press i. OF TIMER PROGRAMME O2 Shows the ...TAPE STATUS NO. and SAFE will appear in the display window for the timer recording. Operation Additional Operation - VCR part Video Doctor (Self-Diagnosis) This feature informs you that your DVD+VCR into the jack securely. Press ENTER/OK. ANTENNA CONNECT O PLEASE CHECK: Connect the aerial into an economic...

Owners Manual
Page 33
... If the surfaces are extremely dirty, use a soft cloth lightly moistened with the supplied remote control. Maintaining the Unit The DVD+VCR is listed in contact with your TV (see the table below , set may not function on the surface. Operation Additional Operation... code number you have set the appropriate manufacturer code. 1. Code numbers of the unit. Keeping the exterior surfaces clean • Do not use . Manufacturer LG / GoldStar Zenith Samsung Sony Hitachi Code Number 1 (Default), 2 1, 3, 4 6, 7 8, 9 4 Maintenance and Service Refer to select the manufacturer ...
... If the surfaces are extremely dirty, use a soft cloth lightly moistened with the supplied remote control. Maintaining the Unit The DVD+VCR is listed in contact with your TV (see the table below , set may not function on the surface. Operation Additional Operation... code number you have set the appropriate manufacturer code. 1. Code numbers of the unit. Keeping the exterior surfaces clean • Do not use . Manufacturer LG / GoldStar Zenith Samsung Sony Hitachi Code Number 1 (Default), 2 1, 3, 4 6, 7 8, 9 4 Maintenance and Service Refer to select the manufacturer ...


