
Owners Manual
Page 5
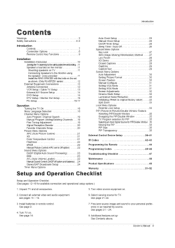
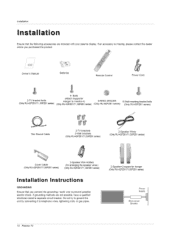
...the PIP 35 PIP Size 35 PIP Transparency 35 External Control Device Setup 36-41 IR Codes 42-43 Programming the Remote Programming Codes Troubleshooting Checklist Maintenance 44 45-46 47 48 Product Specifications 49 Warranty 51-52 Se t:up See Contents ...Screen Adjustments 32 Cinema Mode Setup 32 Luminance Noise Reduction 32 Initializing (Reset to your personal preference or as shown. (Only RU-60PZ61 series 12 External Equipment Connections 12 Antenna Connection 12 VCR Setup I Cable TV Setup External A/V Source Setup DVD Setup DTV ...
...the PIP 35 PIP Size 35 PIP Transparency 35 External Control Device Setup 36-41 IR Codes 42-43 Programming the Remote Programming Codes Troubleshooting Checklist Maintenance 44 45-46 47 48 Product Specifications 49 Warranty 51-52 Se t:up See Contents ...Screen Adjustments 32 Cinema Mode Setup 32 Luminance Noise Reduction 32 Initializing (Reset to your personal preference or as shown. (Only RU-60PZ61 series 12 External Equipment Connections 12 Antenna Connection 12 VCR Setup I Cable TV Setup External A/V Source Setup DVD Setup DTV ...
Owners Manual
Page 7
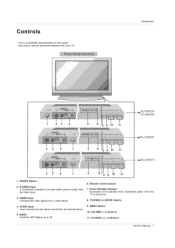
...Remote Control Sensor 7. TVNIDEO or ENTER Button 9. - ON/OFF Button 2. MENU Button 10. Here shown may be somewhat different from a video device. 4. Power Standby Indicator Illuminates red in standby mode, Illuminates green when the TV is a simplified representation of front panel. VOLUME (F,G) Buttons 11. Introduction RU-50PZ61 RU-60PZ61 4 78 9 10 11 6 8 9 10 11 _,RU...-42PZ61 _, RU-42PZ71 1. CHANNEL (E, D) Buttons Owner's Manual 7 This...
...Remote Control Sensor 7. TVNIDEO or ENTER Button 9. - ON/OFF Button 2. MENU Button 10. Here shown may be somewhat different from a video device. 4. Power Standby Indicator Illuminates red in standby mode, Illuminates green when the TV is a simplified representation of front panel. VOLUME (F,G) Buttons 11. Introduction RU-50PZ61 RU-60PZ61 4 78 9 10 11 6 8 9 10 11 _,RU...-42PZ61 _, RU-42PZ71 1. CHANNEL (E, D) Buttons Owner's Manual 7 This...
Owners Manual
Page 8
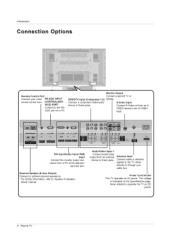
... 'Speaker Stand' manual. & Speaker I Connect S-Video out from a PC to the S-VIDEO input. Antenna Input Connect cable or antenna signals to these jacks. Introduction Options Remote Control Port Connect your cable box. I AudioNideo Input 1 Connect audio/video output from an external device to the TV, either directly or through your wired...
... 'Speaker Stand' manual. & Speaker I Connect S-Video out from a PC to the S-VIDEO input. Antenna Input Connect cable or antenna signals to these jacks. Introduction Options Remote Control Port Connect your cable box. I AudioNideo Input 1 Connect audio/video output from an external device to the TV, either directly or through your wired...
Owners Manual
Page 9
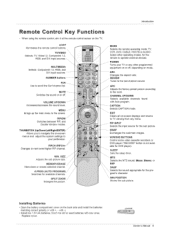
... your TV or any menu. THUMBSTICK (Up/Down/Left/Right/ENTER) Allows you to TV viewing from any other operating modes, for the remote to the last channel viewed. CHANNEL UP/DOWN Selects available channels with new ones. DASP Selects the sound appropriate for DVD player). _ SLEEP.... Switches between PIP, and Double Window modes. MEMORY/ERASE / Memorizes or erases selected channel. Introduction Contro! When using the remote control, aim it at the remote control sensor on -screen displays and returns to navigate the on or off , depending on the back side and install the ...
... your TV or any menu. THUMBSTICK (Up/Down/Left/Right/ENTER) Allows you to TV viewing from any other operating modes, for the remote to the last channel viewed. CHANNEL UP/DOWN Selects available channels with new ones. DASP Selects the sound appropriate for DVD player). _ SLEEP.... Switches between PIP, and Double Window modes. MEMORY/ERASE / Memorizes or erases selected channel. Introduction Contro! When using the remote control, aim it at the remote control sensor on -screen displays and returns to navigate the on or off , depending on the back side and install the ...
Owners Manual
Page 10
... Batteries Remote Control Power Cord 2-TV bracket bolts (Only RU-42PZ61/71, 50PZ61 sedes) 4- Bolts (Attach Supporter Hanger to monitor-4) (Only RU-42PZ61/71, 50PZ61 sedes) 6-RING SPACER (Only RU-60PZ61 series) 6-Wall mounting bracket bolts (Only RU-60PZ61 series) 75_2 Round Cable 2-TV brackets 2-Wall brackets (Only RU-42PZ61/71,50PZ61 series) 2-Speaker Wires (Only RU-42PZ61/71...
... Batteries Remote Control Power Cord 2-TV bracket bolts (Only RU-42PZ61/71, 50PZ61 sedes) 4- Bolts (Attach Supporter Hanger to monitor-4) (Only RU-42PZ61/71, 50PZ61 sedes) 6-RING SPACER (Only RU-60PZ61 series) 6-Wall mounting bracket bolts (Only RU-60PZ61 series) 75_2 Round Cable 2-TV brackets 2-Wall brackets (Only RU-42PZ61/71,50PZ61 series) 2-Speaker Wires (Only RU-42PZ61/71...
Owners Manual
Page 13
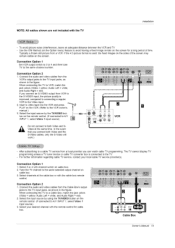
... on the VCR. (Refer to the S-VIDEO input, the picture quality is improved; Tune the TV channel to the same selected output channel on the remote control. (If connected to A/V INPUT 1, select Video 1 input source) Do not connect to both Video and the S-Video cables, only the S-Video will ...used; Connect the audio and video cables from a VCR. For further information regarding cable TV service, contact your desired channel with the cable box remote control. Select the input source by the TVNIDEO but- If you can watch cable TV programming. Insert a video tape into the VCR and press...
... on the VCR. (Refer to the S-VIDEO input, the picture quality is improved; Tune the TV channel to the same selected output channel on the remote control. (If connected to A/V INPUT 1, select Video 1 input source) Do not connect to both Video and the S-Video cables, only the S-Video will ...used; Connect the audio and video cables from a VCR. For further information regarding cable TV service, contact your desired channel with the cable box remote control. Select the input source by the TVNIDEO but- If you can watch cable TV programming. Insert a video tape into the VCR and press...
Owners Manual
Page 14
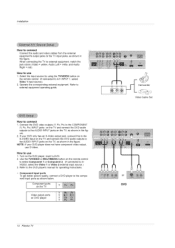
... shown below. Use the TVNIDEO or MULTIMEDIA button on the TV imiiii ii_iii_iii_iii_iii_iii_i iii_iii_iii_iii_iii_iii_iii_iii VonideDoVDoutpplauyt erports or DVD 14 Plasma TV Component ports on the remote control to select Component 1 or Component 2. (If connected to the AUDIO INPUT jacks on the TV, as shown in the figure. Z ]._ ... to SVIDEO, select the Video 1 or Video 2 external input source.) 3. Refer to connect 1. Operate the corresponding external equipment. Turn on the remote control. (If connected to the component input ports as shown in the figure.
... shown below. Use the TVNIDEO or MULTIMEDIA button on the TV imiiii ii_iii_iii_iii_iii_iii_i iii_iii_iii_iii_iii_iii_iii_iii VonideDoVDoutpplauyt erports or DVD 14 Plasma TV Component ports on the remote control to select Component 1 or Component 2. (If connected to the AUDIO INPUT jacks on the TV, as shown in the figure. Z ]._ ... to SVIDEO, select the Video 1 or Video 2 external input source.) 3. Refer to connect 1. Operate the corresponding external equipment. Turn on the remote control. (If connected to the component input ports as shown in the figure.
Owners Manual
Page 15
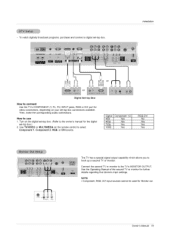
Turn on the digital set-top box. (Refer to the owner's manual for video connections, depending on the remote control to select Component 1, Component 2, RGB, or DVl source. NOTE • Component, RGB, DVI input sources cannot be used for further details regarding that device's ...
Turn on the digital set-top box. (Refer to the owner's manual for video connections, depending on the remote control to select Component 1, Component 2, RGB, or DVl source. NOTE • Component, RGB, DVI input sources cannot be used for further details regarding that device's ...

Owners Manual
Page 16
... 3. Use the TV's RGB INPUT or DVI (Digital Visual Interface) INPUT port for Horizontal and Vertical frequencies is set to (RU-42PZ61->1024x768, RU42PZ71->852x480, RU-50/60PZ61-> 1366x768), 60Hz. 2. How to connect 1. If the refresh rate of the PC graphic card. The fixed image may be ...changed, change the refresh rate to another rate or adjust the brightness and contrast on the remote control to select RGB, or DVl source. 4. Turn on the TV's remote...
... 3. Use the TV's RGB INPUT or DVI (Digital Visual Interface) INPUT port for Horizontal and Vertical frequencies is set to (RU-42PZ61->1024x768, RU42PZ71->852x480, RU-50/60PZ61-> 1366x768), 60Hz. 2. How to connect 1. If the refresh rate of the PC graphic card. The fixed image may be ...changed, change the refresh rate to another rate or adjust the brightness and contrast on the remote control to select RGB, or DVl source. 4. Turn on the TV's remote...
Owners Manual
Page 18
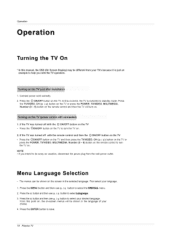
...(D / E) button on the TV or press the POWER, TV/VlDEO, MULTIMEDIA, Number (0 ~ 9) button on the remote control and then the TV will be shown on the screen in the language of your TV's because it is switched to... choice. 4. Press the O ON/OFF button on . If the TV was turned off with the remote control and then the (D ON/OFF button on the TV • Press the OON/OFF button on...E) button on the TV or press the POWER, TV/VlDEO, MULTIMEDIA, Number (0 ~ 9) button on the remote control to be different from the wall power outlet. The menus can be shown in the selected language. From this...
...(D / E) button on the TV or press the POWER, TV/VlDEO, MULTIMEDIA, Number (0 ~ 9) button on the remote control and then the TV will be shown on the screen in the language of your TV's because it is switched to... choice. 4. Press the O ON/OFF button on . If the TV was turned off with the remote control and then the (D ON/OFF button on the TV • Press the OON/OFF button on...E) button on the TV or press the POWER, TV/VlDEO, MULTIMEDIA, Number (0 ~ 9) button on the remote control to be different from the wall power outlet. The menus can be shown in the selected language. From this...
Owners Manual
Page 27
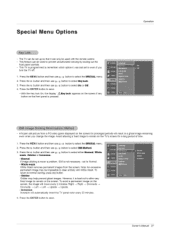
... is not necessary - Press the G button and then use D / E button to select ISM Method. 3. This feature can only be used to clear entirely with the remote control. Press the ENTER button to save . A frozen still picture from the screen. Press the ENTER button to select On or Off. 4. Press the MENU...
... is not necessary - Press the G button and then use D / E button to select ISM Method. 3. This feature can only be used to clear entirely with the remote control. Press the ENTER button to save . A frozen still picture from the screen. Press the ENTER button to select On or Off. 4. Press the MENU...
Owners Manual
Page 34
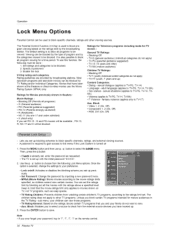
... used to block specific channels, ratings and other TV programs. Unless you have been shown at the theaters or direct-to movies shown on the remote control. 34 Plasma TV Movies that the movie ratings limit only applies to -video movies use the Movie Rating System (MPAA) only. Operation Menu Options...
... used to block specific channels, ratings and other TV programs. Unless you have been shown at the theaters or direct-to movies shown on the remote control. 34 Plasma TV Movies that the movie ratings limit only applies to -video movies use the Movie Rating System (MPAA) only. Operation Menu Options...
Owners Manual
Page 37
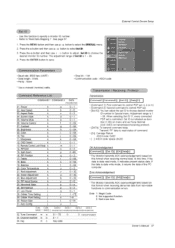
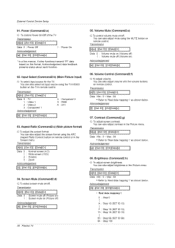
... G button and then use F / (5 button to adjust Set ID to select Set ID. 3. The adjustment range of Set ID is 1 ~ 99. Power k a 0~ 1 02. Tint k 11. Remote Control Lock Mode k 14. Balance k 20. Blue Adjustment k p 0 ~99 q 0~ 3 r 0 ~ 64 s 0 ~ 64 t 0 ~ 64 u 0~ 3 v 0 ~ 3C w 0 ~ 3C $ 0 ~ 3C [[Command2][ ][Set ID][ ][OK][Data][x] [ * The Monitor transmits ACK (acknowledgement...
... G button and then use F / (5 button to adjust Set ID to select Set ID. 3. The adjustment range of Set ID is 1 ~ 99. Power k a 0~ 1 02. Tint k 11. Remote Control Lock Mode k 14. Balance k 20. Blue Adjustment k p 0 ~99 q 0~ 3 r 0 ~ 64 s 0 ~ 64 t 0 ~ 64 u 0~ 3 v 0 ~ 3C w 0 ~ 3C $ 0 ~ 3C [[Command2][ ][Set ID][ ][OK][Data][x] [ * The Monitor transmits ACK (acknowledgement...
Owners Manual
Page 38
...[[e][ ][Set ID][ ][OK][Data][x] ] 06. Brightness (Command2:h) G To adjust screen brightness• You can also adjust volume with the volume buttons on remote control or in the Picture menu. Power (Command2:a) G To control Power On/Off of the TV. Transmission [[k][b][ ][Set ID][ ][Data][Cr] Data 0...Power On [[a][ ][Set ID][ ][OK][Data][x] J * In a like manner, if other functions transmit 'FF' data based on /off (Volume on remote control. Input Select (Command2:b) (Main Picture Input) G To select input source for the TV. Volume Mute (Command2:e) G To control volume mute on ...
...[[e][ ][Set ID][ ][OK][Data][x] ] 06. Brightness (Command2:h) G To adjust screen brightness• You can also adjust volume with the volume buttons on remote control or in the Picture menu. Power (Command2:a) G To control Power On/Off of the TV. Transmission [[k][b][ ][Set ID][ ][Data][Cr] Data 0...Power On [[a][ ][Set ID][ ][OK][Data][x] J * In a like manner, if other functions transmit 'FF' data based on /off (Volume on remote control. Input Select (Command2:b) (Main Picture Input) G To select input source for the TV. Volume Mute (Command2:e) G To control volume mute on ...
Owners Manual
Page 39
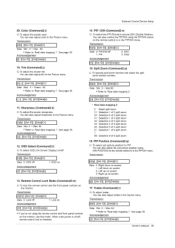
... ] Data Min: 0 ~ Max:99 • Refer to 'Real data mapping 1'. You can also adjust the sub picture position using WIN.POSITION on the remote control or in the Sound menu. Transmission [[k][r][ ][Set ID][ ][Data][Cr] ] Data Min: 0 ~ Max: 64 • Refer to 'Real data mapping... menu. Acknowledgement [[r][ ][Set ID][ ][OK][Data][x] ] Owner's Manual 39 See page 38. You can also control the PIP/DW using the remote control and front panel controls on screen Acknowledgement [[q][ ][Set ID][ ][OK][Data][x] ] 17. When main power is on Acknowledgement I[I [k][m][ ][Set...
... ] Data Min: 0 ~ Max:99 • Refer to 'Real data mapping 1'. You can also adjust the sub picture position using WIN.POSITION on the remote control or in the Sound menu. Transmission [[k][r][ ][Set ID][ ][Data][Cr] ] Data Min: 0 ~ Max: 64 • Refer to 'Real data mapping... menu. Acknowledgement [[r][ ][Set ID][ ][OK][Data][x] ] Owner's Manual 39 See page 38. You can also control the PIP/DW using the remote control and front panel controls on screen Acknowledgement [[q][ ][Set ID][ ][OK][Data][x] ] 17. When main power is on Acknowledgement I[I [k][m][ ][Set...
Owners Manual
Page 40
... monitor off with On Time function. (If you do not press any button within 2 hours after the TV turns on ). 2: Turn the monitor off with remote control. 3: Turn the monitor off with Sleep Time function. 4: Turn the monitor off with RS-232C function. 5: 5V down. 6: AC down. 7: Turn the monitor off...
... monitor off with On Time function. (If you do not press any button within 2 hours after the TV turns on ). 2: Turn the monitor off with remote control. 3: Turn the monitor off with Sleep Time function. 4: Turn the monitor off with RS-232C function. 5: 5V down. 6: AC down. 7: Turn the monitor off...
Owners Manual
Page 41
... orbiter operation time term. Picture Size Setting for Double Window mode (Command2:t) G To adjust main window size in orbiter function. Key (Command: m c) G To send IR remote key code Transmission I 30. 26. Transmission [[j ][s][ ][Set ID][ ][Data][Cr] I Data Min: 1~Max:9 Acknowledgement [[s][ ][Set ID][ ][OK][Data][x] I [m][c][ ][Set ID][ ][Data][ ][Cr] Data Key code...
... orbiter operation time term. Picture Size Setting for Double Window mode (Command2:t) G To adjust main window size in orbiter function. Key (Command: m c) G To send IR remote key code Transmission I 30. 26. Transmission [[j ][s][ ][Set ID][ ][Data][Cr] I Data Min: 1~Max:9 Acknowledgement [[s][ ][Set ID][ ][OK][Data][x] I [m][c][ ][Set ID][ ][Data][ ][Cr] Data Key code...
Owners Manual
Page 42
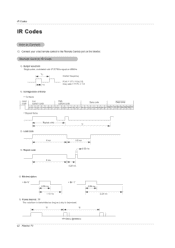
...]q 2.25 ms G Bit description * Bit "0" * Bit "1" G Frame interval : Tf The waveform is transmitted as long as a key is depressed. IRCodes IR Codes G Connect your wired remote control to the Remote Control port on the Monitor.
...]q 2.25 ms G Bit description * Bit "0" * Bit "1" G Frame interval : Tf The waveform is transmitted as long as a key is depressed. IRCodes IR Codes G Connect your wired remote control to the Remote Control port on the Monitor.
Owners Manual
Page 44
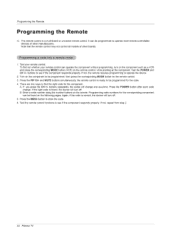
...If the right code is ready to see if the component responds properly. and MUTE buttons simultaneously, the remote control is found on the remote. Note that the remote control may not control all models of other brands. 1. A. Press the POWER button after each code change... one at the component. ProgrammthineRgemote Programming the G The remote control is correct, the device will turn off . Test your remote control can be programmed, then press the corresponding MODE button on the remote control, while pointing at -a-time. To find the right code ...
...If the right code is ready to see if the component responds properly. and MUTE buttons simultaneously, the remote control is found on the remote. Note that the remote control may not control all models of other brands. 1. A. Press the POWER button after each code change... one at the component. ProgrammthineRgemote Programming the G The remote control is correct, the device will turn off . Test your remote control can be programmed, then press the corresponding MODE button on the remote control, while pointing at -a-time. To find the right code ...
Owners Manual
Page 47
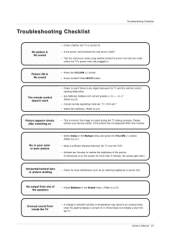
... f Horizontal/vertical bars L orpicture shaking • Select Color in an unusual noise the TV. to -)? (Refer to p.9) • Correct remote operating mode set: TV, VCR etc.? • Install new batteries. (Refer to p.21) • Keep a sufficient distance between the TV and the... remote control causing obstruction. • Are batteries installed with Owner's Manual 47 i iI • Adjust Balance in . NO picture & No sound f PiCtureoK& ...
... f Horizontal/vertical bars L orpicture shaking • Select Color in an unusual noise the TV. to -)? (Refer to p.9) • Correct remote operating mode set: TV, VCR etc.? • Install new batteries. (Refer to p.21) • Keep a sufficient distance between the TV and the... remote control causing obstruction. • Are batteries installed with Owner's Manual 47 i iI • Adjust Balance in . NO picture & No sound f PiCtureoK& ...


