
Owners Manual
Page 1
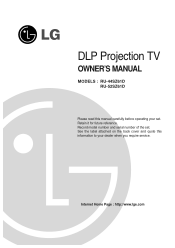
See the label attached on the back cover and quote this manual carefully before operating your dealer when you require service. Record model number and serial number of the set . Retain it for future reference. Internet Home Page : http://www.lge.com DLP Projection TV OWNER'S MANUAL MODELS : RU-44SZ61D RU-52SZ61D Please read this information to your set .
See the label attached on the back cover and quote this manual carefully before operating your dealer when you require service. Record model number and serial number of the set . Retain it for future reference. Internet Home Page : http://www.lge.com DLP Projection TV OWNER'S MANUAL MODELS : RU-44SZ61D RU-52SZ61D Please read this information to your set .
Owners Manual
Page 2
...820-40 of the FCC Rules. REGULATORY INFORMATION: This equipment has been tested and found to operate the equipment. NOTE TO CABLE/TV INSTALLER: This reminder is encouraged to try to correct the interference by turning the equipment off and on, the user is provided ... equipment and receiver. • Connect the equipment into an outlet on a circuit different from LG Electronics Corporation. Unauthorized modification could void the user's authority to comply with the instruction manual, may be connected to the grounding system of the cable entry as close to provide reasonable...
...820-40 of the FCC Rules. REGULATORY INFORMATION: This equipment has been tested and found to operate the equipment. NOTE TO CABLE/TV INSTALLER: This reminder is encouraged to try to correct the interference by turning the equipment off and on, the user is provided ... equipment and receiver. • Connect the equipment into an outlet on a circuit different from LG Electronics Corporation. Unauthorized modification could void the user's authority to comply with the instruction manual, may be connected to the grounding system of the cable entry as close to provide reasonable...
Owners Manual
Page 3
..., consult your safety in electrical shock or fire hazards. Use only with a cart, stand, tripod, bracket, or table recommended by the manufacturer. 8. Cleaning Unplug this manual can result in mind. Power Sources This product should use can help you and your new product Your product has been manufactured and tested with...
..., consult your safety in electrical shock or fire hazards. Use only with a cart, stand, tripod, bracket, or table recommended by the manufacturer. 8. Cleaning Unplug this manual can result in mind. Power Sources This product should use can help you and your new product Your product has been manufactured and tested with...
Owners Manual
Page 5
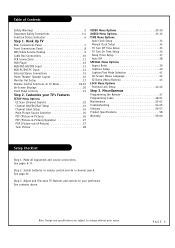
...Menu Options 31-32 TIME Menu Options Auto Clock Setup 33 Manual Clock Setup 34 TV Turn Off Time Setup 35 TV Turn On Time Setup 36 Sleep Timer Setup 37 Auto Off...Lock Setup 44-46 Step 3. Make all equipment and source connections. See page 22. Step 3. See contents above. Customize your preference. Step 2. Note: Design and specifications are subject to your TV's Features ...(Picture-in-Picture 26 PIP (Picture-in remote control and do a channel search. Hook Up TV Rear Connections Panel 7 Front Connections Panel 8 ANT/Cable Service Hookup 9 Cable Box Connections 10 VCR Connections...
...Menu Options 31-32 TIME Menu Options Auto Clock Setup 33 Manual Clock Setup 34 TV Turn Off Time Setup 35 TV Turn On Time Setup 36 Sleep Timer Setup 37 Auto Off...Lock Setup 44-46 Step 3. Make all equipment and source connections. See page 22. Step 3. See contents above. Customize your preference. Step 2. Note: Design and specifications are subject to your TV's Features ...(Picture-in-Picture 26 PIP (Picture-in remote control and do a channel search. Hook Up TV Rear Connections Panel 7 Front Connections Panel 8 ANT/Cable Service Hookup 9 Cable Box Connections 10 VCR Connections...
Owners Manual
Page 7
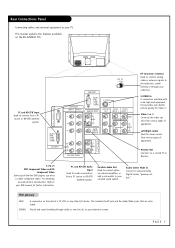
...preamp output." Audio Center Mode In Connect to connect from various types of a TV, VCR, or any other A/V device. Mini glossary JACK SIGNAL A connection on the RU-52SZ61D TVs. This includes the RF jack and the Audio/Video jacks that provides even better ... traveling through your TV. Left/Right Audio Used for Video 2. Rear Connections Panel Connecting cables and external equipment to a second TV or Monitor. Monitor Out Connects to your cable box. Refer to your DVD manual for extremely accurate picture reproduction. This manual explains the features available...
...preamp output." Audio Center Mode In Connect to connect from various types of a TV, VCR, or any other A/V device. Mini glossary JACK SIGNAL A connection on the RU-52SZ61D TVs. This includes the RF jack and the Audio/Video jacks that provides even better ... traveling through your TV. Left/Right Audio Used for Video 2. Rear Connections Panel Connecting cables and external equipment to a second TV or Monitor. Monitor Out Connects to your cable box. Refer to your DVD manual for extremely accurate picture reproduction. This manual explains the features available...
Owners Manual
Page 12
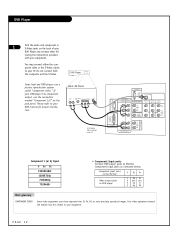
...Video. DVD Player Some high-end DVD players use the connectors marked "Component 1/2" on the jack panel. Please refer to your TV. You may connect either the composite video or the S-Video cables to your DVD Player and connect them fol- DVD Player ... three separate lines (Y, PB, PR) to Monitor Component input jacks as indicated below. Your video equipment manual will explain how this relates to your DVD manual for proper installation. PAGE 12 lowing the instructions provided with TV C A L I B R A T I O N PC/DTV (XGA /480p /720p /1080i) DVI INPUT COMPONENT INPUT2...
...Video. DVD Player Some high-end DVD players use the connectors marked "Component 1/2" on the jack panel. Please refer to your TV. You may connect either the composite video or the S-Video cables to your DVD Player and connect them fol- DVD Player ... three separate lines (Y, PB, PR) to Monitor Component input jacks as indicated below. Your video equipment manual will explain how this relates to your DVD manual for proper installation. PAGE 12 lowing the instructions provided with TV C A L I B R A T I O N PC/DTV (XGA /480p /720p /1080i) DVI INPUT COMPONENT INPUT2...
Owners Manual
Page 17
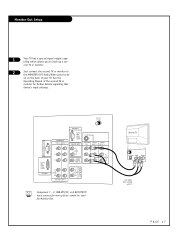
... monitor to hook up a sec- See the Operating Manual of your TV. Monitor Out Setup 1 Your TV has a special signal output capability which allows you to the MONITOR OUT Audio/Video jacks locat- ed on the back of the second TV or monitor for Monitor Out. ANT IN +75 Ω C A L I B R A T I O N PC/DTV (XGA /480p... V A R I A A U D I O (R) B L E O U T Component 1 - 2, RGB-DTV/PC, and DVI-DTV/PC input sources for main picture cannot be used for further details regarding that device's input settings. Second TV S-Video Video Audio A/V Cables Not included with...
... monitor to hook up a sec- See the Operating Manual of your TV. Monitor Out Setup 1 Your TV has a special signal output capability which allows you to the MONITOR OUT Audio/Video jacks locat- ed on the back of the second TV or monitor for Monitor Out. ANT IN +75 Ω C A L I B R A T I O N PC/DTV (XGA /480p... V A R I A A U D I O (R) B L E O U T Component 1 - 2, RGB-DTV/PC, and DVI-DTV/PC input sources for main picture cannot be used for further details regarding that device's input settings. Second TV S-Video Video Audio A/V Cables Not included with...
Owners Manual
Page 21
... to normal room temperature, humidity may form inside TV, wait 3 hours for instructions on using the onscreen menus. This manual explains the features available on the RU-52SZ61D TVs. If TV is moved from cold to room temperature before turning it on. - PAGE 21 The POWER, CHANNEL, TV/VIDEO, and VOLUME buttons work just as ENTER...
... to normal room temperature, humidity may form inside TV, wait 3 hours for instructions on using the onscreen menus. This manual explains the features available on the RU-52SZ61D TVs. If TV is moved from cold to room temperature before turning it on. - PAGE 21 The POWER, CHANNEL, TV/VIDEO, and VOLUME buttons work just as ENTER...
Owners Manual
Page 29
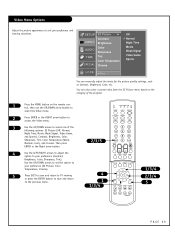
... to adjust the option to the previous menu. 2/3/5 4 1 1/3/4 TV VCR CABLE DVD SAT MODE LIGHT POWER TV/VIDEO FRONT DVI COMP1 COMP2 RGB 123 456 789 ENTER 0 MUTE FLASHBK SURF SAP VOL VIDEO CH PIP PIPCH- You can manually adjust the levels for the picture quality settings, such as Contrast..., Brightness, Color, etc. Use the UP/DOWN arrows to set the option to your preference (EZ Picture, Color Temperature, Cinema). 5 Press EXIT to save and return to TV viewing or press the ENTER...
... to adjust the option to the previous menu. 2/3/5 4 1 1/3/4 TV VCR CABLE DVD SAT MODE LIGHT POWER TV/VIDEO FRONT DVI COMP1 COMP2 RGB 123 456 789 ENTER 0 MUTE FLASHBK SURF SAP VOL VIDEO CH PIP PIPCH- You can manually adjust the levels for the picture quality settings, such as Contrast..., Brightness, Color, etc. Use the UP/DOWN arrows to set the option to your preference (EZ Picture, Color Temperature, Cinema). 5 Press EXIT to save and return to TV viewing or press the ENTER...

Owners Manual
Page 30
... the level, the softer the image. • Tint Adjusts the balance between the red and green levels. • EZ Picture Lets you adjust the picture manually to activate adjusting. • Brightness Adjusts the white or light level of the overall picture. • Color Adjusts the intensity of all colors in the... the light and dark levels of the picture. Night Time: Increases the levels of all colors. • Sharpness Adjusts the level of crispness in the TV picture: Warm, Medium, or cool. • Cinema Adjust the...
... the level, the softer the image. • Tint Adjusts the balance between the red and green levels. • EZ Picture Lets you adjust the picture manually to activate adjusting. • Brightness Adjusts the white or light level of the overall picture. • Color Adjusts the intensity of all colors in the... the light and dark levels of the picture. Night Time: Increases the levels of all colors. • Sharpness Adjusts the level of crispness in the TV picture: Warm, Medium, or cool. • Cinema Adjust the...

Owners Manual
Page 32
...Chooses the sound options manually. Stadium Stresses high frequency sounds and front surround sound to create the sensation you would experience in treble, for example, make voice or string sounds stand out. • Bass Increases or decreases the lower frequency sounds from the TV speakers. Increases in a... settings. However, you would experience in addition to the front surround sound, to stress the sounds of the TV program you adjust the Audio menu sound options manually. nal hi-fi stereo system, turn off . Music Increases both high and low frequency sounds, in a stadium...
...Chooses the sound options manually. Stadium Stresses high frequency sounds and front surround sound to create the sensation you would experience in treble, for example, make voice or string sounds stand out. • Bass Increases or decreases the lower frequency sounds from the TV speakers. Increases in a... settings. However, you would experience in addition to the front surround sound, to stress the sounds of the TV program you adjust the Audio menu sound options manually. nal hi-fi stereo system, turn off . Music Increases both high and low frequency sounds, in a stadium...
Owners Manual
Page 33
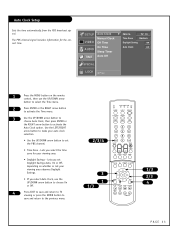
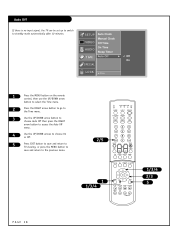
TV 13 Manual Clock Time Zone Eastern VIDEO Off Time Daylight Saving on On Time Auto Clock on AUDIO Sleep Timer TIME Auto Off SPECIAL LOCK F Prev. 1 Press ... arrow button to choose On or Off. 4 Press EXIT to save and return to TV viewing or press the ENTER button to save and return to the previous menu. 2/3/4 3 1 1/3 TV VCR CABLE DVD SAT MODE LIGHT POWER TV/VIDEO FRONT DVI COMP1 COMP2 RGB 123 456 789 ENTER 0 MUTE FLASHBK SURF SAP VOL...
TV 13 Manual Clock Time Zone Eastern VIDEO Off Time Daylight Saving on On Time Auto Clock on AUDIO Sleep Timer TIME Auto Off SPECIAL LOCK F Prev. 1 Press ... arrow button to choose On or Off. 4 Press EXIT to save and return to TV viewing or press the ENTER button to save and return to the previous menu. 2/3/4 3 1 1/3 TV VCR CABLE DVD SAT MODE LIGHT POWER TV/VIDEO FRONT DVI COMP1 COMP2 RGB 123 456 789 ENTER 0 MUTE FLASHBK SURF SAP VOL...

Owners Manual
Page 34
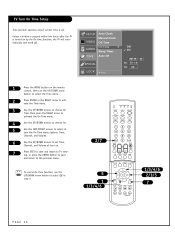
.../DOWN arrows to set the Year, Date, and Time. 6 Press EXIT to save and return to TV viewing or press the ENTER button to save and return to make your Manual Clock selection. Manual Clock Setup SETUP Auto Clock Manual Clock G Year 2 0 0 4 VIDEO Off Time Date 0 1 / 1 0 On Time AUDIO Sleep... Timer Time AM 10 : 44 TIME Auto Off SPECIAL LOCK F Prev. 1 Press the MENU button on the remote...
.../DOWN arrows to set the Year, Date, and Time. 6 Press EXIT to save and return to TV viewing or press the ENTER button to save and return to make your Manual Clock selection. Manual Clock Setup SETUP Auto Clock Manual Clock G Year 2 0 0 4 VIDEO Off Time Date 0 1 / 1 0 On Time AUDIO Sleep... Timer Time AM 10 : 44 TIME Auto Off SPECIAL LOCK F Prev. 1 Press the MENU button on the remote...

Owners Manual
Page 35
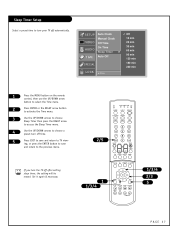
... then set the minutes. 7 Press EXIT to save and return to the previous menu. ing, or press the ENTER button to save and return to TV view- PIPCH+ SWAP RATIO CC FREEZE PIP INPUT MENU EXIT PLAY PAUSE STOP RECORD REW FF SKIP 1/3/4/6 2/3/5 7 PAGE 35 Off On AM 12 : 00 1 ... CABLE DVD SAT MODE LIGHT POWER TV/VIDEO FRONT DVI COMP1 COMP2 RGB 123 456 789 ENTER 0 MUTE FLASHBK SURF SAP VOL VIDEO CH PIP PIPCH- SETUP Auto Clock Manual Clock VIDEO Off Time G On Time AUDIO Sleep Timer TIME Auto Off SPECIAL LOCK F Prev. To cancel Off Time function, use the...
... then set the minutes. 7 Press EXIT to save and return to the previous menu. ing, or press the ENTER button to save and return to TV view- PIPCH+ SWAP RATIO CC FREEZE PIP INPUT MENU EXIT PLAY PAUSE STOP RECORD REW FF SKIP 1/3/4/6 2/3/5 7 PAGE 35 Off On AM 12 : 00 1 ... CABLE DVD SAT MODE LIGHT POWER TV/VIDEO FRONT DVI COMP1 COMP2 RGB 123 456 789 ENTER 0 MUTE FLASHBK SURF SAP VOL VIDEO CH PIP PIPCH- SETUP Auto Clock Manual Clock VIDEO Off Time G On Time AUDIO Sleep Timer TIME Auto Off SPECIAL LOCK F Prev. To cancel Off Time function, use the...
Owners Manual
Page 36
SETUP VIDEO AUDIO TIME Auto Clock Manual Clock Off Time On Time G Sleep Timer Auto Off SPECIAL LOCK F Prev. TV 1 4 Vol. 2 0 1 Press the MENU button on . 7 Press EXIT to save and return to TV viewing, or press the ENTER button to save and return to set . Off On Tim AM 04 : 00 Ch. ... On Time menu. 4 Use the UP/DOWN arrows to choose On. 5 Use the LEFT/RIGHT arrows to select in step 4. 2/7 5 1 1/3/4/6 TV VCR CABLE DVD SAT MODE LIGHT POWER TV/VIDEO FRONT DVI COMP1 COMP2 RGB 123 456 789 ENTER 0 MUTE FLASHBK SURF SAP VOL VIDEO CH PIP PIPCH- PIPCH+ SWAP RATIO...
SETUP VIDEO AUDIO TIME Auto Clock Manual Clock Off Time On Time G Sleep Timer Auto Off SPECIAL LOCK F Prev. TV 1 4 Vol. 2 0 1 Press the MENU button on . 7 Press EXIT to save and return to TV viewing, or press the ENTER button to save and return to set . Off On Tim AM 04 : 00 Ch. ... On Time menu. 4 Use the UP/DOWN arrows to choose On. 5 Use the LEFT/RIGHT arrows to select in step 4. 2/7 5 1 1/3/4/6 TV VCR CABLE DVD SAT MODE LIGHT POWER TV/VIDEO FRONT DVI COMP1 COMP2 RGB 123 456 789 ENTER 0 MUTE FLASHBK SURF SAP VOL VIDEO CH PIP PIPCH- PIPCH+ SWAP RATIO...
Owners Manual
Page 37
Set it again if necessary. 2/5 TV VCR CABLE DVD SAT MODE LIGHT POWER TV/VIDEO FRONT DVI COMP1 COMP2 RGB 123 456 789 ENTER 0 MUTE FLASHBK SURF SAP VOL VIDEO CH PIP PIPCH- SETUP VIDEO Auto Clock Manual Clock Off Time On Time AUDIO Sleep Timer G TIME Auto Off SPECIAL LOCK F Prev.... PIPCH+ SWAP RATIO CC FREEZE PIP INPUT 1 1/3/4 MENU EXIT PLAY PAUSE STOP RECORD REW FF SKIP 1/3/4 2/3 5 PAGE 37 If you turn off time. 5 Press EXIT to save and return to TV viewing,...
Set it again if necessary. 2/5 TV VCR CABLE DVD SAT MODE LIGHT POWER TV/VIDEO FRONT DVI COMP1 COMP2 RGB 123 456 789 ENTER 0 MUTE FLASHBK SURF SAP VOL VIDEO CH PIP PIPCH- SETUP VIDEO Auto Clock Manual Clock Off Time On Time AUDIO Sleep Timer G TIME Auto Off SPECIAL LOCK F Prev.... PIPCH+ SWAP RATIO CC FREEZE PIP INPUT 1 1/3/4 MENU EXIT PLAY PAUSE STOP RECORD REW FF SKIP 1/3/4 2/3 5 PAGE 37 If you turn off time. 5 Press EXIT to save and return to TV viewing,...
Owners Manual
Page 38
PIPCH+ SWAP RATIO CC FREEZE PIP INPUT 1 1/3/4 MENU EXIT PLAY PAUSE STOP RECORD REW FF SKIP 1/3/4 2/3 5 PAGE 38 SETUP VIDEO Auto Clock Manual Clock Off Time On Time AUDIO Sleep Timer TIME Auto Off G Off On SPECIAL LOCK F Prev. 1 Press the MENU button on the remote control, then ... button to access the Auto Off menu. 4 Use the UP/DOWN arrows to choose On or Off. 5 Press EXIT button to save and return to TV viewing, or press the MENU button to save and return to standby mode automatically after 10 minutes. Auto Off If there is no input signal...
PIPCH+ SWAP RATIO CC FREEZE PIP INPUT 1 1/3/4 MENU EXIT PLAY PAUSE STOP RECORD REW FF SKIP 1/3/4 2/3 5 PAGE 38 SETUP VIDEO Auto Clock Manual Clock Off Time On Time AUDIO Sleep Timer TIME Auto Off G Off On SPECIAL LOCK F Prev. 1 Press the MENU button on the remote control, then ... button to access the Auto Off menu. 4 Use the UP/DOWN arrows to choose On or Off. 5 Press EXIT button to save and return to TV viewing, or press the MENU button to save and return to standby mode automatically after 10 minutes. Auto Off If there is no input signal...
Owners Manual
Page 55
...been turned on. • Make sure that decision. • Check to view your TV for PIP is selected. No stereo sound is turned on your TV and on the source equipment. • Check to see if all the connections are secure... in the Audio mode menu to see if all the wires are connected properly. • Check to see if the TV/VCR button on . • You might want to adjust the PIP picture settings under that the connections are fresh and... • Make sure the batteries are secure on the back of your VCR has the TV selected or change the PIP to another source. • Reset clock...
...been turned on. • Make sure that decision. • Check to view your TV for PIP is selected. No stereo sound is turned on your TV and on the source equipment. • Check to see if all the connections are secure... in the Audio mode menu to see if all the wires are connected properly. • Check to see if the TV/VCR button on . • You might want to adjust the PIP picture settings under that the connections are fresh and... • Make sure the batteries are secure on the back of your VCR has the TV selected or change the PIP to another source. • Reset clock...

Owners Manual
Page 60
...sale or delivery ticket as evidence of the Date of the purchase date. P/N : 3828VA0220Y a (NB03JC) Limited Warranty Your LG® brand DLP Rear Projection Television will be repaired or replaced as evidence of Purchase for power supply requirements). In-Home Service is provided. THIS LIMITED WARRANTY...in this Unit, as a result of improper installation, including incorrect or insufficient AC supply (please consult the owner's manual for proof of warranty, and submit a copy of the bill of sale to schedule a service appointment. NEITHER THE MANUFACTURER NOR ITS U.S.
...sale or delivery ticket as evidence of the Date of the purchase date. P/N : 3828VA0220Y a (NB03JC) Limited Warranty Your LG® brand DLP Rear Projection Television will be repaired or replaced as evidence of Purchase for power supply requirements). In-Home Service is provided. THIS LIMITED WARRANTY...in this Unit, as a result of improper installation, including incorrect or insufficient AC supply (please consult the owner's manual for proof of warranty, and submit a copy of the bill of sale to schedule a service appointment. NEITHER THE MANUFACTURER NOR ITS U.S.

