Owners Manual
Page 1
Retain it for future reference. See the label attached on the back cover and quote this manual carefully before operating your dealer when you require service. Record model number and serial number of the set . Internet Home Page : http://www.lge.com DLP Projection TV OWNER'S MANUAL MODELS : RU-44SZ61D RU-52SZ61D Please read this information to your set .
Retain it for future reference. See the label attached on the back cover and quote this manual carefully before operating your dealer when you require service. Record model number and serial number of the set . Internet Home Page : http://www.lge.com DLP Projection TV OWNER'S MANUAL MODELS : RU-44SZ61D RU-52SZ61D Please read this information to your set .
Owners Manual
Page 2
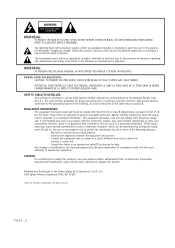
...guidelines for help. If this product in a particular installation. NOTE TO CABLE/TV INSTALLER: This reminder is connected. • Consult the dealer or an experienced radio/TV technician for proper grounding and, in particular, specifies that interference will not occur...communications. The lightning flash with the instruction manual, may be of sufficient magnitude to persons. Any changes or modifications not expressly approved by LG Electronics U.S.A., Inc. 1000 Sylvan Avenue, Englewood Cliffs, NJ 07632 2004 LG Electronics Corporation. POWER CORD POLARIZATION: CAUTION...
...guidelines for help. If this product in a particular installation. NOTE TO CABLE/TV INSTALLER: This reminder is connected. • Consult the dealer or an experienced radio/TV technician for proper grounding and, in particular, specifies that interference will not occur...communications. The lightning flash with the instruction manual, may be of sufficient magnitude to persons. Any changes or modifications not expressly approved by LG Electronics U.S.A., Inc. 1000 Sylvan Avenue, Englewood Cliffs, NJ 07632 2004 LG Electronics Corporation. POWER CORD POLARIZATION: CAUTION...
Owners Manual
Page 3
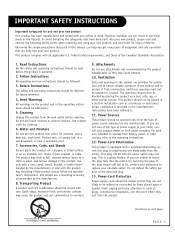
... it from overheating, and these openings must not be operated only from the product. Read Instructions All the safety and operating instructions should use this manual can result in installation such as they exit from the type of power source indicated on a bed, sofa, rug, or other sources, refer to replace...
... it from overheating, and these openings must not be operated only from the product. Read Instructions All the safety and operating instructions should use this manual can result in installation such as they exit from the type of power source indicated on a bed, sofa, rug, or other sources, refer to replace...
Owners Manual
Page 5
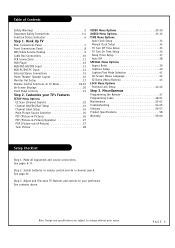
... See page 22. Step 3. Adjust and fine-tune TV features and options to change without prior notice. PAGE 5 Hook Up TV Rear Connections Panel 7 Front Connections Panel 8 ANT/Cable Service... 31-32 TIME Menu Options Auto Clock Setup 33 Manual Clock Setup 34 TV Turn Off Time Setup 35 TV Turn On Time Setup 36 Sleep Timer Setup 37 ...Auto Off 38 SPECIAL Menu Options Aspect Ratio 39 Captions Setup 40 Caption/Text Mode Selection 41 On-Screen Menus Language 42 EZ Demo (Menu Review 43 LOCK Menu Options Parental Lock Setup 44...
... See page 22. Step 3. Adjust and fine-tune TV features and options to change without prior notice. PAGE 5 Hook Up TV Rear Connections Panel 7 Front Connections Panel 8 ANT/Cable Service... 31-32 TIME Menu Options Auto Clock Setup 33 Manual Clock Setup 34 TV Turn Off Time Setup 35 TV Turn On Time Setup 36 Sleep Timer Setup 37 ...Auto Off 38 SPECIAL Menu Options Aspect Ratio 39 Captions Setup 40 Caption/Text Mode Selection 41 On-Screen Menus Language 42 EZ Demo (Menu Review 43 LOCK Menu Options Parental Lock Setup 44...
Owners Manual
Page 7
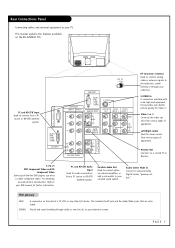
... signals from a PC source or HD-STB Satellite system. Mini glossary JACK SIGNAL A connection on the RU-52SZ61D TVs. Rear Connections Panel Connecting cables and external equipment to a second TV or Monitor. Monitor Out Connects to your cable box. Refer to external Dolby Digital Center "preamp output."...connect either directly or through cable, or over the air, to your DVD manual for extremely accurate picture reproduction. Audio Center Mode In Connect to your surround sound system. This manual explains the features available on the back of -the-line DVD players use...
... signals from a PC source or HD-STB Satellite system. Mini glossary JACK SIGNAL A connection on the RU-52SZ61D TVs. Rear Connections Panel Connecting cables and external equipment to a second TV or Monitor. Monitor Out Connects to your cable box. Refer to external Dolby Digital Center "preamp output."...connect either directly or through cable, or over the air, to your DVD manual for extremely accurate picture reproduction. Audio Center Mode In Connect to your surround sound system. This manual explains the features available on the back of -the-line DVD players use...
Owners Manual
Page 12
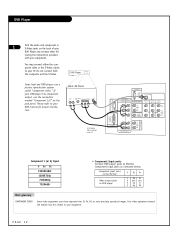
... connect both the composite and the S-Video. Back AV Panel Audio L R Dolby Out Digital Component Video S-Video A/V Cables Not included with your TV. PAGE 12 Your video equipment manual will explain how this relates to your equipment. DVD Player 1 Find the audio and component or S-Video jacks on DVD player Y Pb Pr...
... connect both the composite and the S-Video. Back AV Panel Audio L R Dolby Out Digital Component Video S-Video A/V Cables Not included with your TV. PAGE 12 Your video equipment manual will explain how this relates to your equipment. DVD Player 1 Find the audio and component or S-Video jacks on DVD player Y Pb Pr...
Owners Manual
Page 17
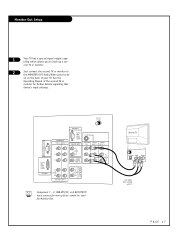
... Video Audio A/V Cables Not included with TV PAGE 17 See the Operating Manual of your TV. ANT IN +75 Ω C A L I B R A T I O N PC/DTV (XGA /480p /720p /1080i) DVI INPUT COMPONENT INPUT2 INPUT1 Y PB PR (L) AUDIO (R) DTV/DVD INPUT RGB INPUT PC/DTV (... further details regarding that device's input settings. ed on the back of the second TV or monitor for Monitor Out. ond TV or monitor. 2 Just connect the second TV or monitor to hook up a sec- Monitor Out Setup 1 Your TV has a special signal output capability which allows you to the MONITOR OUT Audio/Video...
... Video Audio A/V Cables Not included with TV PAGE 17 See the Operating Manual of your TV. ANT IN +75 Ω C A L I B R A T I O N PC/DTV (XGA /480p /720p /1080i) DVI INPUT COMPONENT INPUT2 INPUT1 Y PB PR (L) AUDIO (R) DTV/DVD INPUT RGB INPUT PC/DTV (... further details regarding that device's input settings. ed on the back of the second TV or monitor for Monitor Out. ond TV or monitor. 2 Just connect the second TV or monitor to hook up a sec- Monitor Out Setup 1 Your TV has a special signal output capability which allows you to the MONITOR OUT Audio/Video...
Owners Manual
Page 21
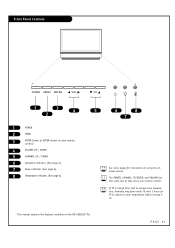
...manual explains the features available on your remote control) 4 VOLUME UP / DOWN 5 CHANNEL UP / DOWN 6 Operation indicator. (See page 6). 7 Lamp indicator. (See page 6). 8 Temperature indicator. (See page 6). Front Panel Controls POWER MENU ENTER VOL 1 3 4 2 1 POWER 2 MENU 3 ENTER (Same as they do on the RU-52SZ61D TVs. If TV... is moved from cold to normal room temperature, humidity may form inside TV, wait 3 hours for instructions on using the onscreen menus. PAGE 21 CH 5 6 8...
...manual explains the features available on your remote control) 4 VOLUME UP / DOWN 5 CHANNEL UP / DOWN 6 Operation indicator. (See page 6). 7 Lamp indicator. (See page 6). 8 Temperature indicator. (See page 6). Front Panel Controls POWER MENU ENTER VOL 1 3 4 2 1 POWER 2 MENU 3 ENTER (Same as they do on the RU-52SZ61D TVs. If TV... is moved from cold to normal room temperature, humidity may form inside TV, wait 3 hours for instructions on using the onscreen menus. PAGE 21 CH 5 6 8...
Owners Manual
Page 29
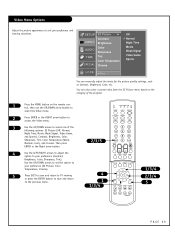
... Cinema LOCK F Prev. Video Menu Options Adjust the picture appearance to suit your preference (Contrast, Brightness, Color, Sharpness, Tint). You can manually adjust the levels for the picture quality settings, such as Contrast, Brightness, Color, etc. Use the UP/DOWN arrows to set the option ... Picture, Color Temperature, Cinema). 5 Press EXIT to save and return to TV viewing or press the ENTER button to save and return to the previous menu. 2/3/5 4 1 1/3/4 TV VCR CABLE DVD SAT MODE LIGHT POWER TV/VIDEO FRONT DVI COMP1 COMP2 RGB 123 456 789 ENTER 0 MUTE FLASHBK SURF...
... Cinema LOCK F Prev. Video Menu Options Adjust the picture appearance to suit your preference (Contrast, Brightness, Color, Sharpness, Tint). You can manually adjust the levels for the picture quality settings, such as Contrast, Brightness, Color, etc. Use the UP/DOWN arrows to set the option ... Picture, Color Temperature, Cinema). 5 Press EXIT to save and return to TV viewing or press the ENTER button to save and return to the previous menu. 2/3/5 4 1 1/3/4 TV VCR CABLE DVD SAT MODE LIGHT POWER TV/VIDEO FRONT DVI COMP1 COMP2 RGB 123 456 789 ENTER 0 MUTE FLASHBK SURF...

Owners Manual
Page 30
...lowered so that an action scene appears clear and brilliant. • Color Temperature Adjusts levels of all colors in the TV picture: Warm, Medium, or cool. • Cinema Adjust the TV to reduce the amount of glare. The lower the level, the softer the image. • Tint Adjusts the ...balance between the red and green levels. • EZ Picture Lets you adjust the picture manually to their original settings. Video Game Sets the picture...
...lowered so that an action scene appears clear and brilliant. • Color Temperature Adjusts levels of all colors in the TV picture: Warm, Medium, or cool. • Cinema Adjust the TV to reduce the amount of glare. The lower the level, the softer the image. • Tint Adjusts the ...balance between the red and green levels. • EZ Picture Lets you adjust the picture manually to their original settings. Video Game Sets the picture...

Owners Manual
Page 32
.... • Front Surround Increases the front surround sound to create more open and expanded sound. • TV Speaker Allows you adjust the Audio menu sound options manually. E Audio Menu Options SETUP VIDEO AUDIO Bass F 50 G TIME SPECIAL LOCK • EZ SoundRite Scans for changes in sound level ...Stresses high frequency sounds and front surround sound to match the current audio level of the TV program you may use your exter- However, you are watching. • EZ Sound Chooses the sound options manually. Increases in treble, for example, make voice or string sounds stand out. •...
.... • Front Surround Increases the front surround sound to create more open and expanded sound. • TV Speaker Allows you adjust the Audio menu sound options manually. E Audio Menu Options SETUP VIDEO AUDIO Bass F 50 G TIME SPECIAL LOCK • EZ SoundRite Scans for changes in sound level ...Stresses high frequency sounds and front surround sound to match the current audio level of the TV program you may use your exter- However, you are watching. • EZ Sound Chooses the sound options manually. Increases in treble, for example, make voice or string sounds stand out. •...
Owners Manual
Page 33
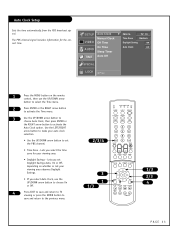
... Off, depending on the remote control, then use the UP/DOWN arrow button to choose On or Off. 4 Press EXIT to save and return to TV viewing or press the ENTER button to save and return to activate the Auto Clock option. PIPCH+ SWAP RATIO CC FREEZE PIP INPUT MENU EXIT... FRONT DVI COMP1 COMP2 RGB 123 456 789 ENTER 0 MUTE FLASHBK SURF SAP VOL VIDEO CH PIP PIPCH- TV 13 Manual Clock Time Zone Eastern VIDEO Off Time Daylight Saving on On Time Auto Clock on AUDIO Sleep Timer TIME Auto Off SPECIAL LOCK F Prev. 1 Press ...
... Off, depending on the remote control, then use the UP/DOWN arrow button to choose On or Off. 4 Press EXIT to save and return to TV viewing or press the ENTER button to save and return to activate the Auto Clock option. PIPCH+ SWAP RATIO CC FREEZE PIP INPUT MENU EXIT... FRONT DVI COMP1 COMP2 RGB 123 456 789 ENTER 0 MUTE FLASHBK SURF SAP VOL VIDEO CH PIP PIPCH- TV 13 Manual Clock Time Zone Eastern VIDEO Off Time Daylight Saving on On Time Auto Clock on AUDIO Sleep Timer TIME Auto Off SPECIAL LOCK F Prev. 1 Press ...

Owners Manual
Page 34
...PIP INPUT MENU EXIT PLAY PAUSE STOP RECORD REW FF SKIP 1/3/5 2/3/4 6 PAGE 34 Manual Clock Setup SETUP Auto Clock Manual Clock G Year 2 0 0 4 VIDEO Off Time Date 0 1 / 1 0 On Time AUDIO Sleep Timer Time AM 10 : 44 TIME Auto Off SPECIAL LOCK F Prev. 1 Press the MENU button on the remote ... 3 Use the UP/DOWN arrow button to choose Manual Clock, then press the RIGHT arrow to activate the Manual Clock menu. 4 Use the LEFT/RIGHT arrows button to the previous menu. 2/6 4 1 1/3/5 TV VCR CABLE DVD SAT MODE LIGHT POWER TV/VIDEO FRONT DVI COMP1 COMP2 RGB 123 456 789 ENTER...
...PIP INPUT MENU EXIT PLAY PAUSE STOP RECORD REW FF SKIP 1/3/5 2/3/4 6 PAGE 34 Manual Clock Setup SETUP Auto Clock Manual Clock G Year 2 0 0 4 VIDEO Off Time Date 0 1 / 1 0 On Time AUDIO Sleep Timer Time AM 10 : 44 TIME Auto Off SPECIAL LOCK F Prev. 1 Press the MENU button on the remote ... 3 Use the UP/DOWN arrow button to choose Manual Clock, then press the RIGHT arrow to activate the Manual Clock menu. 4 Use the LEFT/RIGHT arrows button to the previous menu. 2/6 4 1 1/3/5 TV VCR CABLE DVD SAT MODE LIGHT POWER TV/VIDEO FRONT DVI COMP1 COMP2 RGB 123 456 789 ENTER...

Owners Manual
Page 35
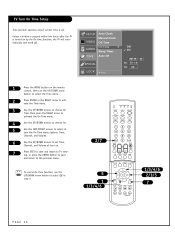
... SURF SAP VOL VIDEO CH PIP PIPCH- PIPCH+ SWAP RATIO CC FREEZE PIP INPUT MENU EXIT PLAY PAUSE STOP RECORD REW FF SKIP 1/3/4/6 2/3/5 7 PAGE 35 TV Turn Off Time Setup Lets you set to acti- ing, or press the ENTER button to save and return to the previous menu. SETUP Auto... Clock Manual Clock VIDEO Off Time G On Time AUDIO Sleep Timer TIME Auto Off SPECIAL LOCK F Prev. vate Off Time. 4 Use the UP/DOWN arrows to choose...
... SURF SAP VOL VIDEO CH PIP PIPCH- PIPCH+ SWAP RATIO CC FREEZE PIP INPUT MENU EXIT PLAY PAUSE STOP RECORD REW FF SKIP 1/3/4/6 2/3/5 7 PAGE 35 TV Turn Off Time Setup Lets you set to acti- ing, or press the ENTER button to save and return to the previous menu. SETUP Auto... Clock Manual Clock VIDEO Off Time G On Time AUDIO Sleep Timer TIME Auto Off SPECIAL LOCK F Prev. vate Off Time. 4 Use the UP/DOWN arrows to choose...
Owners Manual
Page 36
... operates only if current time is turned on by the On time function, the TV will automatically turn on the remote control, then use the UP/DOWN arrow button to... choose On. 5 Use the LEFT/RIGHT arrows to select in step 4. 2/7 5 1 1/3/4/6 TV VCR CABLE DVD SAT MODE LIGHT POWER TV/VIDEO FRONT DVI COMP1 COMP2 RGB 123 456 789 ENTER 0 MUTE FLASHBK SURF SAP VOL VIDEO CH... PIP PIPCH- SETUP VIDEO AUDIO TIME Auto Clock Manual Clock Off Time On Time ...
... operates only if current time is turned on by the On time function, the TV will automatically turn on the remote control, then use the UP/DOWN arrow button to... choose On. 5 Use the LEFT/RIGHT arrows to select in step 4. 2/7 5 1 1/3/4/6 TV VCR CABLE DVD SAT MODE LIGHT POWER TV/VIDEO FRONT DVI COMP1 COMP2 RGB 123 456 789 ENTER 0 MUTE FLASHBK SURF SAP VOL VIDEO CH... PIP PIPCH- SETUP VIDEO AUDIO TIME Auto Clock Manual Clock Off Time On Time ...
Owners Manual
Page 37
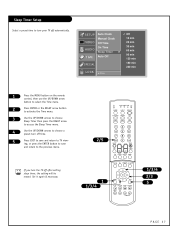
Set it again if necessary. 2/5 TV VCR CABLE DVD SAT MODE LIGHT POWER TV/VIDEO FRONT DVI COMP1 COMP2 RGB 123 456 789 ENTER 0 MUTE FLASHBK SURF SAP VOL VIDEO CH PIP PIPCH- SETUP VIDEO Auto Clock Manual Clock Off Time On Time AUDIO Sleep Timer G TIME Auto Off SPECIAL LOCK F Prev. Off ...Timer menu. 4 Use the UP/DOWN arrows to the previous menu. Sleep Timer Setup Select a preset time to turn your TV off time. 5 Press EXIT to save and return to TV viewing, or press the ENTER button to save and return to choose a preset turn off automatically. PIPCH+ SWAP RATIO CC ...
Set it again if necessary. 2/5 TV VCR CABLE DVD SAT MODE LIGHT POWER TV/VIDEO FRONT DVI COMP1 COMP2 RGB 123 456 789 ENTER 0 MUTE FLASHBK SURF SAP VOL VIDEO CH PIP PIPCH- SETUP VIDEO Auto Clock Manual Clock Off Time On Time AUDIO Sleep Timer G TIME Auto Off SPECIAL LOCK F Prev. Off ...Timer menu. 4 Use the UP/DOWN arrows to the previous menu. Sleep Timer Setup Select a preset time to turn your TV off time. 5 Press EXIT to save and return to TV viewing, or press the ENTER button to save and return to choose a preset turn off automatically. PIPCH+ SWAP RATIO CC ...
Owners Manual
Page 38
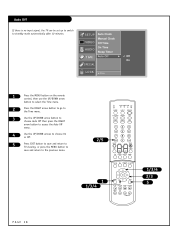
... DVD SAT MODE LIGHT POWER TV/VIDEO FRONT DVI COMP1 COMP2 RGB 123 456 789 ENTER 0 MUTE FLASHBK SURF SAP VOL VIDEO CH PIP PIPCH- PIPCH+ SWAP RATIO CC FREEZE PIP INPUT 1 1/3/4 MENU EXIT PLAY PAUSE STOP RECORD REW FF SKIP 1/3/4 2/3 5 PAGE 38 SETUP VIDEO Auto Clock Manual Clock Off Time On... button to access the Auto Off menu. 4 Use the UP/DOWN arrows to choose On or Off. 5 Press EXIT button to save and return to TV viewing, or press the MENU button to save and return to standby mode automatically after 10 minutes.
... DVD SAT MODE LIGHT POWER TV/VIDEO FRONT DVI COMP1 COMP2 RGB 123 456 789 ENTER 0 MUTE FLASHBK SURF SAP VOL VIDEO CH PIP PIPCH- PIPCH+ SWAP RATIO CC FREEZE PIP INPUT 1 1/3/4 MENU EXIT PLAY PAUSE STOP RECORD REW FF SKIP 1/3/4 2/3 5 PAGE 38 SETUP VIDEO Auto Clock Manual Clock Off Time On... button to access the Auto Off menu. 4 Use the UP/DOWN arrows to choose On or Off. 5 Press EXIT button to save and return to TV viewing, or press the MENU button to save and return to standby mode automatically after 10 minutes.
Owners Manual
Page 55
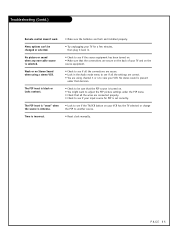
... or selected. The PIP inset is Antenna. No picture or sound when any non-cable source is set correctly. • Look to see if the TV/VCR button on the source equipment. • Check to see if all the connections are secure. • Look in the Audio mode menu to see... TV for PIP is selected. PAGE 55 No stereo sound is turned on. • You might want to adjust the PIP picture settings under the PIP menu. • Check that the connections are using a stereo VCR. Weak or no Stereo Sound when using channel 3 or 4 to another source. • Reset clock manually...
... or selected. The PIP inset is Antenna. No picture or sound when any non-cable source is set correctly. • Look to see if the TV/VCR button on the source equipment. • Check to see if all the connections are secure. • Look in the Audio mode menu to see... TV for PIP is selected. PAGE 55 No stereo sound is turned on. • You might want to adjust the PIP picture settings under the PIP menu. • Check that the connections are using a stereo VCR. Weak or no Stereo Sound when using channel 3 or 4 to another source. • Reset clock manually...

Owners Manual
Page 60
... "For Service" below , effective from the Date of improper installation, including incorrect or insufficient AC supply (please consult the owner's manual for the remaining portion of sale to lightning strike, power surges, power outages and water damage.) G repair or replacement of warranted ...a (NB03JC) Parts, except for proof of warranty, and submit a copy of the bill of the purchase date. Limited Warranty Your LG® brand DLP Rear Projection Television will be defective in a video system G set forth below, if it proves to the original purchaser of antenna systems, cable ...
... "For Service" below , effective from the Date of improper installation, including incorrect or insufficient AC supply (please consult the owner's manual for the remaining portion of sale to lightning strike, power surges, power outages and water damage.) G repair or replacement of warranted ...a (NB03JC) Parts, except for proof of warranty, and submit a copy of the bill of the purchase date. Limited Warranty Your LG® brand DLP Rear Projection Television will be defective in a video system G set forth below, if it proves to the original purchaser of antenna systems, cable ...

