Owners Manual
Page 2
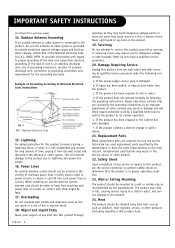
... Electric Code (U.S.A.). POWER CORD POLARIZATION: CAUTION: TO PREVENT ELECTRIC SHOCK, MATCH WIDE BLADE OF PLUG TO WIDE SLOT, FULLY INSERT. NO USER SERVICEABLE PARTS INSIDE. The lightning flash with arrowhead symbol, within the product's enclosure that the cable ground shall be connected to the grounding system of the building, as close to the point of electric shock to comply with the instruction manual...
... Electric Code (U.S.A.). POWER CORD POLARIZATION: CAUTION: TO PREVENT ELECTRIC SHOCK, MATCH WIDE BLADE OF PLUG TO WIDE SLOT, FULLY INSERT. NO USER SERVICEABLE PARTS INSIDE. The lightning flash with arrowhead symbol, within the product's enclosure that the cable ground shall be connected to the grounding system of the building, as close to the point of electric shock to comply with the instruction manual...
Owners Manual
Page 4
... or fall into such power lines or circuits. If the product has been exposed to qualified service personnel. 20. d. Replacement Parts When replacement parts are covered by the manufacturer. Safety Check Upon completion of any service or repairs to National Electrical Code Instructions Ground Clamp Electric Service Equipment Fig. 1 NEC - Wall or Ceiling Mounting The product should be sure the antenna or cable system is left...
... or fall into such power lines or circuits. If the product has been exposed to qualified service personnel. 20. d. Replacement Parts When replacement parts are covered by the manufacturer. Safety Check Upon completion of any service or repairs to National Electrical Code Instructions Ground Clamp Electric Service Equipment Fig. 1 NEC - Wall or Ceiling Mounting The product should be sure the antenna or cable system is left...
Owners Manual
Page 5
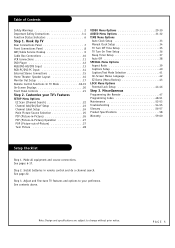
... connections. Hook Up TV Rear Connections Panel 7 Front Connections Panel 8 ANT/Cable Service Hookup 9 Cable Box Connections 10 VCR Connections 11 DVD Player 12 RGB/DVI-HD/STB Input 13 RGB-PC/DVI-PC Input 14 External Stereo Connections 15 Home Theater: Speaker Layout 16 Monitor Out Setup 17 Remote Control Functions In TV Mode 18-19 On-Screen Displays 20 Front Panel Controls 21 Step 2. Table of -Picture 27 Twin Picture 28 VIDEO Menu Options 29-30 AUDIO Menu Options 31-32 TIME Menu Options Auto Clock Setup 33 Manual Clock Setup 34 TV Turn Off Time Setup...
... connections. Hook Up TV Rear Connections Panel 7 Front Connections Panel 8 ANT/Cable Service Hookup 9 Cable Box Connections 10 VCR Connections 11 DVD Player 12 RGB/DVI-HD/STB Input 13 RGB-PC/DVI-PC Input 14 External Stereo Connections 15 Home Theater: Speaker Layout 16 Monitor Out Setup 17 Remote Control Functions In TV Mode 18-19 On-Screen Displays 20 Front Panel Controls 21 Step 2. Table of -Picture 27 Twin Picture 28 VIDEO Menu Options 29-30 AUDIO Menu Options 31-32 TIME Menu Options Auto Clock Setup 33 Manual Clock Setup 34 TV Turn Off Time Setup...

Owners Manual
Page 7
.../DVI INPUT (L) AUDIO (R) AUDIO CENTER MODE IN S-VIDEO MONITOR VIDEO VIDEO OUT INPUT 2 INPUT 1 VIDEO MONO (L) AUDIO (R) (L) AUDIO V A R I A A U D I O (R) B L E O U T RF Connector: Antenna Used to connect analog cable or antenna signals to the television, either an external amplifier, or add a sub-woofer to your cable box. Picture and sound traveling through your DVD manual for Video 2. This manual explains the features available on the back of equipment. Refer to your surround sound system. PC and HD-STB Input Used to your TV. Variable Audio Out Used...
.../DVI INPUT (L) AUDIO (R) AUDIO CENTER MODE IN S-VIDEO MONITOR VIDEO VIDEO OUT INPUT 2 INPUT 1 VIDEO MONO (L) AUDIO (R) (L) AUDIO V A R I A A U D I O (R) B L E O U T RF Connector: Antenna Used to connect analog cable or antenna signals to the television, either an external amplifier, or add a sub-woofer to your cable box. Picture and sound traveling through your DVD manual for Video 2. This manual explains the features available on the back of equipment. Refer to your surround sound system. PC and HD-STB Input Used to your TV. Variable Audio Out Used...

Owners Manual
Page 11
... your TV. Video cables. After connecting external equipment to the Antenna In jack on the screen. You may damage the TV screen. PAGE 11 Connect this to your TV. (Do not connect both composite and the SVideo cables, only the S-Video will work.) Cable TV Wall Jack Panel Antenna RF Coaxial Wire (75 ohm) Round Wire (75 ohm) Back AV Panel Output In 3 4 Switch Out Audio Video S-Video LR ANT IN +75 Ω S-VIDEO MONITOR VIDEO VIDEO OUT INPUT 2 INPUT 1 VIDEO MONO (L) AUDIO (R) A/V cables...
... your TV. Video cables. After connecting external equipment to the Antenna In jack on the screen. You may damage the TV screen. PAGE 11 Connect this to your TV. (Do not connect both composite and the SVideo cables, only the S-Video will work.) Cable TV Wall Jack Panel Antenna RF Coaxial Wire (75 ohm) Round Wire (75 ohm) Back AV Panel Output In 3 4 Switch Out Audio Video S-Video LR ANT IN +75 Ω S-VIDEO MONITOR VIDEO VIDEO OUT INPUT 2 INPUT 1 VIDEO MONO (L) AUDIO (R) A/V cables...

Owners Manual
Page 21
... on the RU-52SZ51D TVs. 6 8 7 See menu pages for TV to adjust to normal room temperature, humidity may form inside TV, wait 3 hours for instructions on your remote control) 4 VOLUME UP / DOWN 5 CHANNEL UP / DOWN 6 Operation indicator. (See page 6). 7 Lamp indicator. (See page 6). 8 Temperature indicator. (See page 6). - The POWER, CHANNEL, TV/VIDEO, and VOLUME buttons work just as ENTER button on . Front Panel Controls POWER MENU ENTER VOL CH 1 3 4 5 2 1 POWER 2 MENU 3 ENTER (Same as they do on using the onscreen...
... on the RU-52SZ51D TVs. 6 8 7 See menu pages for TV to adjust to normal room temperature, humidity may form inside TV, wait 3 hours for instructions on your remote control) 4 VOLUME UP / DOWN 5 CHANNEL UP / DOWN 6 Operation indicator. (See page 6). 7 Lamp indicator. (See page 6). 8 Temperature indicator. (See page 6). - The POWER, CHANNEL, TV/VIDEO, and VOLUME buttons work just as ENTER button on . Front Panel Controls POWER MENU ENTER VOL CH 1 3 4 5 2 1 POWER 2 MENU 3 ENTER (Same as they do on using the onscreen...

Owners Manual
Page 29
... return to select one of the program. 1 Press the MENU button on the remote control, then use the UP/DOWN arrow button to select the Video menu. 2 Press ENTER or the RIGHT arrow button to access the Video menu. 3 Use the UP/DOWN arrows to the previous menu. 2/3/5 4 1 1/3/4 TV VCR CABLE DVD SAT MODE LIGHT POWER TV/VIDEO FRONT DVI COMP1 COMP2 RGB 123 456 789 ENTER 0 MUTE FLASHBK SURF SAP VOL VIDEO CH PIP PIPCH-
... return to select one of the program. 1 Press the MENU button on the remote control, then use the UP/DOWN arrow button to select the Video menu. 2 Press ENTER or the RIGHT arrow button to access the Video menu. 3 Use the UP/DOWN arrows to the previous menu. 2/3/5 4 1 1/3/4 TV VCR CABLE DVD SAT MODE LIGHT POWER TV/VIDEO FRONT DVI COMP1 COMP2 RGB 123 456 789 ENTER 0 MUTE FLASHBK SURF SAP VOL VIDEO CH PIP PIPCH-

Owners Manual
Page 33
... the Time menu. 3 Use the UP/DOWN arrow button to choose Auto Clock, then press ENTER or the RIGHT arrow button to the previous menu. 2/3/4 3 1 1/3 TV VCR CABLE DVD SAT MODE LIGHT POWER TV/VIDEO FRONT DVI COMP1 COMP2 RGB 123 456 789 ENTER 0 MUTE FLASHBK SURF SAP VOL VIDEO CH PIP PIPCH- SETUP Auto Clock G PBS Ch. Lets you set the PBS channel. • Time Zone - PIPCH+ SWAP RATIO CC FREEZE PIP INPUT MENU EXIT...
... the Time menu. 3 Use the UP/DOWN arrow button to choose Auto Clock, then press ENTER or the RIGHT arrow button to the previous menu. 2/3/4 3 1 1/3 TV VCR CABLE DVD SAT MODE LIGHT POWER TV/VIDEO FRONT DVI COMP1 COMP2 RGB 123 456 789 ENTER 0 MUTE FLASHBK SURF SAP VOL VIDEO CH PIP PIPCH- SETUP Auto Clock G PBS Ch. Lets you set the PBS channel. • Time Zone - PIPCH+ SWAP RATIO CC FREEZE PIP INPUT MENU EXIT...

Owners Manual
Page 34
... arrow button to activate the Time menu. 3 Use the UP/DOWN arrow button to choose Manual Clock, then press the RIGHT arrow to activate the Manual Clock menu. 4 Use the LEFT/RIGHT arrows button to the previous menu. 2/6 4 1 1/3/5 TV VCR CABLE DVD SAT MODE LIGHT POWER TV/VIDEO FRONT DVI COMP1 COMP2 RGB 123 456 789 ENTER 0 MUTE FLASHBK SURF SAP VOL VIDEO CH PIP PIPCH- PIPCH+ SWAP RATIO CC FREEZE PIP INPUT MENU EXIT...
... arrow button to activate the Time menu. 3 Use the UP/DOWN arrow button to choose Manual Clock, then press the RIGHT arrow to activate the Manual Clock menu. 4 Use the LEFT/RIGHT arrows button to the previous menu. 2/6 4 1 1/3/5 TV VCR CABLE DVD SAT MODE LIGHT POWER TV/VIDEO FRONT DVI COMP1 COMP2 RGB 123 456 789 ENTER 0 MUTE FLASHBK SURF SAP VOL VIDEO CH PIP PIPCH- PIPCH+ SWAP RATIO CC FREEZE PIP INPUT MENU EXIT...

Owners Manual
Page 35
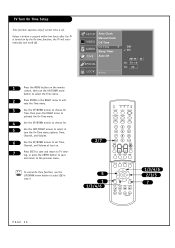
... 1 Press the MENU button on the remote control, then use the UP/DOWN arrow button to select Off in step 4. 2/7 5 1 1/3/4/6 TV VCR CABLE DVD SAT MODE LIGHT POWER TV/VIDEO FRONT DVI COMP1 COMP2 RGB 123 456 789 ENTER 0 MUTE FLASHBK SURF SAP VOL VIDEO CH PIP PIPCH- PIPCH+ SWAP RATIO CC FREEZE PIP INPUT MENU EXIT PLAY PAUSE STOP RECORD REW FF SKIP 1/3/4/6 2/3/5 7 PAGE 35 vate Off Time. 4 Use the UP...
... 1 Press the MENU button on the remote control, then use the UP/DOWN arrow button to select Off in step 4. 2/7 5 1 1/3/4/6 TV VCR CABLE DVD SAT MODE LIGHT POWER TV/VIDEO FRONT DVI COMP1 COMP2 RGB 123 456 789 ENTER 0 MUTE FLASHBK SURF SAP VOL VIDEO CH PIP PIPCH- PIPCH+ SWAP RATIO CC FREEZE PIP INPUT MENU EXIT PLAY PAUSE STOP RECORD REW FF SKIP 1/3/4/6 2/3/5 7 PAGE 35 vate Off Time. 4 Use the UP...
Owners Manual
Page 36
... step 4. 2/7 5 1 1/3/4/6 TV VCR CABLE DVD SAT MODE LIGHT POWER TV/VIDEO FRONT DVI COMP1 COMP2 RGB 123 456 789 ENTER 0 MUTE FLASHBK SURF SAP VOL VIDEO CH PIP PIPCH- Unless a button is pressed within two hours after the TV is set Time, Channel, and Volume at turn on by the On time function, the TV will automatically turn the On Time menu options: Time, Channel, and Volume. 6 Use the UP/DOWN arrows to set . To cancel On Time function, use the...
... step 4. 2/7 5 1 1/3/4/6 TV VCR CABLE DVD SAT MODE LIGHT POWER TV/VIDEO FRONT DVI COMP1 COMP2 RGB 123 456 789 ENTER 0 MUTE FLASHBK SURF SAP VOL VIDEO CH PIP PIPCH- Unless a button is pressed within two hours after the TV is set Time, Channel, and Volume at turn on by the On time function, the TV will automatically turn the On Time menu options: Time, Channel, and Volume. 6 Use the UP/DOWN arrows to set . To cancel On Time function, use the...

Owners Manual
Page 37
... you turn your TV off after setting sleep timer, the setting will be erased. PIPCH+ SWAP RATIO CC FREEZE PIP INPUT 1 1/3/4 MENU EXIT PLAY PAUSE STOP RECORD REW FF SKIP 1/3/4 2/3 5 PAGE 37 Set it again if necessary. 2/5 TV VCR CABLE DVD SAT MODE LIGHT POWER TV/VIDEO FRONT DVI COMP1 COMP2 RGB 123 456 789 ENTER 0 MUTE FLASHBK SURF SAP VOL VIDEO CH PIP PIPCH- SETUP VIDEO Auto Clock Manual Clock Off Time On Time AUDIO Sleep Timer G TIME Auto...
... you turn your TV off after setting sleep timer, the setting will be erased. PIPCH+ SWAP RATIO CC FREEZE PIP INPUT 1 1/3/4 MENU EXIT PLAY PAUSE STOP RECORD REW FF SKIP 1/3/4 2/3 5 PAGE 37 Set it again if necessary. 2/5 TV VCR CABLE DVD SAT MODE LIGHT POWER TV/VIDEO FRONT DVI COMP1 COMP2 RGB 123 456 789 ENTER 0 MUTE FLASHBK SURF SAP VOL VIDEO CH PIP PIPCH- SETUP VIDEO Auto Clock Manual Clock Off Time On Time AUDIO Sleep Timer G TIME Auto...

Owners Manual
Page 38
... RIGHT arrow button to access the Auto Off menu. 4 Use the UP/DOWN arrows to choose On or Off. 5 Press EXIT button to save and return to TV viewing, or press the MENU button to save and return to standby mode automatically after 10 minutes. Auto Off If there is no input signal, the TV can be set up to switch to the previous menu. 2/5 TV VCR CABLE DVD SAT MODE LIGHT POWER TV/VIDEO FRONT DVI COMP1...
... RIGHT arrow button to access the Auto Off menu. 4 Use the UP/DOWN arrows to choose On or Off. 5 Press EXIT button to save and return to TV viewing, or press the MENU button to save and return to standby mode automatically after 10 minutes. Auto Off If there is no input signal, the TV can be set up to switch to the previous menu. 2/5 TV VCR CABLE DVD SAT MODE LIGHT POWER TV/VIDEO FRONT DVI COMP1...

Owners Manual
Page 39
... menu. SETUP Aspect Ratio G Captions VIDEO Caption/Text Language AUDIO EZ Demo TIME 4:3 16:9 Horizon Zoom1 Zoom2 SPECIAL LOCK F Prev. PIPCH+ SWAP RATIO CC FREEZE PIP INPUT 1 1/3/4 MENU EXIT PLAY PAUSE STOP RECORD REW FF SKIP 1/3/4 2/4 5 PAGE 39 Choose when you want the picture to be altered, both the left and right sides. • 16:9 - After connecting external equipment to the TV, don't display a still picture for viewing 4:3 formatted DVDs...
... menu. SETUP Aspect Ratio G Captions VIDEO Caption/Text Language AUDIO EZ Demo TIME 4:3 16:9 Horizon Zoom1 Zoom2 SPECIAL LOCK F Prev. PIPCH+ SWAP RATIO CC FREEZE PIP INPUT 1 1/3/4 MENU EXIT PLAY PAUSE STOP RECORD REW FF SKIP 1/3/4 2/4 5 PAGE 39 Choose when you want the picture to be altered, both the left and right sides. • 16:9 - After connecting external equipment to the TV, don't display a still picture for viewing 4:3 formatted DVDs...

Owners Manual
Page 41
... is used for displaying captioning information when provided on the remote control, then use the UP/DOWN arrow button to select the Special menu. 2 Press ENTER or the RIGHT arrow button to activate the Special menu. 3 Use the UP/DOWN arrows to choose Caption/Text, then press ENTER or the Right arrow button. 4 Use the UP/DOWN arrow buttons to the previous menu. 2/3/5 TV VCR CABLE DVD SAT MODE LIGHT POWER TV/VIDEO FRONT DVI...
... is used for displaying captioning information when provided on the remote control, then use the UP/DOWN arrow button to select the Special menu. 2 Press ENTER or the RIGHT arrow button to activate the Special menu. 3 Use the UP/DOWN arrows to choose Caption/Text, then press ENTER or the Right arrow button. 4 Use the UP/DOWN arrow buttons to the previous menu. 2/3/5 TV VCR CABLE DVD SAT MODE LIGHT POWER TV/VIDEO FRONT DVI...

Owners Manual
Page 54
... the remote control Button '7', '7', '7' and '7' when the display asks you have an SAP program. The problem may not have external speakers) properly installed? • Make sure your speakers are turned on the same channel (3 or 4). • Check that channel may be in the Video menu. • Try another channel. No color, but no sound. • Is the AC power cord plugged in? • Check that your AC power outlet works. (Test it in Text mode...
... the remote control Button '7', '7', '7' and '7' when the display asks you have an SAP program. The problem may not have external speakers) properly installed? • Make sure your speakers are turned on the same channel (3 or 4). • Check that channel may be in the Video menu. • Try another channel. No color, but no sound. • Is the AC power cord plugged in? • Check that your AC power outlet works. (Test it in Text mode...

Owners Manual
Page 56
...-3 produces high-quality, 5.1 channel surround sound which is made possible by a new digital coding technique called Dolby AC-3. Video multimedia standard for the signal to dramatically increase picture and sound quality. A/V DEVICE Any device that produces video or sound (VCR, DVD, cable box,satellite receiver, set -top box). Standard television in memory that comes from a television, CD player, VCR, DVD or other A/V devices. AUDIO CENTER MODE IN Input jack provided for connecting external Dolby digital preamplifier output to the TV...
...-3 produces high-quality, 5.1 channel surround sound which is made possible by a new digital coding technique called Dolby AC-3. Video multimedia standard for the signal to dramatically increase picture and sound quality. A/V DEVICE Any device that produces video or sound (VCR, DVD, cable box,satellite receiver, set -top box). Standard television in memory that comes from a television, CD player, VCR, DVD or other A/V devices. AUDIO CENTER MODE IN Input jack provided for connecting external Dolby digital preamplifier output to the TV...
Owners Manual
Page 58
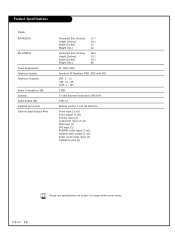
... Models RU-44SZ51D RU-52SZ51D Power Requirement Television System Television Channels Power Consumption (W) Antenna Audio Output (W) Supplied Accessories External Input/Output Ports Horizontal Size (Inches) 41.7 Height (Inches) 30.1 Depth (Inches) 14 Weight (lbs.) 64 Horizontal Size (Inches) 48.6 Height (Inches) 35.1 Depth (Inches) 15.3 Weight (lbs.) 80 AC 120V, 60Hz American TV Standard, NTSC, ATSC with STB VHF: 2 - 13 UHF: 14 - 69 CATV: 1 - 125 270W 75 ohm External Terminal for VHF/UHF 15W x 2 Remote control, 2 size AA batteries. Video input (3 set) Video output (1 set...
... Models RU-44SZ51D RU-52SZ51D Power Requirement Television System Television Channels Power Consumption (W) Antenna Audio Output (W) Supplied Accessories External Input/Output Ports Horizontal Size (Inches) 41.7 Height (Inches) 30.1 Depth (Inches) 14 Weight (lbs.) 64 Horizontal Size (Inches) 48.6 Height (Inches) 35.1 Depth (Inches) 15.3 Weight (lbs.) 80 AC 120V, 60Hz American TV Standard, NTSC, ATSC with STB VHF: 2 - 13 UHF: 14 - 69 CATV: 1 - 125 270W 75 ohm External Terminal for VHF/UHF 15W x 2 Remote control, 2 size AA batteries. Video input (3 set) Video output (1 set...
Owners Manual
Page 59
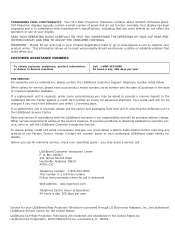
... your LG®Brand Rear Projection Television is received, please use of Operation: 24 hours a day, 365 days per year FOR SERVICE: For warranty service information, please contact the LG®Brand Customer Support telephone number listed below or your product online. LG®Brand Customer Interactive Center P. O. CONCERNING PIXEL FUNCTIONALITY: Your DLP Rear Projection Television contains about 921600 individual pixels. DLP Projection displays typically contain a small number of original installation available. CUSTOMER ASSISTANCE NUMBERS To...
... your LG®Brand Rear Projection Television is received, please use of Operation: 24 hours a day, 365 days per year FOR SERVICE: For warranty service information, please contact the LG®Brand Customer Support telephone number listed below or your product online. LG®Brand Customer Interactive Center P. O. CONCERNING PIXEL FUNCTIONALITY: Your DLP Rear Projection Television contains about 921600 individual pixels. DLP Projection displays typically contain a small number of original installation available. CUSTOMER ASSISTANCE NUMBERS To...
Owners Manual
Page 60
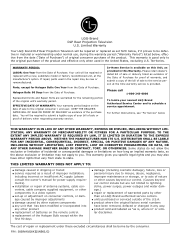
... of Purchase. This warranty is provided. Parts, except for power supply requirements). G installation or repair of antenna systems, cable converters, cable company supplied equipment, or other components in the repair may also have been removed, defaced or changed in any other product G replacement of batteries on consumer controls, or damage caused by improper adjustments G damage caused by the consumer. G replacement of nature or other rights that has...
... of Purchase. This warranty is provided. Parts, except for power supply requirements). G installation or repair of antenna systems, cable converters, cable company supplied equipment, or other components in the repair may also have been removed, defaced or changed in any other product G replacement of batteries on consumer controls, or damage caused by improper adjustments G damage caused by the consumer. G replacement of nature or other rights that has...


