

Owners Manual
Page 2
The exclamation point within the product's enclosure that may cause harmful interference to radio communications. POWER CORD POLARIZATION: CAUTION: TO PREVENT ELECTRIC SHOCK, MATCH WIDE BLADE OF PLUG TO WIDE SLOT, FULLY INSERT. The code provides guidelines... for help. Any changes or modifications not expressly approved by one or more of the National Electric Code (U.S.A.). However, there is : LG Electronics U.S.A., Inc 1000 Sylvan Avenue, Englewood Cliffs, NJ 07632 1-201-816-2000 http://www.lgusa.com 2 Plasma TV If this product. REGULATORY ...
The exclamation point within the product's enclosure that may cause harmful interference to radio communications. POWER CORD POLARIZATION: CAUTION: TO PREVENT ELECTRIC SHOCK, MATCH WIDE BLADE OF PLUG TO WIDE SLOT, FULLY INSERT. The code provides guidelines... for help. Any changes or modifications not expressly approved by one or more of the National Electric Code (U.S.A.). However, there is : LG Electronics U.S.A., Inc 1000 Sylvan Avenue, Englewood Cliffs, NJ 07632 1-201-816-2000 http://www.lgusa.com 2 Plasma TV If this product. REGULATORY ...
Owners Manual
Page 3
...or pinched by the manufacturer, or sold with care. Heed Warnings All warnings on an unstable cart, stand, tripod, bracket, or table. Power Sources This product should be retained for cleaning. 6. Do not defeat the safety purpose of the Canadian Standards Association. 1. Federal safety requirements...help you get many years of enjoyment and safe operation that they are not likely to be adhered to the operating instructions. 12. Power-Cord Protection Power-supply cords should be walked on a bed, sofa, rug, or other sources, refer to . 10. However, improper use ...
...or pinched by the manufacturer, or sold with care. Heed Warnings All warnings on an unstable cart, stand, tripod, bracket, or table. Power Sources This product should be retained for cleaning. 6. Do not defeat the safety purpose of the Canadian Standards Association. 1. Federal safety requirements...help you get many years of enjoyment and safe operation that they are not likely to be adhered to the operating instructions. 12. Power-Cord Protection Power-supply cords should be walked on a bed, sofa, rug, or other sources, refer to . 10. However, improper use ...
Owners Manual
Page 4
...wall outlet and disconnect the antenna or cable system. Adjust only those controls that are required, be situated away from touching such power lines or circuits as to National Electrical Code Instructions Ground Clamp Electric Service Equipment NEC - If the product exhibits a distinct ...change in Wire Antenna Discharge Unit (NEC Section 810-20) Grounding Conductor (NEC Section 810-21) Ground Clamps Power Service Grounding Electrode System (NEC Art 250, Part H) 15. Safety Check Upon completion of any service or repairs to this product (receiver)...
...wall outlet and disconnect the antenna or cable system. Adjust only those controls that are required, be situated away from touching such power lines or circuits as to National Electrical Code Instructions Ground Clamp Electric Service Equipment NEC - If the product exhibits a distinct ...change in Wire Antenna Discharge Unit (NEC Section 810-20) Grounding Conductor (NEC Section 810-21) Ground Clamps Power Service Grounding Electrode System (NEC Art 250, Part H) 15. Safety Check Upon completion of any service or repairs to this product (receiver)...
Owners Manual
Page 5
... Setup 23 On/Off Timer Setup 23 Sleep Timer / Auto Off 24 Special Menu Features Key Lock 25 ISM (Image Sticking Minimization) Method . . . .25 Low Power 26 XD Demo 26 Closed Captions 27 Captions 27 Caption/Text 27 Screen Menu Features Auto Adjustment 28 Setting Picture Format 28 Screen Position 28...
... Setup 23 On/Off Timer Setup 23 Sleep Timer / Auto Off 24 Special Menu Features Key Lock 25 ISM (Image Sticking Minimization) Method . . . .25 Low Power 26 XD Demo 26 Closed Captions 27 Captions 27 Caption/Text 27 Screen Menu Features Auto Adjustment 28 Setting Picture Format 28 Screen Position 28...
Owners Manual
Page 7
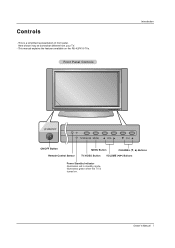
Here shown may be somewhat different from your TV. - This manual explains the features available on . Front Panel Controls Introduction ON/OFF TV/VIDEO MENU VOL CH ON/OFF Button Remote Control Sensor MENU Button CHANNEL (E, D) Buttons TV/VIDEO Button VOLUME (F,G) Buttons Power Standby Indicator Illuminates red in standby mode, Illuminates green when the TV is a simplified representation of front panel. Controls - Owner's Manual 7 This is turned on the RU-42PX10 TVs.
Here shown may be somewhat different from your TV. - This manual explains the features available on . Front Panel Controls Introduction ON/OFF TV/VIDEO MENU VOL CH ON/OFF Button Remote Control Sensor MENU Button CHANNEL (E, D) Buttons TV/VIDEO Button VOLUME (F,G) Buttons Power Standby Indicator Illuminates red in standby mode, Illuminates green when the TV is a simplified representation of front panel. Controls - Owner's Manual 7 This is turned on the RU-42PX10 TVs.
Owners Manual
Page 8
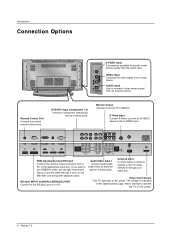
... from an S-VIDEO device to the TV, either directly or through your wired remote control here. The voltage is indicated on AC power. Never attempt to the appropriate input port. DVD/DTV Input (Component 1-2) Connect a component video/audio device to use the cable ...external device. Introduction Connection Options S-VIDEO A/V INPUT2 R AUDIO L / MONO VIDEO S-VIDEO Input A connection available to the RS-232C port on DC power. 8 Plasma TV VIDEO Input Connects the video signal from a video device. Monitor Output Connect a second TV or Monitor. RS-232C INPUT (CONTROL/SERVICE...
... from an S-VIDEO device to the TV, either directly or through your wired remote control here. The voltage is indicated on AC power. Never attempt to the appropriate input port. DVD/DTV Input (Component 1-2) Connect a component video/audio device to use the cable ...external device. Introduction Connection Options S-VIDEO A/V INPUT2 R AUDIO L / MONO VIDEO S-VIDEO Input A connection available to the RS-232C port on DC power. 8 Plasma TV VIDEO Input Connects the video signal from a video device. Monitor Output Connect a second TV or Monitor. RS-232C INPUT (CONTROL/SERVICE...
Owners Manual
Page 9
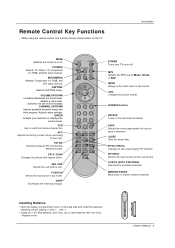
... old or used batteries with -). • Install two 1.5V AAA batteries. CAPTION Selects CAPTION mode. PIP INPUT POSITION SWAP A.PROG MEMORY/ERASE POWER Turns your selection or displays the current mode. PIP INPUT Selects the input source for the program's character. VOLUME UP/DOWN Increases/decreases the sound...picture in pip mode. PIPCH-/PIPCH+ Changes to next lower/higher PIP channel. PIP/DW Switches between PIP and Double Window modes. MUTE POWER TV/VIDEO MULTIMEDIA MTS CAPTION ARC MENU CH ENTER VOL VOL CH 123 456 789 FCR REVIEW 0 APC PIP/DW DASP SPLIT ZOOM ...
... old or used batteries with -). • Install two 1.5V AAA batteries. CAPTION Selects CAPTION mode. PIP INPUT POSITION SWAP A.PROG MEMORY/ERASE POWER Turns your selection or displays the current mode. PIP INPUT Selects the input source for the program's character. VOLUME UP/DOWN Increases/decreases the sound...picture in pip mode. PIPCH-/PIPCH+ Changes to next lower/higher PIP channel. PIP/DW Switches between PIP and Double Window modes. MUTE POWER TV/VIDEO MULTIMEDIA MTS CAPTION ARC MENU CH ENTER VOL VOL CH 123 456 789 FCR REVIEW 0 APC PIP/DW DASP SPLIT ZOOM ...

Owners Manual
Page 10
...VOL 1 2 4 3 5 7 FCR 8 6 9 POSMIETMWIOORINYN/E.SSRSPAIWLSZEIETAZPPOIOPAAMC.PPHPCRIP-OCPGHPIPI+PIN/DSPWLUET0EDP ASPREVIEW Remote Control 2-TV bracket bolts Power Cord D-sub 15 pin cable Installation Instructions GROUNDING Ensure that the following accessories are included with your plasma display. Do not try... wall with strong strings or wound wire cables, (not supplied with the product), as shown. DVI Cable 2-TV brackets 2-Wall brackets Power Supply Short-circuit Breaker • Install the TV brackets on the wall with 4 bolts*, (not supplied with the product), as shown...
...VOL 1 2 4 3 5 7 FCR 8 6 9 POSMIETMWIOORINYN/E.SSRSPAIWLSZEIETAZPPOIOPAAMC.PPHPCRIP-OCPGHPIPI+PIN/DSPWLUET0EDP ASPREVIEW Remote Control 2-TV bracket bolts Power Cord D-sub 15 pin cable Installation Instructions GROUNDING Ensure that the following accessories are included with your plasma display. Do not try... wall with strong strings or wound wire cables, (not supplied with the product), as shown. DVI Cable 2-TV brackets 2-Wall brackets Power Supply Short-circuit Breaker • Install the TV brackets on the wall with 4 bolts*, (not supplied with the product), as shown...
Owners Manual
Page 15
... DVI (Digital Visual Interface) INPUT port for Horizontal and Vertical frequencies is present, change the PC mode to Plug and Play automatically by pressing the POWER button on your TV. Use the Orbiter screen saver when possible. • The synchronization input form for video connections, depending on the TV's remote control...
... DVI (Digital Visual Interface) INPUT port for Horizontal and Vertical frequencies is present, change the PC mode to Plug and Play automatically by pressing the POWER button on your TV. Use the Orbiter screen saver when possible. • The synchronization input form for video connections, depending on the TV's remote control...
Owners Manual
Page 16
Turning on the TV. Press the ON/OFF button on the TV just after installation 1. The menus can be shown on vacation, disconnect the power plug from your choice. 4. Press the MENU button and then use D / E button to select the SPECIAL menu. 2. Press the G button and then use D / E button to... Operation Turning the TV On * In this manual, the OSD (On Screen Display) may be different from the wall power outlet. Press the TV/VIDEO, CH (D / E) button on the TV or press the POWER, TV/VIDEO, MULTIMEDIA, Number (0 ~ 9) button on the remote control and then the TV will be away on ...
Turning on the TV. Press the ON/OFF button on the TV just after installation 1. The menus can be shown on vacation, disconnect the power plug from your choice. 4. Press the MENU button and then use D / E button to select the SPECIAL menu. 2. Press the G button and then use D / E button to... Operation Turning the TV On * In this manual, the OSD (On Screen Display) may be different from the wall power outlet. Press the TV/VIDEO, CH (D / E) button on the TV or press the POWER, TV/VIDEO, MULTIMEDIA, Number (0 ~ 9) button on the remote control and then the TV will be away on ...
Owners Manual
Page 25
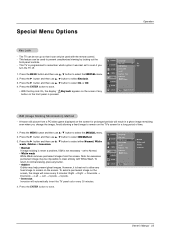
...Inversion will result in a ghost image remaining even when you turn the TV off. 1. CHANNEL Language Key lock PICTURE ISM Method G SOUND TIMER Low power Set ID Caption / Text SPECIAL Captions Demo SCREEN PIP/DW LOCK Menu Prev. This TV is not necessary - Normal White wash Orbiter Inversion Owner's ... front panel is best not to allow any button on the screen. CHANNEL Language PICTURE Key lock ISM Method G On Off SOUND TIMER Low power Set ID Caption / Text SPECIAL Captions Demo SCREEN PIP/DW LOCK Menu Prev. A frozen still picture from the screen. The TV can only...
...Inversion will result in a ghost image remaining even when you turn the TV off. 1. CHANNEL Language Key lock PICTURE ISM Method G SOUND TIMER Low power Set ID Caption / Text SPECIAL Captions Demo SCREEN PIP/DW LOCK Menu Prev. This TV is not necessary - Normal White wash Orbiter Inversion Owner's ... front panel is best not to allow any button on the screen. CHANNEL Language PICTURE Key lock ISM Method G On Off SOUND TIMER Low power Set ID Caption / Text SPECIAL Captions Demo SCREEN PIP/DW LOCK Menu Prev. A frozen still picture from the screen. The TV can only...
Owners Manual
Page 26
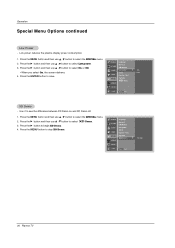
.... 1. Press the G button to stop XD Demo. Press the MENU button to begin XD Demo. 4. Use it to select Low power. 3. Press the G button and then use D / E button to see the difference between XD Demo on and XD Demo off. 1. Press the G button and then use D / E... Plasma TV Press the MENU button and then use D / E button to select the SPECIAL menu. 2. CHANNEL Language PICTURE Key lock ISM Method SOUND TIMER Low power Set ID Caption / Text SPECIAL Captions Demo G SCREEN PIP/DW LOCK Menu Prev. Press the MENU button and then use D / E button to select the ...
.... 1. Press the G button to stop XD Demo. Press the MENU button to begin XD Demo. 4. Use it to select Low power. 3. Press the G button and then use D / E button to see the difference between XD Demo on and XD Demo off. 1. Press the G button and then use D / E... Plasma TV Press the MENU button and then use D / E button to select the SPECIAL menu. 2. CHANNEL Language PICTURE Key lock ISM Method SOUND TIMER Low power Set ID Caption / Text SPECIAL Captions Demo G SCREEN PIP/DW LOCK Menu Prev. Press the MENU button and then use D / E button to select the ...

Owners Manual
Page 27
... a television program into English. Press the MENU button and then use D / E button to select Caption / Text. 3. CHANNEL Language PICTURE Key lock ISM Method SOUND Low power Set ID TIMER Caption / Text G SPECIAL Captions Demo SCREEN PIP/DW LOCK Menu Prev. Captioning is located at left shows a typical caption. Press the ENTER...
... a television program into English. Press the MENU button and then use D / E button to select Caption / Text. 3. CHANNEL Language PICTURE Key lock ISM Method SOUND Low power Set ID TIMER Caption / Text G SPECIAL Captions Demo SCREEN PIP/DW LOCK Menu Prev. Captioning is located at left shows a typical caption. Press the ENTER...

Owners Manual
Page 34
Use this format when receiving abnormal data from non-viable functions or communication errors. SOUND Low power Set ID G 1 3. Press the G button and then use D / E button to select the SPECIAL menu. Sharpness k 12. Low Power j 28. Orbiter Time Setting j 29. Picture Size j 31. Auto Config j a 0 ~ 1 b 0 ~ 6 c 0 ~ 3 d 0 ~ 1 e 0 ~ 1 f 0 ~ 64 g 0 ~ 64 h 0 ~ 64 i 0 ~ 64 j 0 ~ 64 k 0 ~ 64 l 0 ~ 1 m 0 ~ 1 ...) based on this format when receiving normal data. External Control Device Setup Set ID - Power k 02. Treble k 18.
Use this format when receiving abnormal data from non-viable functions or communication errors. SOUND Low power Set ID G 1 3. Press the G button and then use D / E button to select the SPECIAL menu. Sharpness k 12. Low Power j 28. Orbiter Time Setting j 29. Picture Size j 31. Auto Config j a 0 ~ 1 b 0 ~ 6 c 0 ~ 3 d 0 ~ 1 e 0 ~ 1 f 0 ~ 64 g 0 ~ 64 h 0 ~ 64 i 0 ~ 64 j 0 ~ 64 k 0 ~ 64 l 0 ~ 1 m 0 ~ 1 ...) based on this format when receiving normal data. External Control Device Setup Set ID - Power k 02. Treble k 18.

Owners Manual
Page 35
... also adjust mute using the ARC (Aspect Ratio Control) button on ) Acknowledgement [e][ ][Set ID][ ][OK][Data][x] 06. Power (Command2:a) G To control Power On/Off of the TV. Transmission [k][a][ ][Set ID][ ][Data][Cr] Data 0 : Power Off Acknowledgement 1 : Power On [a][ ][Set ID][ ][OK][Data][x] * In a like manner, if other functions transmit 'FF' data based on remote...
... also adjust mute using the ARC (Aspect Ratio Control) button on ) Acknowledgement [e][ ][Set ID][ ][OK][Data][x] 06. Power (Command2:a) G To control Power On/Off of the TV. Transmission [k][a][ ][Set ID][ ][Data][Cr] Data 0 : Power Off Acknowledgement 1 : Power On [a][ ][Set ID][ ][OK][Data][x] * In a like manner, if other functions transmit 'FF' data based on remote...

Owners Manual
Page 36
... /off 1: Lock on Acknowledgement [m][ ][Set ID][ ][OK][Data][x] • If you're not using WIN.POSITION on Acknowledgement [l][ ][Set ID][ ][OK][Data][x] 13. When main power is released. 36 Plasma TV 14. You can also adjust color in the Picture menu. Transmission [k][n][ ][Set ID][ ][Data][Cr] Data 0: PIP/DW off 1: OSD...
... /off 1: Lock on Acknowledgement [m][ ][Set ID][ ][OK][Data][x] • If you're not using WIN.POSITION on Acknowledgement [l][ ][Set ID][ ][OK][Data][x] 13. When main power is released. 36 Plasma TV 14. You can also adjust color in the Picture menu. Transmission [k][n][ ][Set ID][ ][Data][Cr] Data 0: PIP/DW off 1: OSD...

Owners Manual
Page 37
... to 'Real data mapping 3' as shown below. Transmission [k][z][ ][Set ID][ ][FF][Cr] Data FF:Read Acknowledgement [z][ ][Set ID][ ][OK][Data][x] Data 0: Normal (Power on and signal exist) 1: No signal (Power on). 2: Turn the monitor off with remote control. 3: Turn the monitor off with Sleep Time function. 4: Turn the monitor off with RS...
... to 'Real data mapping 3' as shown below. Transmission [k][z][ ][Set ID][ ][FF][Cr] Data FF:Read Acknowledgement [z][ ][Set ID][ ][OK][Data][x] Data 0: Normal (Power on and signal exist) 1: No signal (Power on). 2: Turn the monitor off with remote control. 3: Turn the monitor off with Sleep Time function. 4: Turn the monitor off with RS...

Owners Manual
Page 38
... ][Set ID][ ][OK][Data][x] 28. Auto Configure (Command2:u) G To adjust picture position and minimize image shaking automatically. Low Power (Command2:q) G To control the low power function on screen. Transmission [j][r][ ][Set ID][ ][Data][Cr] Data Min: 1 ~ Max: FE Acknowledgement [r][ ][Set ID][... [t][ ][Set ID][ ][OK][Data][x] 38 Plasma TV 31. External Control Device Setup 26. Transmission [j][q][ ][Set ID][ ][Data][Cr] Data 0: Low power off . Orbiter Time Setting (Command2:r) G To adjust orbiter operation time term. Transmission [j][s][ ][Set ID][ ][Data][Cr] Data Min: 1 ~ Max:...
... ][Set ID][ ][OK][Data][x] 28. Auto Configure (Command2:u) G To adjust picture position and minimize image shaking automatically. Low Power (Command2:q) G To control the low power function on screen. Transmission [j][r][ ][Set ID][ ][Data][Cr] Data Min: 1 ~ Max: FE Acknowledgement [r][ ][Set ID][... [t][ ][Set ID][ ][OK][Data][x] 38 Plasma TV 31. External Control Device Setup 26. Transmission [j][q][ ][Set ID][ ][Data][Cr] Data 0: Low power off . Orbiter Time Setting (Command2:r) G To adjust orbiter operation time term. Transmission [j][s][ ][Set ID][ ][Data][Cr] Data Min: 1 ~ Max:...
Owners Manual
Page 40
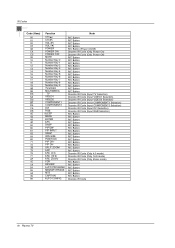
...60 61 63 64 62 71 72 7B 79 76 77 AF 1E 1A 54 55 0A 39 99 Function CH (D) CH (E) VOL (G) VOL (F) POWER POWER ON POWER OFF MUTE Number Key 0 Number Key 1 Number Key 2 Number Key 3 Number Key 4 Number Key 5 Number Key 6 Number Key 7 Number Key... (16:9) ARC (Zoom) FCR REVIEW AUTO PROGRAM MEMORY/ERASE MTS CAPTION AUTO CONFIG Note R/C Button R/C Button R/C Button R/C Button R/C Button (Power On/Off) Discrete IR Code (Only Power On) Discrete IR Code (Only Power Off) R/C Button R/C Button R/C Button R/C Button R/C Button R/C Button R/C Button R/C Button R/C Button R/C Button R/C Button R/C Button R/C ...
...60 61 63 64 62 71 72 7B 79 76 77 AF 1E 1A 54 55 0A 39 99 Function CH (D) CH (E) VOL (G) VOL (F) POWER POWER ON POWER OFF MUTE Number Key 0 Number Key 1 Number Key 2 Number Key 3 Number Key 4 Number Key 5 Number Key 6 Number Key 7 Number Key... (16:9) ARC (Zoom) FCR REVIEW AUTO PROGRAM MEMORY/ERASE MTS CAPTION AUTO CONFIG Note R/C Button R/C Button R/C Button R/C Button R/C Button (Power On/Off) Discrete IR Code (Only Power On) Discrete IR Code (Only Power Off) R/C Button R/C Button R/C Button R/C Button R/C Button R/C Button R/C Button R/C Button R/C Button R/C Button R/C Button R/C Button R/C ...
Owners Manual
Page 41
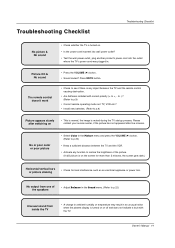
..., the screen gets dark.) Horizontal/vertical bars or picture shaking • Check for local interference such as an electrical appliance or power tool. Owner's Manual 41 Please contact your service center, if the picture has not appeared after switching on . • Is the... power cord inserted into wall power outlet? • Test the wall power outlet, plug another product's power cord into the outlet where the TV's power cord was plugged in the Picture menu and press the VOLUME (G) button. (Refer ...
..., the screen gets dark.) Horizontal/vertical bars or picture shaking • Check for local interference such as an electrical appliance or power tool. Owner's Manual 41 Please contact your service center, if the picture has not appeared after switching on . • Is the... power cord inserted into wall power outlet? • Test the wall power outlet, plug another product's power cord into the outlet where the TV's power cord was plugged in the Picture menu and press the VOLUME (G) button. (Refer ...

