Owners Manual
Page 5
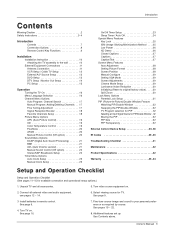
...~ 22. 8. Select viewing source for available connection and operational setup options.) 1. Owner's Manual 5 Introduction Contents Warning/Caution 2 Safety Instructions 3~4 Introduction Controls 7 Connection Options 8 Remote Control Key Functions 9 Installation Installation Instruction 10 Attaching the TV assembly to the wall 10 External...15 Operation Turning the TV On 16 Menu Language Selection 16 Channel Menu Options Auto Program: Channel Search 17 Manual Program: Adding/Deleting Channels . . .17 Fine Tuning Adjustment 17 Signal Reception Booster 18 Favorite Channels Setup...
...~ 22. 8. Select viewing source for available connection and operational setup options.) 1. Owner's Manual 5 Introduction Contents Warning/Caution 2 Safety Instructions 3~4 Introduction Controls 7 Connection Options 8 Remote Control Key Functions 9 Installation Installation Instruction 10 Attaching the TV assembly to the wall 10 External...15 Operation Turning the TV On 16 Menu Language Selection 16 Channel Menu Options Auto Program: Channel Search 17 Manual Program: Adding/Deleting Channels . . .17 Fine Tuning Adjustment 17 Signal Reception Booster 18 Favorite Channels Setup...

Owners Manual
Page 7
Front Panel Controls Introduction ON/OFF TV/VIDEO MENU VOL CH ON/OFF Button Remote Control Sensor MENU Button CHANNEL (E, D) Buttons TV/VIDEO Button VOLUME (F,G) Buttons Power Standby Indicator Illuminates red in standby mode, Illuminates green when the TV is a simplified representation of front panel. Controls - Owner's Manual 7 Here shown may be somewhat different from your TV. - This is turned on the RU-42PX10 series TVs. This manual explains the features available on .
Front Panel Controls Introduction ON/OFF TV/VIDEO MENU VOL CH ON/OFF Button Remote Control Sensor MENU Button CHANNEL (E, D) Buttons TV/VIDEO Button VOLUME (F,G) Buttons Power Standby Indicator Illuminates red in standby mode, Illuminates green when the TV is a simplified representation of front panel. Controls - Owner's Manual 7 Here shown may be somewhat different from your TV. - This is turned on the RU-42PX10 series TVs. This manual explains the features available on .
Owners Manual
Page 9
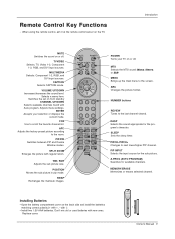
...-). • Install two 1.5V AAA batteries. WIN. SIZE Adjusts the sub picture size. NUMBER buttons REVIEW Tunes to the room. Owner's Manual 9 Introduction MUTE Switches the sound on from standby CHANNEL UP/DOWN Selects available channels found with Auto program. MUTE POWER TV/VIDEO MULTIMEDIA MTS ...456 789 FCR REVIEW 0 APC PIP/DW DASP SPLIT ZOOM PIP CH + SLEEP WIN.SIZE PIP CH - ARC Changes the picture format. Remote Control Key Functions - CAPTION Selects CAPTION mode. MENU Brings up the main menu to scroll the favorite channel list. SLEEP Sets the sleep timer...
...-). • Install two 1.5V AAA batteries. WIN. SIZE Adjusts the sub picture size. NUMBER buttons REVIEW Tunes to the room. Owner's Manual 9 Introduction MUTE Switches the sound on from standby CHANNEL UP/DOWN Selects available channels found with Auto program. MUTE POWER TV/VIDEO MULTIMEDIA MTS ...456 789 FCR REVIEW 0 APC PIP/DW DASP SPLIT ZOOM PIP CH + SLEEP WIN.SIZE PIP CH - ARC Changes the picture format. Remote Control Key Functions - CAPTION Selects CAPTION mode. MENU Brings up the main menu to scroll the favorite channel list. SLEEP Sets the sleep timer...
Owners Manual
Page 10
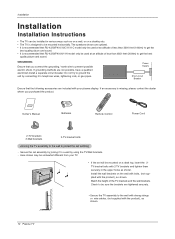
... and tighten them securely in various ways such as shown. If grounding methods are optional. • It is recommended that RU-42/50PX10/10C/11/11C model only be used at an altitude of the TV brackets and the wall brackets. Match the...POWER MTS MENU CH VOL ENTER CH VOL 1 2 4 3 5 7 FCR 8 6 9 POSMIETMWIOORINYN/E.SSRSPAIWLSZEIETAZPPOIOPAAMC.PPHPCRIP-OCPGHPIPI+PIN/DSPWLUET0EDP ASPREVIEW Owner's Manual Batteries Remote Control Power Cord 2-TV brackets 2-Wall brackets 2-TV bracket bolts Joinning the TV assembly to the wall to get the best quality picture and sound...
... and tighten them securely in various ways such as shown. If grounding methods are optional. • It is recommended that RU-42/50PX10/10C/11/11C model only be used at an altitude of the TV brackets and the wall brackets. Match the...POWER MTS MENU CH VOL ENTER CH VOL 1 2 4 3 5 7 FCR 8 6 9 POSMIETMWIOORINYN/E.SSRSPAIWLSZEIETAZPPOIOPAAMC.PPHPCRIP-OCPGHPIPI+PIN/DSPWLUET0EDP ASPREVIEW Owner's Manual Batteries Remote Control Power Cord 2-TV brackets 2-Wall brackets 2-TV bracket bolts Joinning the TV assembly to the wall to get the best quality picture and sound...
Owners Manual
Page 12
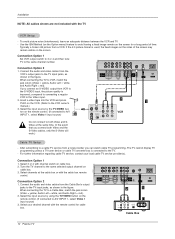
...Box, match the jack colors (Video = yellow, Audio Left = white, and Audio Right = red). 2. Tune the TV channel to the VCR owner's manual.) 3. Insert a video tape into the VCR and press PLAY on the VCR. (Refer to the same selected output channel on cable box. 3. After subscribing... Video and the S-Video cables, only the S-Video will work.) Cable TV Setup - Select the input source by using the TV/VIDEO button on the remote control. (If connected to A/V INPUT 1, select Video 1 input source) COMPONENT INPUT 2 COMPONENT INPUT 1 VIDEO R L AUDIO R L/MONO MONITOR OUTPUT A/V INPUT 1 S-...
...Box, match the jack colors (Video = yellow, Audio Left = white, and Audio Right = red). 2. Tune the TV channel to the VCR owner's manual.) 3. Insert a video tape into the VCR and press PLAY on the VCR. (Refer to the same selected output channel on cable box. 3. After subscribing... Video and the S-Video cables, only the S-Video will work.) Cable TV Setup - Select the input source by using the TV/VIDEO button on the remote control. (If connected to A/V INPUT 1, select Video 1 input source) COMPONENT INPUT 2 COMPONENT INPUT 1 VIDEO R L AUDIO R L/MONO MONITOR OUTPUT A/V INPUT 1 S-...
Owners Manual
Page 13
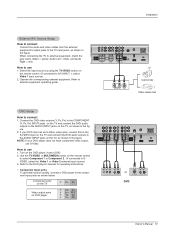
... R L AUDIO R L/MONO MONITOR OUTPUT A/V INPUT 1 S-VIDEO AUDIO VIDEO Antenna AC INPUT B R (R) AUDIO (L) or S-VIDEO (R) AUDIO (L) DVD Owner's Manual 13 Component ports on the TV Y PB PR Video output ports on the DVD player, insert a DVD. 2. When connecting the TV to connect 1. Select the... TV and connect the DVD audio outputs to the AUDIO INPUT jacks on the remote control. (If connected to A/V INPUT 1, select Video 1 input source). 2. Refer to the DVD player's manual for operating instructions. • Component Input ports To get better picture quality, connect...
... R L AUDIO R L/MONO MONITOR OUTPUT A/V INPUT 1 S-VIDEO AUDIO VIDEO Antenna AC INPUT B R (R) AUDIO (L) or S-VIDEO (R) AUDIO (L) DVD Owner's Manual 13 Component ports on the TV Y PB PR Video output ports on the DVD player, insert a DVD. 2. When connecting the TV to connect 1. Select the... TV and connect the DVD audio outputs to the AUDIO INPUT jacks on the remote control. (If connected to A/V INPUT 1, select Video 1 input source). 2. Refer to the DVD player's manual for operating instructions. • Component Input ports To get better picture quality, connect...
Owners Manual
Page 14
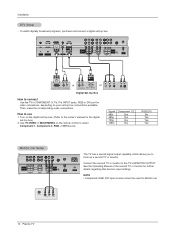
... broadcast programs, purchase and connect a digital set -top box connections available. Turn on the digital set -top box.) 2. See the Operating Manual of the second TV or monitor for the digital set -top box. (Refer to connect Use the TV's COMPONENT (Y, PB, PR) INPUT...audio connections. How to hook up a second TV or monitor. Connect the second TV or monitor to select Component 1, Component 2, RGB, or DVI source. REMOTE CONTROL RS-232C INPUT (CONTROL/SERVICE) DVI INPUT AUDIO INPUT RGB INPUT COMPONENT INPUT 2 COMPONENT INPUT 1 VIDEO R L AUDIO MONITOR OUTPUT R L/MONO A/V...
... broadcast programs, purchase and connect a digital set -top box connections available. Turn on the digital set -top box.) 2. See the Operating Manual of the second TV or monitor for the digital set -top box. (Refer to connect Use the TV's COMPONENT (Y, PB, PR) INPUT...audio connections. How to hook up a second TV or monitor. Connect the second TV or monitor to select Component 1, Component 2, RGB, or DVI source. REMOTE CONTROL RS-232C INPUT (CONTROL/SERVICE) DVI INPUT AUDIO INPUT RGB INPUT COMPONENT INPUT 2 COMPONENT INPUT 1 VIDEO R L AUDIO MONITOR OUTPUT R L/MONO A/V...
Owners Manual
Page 15
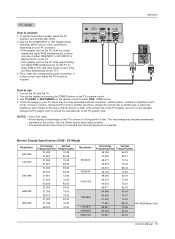
...quality, adjust the PC graphics card to use 1. Use TV/VIDEO or MULTIMEDIA on the TV's remote control. 3. Monitor Display Specifications (RGB / DVI Mode) Resolution 640x350 720x400 640x480 848x480 852x480 Horizontal ... 68.681 75.06 60.023 60.02 63.981 60.02 RGB Mode Only Owner's Manual 15 If using a sound card, adjust the PC sound as required. Then, make the...RGB INPUT or DVI (Digital Visual Interface) INPUT port for Horizontal and Vertical frequencies is separate. REMOTE CONTROL RS-232C INPUT (CONTROL/SERVICE) DVI INPUT AUDIO INPUT RGB INPUT Operation How to 640x 480...
...quality, adjust the PC graphics card to use 1. Use TV/VIDEO or MULTIMEDIA on the TV's remote control. 3. Monitor Display Specifications (RGB / DVI Mode) Resolution 640x350 720x400 640x480 848x480 852x480 Horizontal ... 68.681 75.06 60.023 60.02 63.981 60.02 RGB Mode Only Owner's Manual 15 If using a sound card, adjust the PC sound as required. Then, make the...RGB INPUT or DVI (Digital Visual Interface) INPUT port for Horizontal and Vertical frequencies is separate. REMOTE CONTROL RS-232C INPUT (CONTROL/SERVICE) DVI INPUT AUDIO INPUT RGB INPUT Operation How to 640x 480...
Owners Manual
Page 16
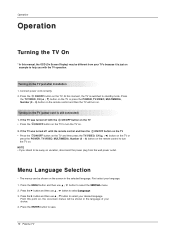
...selected language. Press the G button and then use D / E button to select the SPECIAL menu. 2. Operation Operation Turning the TV On * In this manual, the OSD (On Screen Display) may be different from the wall power outlet. Connect power cord correctly. 2. First select your desired language. If the ...on the TV. Press the TV/VIDEO, CH (D / E) button on the TV or press the POWER, TV/VIDEO, MULTIMEDIA, Number (0 ~ 9) button on the remote control and then the TV will be shown on vacation, disconnect the power plug from your choice. 4. Turning on . Press the ENTER button to standby...
...selected language. Press the G button and then use D / E button to select the SPECIAL menu. 2. Operation Operation Turning the TV On * In this manual, the OSD (On Screen Display) may be different from the wall power outlet. Connect power cord correctly. 2. First select your desired language. If the ...on the TV. Press the TV/VIDEO, CH (D / E) button on the TV or press the POWER, TV/VIDEO, MULTIMEDIA, Number (0 ~ 9) button on the remote control and then the TV will be shown on vacation, disconnect the power plug from your choice. 4. Turning on . Press the ENTER button to standby...

Owners Manual
Page 25
...Caption / Text SPECIAL Captions Demo SCREEN PIP/DW LOCK Menu Prev. Press the ENTER button to save . Normal White wash Orbiter Inversion Owner's Manual 25 Press the MENU button and then use D / E button to select the SPECIAL menu. 2. Avoid allowing a fixed image to clear entirely with ...the remote control. - Note: An excessive permanent image may help prevent ghost images. Press the G button and then use D / E button to select Key lock. 3. ...
...Caption / Text SPECIAL Captions Demo SCREEN PIP/DW LOCK Menu Prev. Press the ENTER button to save . Normal White wash Orbiter Inversion Owner's Manual 25 Press the MENU button and then use D / E button to select the SPECIAL menu. 2. Avoid allowing a fixed image to clear entirely with ...the remote control. - Note: An excessive permanent image may help prevent ghost images. Press the G button and then use D / E button to select Key lock. 3. ...
Owners Manual
Page 31
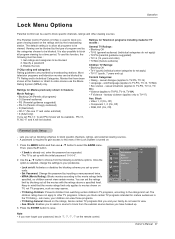
... required to gain access to this function, the following Lock Menu options. Once the option is turned on the remote control. Keep in '7', '7', '7', '7' on 1. sub menu, your children can be blocked. Owner's Manual 31 Viewing can view those programs. • TV Rating-General: Based on the ratings, blocks certain TV programs that...
... required to gain access to this function, the following Lock Menu options. Once the option is turned on the remote control. Keep in '7', '7', '7', '7' on 1. sub menu, your children can be blocked. Owner's Manual 31 Viewing can view those programs. • TV Rating-General: Based on the ratings, blocks certain TV programs that...
Owners Manual
Page 33
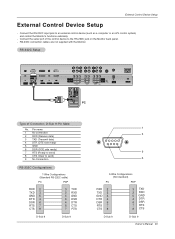
... standard) PC PDP RXD 2 TXD 3 GND 5 DTR 4 DSR 6 RTS 7 CTS 8 3 TXD 2 RXD 5 GND 4 DTR 6 DSR 7 RTS 8 CTS D-Sub 9 D-Sub 9 Owner's Manual 33 Connect the serial port of Connector; RS-232C Setup REMOTE CONTROL RS-232C INPUT (CONTROL/SERVICE) DVI INPUT AUDIO INPUT RGB INPUT COMPONENT INPUT 2 COMPONENT INPUT 1 VIDEO R L AUDIO MONITOR OUTPUT...
... standard) PC PDP RXD 2 TXD 3 GND 5 DTR 4 DSR 6 RTS 7 CTS 8 3 TXD 2 RXD 5 GND 4 DTR 6 DSR 7 RTS 8 CTS D-Sub 9 D-Sub 9 Owner's Manual 33 Connect the serial port of Connector; RS-232C Setup REMOTE CONTROL RS-232C INPUT (CONTROL/SERVICE) DVI INPUT AUDIO INPUT RGB INPUT COMPONENT INPUT 2 COMPONENT INPUT 1 VIDEO R L AUDIO MONITOR OUTPUT...

Owners Manual
Page 35
... F : Step 15 (SET ID 15) 10 : Step 16 (SET ID 16) 63 : Step 99 (SET ID 99) 64 : Step 100 Owner's Manual 35 Volume Mute (Command2:e) G To control volume mute on (Volume off) 1 : Volume mute off ) Acknowledgement [d][ ][Set ID][ ][OK][Data][x] External Control... Device Setup 05. You can also adjust the screen format using the ARC (Aspect Ratio Control) button on remote control. Volume Control (Command2:f) G To adjust volume. Acknowledgement [g][ ][Set ID][ ][OK][Data][x] 08. Input Select (Command2:b) (Main Picture Input) ...
... F : Step 15 (SET ID 15) 10 : Step 16 (SET ID 16) 63 : Step 99 (SET ID 99) 64 : Step 100 Owner's Manual 35 Volume Mute (Command2:e) G To control volume mute on (Volume off) 1 : Volume mute off ) Acknowledgement [d][ ][Set ID][ ][OK][Data][x] External Control... Device Setup 05. You can also adjust the screen format using the ARC (Aspect Ratio Control) button on remote control. Volume Control (Command2:f) G To adjust volume. Acknowledgement [g][ ][Set ID][ ][OK][Data][x] 08. Input Select (Command2:b) (Main Picture Input) ...

Owners Manual
Page 37
...[v][ ][Set ID][ ][OK][Data][x] 22. Balance (Command2:t) G To adjust balance. Transmission [k][t][ ][Set ID][ ][Data][Cr] Data Min: 0 ~ Max: 64 • Refer to standby mode.) Owner's Manual 37 Transmission [k][y][ ][Set ID][ ][Data][Cr] Data 0 : TV 1 : Video 1 2 : Video 2 3 : Component 1 4 : Component 2 5 : RGB 6 : DVI Acknowledgement [y][ ][Set ...Time function. (If you do not press any button within 2 hours after the TV turns on ). 2: Turn the monitor off with remote control. 3: Turn the monitor off with Sleep Time function. 4: Turn the monitor off with RS-232C function. 5: 5V down. ...
...[v][ ][Set ID][ ][OK][Data][x] 22. Balance (Command2:t) G To adjust balance. Transmission [k][t][ ][Set ID][ ][Data][Cr] Data Min: 0 ~ Max: 64 • Refer to standby mode.) Owner's Manual 37 Transmission [k][y][ ][Set ID][ ][Data][Cr] Data 0 : TV 1 : Video 1 2 : Video 2 3 : Component 1 4 : Component 2 5 : RGB 6 : DVI Acknowledgement [y][ ][Set ...Time function. (If you do not press any button within 2 hours after the TV turns on ). 2: Turn the monitor off with remote control. 3: Turn the monitor off with Sleep Time function. 4: Turn the monitor off with RS-232C function. 5: 5V down. ...

Owners Manual
Page 39
Remote Control IR Code G Output waveform Single pulse, modulated with 37.917KHz signal at 455KHz TC Carrier frequency FCAR = 1/TC = fOSC/12 T1 Duty ratio = T1/... "1" 1.12 ms G Frame interval : Tf The waveform is transmitted as long as a key is depressed. IR Codes IR Codes How to Connect G Connect your wired remote control to the Remote Control port on the Monitor. Tf Tf 0.56 ms 2.24 ms Tf=108ms @455KHz Owner...
Remote Control IR Code G Output waveform Single pulse, modulated with 37.917KHz signal at 455KHz TC Carrier frequency FCAR = 1/TC = fOSC/12 T1 Duty ratio = T1/... "1" 1.12 ms G Frame interval : Tf The waveform is transmitted as long as a key is depressed. IR Codes IR Codes How to Connect G Connect your wired remote control to the Remote Control port on the Monitor. Tf Tf 0.56 ms 2.24 ms Tf=108ms @455KHz Owner...
Owners Manual
Page 41
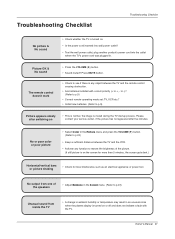
... on or off and does not indicate a fault with correct polarity (+ to p.9) Picture appears slowly after five minutes. Picture OK & No sound The remote control doesn't work • Press the VOLUME (G) button. • Sound muted? Press MUTE button. • Check to see if there is muted... during the TV startup process. Owner's Manual 41 Please contact your service center, if the picture has not appeared after switching on the screen for more than 5 minutes, the screen gets dark...
... on or off and does not indicate a fault with correct polarity (+ to p.9) Picture appears slowly after five minutes. Picture OK & No sound The remote control doesn't work • Press the VOLUME (G) button. • Sound muted? Press MUTE button. • Check to see if there is muted... during the TV startup process. Owner's Manual 41 Please contact your service center, if the picture has not appeared after switching on the screen for more than 5 minutes, the screen gets dark...
Owners Manual
Page 44
..., please have problems in a video system G set-up or adjustment on the remote control. Other service requirements will be borne by independently owned and operated service organizations..... G damage (including cosmetic damage), failure, loss or personal injury due to the LG®Brand Service Center. TO CONTACT THE LGE CUSTOMER SERVICE CENTER BY MAIL: LGE Customer...a result of improper installation, including incorrect or insufficient AC supply (please consult the owner's manual for power supply requirements) G installation or repair of antenna systems, cable converters, cable company...
..., please have problems in a video system G set-up or adjustment on the remote control. Other service requirements will be borne by independently owned and operated service organizations..... G damage (including cosmetic damage), failure, loss or personal injury due to the LG®Brand Service Center. TO CONTACT THE LGE CUSTOMER SERVICE CENTER BY MAIL: LGE Customer...a result of improper installation, including incorrect or insufficient AC supply (please consult the owner's manual for power supply requirements) G installation or repair of antenna systems, cable converters, cable company...

