Owners Manual
Page 1
Retain this information to your TV. See the label attached on the back cover and relate this manual for future reference. Model Number : Serial Number : LG Electronics U.S.A., Inc. Record model number and serial number of the TV in the spaces provided below. PLASMA TV OWNER'S MANUAL MODELS: RU-42PX10/10C/10H/11/11C/11H RU-50PX10/10C/10H/11/11C/11H Please read this manual carefully and completely before operating your dealer if you require service.
Retain this information to your TV. See the label attached on the back cover and relate this manual for future reference. Model Number : Serial Number : LG Electronics U.S.A., Inc. Record model number and serial number of the TV in the spaces provided below. PLASMA TV OWNER'S MANUAL MODELS: RU-42PX10/10C/10H/11/11C/11H RU-50PX10/10C/10H/11/11C/11H Please read this manual carefully and completely before operating your dealer if you require service.
Owners Manual
Page 3
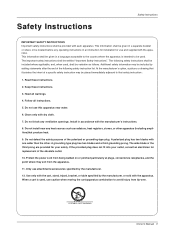
... in accordance with the apparatus. Additional safety information may be placed immediately adjacent to the country where the apparatus is used . PORTABLE CART WARNING Owner's Manual 3 At the manufacturer's option, a picture or drawing that safety instruction : 1. Install in a language acceptable to that illustrates the intent of a specific safety instruction may be...
... in accordance with the apparatus. Additional safety information may be placed immediately adjacent to the country where the apparatus is used . PORTABLE CART WARNING Owner's Manual 3 At the manufacturer's option, a picture or drawing that safety instruction : 1. Install in a language acceptable to that illustrates the intent of a specific safety instruction may be...
Owners Manual
Page 4
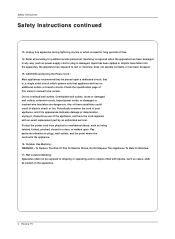
.... Safety Instructions Safety Instructions continued 13. CAUTION concerning the Power Cord : Most appliances recommend they be placed on the apparatus. 4 Plasma TV Unplug this owner's manual to qualified service personnel.
.... Safety Instructions Safety Instructions continued 13. CAUTION concerning the Power Cord : Most appliances recommend they be placed on the apparatus. 4 Plasma TV Unplug this owner's manual to qualified service personnel.
Owners Manual
Page 5
... Out Setup 14 PC Setup 15 Operation Turning the TV On 16 Menu Language Selection 16 Channel Menu Options Auto Program: Channel Search 17 Manual Program: Adding/Deleting Channels . . .17 Fine Tuning Adjustment 17 Signal Reception Booster 18 Favorite Channels Setup 18 Picture Menu Options APC (... 26 Closed Captions 27 Captions 27 Caption/Text 27 Screen Menu Features Auto Adjustment 28 Setting Picture Format 28 Screen Position 28 Manual Configure 29 Setting VGA Mode 29 Screen Adjustments 29 Cinema Mode Setup 29 Luminance Noise Reduction 30 Initializing (Reset to your personal...
... Out Setup 14 PC Setup 15 Operation Turning the TV On 16 Menu Language Selection 16 Channel Menu Options Auto Program: Channel Search 17 Manual Program: Adding/Deleting Channels . . .17 Fine Tuning Adjustment 17 Signal Reception Booster 18 Favorite Channels Setup 18 Picture Menu Options APC (... 26 Closed Captions 27 Captions 27 Caption/Text 27 Screen Menu Features Auto Adjustment 28 Setting Picture Format 28 Screen Position 28 Manual Configure 29 Setting VGA Mode 29 Screen Adjustments 29 Cinema Mode Setup 29 Luminance Noise Reduction 30 Initializing (Reset to your personal...

Owners Manual
Page 7
This manual explains the features available on . This is turned on the RU-42PX10 series TVs. Front Panel Controls Introduction ON/OFF TV/VIDEO MENU VOL CH ON/OFF Button Remote Control Sensor MENU Button CHANNEL (E, D) Buttons TV/VIDEO Button VOLUME (F,G) Buttons Power Standby Indicator Illuminates red in standby mode, Illuminates green when the TV is a simplified representation of front panel. Owner's Manual 7 Controls - Here shown may be somewhat different from your TV. -
This manual explains the features available on . This is turned on the RU-42PX10 series TVs. Front Panel Controls Introduction ON/OFF TV/VIDEO MENU VOL CH ON/OFF Button Remote Control Sensor MENU Button CHANNEL (E, D) Buttons TV/VIDEO Button VOLUME (F,G) Buttons Power Standby Indicator Illuminates red in standby mode, Illuminates green when the TV is a simplified representation of front panel. Owner's Manual 7 Controls - Here shown may be somewhat different from your TV. -
Owners Manual
Page 9
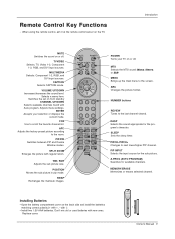
... • Open the battery compartment cover on the back side and install the batteries matching correct polarity (+ with -). • Install two 1.5V AAA batteries. Owner's Manual 9 ENTER Accepts your TV on from standby CHANNEL UP/DOWN Selects available channels found with Auto program. SLEEP Sets the sleep timer. A.PROG (AUTO PROGRAM...
... • Open the battery compartment cover on the back side and install the batteries matching correct polarity (+ with -). • Install two 1.5V AAA batteries. Owner's Manual 9 ENTER Accepts your TV on from standby CHANNEL UP/DOWN Selects available channels found with Auto program. SLEEP Sets the sleep timer. A.PROG (AUTO PROGRAM...
Owners Manual
Page 10
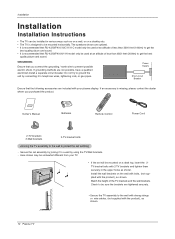
...or wire cables, (not supplied with your TV. • If the set tumbling - Power Supply Short-circuit Breaker Ensure that RU-42/50PX10H/11H model only be mounted on a desk top, insert the 2TV bracket bolts with 2-TV brackets and tighten them... POWER MTS MENU CH VOL ENTER CH VOL 1 2 4 3 5 7 FCR 8 6 9 POSMIETMWIOORINYN/E.SSRSPAIWLSZEIETAZPPOIOPAAMC.PPHPCRIP-OCPGHPIPI+PIN/DSPWLUET0EDP ASPREVIEW Owner's Manual Batteries Remote Control Power Cord 2-TV brackets 2-Wall brackets 2-TV bracket bolts Joinning the TV assembly to the wall to telephone wires, lightening rods, or...
...or wire cables, (not supplied with your TV. • If the set tumbling - Power Supply Short-circuit Breaker Ensure that RU-42/50PX10H/11H model only be mounted on a desk top, insert the 2TV bracket bolts with 2-TV brackets and tighten them... POWER MTS MENU CH VOL ENTER CH VOL 1 2 4 3 5 7 FCR 8 6 9 POSMIETMWIOORINYN/E.SSRSPAIWLSZEIETAZPPOIOPAAMC.PPHPCRIP-OCPGHPIPI+PIN/DSPWLUET0EDP ASPREVIEW Owner's Manual Batteries Remote Control Power Cord 2-TV brackets 2-Wall brackets 2-TV bracket bolts Joinning the TV assembly to the wall to telephone wires, lightening rods, or...

Owners Manual
Page 11
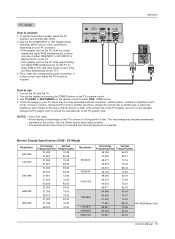
... antenna is not installed properly, contact your dealer for two TV's, install a "2-Way Signal Splitter" in a poor signal area, purchase and install a signal amplifier. Owner's Manual 11 Single-family Dwellings /Houses (Connect to wall jack for outdoor antenna) Bronze Wire Be careful not to tighten. Antenna • If the antenna needs...
... antenna is not installed properly, contact your dealer for two TV's, install a "2-Way Signal Splitter" in a poor signal area, purchase and install a signal amplifier. Owner's Manual 11 Single-family Dwellings /Houses (Connect to wall jack for outdoor antenna) Bronze Wire Be careful not to tighten. Antenna • If the antenna needs...
Owners Manual
Page 12
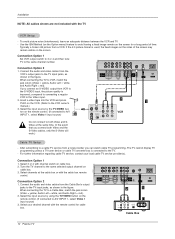
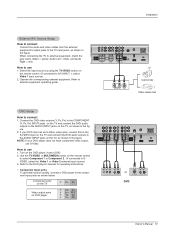
... avoid picture noise (interference), leave an adequate distance between the VCR and TV - Connect the audio and video cables from VCR to the VCR owner's manual.) 3. When connecting the TV to a Cable Box, match the jack colors (Video = yellow, Audio Left = white, and Audio Right = red). 2. If you connect both Video...
... avoid picture noise (interference), leave an adequate distance between the VCR and TV - Connect the audio and video cables from VCR to the VCR owner's manual.) 3. When connecting the TV to a Cable Box, match the jack colors (Video = yellow, Audio Left = white, and Audio Right = red). 2. If you connect both Video...
Owners Manual
Page 13
... 1 VIDEO R L AUDIO R L/MONO MONITOR OUTPUT A/V INPUT 1 S-VIDEO AUDIO VIDEO Antenna AC INPUT B R (R) AUDIO (L) or S-VIDEO (R) AUDIO (L) DVD Owner's Manual 13 Component ports on the TV Y PB PR Video output ports on the DVD player, insert a DVD. 2. How to use S-Video. How to connect 1. Refer... to the DVD player's manual for operating instructions. • Component Input ports To get better picture quality, connect a DVD player to the component input ports as shown ...
... 1 VIDEO R L AUDIO R L/MONO MONITOR OUTPUT A/V INPUT 1 S-VIDEO AUDIO VIDEO Antenna AC INPUT B R (R) AUDIO (L) or S-VIDEO (R) AUDIO (L) DVD Owner's Manual 13 Component ports on the TV Y PB PR Video output ports on the DVD player, insert a DVD. 2. How to use S-Video. How to connect 1. Refer... to the DVD player's manual for operating instructions. • Component Input ports To get better picture quality, connect a DVD player to the component input ports as shown ...
Owners Manual
Page 14
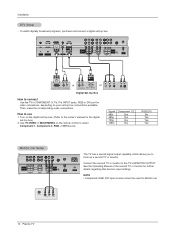
... A/V INPUT 1 S-VIDEO AUDIO VIDEO Antenna or or DVI-DTV OUTPUT (R) AUDIO (L) (R) AUDIO (L) RGB-DTV OUTPUT Digital Set-top Box How to the owner's manual for video connections, depending on your set -top box. Then, make the corresponding audio connections. Turn on the remote control to the TV's MONITOR OUTPUT... up a second TV or monitor. Connect the second TV or monitor to select Component 1, Component 2, RGB, or DVI source. See the Operating Manual of the second TV or monitor for Monitor out. Use TV/VIDEO or MULTIMEDIA on the digital set-top box. (Refer to connect Use the...
... A/V INPUT 1 S-VIDEO AUDIO VIDEO Antenna or or DVI-DTV OUTPUT (R) AUDIO (L) (R) AUDIO (L) RGB-DTV OUTPUT Digital Set-top Box How to the owner's manual for video connections, depending on your set -top box. Then, make the corresponding audio connections. Turn on the remote control to the TV's MONITOR OUTPUT... up a second TV or monitor. Connect the second TV or monitor to select Component 1, Component 2, RGB, or DVI source. See the Operating Manual of the second TV or monitor for Monitor out. Use TV/VIDEO or MULTIMEDIA on the digital set-top box. (Refer to connect Use the...
Owners Manual
Page 15
....01 67.500 75.00 77.487 85.00 68.681 75.06 60.023 60.02 63.981 60.02 RGB Mode Only Owner's Manual 15 Turn on the display by the TV.) 3. If noise is separate. NOTES: • Use a DVI cable. • Avoid keeping a fixed image on the TV...
....01 67.500 75.00 77.487 85.00 68.681 75.06 60.023 60.02 63.981 60.02 RGB Mode Only Owner's Manual 15 Turn on the display by the TV.) 3. If noise is separate. NOTES: • Use a DVI cable. • Avoid keeping a fixed image on the TV...
Owners Manual
Page 16
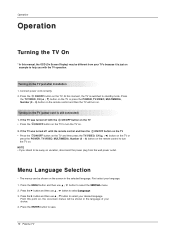
Operation Operation Turning the TV On * In this manual, the OSD (On Screen Display) may be different from the wall power outlet. NOTE • If you with the ON/OFF button on the TV &#...
Operation Operation Turning the TV On * In this manual, the OSD (On Screen Display) may be different from the wall power outlet. NOTE • If you with the ON/OFF button on the TV &#...
Owners Manual
Page 17
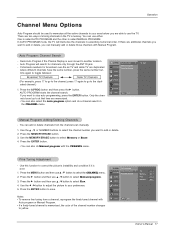
.../ERASE button. 3. Use the MEMORY/ERASE button to another location. - Press the G button and then use D / E button to select Manual program. 3. There are duplicated where different channels have the same number, press the same number buttons again to toggle between: Broadcast TV Channels Cable... search. You can use D / E button to select the CHANNEL menu. 2. Notes • To remove fine tuning from the channel scan manually. 1. Operation Channel Menu Options Auto Program should be used to memorize all the active channels in your preference. 5. Only the channels found up ...
.../ERASE button. 3. Use the MEMORY/ERASE button to another location. - Press the G button and then use D / E button to select Manual program. 3. There are duplicated where different channels have the same number, press the same number buttons again to toggle between: Broadcast TV Channels Cable... search. You can use D / E button to select the CHANNEL menu. 2. Notes • To remove fine tuning from the channel scan manually. 1. Operation Channel Menu Options Auto Program should be used to memorize all the active channels in your preference. 5. Only the channels found up ...

Owners Manual
Page 18
...button and then use D / E button to a favorite channel, press the FCR (Favorite Channel Review) button repeatedly. CHANNEL Auto program Manual program G TV 2 PICTURE Favorite channel Memory On SOUND Fine 0 Booster Off TIMER SPECIAL SCREEN PIP/DW LOCK Menu Prev. Press the ...'t affect the adjustment for each channel separately. 1. Favorite Channels Setup - Use the F / G button to set Booster to select Manual program. 3. The eight favorite channels appear on or off for other favorite channels. 6. Operation Channel Menu Options continued Signal Reception Booster ...
...button and then use D / E button to a favorite channel, press the FCR (Favorite Channel Review) button repeatedly. CHANNEL Auto program Manual program G TV 2 PICTURE Favorite channel Memory On SOUND Fine 0 Booster Off TIMER SPECIAL SCREEN PIP/DW LOCK Menu Prev. Press the ...'t affect the adjustment for each channel separately. 1. Favorite Channels Setup - Use the F / G button to set Booster to select Manual program. 3. The eight favorite channels appear on or off for other favorite channels. 6. Operation Channel Menu Options continued Signal Reception Booster ...
Owners Manual
Page 19
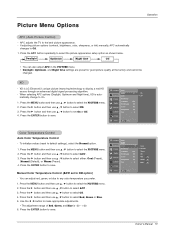
... 55 60 0 PIP/DW LOCK Menu Prev. Cool Normal Warm Off Red 0 Green 0 Blue 0 Owner's Manual 19 If adjusting picture options (contrast, brightness, color, sharpness, or tint) manually, APC automatically changes to select XD. 3. XD - XD is LG Electronic's unique picture improving technology to select the picture appearance setup option as shown below... picture appearance. - Press the G button and then use D / E button to save . APC adjusts the TV to select Off. 4. Press the ENTER button to Off option) - Manual Color Temperature Control (ACC set On or Off. 4.
... 55 60 0 PIP/DW LOCK Menu Prev. Cool Normal Warm Off Red 0 Green 0 Blue 0 Owner's Manual 19 If adjusting picture options (contrast, brightness, color, sharpness, or tint) manually, APC automatically changes to select XD. 3. XD - XD is LG Electronic's unique picture improving technology to select the picture appearance setup option as shown below... picture appearance. - Press the G button and then use D / E button to save . APC adjusts the TV to select Off. 4. Press the ENTER button to Off option) - Manual Color Temperature Control (ACC set On or Off. 4.
Owners Manual
Page 20
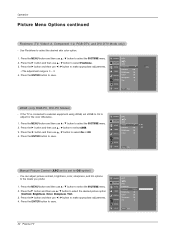
... SPECIAL Color 55 SCREEN PIP/DW LOCK Menu Prev. Use Fleshtone to save. PICTURE ACC 3. Press the G button and then use D / E button to select Fleshtone. Manual Picture Control (APC set to set sRGB to On to save . Press the MENU button and then use D / E button to Off option) - Press the ENTER...
... SPECIAL Color 55 SCREEN PIP/DW LOCK Menu Prev. Use Fleshtone to save. PICTURE ACC 3. Press the G button and then use D / E button to select Fleshtone. Manual Picture Control (APC set to set sRGB to On to save . Press the MENU button and then use D / E button to Off option) - Press the ENTER...

Owners Manual
Page 21
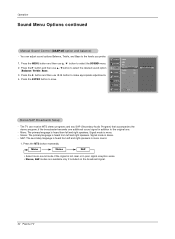
...below. Press the G button and then use D / E button to select BBE. 3. Press the ENTER button to save . AVL maintains an equal sound level; Owner's Manual 21 Press the G button and then use D / E button to select the SOUND menu. 2. Press the G button and then use D / E button to Off...Press the G button and then use D / E button to select On or Off. 4. even if you adjust sound options (Treble and Bass) manually, DASP automatically changes to select On or Off. 4. CHANNEL PICTURE SOUND TIMER DASP BBE AVL Balance Treble Bass SPECIAL G On 0 Off 50 50 SCREEN...
...below. Press the G button and then use D / E button to select BBE. 3. Press the ENTER button to save . AVL maintains an equal sound level; Owner's Manual 21 Press the G button and then use D / E button to select the SOUND menu. 2. Press the G button and then use D / E button to Off...Press the G button and then use D / E button to select On or Off. 4. even if you adjust sound options (Treble and Bass) manually, DASP automatically changes to select On or Off. 4. CHANNEL PICTURE SOUND TIMER DASP BBE AVL Balance Treble Bass SPECIAL G On 0 Off 50 50 SCREEN...
Owners Manual
Page 22
... in addition to select the SOUND menu. Treble 50 TIMER Bass 50 3. Stereo/SAP Broadcasts Setup - Signal mode is stereo. - Operation Sound Menu Options continued Manual Sound Control (DASP off option and balance) - SCREEN PIP/DW LOCK Menu Prev. if the broadcaster transmits one additional sound signal in poor signal reception...
... in addition to select the SOUND menu. Treble 50 TIMER Bass 50 3. Stereo/SAP Broadcasts Setup - Signal mode is stereo. - Operation Sound Menu Options continued Manual Sound Control (DASP off option and balance) - SCREEN PIP/DW LOCK Menu Prev. if the broadcaster transmits one additional sound signal in poor signal reception...
Owners Manual
Page 23
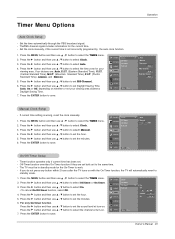
... to select the TIMER menu. 2. Press the ENTER button to select On. • To cancel On/Off timer function, select Off. 4. TV 2 Owner's Manual 23 ThePBS channel signal includes information for your viewing area observes Daylight Saving Time. 7. Press the G button and then use D / E button to save ....whether or not your viewing area. G On Off 6 : 30 AM Volume 17 Ch. Press the G button and then use D / E button to selectt Manual. 4. Press the G button and then use D / E button to select Off timer or On timer. 3. Off-Timer function overrides On-Timer function if ...
... to select the TIMER menu. 2. Press the ENTER button to select On. • To cancel On/Off timer function, select Off. 4. TV 2 Owner's Manual 23 ThePBS channel signal includes information for your viewing area observes Daylight Saving Time. 7. Press the G button and then use D / E button to save ....whether or not your viewing area. G On Off 6 : 30 AM Volume 17 Ch. Press the G button and then use D / E button to selectt Manual. 4. Press the G button and then use D / E button to select Off timer or On timer. 3. Off-Timer function overrides On-Timer function if ...

