Owner's Manual (English)
Page 2
...lose the authority to water (dripping or splashing) and no guarantee that appliance and has no additional outlets or branch circuits. Performing controls, adjustments, or carrying out procedures other similar surface. To prevent direct exposure to laser beam, do not try to correct the ... for a Class B digital device, pursuant to persons. To disconnect power from the unit, unplug the unit from that the plug is : LG Electronics U.S.A., Inc.,1000 Sylvan Avenue, Englewood Cliffs, NJ. Pay particular attention to . This lightning flash with the manufacturer's instructions. Check the ...
...lose the authority to water (dripping or splashing) and no guarantee that appliance and has no additional outlets or branch circuits. Performing controls, adjustments, or carrying out procedures other similar surface. To prevent direct exposure to laser beam, do not try to correct the ... for a Class B digital device, pursuant to persons. To disconnect power from the unit, unplug the unit from that the plug is : LG Electronics U.S.A., Inc.,1000 Sylvan Avenue, Englewood Cliffs, NJ. Pay particular attention to . This lightning flash with the manufacturer's instructions. Check the ...
Owner's Manual (English)
Page 4
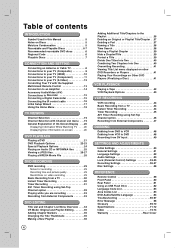
... on other DVD Recorders or Players 41 Playing Your Recordings on Other DVD Players (Finalizing a Disc 41 VCR PLAYBACK Playing a Tape 42 VCR Playback Options 43 VCR RECORDING VCR recording 44 Basic Recording from a TV 44 Instant Timer Recording 44 Timer Recording 45 AV1 Timer Recording using... Dubbing from VCR to DVD 48 Recording from DV Input 49 SETTINGS AND ADJUSTMENTS Initial Settings 50 General Settings 51 Language Settings 52 Audio Settings 53 Lock (Parental Control) Settings 53-55 Recording Settings 56-57 Disc Settings 58 REFERENCE Remote Control 59 Front Panel 60 ...
... on other DVD Recorders or Players 41 Playing Your Recordings on Other DVD Players (Finalizing a Disc 41 VCR PLAYBACK Playing a Tape 42 VCR Playback Options 43 VCR RECORDING VCR recording 44 Basic Recording from a TV 44 Instant Timer Recording 44 Timer Recording 45 AV1 Timer Recording using... Dubbing from VCR to DVD 48 Recording from DV Input 49 SETTINGS AND ADJUSTMENTS Initial Settings 50 General Settings 51 Language Settings 52 Audio Settings 53 Lock (Parental Control) Settings 53-55 Recording Settings 56-57 Disc Settings 58 REFERENCE Remote Control 59 Front Panel 60 ...
Owner's Manual (English)
Page 13
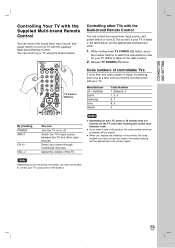
... If more than one code number is listed in the table below . You can control the sound level, input source, and power switch of non-LG TVs as well. Scans up or down TV POWER (1) button, press the number buttons to select the manufacturer code for your TV (.... If your TV is listed, try entering them one that works with your TV. You can control the sound level, input source, and power switch of your LG TV with the supplied Multi-brand Remote Control. Manufacturer LG / GoldStar Zenith Samsung Sony Hitachi Code Number 1 (Default), 2 1, 3, 4 6, 7 8, 9 4 By pressing POWER INPUT CH +/- ...
... If more than one code number is listed in the table below . You can control the sound level, input source, and power switch of non-LG TVs as well. Scans up or down TV POWER (1) button, press the number buttons to select the manufacturer code for your TV (.... If your TV is listed, try entering them one that works with your TV. You can control the sound level, input source, and power switch of your LG TV with the supplied Multi-brand Remote Control. Manufacturer LG / GoldStar Zenith Samsung Sony Hitachi Code Number 1 (Default), 2 1, 3, 4 6, 7 8, 9 4 By pressing POWER INPUT CH +/- ...
Owner's Manual (English)
Page 16
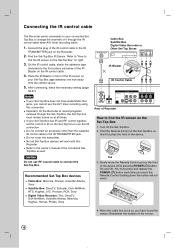
...-Top box must press and release the POWER (1) button each time you cannot use the AV1 timer recording using this Recorder. Connecting the IR control cable The Recorder sends commands to your Set-Top Box approximately one inch away from the remote sensor. 5. After connecting, make the necessary setting... Philips, Sony ANTENNA OUT Cable Box, Satellite Box Digital Video Recorder or Other Set-Top Boxes VIDEO AUDIO OUT OUT IR Blaster Front IR Control Cable Rear of Recorder How to change the channels of it touches the front of the connected SetTop Box as well. Not all times....
...-Top box must press and release the POWER (1) button each time you cannot use the AV1 timer recording using this Recorder. Connecting the IR control cable The Recorder sends commands to your Set-Top Box approximately one inch away from the remote sensor. 5. After connecting, make the necessary setting... Philips, Sony ANTENNA OUT Cable Box, Satellite Box Digital Video Recorder or Other Set-Top Boxes VIDEO AUDIO OUT OUT IR Blaster Front IR Control Cable Rear of Recorder How to change the channels of it touches the front of the connected SetTop Box as well. Not all times....
Owner's Manual (English)
Page 19
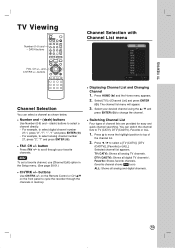
DASH buttons Channel Selection with Channel List menu FAV. CH +/- on the Remote Control or CH v/V on the front panel to cycle the recorder through your desired channel using the v / V and press ENTER ( ) to top of channel lists are ...
DASH buttons Channel Selection with Channel List menu FAV. CH +/- on the Remote Control or CH v/V on the front panel to cycle the recorder through your desired channel using the v / V and press ENTER ( ) to top of channel lists are ...
Owner's Manual (English)
Page 21
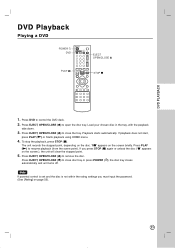
To stop the playback, press STOP (x). Press PLAY (N) to control the DVD deck. 2. Note If parental control is set and the disc is not within the rating settings you press STOP (x) again or unload the disc ("x" appears on page 53). 21 Press ...
To stop the playback, press STOP (x). Press PLAY (N) to control the DVD deck. 2. Note If parental control is set and the disc is not within the rating settings you press STOP (x) again or unload the disc ("x" appears on page 53). 21 Press ...
Owner's Manual (English)
Page 29
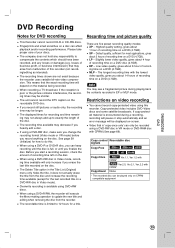
... 14 hours of your discs. EP - The longest recording time with CPRM (See page 69). Note You may be played only on a DVD (4.7GB). Copy control Recordable disc signals Copy-Free -RWVR -RWVideo +RW Copy-Once Copy-Never -R +R RAM -RWVR Ver.1.1, Ver.1.2 with CPRM* RAM Ver.2.0, Ver.2.1, Ver.2.2 with CPRM* None...
... 14 hours of your discs. EP - The longest recording time with CPRM (See page 69). Note You may be played only on a DVD (4.7GB). Copy control Recordable disc signals Copy-Free -RWVR -RWVideo +RW Copy-Once Copy-Never -R +R RAM -RWVR Ver.1.1, Ver.1.2 with CPRM* RAM Ver.2.0, Ver.2.1, Ver.2.2 with CPRM* None...
Owner's Manual (English)
Page 32
... appears. Important, for the Recorder to record sequentially (one right after the other), the very beginning of the later program may not control your Set-Top Box provider. 32 The "Rec. If two timer recordings are set again, the Recorder may not be checked whenever ... delay when a timer recording finishes to save the program. 11. Use v / V to select a program you set to record programs received through the IR control cable. Press RETURN (O) to erase on page 16. 2. The Timer indicator lights on at the current cursor position. Use v / V to previous page". 12...
... appears. Important, for the Recorder to record sequentially (one right after the other), the very beginning of the later program may not control your Set-Top Box provider. 32 The "Rec. If two timer recordings are set again, the Recorder may not be checked whenever ... delay when a timer recording finishes to save the program. 11. Use v / V to select a program you set to record programs received through the IR control cable. Press RETURN (O) to erase on page 16. 2. The Timer indicator lights on at the current cursor position. Use v / V to previous page". 12...

Owner's Manual (English)
Page 34
..., use the v / V buttons to edit VR mode DVD-RW discs. The menu options on the left side of the content on the disc, but just controls how the content is played back. 1. c Menu options: To display menu option, select a title or chapter then press ENTER ( ). You can directly edit the ...Shows) the selected title or chapter. (page 39) [Playlist Add] Adds the title or chapter to the Playlist. (page 36) [Dubbing] Dubs the title to VCR (page 48). [Title] Displays Title List of the chapter. [Combine] Combines two chapters into one (page 40). [Full Play] Starts playback of the titles (or...
..., use the v / V buttons to edit VR mode DVD-RW discs. The menu options on the left side of the content on the disc, but just controls how the content is played back. 1. c Menu options: To display menu option, select a title or chapter then press ENTER ( ). You can directly edit the ...Shows) the selected title or chapter. (page 39) [Playlist Add] Adds the title or chapter to the Playlist. (page 36) [Dubbing] Dubs the title to VCR (page 48). [Title] Displays Title List of the chapter. [Combine] Combines two chapters into one (page 40). [Full Play] Starts playback of the titles (or...
Owner's Manual (English)
Page 38
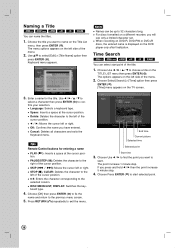
Time Search -RWVR -RWVideo +RW +R -R RAM You can name the titles. 1. Delete: Deletes the character to find the point you have entered. Tips Remote Control buttons for the title. DISC MENU/LIST, DISPLAY: Switches the keyboard type. 4. Choose Use b / B to the left side of the menu. 2. Naming a Title -RWVR -RWVideo +...
Time Search -RWVR -RWVideo +RW +R -R RAM You can name the titles. 1. Delete: Deletes the character to find the point you have entered. Tips Remote Control buttons for the title. DISC MENU/LIST, DISPLAY: Switches the keyboard type. 4. Choose Use b / B to the left side of the menu. 2. Naming a Title -RWVR -RWVideo +...
Owner's Manual (English)
Page 42
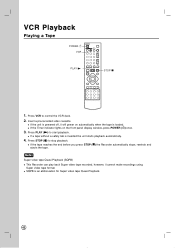
...will power on the front panel display window, press POWER (1) once. 3. Insert a pre-recorded video cassette. Press PLAY (N) to control the VCR deck. 2. Press VCR to start playback. If the Timer indicator lights on automatically when the tape is powered off, it cannot make recordings using Super video...tape format. If the tape reaches the end before you press STOP (x) the Recorder automatically stops, rewinds and ejects the tape. VCR Playback Playing a Tape POWER 1 VCR PLAY STOP * 1. If a tape without a safety tab is an abbreviation for Super video tape Quasi Playback. 42 SQPB is...
...will power on the front panel display window, press POWER (1) once. 3. Insert a pre-recorded video cassette. Press PLAY (N) to control the VCR deck. 2. Press VCR to start playback. If the Timer indicator lights on automatically when the tape is powered off, it cannot make recordings using Super video...tape format. If the tape reaches the end before you press STOP (x) the Recorder automatically stops, rewinds and ejects the tape. VCR Playback Playing a Tape POWER 1 VCR PLAY STOP * 1. If a tape without a safety tab is an abbreviation for Super video tape Quasi Playback. 42 SQPB is...

Owner's Manual (English)
Page 46
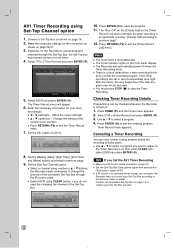
...appears. Set the [Media], [Date], [Start Time], [End Time], and [Mode] options according to [AV1]. 8. Use v / V to record programs received through the IR control cable. Important, for the Recorder to select a program. 4. Select [OFF] using CLEAR button, if you want to save the program. 11. "[Check] field according to...program. The Timer indicator lights on page 16. 2. There is not activated even though you fail the AV1 Timer Recording Make sure IR Control Cable connection. (page 16) Set the [Set-Top Box Edit] options again then proceed the [Test] option. (page 56-57) If IR...
...appears. Set the [Media], [Date], [Start Time], [End Time], and [Mode] options according to [AV1]. 8. Use v / V to record programs received through the IR control cable. Important, for the Recorder to select a program. 4. Select [OFF] using CLEAR button, if you want to save the program. 11. "[Check] field according to...program. The Timer indicator lights on page 16. 2. There is not activated even though you fail the AV1 Timer Recording Make sure IR Control Cable connection. (page 16) Set the [Set-Top Box Edit] options again then proceed the [Test] option. (page 56-57) If IR...
Owner's Manual (English)
Page 48
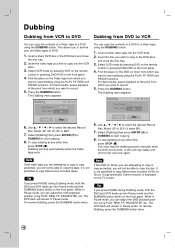
This allows you want to record. 5. Select VCR mode by pressing DVD on the remote control or pressing DVD/VCR on the front panel. Press the DUBBING button. Insert a blank video tape into the VCR deck. 3. To stop dubbing at the point from which you to archive your old Video tapes to DVD. 1. Select ..., you want to start dubbing using the PLAY, FF, REW and PAUSE functions. The VCR deck will not be able to copy into the VCR deck. 2. Select DVD mode by pressing VCR on the remote control or pressing DVD/VCR on the DVD (or Disc) from which you wish to copy the tape. Select [...
This allows you want to record. 5. Select VCR mode by pressing DVD on the remote control or pressing DVD/VCR on the front panel. Press the DUBBING button. Insert a blank video tape into the VCR deck. 3. To stop dubbing at the point from which you to archive your old Video tapes to DVD. 1. Select ..., you want to start dubbing using the PLAY, FF, REW and PAUSE functions. The VCR deck will not be able to copy into the VCR deck. 2. Select DVD mode by pressing VCR on the remote control or pressing DVD/VCR on the DVD (or Disc) from which you wish to copy the tape. Select [...
Owner's Manual (English)
Page 49
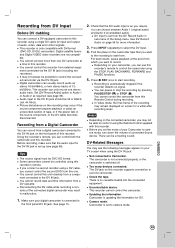
...camcorder. Before recording, make sure that the audio input for input and output of 12bit/32kHz. Check that you require. You cannot control the camcorder from a DV cassette. Picture disturbance on the camcorder tape that the DV audio input is automatically stopped if the recorder... is as you want to the front panel DV IN jack. There can use this recorder. Too many devices connected. This recorder cannot control the camcorder. This recorder is connected to record. Set [DV Record Audio] option to this recorder's remote. Audio input to select the...
...camcorder. Before recording, make sure that the audio input for input and output of 12bit/32kHz. Check that you require. You cannot control the camcorder from a DV cassette. Picture disturbance on the camcorder tape that the DV audio input is automatically stopped if the recorder... is as you want to the front panel DV IN jack. There can use this recorder. Too many devices connected. This recorder cannot control the camcorder. This recorder is connected to record. Set [DV Record Audio] option to this recorder's remote. Audio input to select the...
Owner's Manual (English)
Page 53
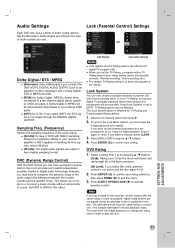
... do so. Higher rated scenes are not effective. DVDs encoded in Dolby Digital or MPEG will be viewed. However, you may wish to activate parental control. To access the Lock Menu options, you must input the 4-digit password you make a mistake, press CLEAR. 3. Select [ON] or [OFF] using the v / V ... rating or a lower one (1) has the most restrictions and rating eight (8) is the least restrictive. [No Limit]: If you connect the DVD+VCR's DIGITAL AUDIO OUTPUT jack to an amplifier or other equipment with 96KHz sampling, Output is not active and the disc plays in the most accurate...
... do so. Higher rated scenes are not effective. DVDs encoded in Dolby Digital or MPEG will be viewed. However, you may wish to activate parental control. To access the Lock Menu options, you must input the 4-digit password you make a mistake, press CLEAR. 3. Select [ON] or [OFF] using the v / V ... rating or a lower one (1) has the most restrictions and rating eight (8) is the least restrictive. [No Limit]: If you connect the DVD+VCR's DIGITAL AUDIO OUTPUT jack to an amplifier or other equipment with 96KHz sampling, Output is not active and the disc plays in the most accurate...
Owner's Manual (English)
Page 56
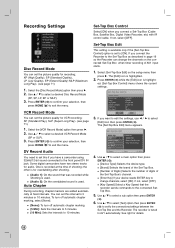
...recorder is set to AV1 automatically. Set-Top Box Edit This setting is available only if the [Set-Top Box Control] option is tuned to [ON]. Select the [VCR Record Mode] option then press B. 2. Auto Chapter During recording, chapter markers are added automatically at the time of ... 56 Use v / V to select [Edit] icon then press ENTER ( ). Select the [Disc Record Mode] option then press B. 2. Recording Settings Set-Top Box Control Select [ON] when you want to edit the settings, use b / B to select a sub option then press ENTER ( ). 6. See right for audio. Some digital...
...recorder is set to AV1 automatically. Set-Top Box Edit This setting is available only if the [Set-Top Box Control] option is tuned to [ON]. Select the [VCR Record Mode] option then press B. 2. Auto Chapter During recording, chapter markers are added automatically at the time of ... 56 Use v / V to select [Edit] icon then press ENTER ( ). Select the [Disc Record Mode] option then press B. 2. Recording Settings Set-Top Box Control Select [ON] when you want to edit the settings, use b / B to select a sub option then press ENTER ( ). 6. See right for audio. Some digital...
Owner's Manual (English)
Page 57
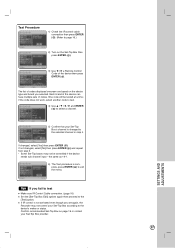
...multiple sets of the device then press ENTER ( ). Confirm recommended Set-Top Box on the device type and brand you selected. One code will be controlled if the device needs sub channel input - SETTINGS AND ADJUSTMENTS Tips If you set again, the Recorder may not be tested at a time; If changed... , select [No] then press ENTER ( ) and repeat from step 3. • Some Set-Top boxes may not control your Set-Top Box provider. 57 the same as 19-1. 6) The Test procedure is complete, press ENTER ( ) to the [Test] option. if the code does...
...multiple sets of the device then press ENTER ( ). Confirm recommended Set-Top Box on the device type and brand you selected. One code will be controlled if the device needs sub channel input - SETTINGS AND ADJUSTMENTS Tips If you set again, the Recorder may not be tested at a time; If changed... , select [No] then press ENTER ( ) and repeat from step 3. • Some Set-Top boxes may not control your Set-Top Box provider. 57 the same as 19-1. 6) The Test procedure is complete, press ENTER ( ) to the [Test] option. if the code does...
Owner's Manual (English)
Page 59
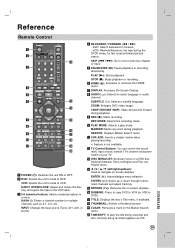
VCR: Rewinds/Advances the tape during the STOP mode, for multiple channels such as PIP. f HOME ( ): Accesses or removes the HOME menu. i REC (z): Starts recording. SEARCH: Displays Marker Search menu. k CHP. q TITLE: Displays the disc's Title menu, if available. Reference Remote Control a b l c d e f m n g o h p i q j ...( ): Acknowledges menu selection. SKIP (. / >): Go to DVD. REC MODE: Selects the recording mode. l TV Control Buttons: You can control the sound level, input source, selects TV's channel and power switch of your TV m DISC MENU/LIST: Accesses menu...
VCR: Rewinds/Advances the tape during the STOP mode, for multiple channels such as PIP. f HOME ( ): Accesses or removes the HOME menu. i REC (z): Starts recording. SEARCH: Displays Marker Search menu. k CHP. q TITLE: Displays the disc's Title menu, if available. Reference Remote Control a b l c d e f m n g o h p i q j ...( ): Acknowledges menu selection. SKIP (. / >): Go to DVD. REC MODE: Selects the recording mode. l TV Control Buttons: You can control the sound level, input source, selects TV's channel and power switch of your TV m DISC MENU/LIST: Accesses menu...

Owner's Manual (English)
Page 60
... exit pause mode. d Display window Shows the current status of an external source (Audio system, TV/ Monitor, VCR, Camcorder, etc.). i Z VCR Ejects the tape in the VCR deck. o DVD/VCR Toggles control between the DVD deck and the VCR deck. Sets the output resolution for HDMI and COMPONENT OUTPUT jacks. - HDMI: 1080p, 1080i, 720p, 480p, 480i...
... exit pause mode. d Display window Shows the current status of an external source (Audio system, TV/ Monitor, VCR, Camcorder, etc.). i Z VCR Ejects the tape in the VCR deck. o DVD/VCR Toggles control between the DVD deck and the VCR deck. Sets the output resolution for HDMI and COMPONENT OUTPUT jacks. - HDMI: 1080p, 1080i, 720p, 480p, 480i...
Owner's Manual (English)
Page 61
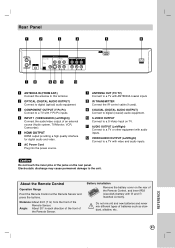
...to this terminal. Distance: About 23 ft (7 m) from the front of the Remote Sensor. Caution Do not touch the inner pins of the Remote Control, and insert R03 (size AAA) battery with video and audio inputs. Angle: About 30° in each direction of the front of the Remote Sensor... of the jacks on TV. Do not mix old and new batteries and never mix different types of an external source (Audio system, TV/Monitor, VCR, Camcorder). i COAXIAL (DIGITAL AUDIO OUTPUT) Connect to the unit. b OPTICAL (DIGITAL AUDIO OUTPUT) Connect to a TV with ANTENNA coaxial inputs h IR TRANSMITTER ...
...to this terminal. Distance: About 23 ft (7 m) from the front of the Remote Sensor. Caution Do not touch the inner pins of the Remote Control, and insert R03 (size AAA) battery with video and audio inputs. Angle: About 30° in each direction of the front of the Remote Sensor... of the jacks on TV. Do not mix old and new batteries and never mix different types of an external source (Audio system, TV/Monitor, VCR, Camcorder). i COAXIAL (DIGITAL AUDIO OUTPUT) Connect to the unit. b OPTICAL (DIGITAL AUDIO OUTPUT) Connect to a TV with ANTENNA coaxial inputs h IR TRANSMITTER ...

