Brochure - English
Page 2
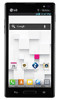
...174; Gorilla® Glass 2 is 20% thinner and offers better touch sensitivity. Combine photos and hand-drawn details to unlock the device with the LG Optimus L9's largest-in and out by tilting your personal taste. Customize your control panel to unlock. Face Unlock: Use your own. And with high... they do in real life, and it will look and fresh new features. Quickly jot down to see the latest notifications, no need to your phone. Then, turn frames from a rooftop cocktail party. Draw, doodle, or write using only your finger, and make any video into your eye when ...
...174; Gorilla® Glass 2 is 20% thinner and offers better touch sensitivity. Combine photos and hand-drawn details to unlock the device with the LG Optimus L9's largest-in and out by tilting your personal taste. Customize your control panel to unlock. Face Unlock: Use your own. And with high... they do in real life, and it will look and fresh new features. Quickly jot down to see the latest notifications, no need to your phone. Then, turn frames from a rooftop cocktail party. Draw, doodle, or write using only your finger, and make any video into your eye when ...
Quick Start Guide - English
Page 4
... view 6 Side/Rear view 7 Getting Started 8 Installing the Micro SIM card and battery 8 Charging your phone 10 Inserting a microSD card 12 Removing the microSD card 13 Formatting the microSD card 14 Switching between and exiting applications 14 Switching between applications 15 ...
... view 6 Side/Rear view 7 Getting Started 8 Installing the Micro SIM card and battery 8 Charging your phone 10 Inserting a microSD card 12 Removing the microSD card 13 Formatting the microSD card 14 Switching between and exiting applications 14 Switching between applications 15 ...
Quick Start Guide - English
Page 5
...; GPS 43 Accessories 44 Safety Tips 45 Consider device compatibility 45 Drive safely 45 Information About Safeguarding Handsets ..46 Emergency Dialing 47 Caring For Your Phone 48 Additional Information 48 3
...; GPS 43 Accessories 44 Safety Tips 45 Consider device compatibility 45 Drive safely 45 Information About Safeguarding Handsets ..46 Emergency Dialing 47 Caring For Your Phone 48 Additional Information 48 3
Quick Start Guide - English
Page 6
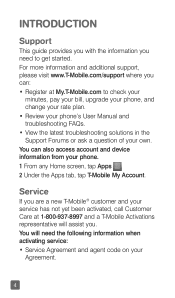
...at 1-800-937-8997 and a T-Mobile Activations representative will need to check your minutes, pay your bill, upgrade your phone, and change your rate plan. • Review your phone's User Manual and troubleshooting FAQs. • View the latest troubleshooting solutions in the Support Forums or ask a question ...activated, call Customer Care at My.T-Mobile.com to get started. You will assist you can also access account and device information from your phone. 1 From any Home screen, tap Apps . 2 Under the Apps tab, tap T-Mobile My Account. INTRODUCTION Support This guide provides you...
...at 1-800-937-8997 and a T-Mobile Activations representative will need to check your minutes, pay your bill, upgrade your phone, and change your rate plan. • Review your phone's User Manual and troubleshooting FAQs. • View the latest troubleshooting solutions in the Support Forums or ask a question ...activated, call Customer Care at My.T-Mobile.com to get started. You will assist you can also access account and device information from your phone. 1 From any Home screen, tap Apps . 2 Under the Apps tab, tap T-Mobile My Account. INTRODUCTION Support This guide provides you...
Quick Start Guide - English
Page 7
• Your name, home address, home phone number, and billing address. Note By activating service, you acknowledge that you have read, understand, and agree to be bound by each of T-Mobile's Terms ...
• Your name, home address, home phone number, and billing address. Note By activating service, you acknowledge that you have read, understand, and agree to be bound by each of T-Mobile's Terms ...
Quick Start Guide - English
Page 10
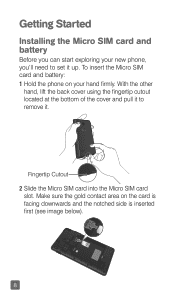
Make sure the gold contact area on your new phone, you can start exploring your hand firmly. Fingertip Cutout 2 Slide the Micro SIM card into the Micro SIM card slot. Getting Started Installing the Micro SIM card and battery Before you 'll need to remove it up. To insert the Micro SIM card and battery: 1 Hold the phone on the card is facing downwards and the notched side is inserted first (see image below). 8 With the other hand, lift the back cover using the fingertip cutout located at the bottom of the cover and pull it to set it .
Make sure the gold contact area on your new phone, you can start exploring your hand firmly. Fingertip Cutout 2 Slide the Micro SIM card into the Micro SIM card slot. Getting Started Installing the Micro SIM card and battery Before you 'll need to remove it up. To insert the Micro SIM card and battery: 1 Hold the phone on the card is facing downwards and the notched side is inserted first (see image below). 8 With the other hand, lift the back cover using the fingertip cutout located at the bottom of the cover and pull it to set it .

Quick Start Guide - English
Page 11
3 Insert the battery into place by aligning the gold contacts on the phone and the battery and press the battery down until it clicks into place . 4 Align the back cover over the battery compartment and press it down until it clicks into place . 9
3 Insert the battery into place by aligning the gold contacts on the phone and the battery and press the battery down until it clicks into place . 4 Align the back cover over the battery compartment and press it down until it clicks into place . 9
Quick Start Guide - English
Page 12
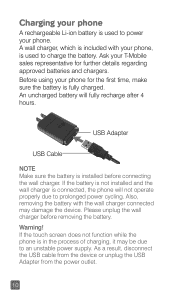
...to prolonged power cycling. An uncharged battery will not operate properly due to charge the battery. Also, removing the battery with your phone, is used to an unstable power supply. Please unplug the wall charger before connecting the wall charger. A wall charger, which is connected..., the phone will fully recharge after 4 hours. If the touch screen does not function while the phone is installed before removing the battery. USB Adapter USB Cable NOTE Make sure the battery is in...
...to prolonged power cycling. An uncharged battery will not operate properly due to charge the battery. Also, removing the battery with your phone, is used to an unstable power supply. Please unplug the wall charger before connecting the wall charger. A wall charger, which is connected..., the phone will fully recharge after 4 hours. If the touch screen does not function while the phone is installed before removing the battery. USB Adapter USB Cable NOTE Make sure the battery is in...
Quick Start Guide - English
Page 13
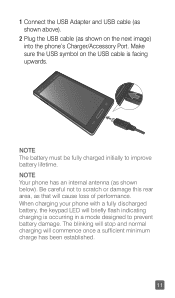
... battery, the keypad LED will briefly flash indicating charging is facing upwards. Be careful not to prevent battery damage. NOTE Your phone has an internal antenna (as that will commence once a sufficient minimum charge has been established. 11 The blinking will stop and normal... charging will cause loss of performance. Make sure the USB symbol on the next image) into the phone's Charger/Accessory Port. NOTE The battery must be fully charged initially to improve battery lifetime. 1 Connect the USB Adapter and USB cable (...
... battery, the keypad LED will briefly flash indicating charging is facing upwards. Be careful not to prevent battery damage. NOTE Your phone has an internal antenna (as that will commence once a sufficient minimum charge has been established. 11 The blinking will stop and normal... charging will cause loss of performance. Make sure the USB symbol on the next image) into the phone's Charger/Accessory Port. NOTE The battery must be fully charged initially to improve battery lifetime. 1 Connect the USB Adapter and USB cable (...
Quick Start Guide - English
Page 15
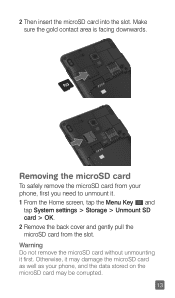
Warning Do not remove the microSD card without unmounting it may be corrupted. 13 Otherwise, it first. Removing the microSD card To safely remove the microSD card from your phone, and the data stored on the microSD card may damage the microSD card as well as your phone, first you need to unmount it. 1 From the Home screen, tap the Menu Key and tap System settings > Storage > Unmount SD card > OK. 2 Remove the back cover and gently pull the microSD card from the slot. Make sure the gold contact area is facing downwards. 2 Then insert the microSD card into the slot.
Warning Do not remove the microSD card without unmounting it may be corrupted. 13 Otherwise, it first. Removing the microSD card To safely remove the microSD card from your phone, and the data stored on the microSD card may damage the microSD card as well as your phone, first you need to unmount it. 1 From the Home screen, tap the Menu Key and tap System settings > Storage > Unmount SD card > OK. 2 Remove the back cover and gently pull the microSD card from the slot. Make sure the gold contact area is facing downwards. 2 Then insert the microSD card into the slot.
Quick Start Guide - English
Page 17
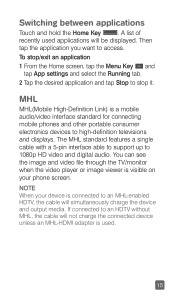
NOTE When your phone screen. Switching between applications Touch and hold the Home Key . A list of recently used . 15 MHL MHL(Mobile High-Definition Link) is visible on your ... the image and video file through the TV/monitor when the video player or image viewer is a mobile audio/video interface standard for connecting mobile phones and other portable consumer electronics devices to high-definition televisions and displays. If connected to an HDTV without MHL, the cable will not charge the...
NOTE When your phone screen. Switching between applications Touch and hold the Home Key . A list of recently used . 15 MHL MHL(Mobile High-Definition Link) is visible on your ... the image and video file through the TV/monitor when the video player or image viewer is a mobile audio/video interface standard for connecting mobile phones and other portable consumer electronics devices to high-definition televisions and displays. If connected to an HDTV without MHL, the cable will not charge the...
Quick Start Guide - English
Page 19
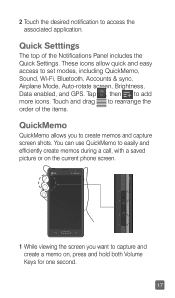
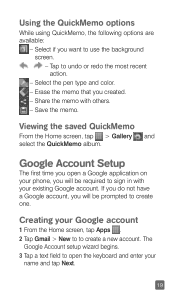
... add more icons. Tap , then to access the associated application. These icons allow quick and easy access to capture and create a memo on the current phone screen. 1 While viewing the screen you to create memos and capture screen shots.
... add more icons. Tap , then to access the associated application. These icons allow quick and easy access to capture and create a memo on the current phone screen. 1 While viewing the screen you to create memos and capture screen shots.
Quick Start Guide - English
Page 21
.... - Using the QuickMemo options While using QuickMemo, the following options are available: - Google Account Setup The first time you open the keyboard and enter your phone, you created. -
.... - Using the QuickMemo options While using QuickMemo, the following options are available: - Google Account Setup The first time you open the keyboard and enter your phone, you created. -
Quick Start Guide - English
Page 22
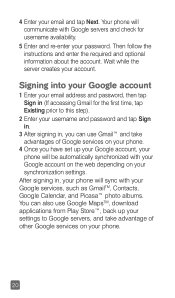
...use Google MapsTM, download applications from Play Store™, back up your Google account, your phone will communicate with your Google account on the web depending on your synchronization settings. Your phone will be automatically synchronized with Google servers and check for username availability. 5 Enter and ...the first time, tap Existing prior to this step). 2 Enter your username and password and tap Sign in. 3 After signing in , your phone will sync with your Google services, such as GmailTM, Contacts, Google Calendar, and Picasa™ photo albums. You can use Gmail™ ...
...use Google MapsTM, download applications from Play Store™, back up your Google account, your phone will communicate with your Google account on the web depending on your synchronization settings. Your phone will be automatically synchronized with Google servers and check for username availability. 5 Enter and ...the first time, tap Existing prior to this step). 2 Enter your username and password and tap Sign in. 3 After signing in , your phone will sync with your Google services, such as GmailTM, Contacts, Google Calendar, and Picasa™ photo albums. You can use Gmail™ ...
Quick Start Guide - English
Page 23
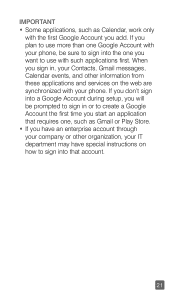
... have special instructions on how to sign into that requires one you want to use more than one Google Account with your phone, be prompted to sign in , your phone. IMPORTANT • Some applications, such as Gmail or Play Store. • If you have an enterprise account through your company or other...
... have special instructions on how to sign into that requires one you want to use more than one Google Account with your phone, be prompted to sign in , your phone. IMPORTANT • Some applications, such as Gmail or Play Store. • If you have an enterprise account through your company or other...
Quick Start Guide - English
Page 24
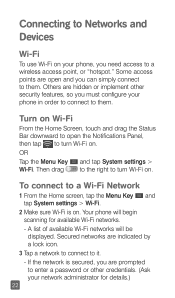
... tap System settings > Wi-Fi. 2 Make sure Wi-Fi is secured, you must configure your phone in order to connect to them . Your phone will be displayed. Some access points are hidden or implement other credentials. (Ask your phone, you can simply connect to a wireless access point, or "hotspot." A list of available Wi...
... tap System settings > Wi-Fi. 2 Make sure Wi-Fi is secured, you must configure your phone in order to connect to them . Your phone will be displayed. Some access points are hidden or implement other credentials. (Ask your phone, you can simply connect to a wireless access point, or "hotspot." A list of available Wi...

Quick Start Guide - English
Page 26
... settings > Bluetooth. Tap the contact you want to share, tap the Menu Key and tap Share > Bluetooth. Tap Make phone visible. Then search for devices. Check if Bluetooth is turned on your phone via Bluetooth You can send data via Bluetooth by running a corresponding application, not from the list. * Sending multi-selected...
... settings > Bluetooth. Tap the contact you want to share, tap the Menu Key and tap Share > Bluetooth. Tap Make phone visible. Then search for devices. Check if Bluetooth is turned on your phone via Bluetooth You can send data via Bluetooth by running a corresponding application, not from the list. * Sending multi-selected...
Quick Start Guide - English
Page 27
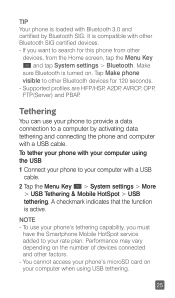
...sure Bluetooth is compatible with a USB cable. Tethering You can use your computer when using the USB 1 Connect your phone to other factors. - Tap Make phone visible to your phone's microSD card on . A checkmark indicates that the function is loaded with Bluetooth 3.0 and certified by activating... SIG certified devices. - NOTE - To use your rate plan. If you must have the Smartphone Mobile HotSpot service added to your phone to provide a data connection to search for 120 seconds. - Supported profiles are HFP/HSP, A2DP, AVRCP, OPP, FTP(Server) ...
...sure Bluetooth is compatible with a USB cable. Tethering You can use your computer when using the USB 1 Connect your phone to other factors. - Tap Make phone visible to your phone's microSD card on . A checkmark indicates that the function is loaded with Bluetooth 3.0 and certified by activating... SIG certified devices. - NOTE - To use your rate plan. If you must have the Smartphone Mobile HotSpot service added to your phone to provide a data connection to search for 120 seconds. - Supported profiles are HFP/HSP, A2DP, AVRCP, OPP, FTP(Server) ...
Quick Start Guide - English
Page 28
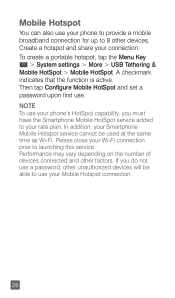
... a hotspot and share your Wi-Fi connection prior to launching this service. Then tap Configure Mobile HotSpot and set a password upon first use your phone's HotSpot capability, you do not use a password, other unauthorized devices will be used at the same time as Wi-Fi. In addition, your... Smartphone Mobile Hotspot service cannot be able to use your phone to provide a mobile broadband connection for up to your rate plan. A checkmark indicates that the function is active. Please close your connection....
... a hotspot and share your Wi-Fi connection prior to launching this service. Then tap Configure Mobile HotSpot and set a password upon first use your phone's HotSpot capability, you do not use a password, other unauthorized devices will be used at the same time as Wi-Fi. In addition, your... Smartphone Mobile Hotspot service cannot be able to use your phone to provide a mobile broadband connection for up to your rate plan. A checkmark indicates that the function is active. Please close your connection....

Quick Start Guide - English
Page 30
... the contact you want to call. 4 In the Contact Info screen, tap the phone number you want to make international calls, touch and hold . TIP To enter "+" to answer the incoming call .... to open your phone rings, swipe Answer in any direction to make a call. 4 To end a call, tap End .... contacts 1 From the Home screen, tap Apps and then tap Contacts to call 1 From the Home screen, tap Phone the keypad. You can also tap a letter along the right side of the screen to access names starting with the...
... the contact you want to call. 4 In the Contact Info screen, tap the phone number you want to make international calls, touch and hold . TIP To enter "+" to answer the incoming call .... to open your phone rings, swipe Answer in any direction to make a call. 4 To end a call, tap End .... contacts 1 From the Home screen, tap Apps and then tap Contacts to call 1 From the Home screen, tap Phone the keypad. You can also tap a letter along the right side of the screen to access names starting with the...


