
User Guide
Page 5
.... • Auto Button Automatic adjustment function (Operational for the analog signal only) There is not a function which is supported There is not a function which is supported • Exit Button • Volume Button Volume up and down direction adjustment. • Mute button 123 456 789 0 • Power On/Off Button • Input Select Button (See next page) • ARC button Aspect Ratio Correction. Using the Remote Control Name of the Remote Control Buttons • AV Button • Sleep Button When...
.... • Auto Button Automatic adjustment function (Operational for the analog signal only) There is not a function which is supported There is not a function which is supported • Exit Button • Volume Button Volume up and down direction adjustment. • Mute button 123 456 789 0 • Power On/Off Button • Input Select Button (See next page) • ARC button Aspect Ratio Correction. Using the Remote Control Name of the Remote Control Buttons • AV Button • Sleep Button When...
User Guide
Page 7
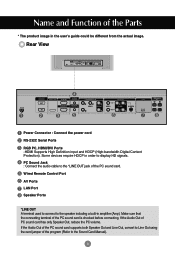
Wired Remote Control Port AV Ports LAN Port Speaker Ports *LINE OUT A terminal used to connect to display HD signals. If the Audio Out of the PC sound card supports both Speaker Out and Line Out, convert to Line Out using the card jumper of the PC sound card is checked before connecting. Rear View AV IN/OUT AV IN/OUT Power Connector : Connect the power cord RS-232C Serial Ports RGB PC, HDMI/DVI Ports -HDMI Supports High Definition input and...
Wired Remote Control Port AV Ports LAN Port Speaker Ports *LINE OUT A terminal used to connect to display HD signals. If the Audio Out of the PC sound card supports both Speaker Out and Line Out, convert to Line Out using the card jumper of the PC sound card is checked before connecting. Rear View AV IN/OUT AV IN/OUT Power Connector : Connect the power cord RS-232C Serial Ports RGB PC, HDMI/DVI Ports -HDMI Supports High Definition input and...
User Guide
Page 8
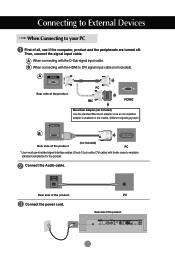
... adapter since an incompatible adapter is available in the market. (Different signaling system) B (not included) Rear side of the product. Connect the Audio cable. A When connecting with the HDMI to DVI signal input cable (not included). Rear side of the product. Connect the power cord. AV IN/OUT 7 Connecting to External Devices When Connecting to maintain standard compliance for the product. B When connecting with the D-Sub signal input cable. PC * User must use shielded signal interface cables...
... adapter since an incompatible adapter is available in the market. (Different signaling system) B (not included) Rear side of the product. Connect the Audio cable. A When connecting with the HDMI to DVI signal input cable (not included). Rear side of the product. Connect the power cord. AV IN/OUT 7 Connecting to External Devices When Connecting to maintain standard compliance for the product. B When connecting with the D-Sub signal input cable. PC * User must use shielded signal interface cables...
User Guide
Page 9
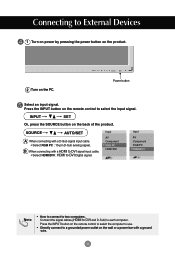
... analog signal. SOURCE AUTO/SET A When connecting with a HDMI to DVI signal input cable. • Select HDMI/DVI : HDMI to select the input signal. Input AV Component RGB PC HDMI/DVI Input AV Component RGB PC HDMI/DVI Note • How to connect to each computer. Press the INPUT button on the wall or a power bar with a ground wire. 8 Press the INPUT button on the remote control to select the computer to use. • Directly connect to a grounded power outlet on the remote control...
... analog signal. SOURCE AUTO/SET A When connecting with a HDMI to DVI signal input cable. • Select HDMI/DVI : HDMI to select the input signal. Input AV Component RGB PC HDMI/DVI Input AV Component RGB PC HDMI/DVI Note • How to connect to each computer. Press the INPUT button on the wall or a power bar with a ground wire. 8 Press the INPUT button on the remote control to select the computer to use. • Directly connect to a grounded power outlet on the remote control...
User Guide
Page 13
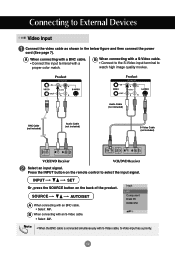
... connecting with a proper color match. A When connecting with a BNC cable. • Connect the input terminal with a S-Video cable. • Connect to the S-Video input terminal to External Devices Video Input Connect the video cable as shown in the below figure and then connect the power cord (See page 7). Product AV IN/OUT Product AV IN/OUT AUDIO AUDIO Audio Cable (not included) BNC Cable (not included) Audio Cable (not included) S-Video Cable (not included) VCR/DVD Receiver VCR/DVD Receiver Select an input signal. SOURCE AUTO/SET A When connecting...
... connecting with a proper color match. A When connecting with a BNC cable. • Connect the input terminal with a S-Video cable. • Connect to the S-Video input terminal to External Devices Video Input Connect the video cable as shown in the below figure and then connect the power cord (See page 7). Product AV IN/OUT Product AV IN/OUT AUDIO AUDIO Audio Cable (not included) BNC Cable (not included) Audio Cable (not included) S-Video Cable (not included) VCR/DVD Receiver VCR/DVD Receiver Select an input signal. SOURCE AUTO/SET A When connecting...
User Guide
Page 14
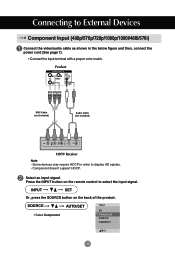
...) Connect the video/audio cable as shown in order to display HD signals. - Press the INPUT button on the back of the product. Connecting to select the input signal. Some devices may require HDCP in the below figure and then, connect the power cord (See page 7). • Connect the input terminal with a proper color match. Product AUDIO BNC Cable (not included) Audio Cable (not included) HDTV Receiver Note - Component doesn't support HDCP. SOURCE AUTO/SET • Select Component Input AV Component...
...) Connect the video/audio cable as shown in order to display HD signals. - Press the INPUT button on the back of the product. Connecting to select the input signal. Some devices may require HDCP in the below figure and then, connect the power cord (See page 7). • Connect the input terminal with a proper color match. Product AUDIO BNC Cable (not included) Audio Cable (not included) HDTV Receiver Note - Component doesn't support HDCP. SOURCE AUTO/SET • Select Component Input AV Component...
User Guide
Page 15
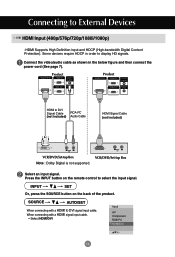
...). INPUT SET Or, press the SOURCE button on the remote control to display HD signals. Connect the video/audio cable as shown in order to select the input signal. Connecting to DVI Signal Cable RCA-PC (not included) Audio Cable HDMI Signal Cable (not included) VCR/DVD/Set-top Box VCR/DVD/Set-top Box Note : Dolby Digital is not supported. Press the INPUT button on the back of the product. Some devices require HDCP in the below figure and then connect the power cord...
...). INPUT SET Or, press the SOURCE button on the remote control to display HD signals. Connect the video/audio cable as shown in order to select the input signal. Connecting to DVI Signal Cable RCA-PC (not included) Audio Cable HDMI Signal Cable (not included) VCR/DVD/Set-top Box VCR/DVD/Set-top Box Note : Dolby Digital is not supported. Press the INPUT button on the back of the product. Some devices require HDCP in the below figure and then connect the power cord...
User Guide
Page 17
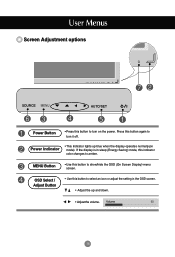
... setting in sleep (Energy Saving) mode, this indicator color changes to amber. Volume 35 16 OSD Select / Adjust Button • Use this button to show/hide the OSD (On Screen Display) menu screen. Power Indicator • This Indicator lights up and down. • Adjust the volume. Press this button again to turn on mode). If the display is in the OSD screen. • Adjust the up blue when the display operates normally(on the power. User Menus Screen Adjustment options SOURCE SOURCE AUTO/SET AUTO/SET Power Button...
... setting in sleep (Energy Saving) mode, this indicator color changes to amber. Volume 35 16 OSD Select / Adjust Button • Use this button to show/hide the OSD (On Screen Display) menu screen. Power Indicator • This Indicator lights up and down. • Adjust the volume. Press this button again to turn on mode). If the display is in the OSD screen. • Adjust the up blue when the display operates normally(on the power. User Menus Screen Adjustment options SOURCE SOURCE AUTO/SET AUTO/SET Power Button...

User Guide
Page 18
Toggles between inputs AUTO/SET AV Component RGB PC HDMI/DVI Composite Video, Separate Video HDTV, DVD 15-pin D-Sub analog signal Digital signal Input AV Component RGB PC HDMI/DVI IR Receiver • This is selected] SOURCE Button SOURCE - User Menus Screen Adjustment options AUTO/SET Button [For PC Analog signal] Auto in progress For opimal display change resolution to 1920 X 1080 [When 1920 X1080 is where the unit receives signals from the remote control. 17
Toggles between inputs AUTO/SET AV Component RGB PC HDMI/DVI Composite Video, Separate Video HDTV, DVD 15-pin D-Sub analog signal Digital signal Input AV Component RGB PC HDMI/DVI IR Receiver • This is selected] SOURCE Button SOURCE - User Menus Screen Adjustment options AUTO/SET Button [For PC Analog signal] Auto in progress For opimal display change resolution to 1920 X 1080 [When 1920 X1080 is where the unit receives signals from the remote control. 17
User Guide
Page 20
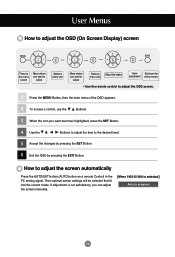
... Exit from the adjustment menu screen. • Use the remote control to adjust the OSD screen. 1 Press the MENU Button, then the main menu of the OSD appears. 2 To access a control, use the Buttons. 3 When the icon you can adjust the screen manually. [When 1920 X1080 is not satisfactory, you want becomes highlighted, press the SET Button. 4 Use the Buttons to adjust the item to adjust the screen automatically Press the AUTO/SET button (AUTO button on a remote Control) in the PC analog signal.
... Exit from the adjustment menu screen. • Use the remote control to adjust the OSD screen. 1 Press the MENU Button, then the main menu of the OSD appears. 2 To access a control, use the Buttons. 3 When the icon you can adjust the screen manually. [When 1920 X1080 is not satisfactory, you want becomes highlighted, press the SET Button. 4 Use the Buttons to adjust the item to adjust the screen automatically Press the AUTO/SET button (AUTO button on a remote Control) in the PC analog signal.
User Guide
Page 21
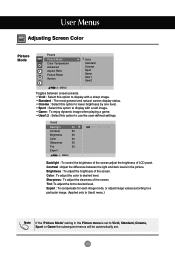
... MENU Backlight : To control the brightness of the screen,adjust the brightness of the screen. Tint :To adjust the tint to desired level. Color : To adjust the color to desired level. Sharpness : To adjust the clearness of LCD panel. User Menus Adjusting Screen Color Picture Mode Picture Picture Mode Color Temperature Advanced Aspect Ratio Picture Reset Screen Vivid Standard Cinema Sport Game User1 User2 MENU Toggles between the light and dark levels in the Picture menu is set . 20 Brightness : To adjust...
... MENU Backlight : To control the brightness of the screen,adjust the brightness of the screen. Tint :To adjust the tint to desired level. Color : To adjust the color to desired level. Sharpness : To adjust the clearness of LCD panel. User Menus Adjusting Screen Color Picture Mode Picture Picture Mode Color Temperature Advanced Aspect Ratio Picture Reset Screen Vivid Standard Cinema Sport Game User1 User2 MENU Toggles between the light and dark levels in the Picture menu is set . 20 Brightness : To adjust...
User Guide
Page 26
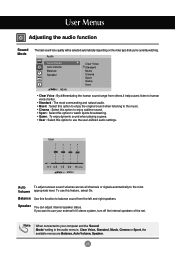
... MENU Auto To adjust uneven sound volumes across all channels or signals automatically to use this function to use the user-defined audio settings. To use your computer and the 'Sound Mode' setting in the audio menu is Clear Voice, Standard, Music, Cinema or Sport, the available menus are Balance, Auto Volume, Speaker. 25 Speaker You can adjust internal speaker status. User Menus Adjusting the audio function Sound Mode The best sound tone quality will be selected automatically depending on the video type...
... MENU Auto To adjust uneven sound volumes across all channels or signals automatically to use this function to use the user-defined audio settings. To use your computer and the 'Sound Mode' setting in the audio menu is Clear Voice, Standard, Music, Cinema or Sport, the available menus are Balance, Auto Volume, Speaker. 25 Speaker You can adjust internal speaker status. User Menus Adjusting the audio function Sound Mode The best sound tone quality will be selected automatically depending on the video type...
User Guide
Page 27
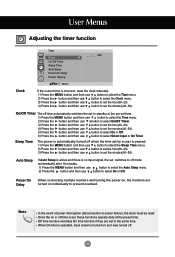
... was turned off mode automatically after 10 minutes. 1) Press the MENU button and then use button to select the Auto Sleep menu. 2) Press the button and then use button to prevent overload. User Menus Adjusting the timer function Time Clock On/Off Timer Sleep Time Auto Sleep Power On Delay Power Saving _ _ : _ _ AM MENU Clock If the current time is incorrect, reset the clock manually. 1) Press the MENU button and then use button to select the Time menu. 2) Press the button and then use button to...
... was turned off mode automatically after 10 minutes. 1) Press the MENU button and then use button to select the Auto Sleep menu. 2) Press the button and then use button to prevent overload. User Menus Adjusting the timer function Time Clock On/Off Timer Sleep Time Auto Sleep Power On Delay Power Saving _ _ : _ _ AM MENU Clock If the current time is incorrect, reset the clock manually. 1) Press the MENU button and then use button to select the Time menu. 2) Press the button and then use button to...

User Guide
Page 29
... screen. White wash : White wash fills the screen with white wash. Dot Wash : This function moves the black dots of the screen. Avoid allowing a fixed image to remain on the screen, the screen will move every 2 minutes. A permanent image may be used with the remote control. User Menus Selecting the options Language Key Lock ISM Method Option Language Key Lock ISM Method Power Indicator DPM Select Tile Mode Network Setup Factory Reset MENU...
... screen. White wash : White wash fills the screen with white wash. Dot Wash : This function moves the black dots of the screen. Avoid allowing a fixed image to remain on the screen, the screen will move every 2 minutes. A permanent image may be used with the remote control. User Menus Selecting the options Language Key Lock ISM Method Option Language Key Lock ISM Method Power Indicator DPM Select Tile Mode Network Setup Factory Reset MENU...
User Guide
Page 33
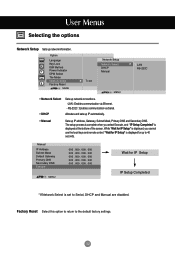
Option Language Key Lock ISM Method Power Indicator DPM Select Tile Mode Network Setup Factory Reset MENU To set to Serial, DHCP and Manual are disabled. RS-232C : Enables communication via Ethernet. - The setup process is set Network Setup Network Select DHCP Manual MENU LAN RS-232C • Network Select • DHCP Sets up IP address, Gateway, Subnet Mask, Primary DNS and Secondary DNS. Manual IP Address Subnet Mask Default Gateway Primary DNS Secondary...
Option Language Key Lock ISM Method Power Indicator DPM Select Tile Mode Network Setup Factory Reset MENU To set to Serial, DHCP and Manual are disabled. RS-232C : Enables communication via Ethernet. - The setup process is set Network Setup Network Select DHCP Manual MENU LAN RS-232C • Network Select • DHCP Sets up IP address, Gateway, Subnet Mask, Primary DNS and Secondary DNS. Manual IP Address Subnet Mask Default Gateway Primary DNS Secondary...
User Guide
Page 35
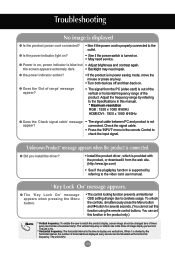
... the Menu button. To unlock the controls, simultaneously press the Menu button and button for several seconds. (You cannot set this function in the product only.) Note * Vertical frequency: To enable the user to the Specifications in the remote Control to display one vertical line. G Is the power indicator light on , power indicator is kHz. 34 Check the signal cable. • Press the 'INPUT' menu in this function using the remote control buttons. G Power is...
... the Menu button. To unlock the controls, simultaneously press the Menu button and button for several seconds. (You cannot set this function in the product only.) Note * Vertical frequency: To enable the user to the Specifications in the remote Control to display one vertical line. G Is the power indicator light on , power indicator is kHz. 34 Check the signal cable. • Press the 'INPUT' menu in this function using the remote control buttons. G Power is...
User Guide
Page 36
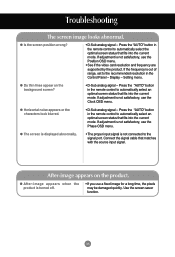
... be damaged quickly. If adjustment is not connected to the recommended resolution in the remote control to automatically select an optimal screen status that fits into the current mode. G The screen is displayed abnormally. • The proper input signal is not satisfactory, use the Position OSD menu. • See if the video card resolution and frequency are supported by the product. Use the screen-saver function. 35 Connect the signal cable that...
... be damaged quickly. If adjustment is not connected to the recommended resolution in the remote control to automatically select an optimal screen status that fits into the current mode. G The screen is displayed abnormally. • The proper input signal is not satisfactory, use the Position OSD menu. • See if the video card resolution and frequency are supported by the product. Use the screen-saver function. 35 Connect the signal cable that...
User Guide
Page 37
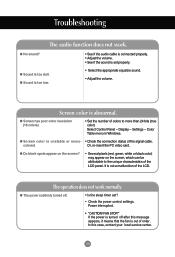
... the signal cable. colored. Power interrupted. • "CAUTION! G Sound is unstable or mono- • Check the connection status of order. G Screen has poor color resolution (16 colors). • Set the number of colors to the unique characteristics of the LCD. G Screen color is too dull. Or, re-insert the PC video card. Display - It is abnormal. The operation does not work . G Do black spots appear on the screen? • Several pixels (red, green, white or black color...
... the signal cable. colored. Power interrupted. • "CAUTION! G Sound is unstable or mono- • Check the connection status of order. G Screen has poor color resolution (16 colors). • Set the number of colors to the unique characteristics of the LCD. G Screen color is too dull. Or, re-insert the PC video card. Display - It is abnormal. The operation does not work . G Do black spots appear on the screen? • Several pixels (red, green, white or black color...
User Guide
Page 38
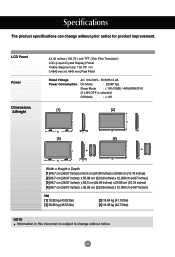
Specifications The product specifications can change without prior notice for product improvement. LCD Panel Power Dimensions &Weight 42.02 inches (106.731 cm) TFT (Thin Film Transistor) LCD (Liquid Crystal Display) Panel Visible diagonal size: 106.731 cm 0.4845 mm x 0.4845 mm (Pixel Pitch) Rated Voltage Power Consumption AC 100-240V~ 50/60Hz 2.2A On Mode : 220W Typ. Sleep Mode : ≤ 1W (RGB) / 4W(HDMI/DVI) (If LAN OFF is...
Specifications The product specifications can change without prior notice for product improvement. LCD Panel Power Dimensions &Weight 42.02 inches (106.731 cm) TFT (Thin Film Transistor) LCD (Liquid Crystal Display) Panel Visible diagonal size: 106.731 cm 0.4845 mm x 0.4845 mm (Pixel Pitch) Rated Voltage Power Consumption AC 100-240V~ 50/60Hz 2.2A On Mode : 220W Typ. Sleep Mode : ≤ 1W (RGB) / 4W(HDMI/DVI) (If LAN OFF is...
User Guide
Page 51
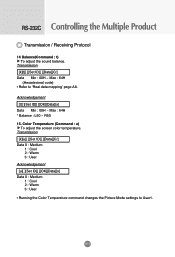
... 2 : Warm 3 : User • Running the Color Temperature command changes the Picture Mode settings to 'Real data mapping' page A8. Acknowledgement [t][ ][Set ID][ ][OK][Data][x] Data Min : 00H ~ Max : 64H * Balance : L50 ~ R50 15. L L RS-232C Controlling the Multiple Product Transmission / Receiving Protocol 14 Balance(Command : t) To adjust the sound balance. Transmission [k][t][ ][Set ID][ ][Data][Cr] Data Min : 00H ~ Max : 64H (Hexadecimal code) •...
... 2 : Warm 3 : User • Running the Color Temperature command changes the Picture Mode settings to 'Real data mapping' page A8. Acknowledgement [t][ ][Set ID][ ][OK][Data][x] Data Min : 00H ~ Max : 64H * Balance : L50 ~ R50 15. L L RS-232C Controlling the Multiple Product Transmission / Receiving Protocol 14 Balance(Command : t) To adjust the sound balance. Transmission [k][t][ ][Set ID][ ][Data][Cr] Data Min : 00H ~ Max : 64H (Hexadecimal code) •...


