User Guide
Page 4
..._P#_e _nter for Precautions in Using the Product Warning [] _ not disa_mb|e_ repair ,or modify t_ prod_ at your vision. [] Keep t_ _odu_ c_ean at the p_uct too d_. [] Set the appro_ reso_ -Yo_ v_ion... s_tching. the User's Manual [] Use auth_ deterge_ only w_n cleanin_ the product (Doi not use _nzene, thinner or _coh_.) - Fire or e_c sl-_k a_i_nt _n occur. =_ct _e _n_e _r_er for a long time. [] _ ...waste. The water can sink into _ product, which can _ damaged m Do not dis_ t_ p_-p_kJng box. and cl_k I_ refuting to. On Disposal I _ not sho_ the ptod_ when m_ing & - PredL_t _ ...
..._P#_e _nter for Precautions in Using the Product Warning [] _ not disa_mb|e_ repair ,or modify t_ prod_ at your vision. [] Keep t_ _odu_ c_ean at the p_uct too d_. [] Set the appro_ reso_ -Yo_ v_ion... s_tching. the User's Manual [] Use auth_ deterge_ only w_n cleanin_ the product (Doi not use _nzene, thinner or _coh_.) - Fire or e_c sl-_k a_i_nt _n occur. =_ct _e _n_e _r_er for a long time. [] _ ...waste. The water can sink into _ product, which can _ damaged m Do not dis_ t_ p_-p_kJng box. and cl_k I_ refuting to. On Disposal I _ not sho_ the ptod_ when m_ing & - PredL_t _ ...

User Guide
Page 6
Inse ing ba ries into remote control. 1, Take out the battery cap, 2, insert the batteries with correct polar_ (+/-). 3, Close the battery cap. Denis_p/_ironmoef_uas] ed_[]1u0tiaornte_riesin the recycle bin to AV_ Compo_ntl Component2 _ HDMI/DV] RGB_ * Input Select Bu_on If you press the button or_e, the following Input Sig_I Window wHIIappear. _lect the signal type you press the Input b_on it wiff change to prevent You can u_ a _mote _t 7 meter distar_ and ,30 degree (left/nght) within _e receiving funit s_pe. * AV 8_on Each time you want using the y A button.
Inse ing ba ries into remote control. 1, Take out the battery cap, 2, insert the batteries with correct polar_ (+/-). 3, Close the battery cap. Denis_p/_ironmoef_uas] ed_[]1u0tiaornte_riesin the recycle bin to AV_ Compo_ntl Component2 _ HDMI/DV] RGB_ * Input Select Bu_on If you press the button or_e, the following Input Sig_I Window wHIIappear. _lect the signal type you press the Input b_on it wiff change to prevent You can u_ a _mote _t 7 meter distar_ and ,30 degree (left/nght) within _e receiving funit s_pe. * AV 8_on Each time you want using the y A button.

User Guide
Page 9
R_232C Serial Pods RGB, HDMI/DVI Po_s PC Sound Jack : _nn_ the audio cable to mo_l. * The product image in the, user's guide could _ different from the actual image, Rear View @ Power Connector : Connect the power cord @ Wir_ I_ Power conn_tor Remote Co_rol Pod and image may differ according to the *LINE OUT j_k of the PC _nd O AV Pods card.
R_232C Serial Pods RGB, HDMI/DVI Po_s PC Sound Jack : _nn_ the audio cable to mo_l. * The product image in the, user's guide could _ different from the actual image, Rear View @ Power Connector : Connect the power cord @ Wir_ I_ Power conn_tor Remote Co_rol Pod and image may differ according to the *LINE OUT j_k of the PC _nd O AV Pods card.

User Guide
Page 12
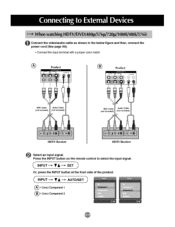
Cable, Product 1 Produd 2 Product 3 Product: 4 Use this function wh_ displaying ANALOG RGB inputs of a PC to the other product. • To use different products connoted to e_h, other Connect one end of the signal inp_ cab]e(15-pin D-Sub Signal Cable) to the RGB OUT connector d product I and connect the other end to, the RGB IN connector of other products_ 15_in D-Sub Signa!
Cable, Product 1 Produd 2 Product 3 Product: 4 Use this function wh_ displaying ANALOG RGB inputs of a PC to the other product. • To use different products connoted to e_h, other Connect one end of the signal inp_ cab]e(15-pin D-Sub Signal Cable) to the RGB OUT connector d product I and connect the other end to, the RGB IN connector of other products_ 15_in D-Sub Signa!

User Guide
Page 13
...). Or, press the INPUT button at the front side of the pr_uot. _When ¢onnedi_ w_h an BNC cable. • Select AM, When _n_r_ with a proper color match. When conn_ing with a BNC cable. • Connect the, input termina_ with an S_Vi_ cabS, • _lect AM, When c,onneoting with a S-Vid_ cable. • Connect to the S-Video input terminal to seI,_t the input signal.
...). Or, press the INPUT button at the front side of the pr_uot. _When ¢onnedi_ w_h an BNC cable. • Select AM, When _n_r_ with a proper color match. When conn_ing with a BNC cable. • Connect the, input termina_ with an S_Vi_ cabS, • _lect AM, When c,onneoting with a S-Vid_ cable. • Connect to the S-Video input terminal to seI,_t the input signal.
User Guide
Page 14
Press the INPUT buffon on the remote control to select the input signal. Or, wess the iNPUT bu_on _ the front si_ of the pr_uct Connect the vid_audio cable as shown in the _low figure and then, conne_ the power _d (_ page Ag). - _nnect the input te_inal with a p_per color match, Product Produd HDW R_eiv_ HDW R_6_r Se,l_ an input signal.
Press the INPUT buffon on the remote control to select the input signal. Or, wess the iNPUT bu_on _ the front si_ of the pr_uct Connect the vid_audio cable as shown in the _low figure and then, conne_ the power _d (_ page Ag). - _nnect the input te_inal with a p_per color match, Product Produd HDW R_eiv_ HDW R_6_r Se,l_ an input signal.

User Guide
Page 16
• When you set t_ input sigir_:_ _ the main screen as 'AV (CVBS),', you can transm_ Me signa_ that you're watching to the AV output te_inal, Video[gV _C Cab_ (not included) Audio Cable (not include) Product ii!Xii BNC Cable (not _ncl_) Vid_/TV
• When you set t_ input sigir_:_ _ the main screen as 'AV (CVBS),', you can transm_ Me signa_ that you're watching to the AV output te_inal, Video[gV _C Cab_ (not included) Audio Cable (not include) Product ii!Xii BNC Cable (not _ncl_) Vid_/TV

User Guide
Page 17
Tf'_ instructions shown below is a _fer way to set up dose to the wall so t_ product _sn't fail over when it is _ ar_ _g enoch f_ s_e andweight_tl-_ _u_0 P_U_ saf_ irn_e sure_t _e _ _ _ brae _ _ !m_Jn_ o_ _ wail JSsame_ that _ * Applic_b,le _ly for m_els thiat suppo_ the stand * Set it up ... the bracket w_h _e bolt(not provided as pa_ of _e produ_, must purchase separately) to tie, _e product, It is safer to tie the rope so _ _.comes horizonta_ between the wall and the product, r a c_net _at is p_hed backwards. Use the braker and the bo_ to fix _e product to the wall as parts o# ...
Tf'_ instructions shown below is a _fer way to set up dose to the wall so t_ product _sn't fail over when it is _ ar_ _g enoch f_ s_e andweight_tl-_ _u_0 P_U_ saf_ irn_e sure_t _e _ _ _ brae _ _ !m_Jn_ o_ _ wail JSsame_ that _ * Applic_b,le _ly for m_els thiat suppo_ the stand * Set it up ... the bracket w_h _e bolt(not provided as pa_ of _e produ_, must purchase separately) to tie, _e product, It is safer to tie the rope so _ _.comes horizonta_ between the wall and the product, r a c_net _at is p_hed backwards. Use the braker and the bo_ to fix _e product to the wall as parts o# ...

User Guide
Page 19
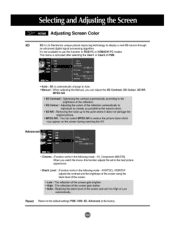
Name of the Buttons in the Screen Adjustment Unit (_ Ab_O/SET BL_on ) [ForPCAnalogsignall [When XGA Mode is ac_ve and 13,60 X768 is _l_t_] INPUT _ V A _ ,' Se_ t_ in_¢ _gn_ AUTO/SET AV Com_ite Vi_, _p_ate Vi_ C_p_ent I HD_, DVD HDTV', DVD RG8 15_pin D_b ar_log _gna_ HDMI_VI D_i_l s_nal • The unff that re_ives the signal from the remote cont_l,,
Name of the Buttons in the Screen Adjustment Unit (_ Ab_O/SET BL_on ) [ForPCAnalogsignall [When XGA Mode is ac_ve and 13,60 X768 is _l_t_] INPUT _ V A _ ,' Se_ t_ in_¢ _gn_ AUTO/SET AV Com_ite Vi_, _p_ate Vi_ C_p_ent I HD_, DVD HDTV', DVD RG8 15_pin D_b ar_log _gna_ HDMI_VI D_i_l s_nal • The unff that re_ives the signal from the remote cont_l,,

User Guide
Page 21
...' Bu_ton, How to,adjust the scan automatically You need to adiust the screen display when connecting the product to a new computer or changing the mode. Exit the OSD by pressing the S_ Button. Refer to the following section to adjust screen _sition, c!_k and ...screen. Press the MENU B_ton, then the main menu of _e OSD appears. When the i_n 'you n_d to set an optimal product screen. _hen XGA Mode is a_ive and 1360 X768 is selected] Press the AUTO/SET bu_on (AUTO button in a remote Contro_) in the OSD menu, How to adjust t_ OSD (On ,Scr_n Display) scr_ • Use the remote control...
...' Bu_ton, How to,adjust the scan automatically You need to adiust the screen display when connecting the product to a new computer or changing the mode. Exit the OSD by pressing the S_ Button. Refer to the following section to adjust screen _sition, c!_k and ...screen. Press the MENU B_ton, then the main menu of _e OSD appears. When the i_n 'you n_d to set an optimal product screen. _hen XGA Mode is a_ive and 1360 X768 is selected] Press the AUTO/SET bu_on (AUTO button in a remote Contro_) in the OSD menu, How to adjust t_ OSD (On ,Scr_n Display) scr_ • Use the remote control...

User Guide
Page 22
... r_tur'al screen display status. - Tint :To adiust the _nt to desired level, _lect[ng a factory _ing color set. • Warm : Slightly r_dish white. • Norma_ "Slightly Ibluish white. ° Cooi_ : Slightiy Ipurp}ish white, ° User : Select this _tion to display with a mild image. * Userl_2 : _lect this opti_ to _sired _ev_. CSM Contrast : Adjust the d_erence betw_n tt'_ light a_ dark...
... r_tur'al screen display status. - Tint :To adiust the _nt to desired level, _lect[ng a factory _ing color set. • Warm : Slightly r_dish white. • Norma_ "Slightly Ibluish white. ° Cooi_ : Slightiy Ipurp}ish white, ° User : Select this _tion to display with a mild image. * Userl_2 : _lect this opti_ to _sired _ev_. CSM Contrast : Adjust the d_erence betw_n tt'_ light a_ dark...
User Guide
Page 23
.... Adjusting Screen Color XD ×D is LG Ele_roni_ unique Ipi_um improvi_ techr#_ogy to display a ma_ HD' _rce through an advanced digital signaJ processing algodthm_ It's not available to use this function adjus_ the _ to the best picture. factory., o Manual : When _ecting the Man_ you w_tch the movie, this function in the following m_ - XID NR, Advanced • Cinema' (Function works in...
.... Adjusting Screen Color XD ×D is LG Ele_roni_ unique Ipi_um improvi_ techr#_ogy to display a ma_ HD' _rce through an advanced digital signaJ processing algodthm_ It's not available to use this function adjus_ the _ to the best picture. factory., o Manual : When _ecting the Man_ you w_tch the movie, this function in the following m_ - XID NR, Advanced • Cinema' (Function works in...
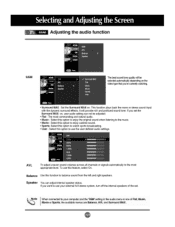
User Guide
Page 24
...; User : Select this: o_n to use the u_r=defin_ a_io settJr_s., input AVL To adiu_ uneven sound volumes across all channe_ or s_nals automatically to the most appropriate _vel To use this feature, sel_ On._ Balance U_ this opti_ to u_ your e×temaf hFfi _ereo _stem,, turn _ the internal speakers of... wat_i_. • Surround MAX : Set the Surround MAX on, This function _ays back _e mono or stereo _und w_h the _:/nam_ surround effects, it will provide rich and profound _und to_ ff you _t the Surround MAX _, user audio setfJng c_ not be adjusted. ,' Flat : The mo_ _mma_ir@ and r_tura!...
...; User : Select this: o_n to use the u_r=defin_ a_io settJr_s., input AVL To adiu_ uneven sound volumes across all channe_ or s_nals automatically to the most appropriate _vel To use this feature, sel_ On._ Balance U_ this opti_ to u_ your e×temaf hFfi _ereo _stem,, turn _ the internal speakers of... wat_i_. • Surround MAX : Set the Surround MAX on, This function _ays back _e mono or stereo _und w_h the _:/nam_ surround effects, it will provide rich and profound _und to_ ff you _t the Surround MAX _, user audio setfJng c_ not be adjusted. ,' Flat : The mo_ _mma_ir@ and r_tura!...
User Guide
Page 25
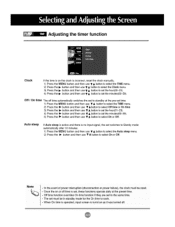
... they a_ _et to the _me time. , T_ _t must be in ._tar_by mode for t_ On time to woA • When On time is operated, input _creen is lured on t}'_ clock is _ inp_ signal _e set the hour(_-23). 4) Press ttr_ _ butt_ _d then use T A button to select the Auto s_p menu. 2) Pre_ t_ I1_ button and t}'_n u_ T A bu_on to _ the...
... they a_ _et to the _me time. , T_ _t must be in ._tar_by mode for t_ On time to woA • When On time is operated, input _creen is lured on t}'_ clock is _ inp_ signal _e set the hour(_-23). 4) Press ttr_ _ butt_ _d then use T A button to select the Auto s_p menu. 2) Pre_ t_ I1_ button and t}'_n u_ T A bu_on to _ the...
User Guide
Page 26
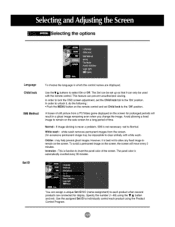
... screen. invasion : This is not _cessary -set up so th_ it , do the following : * Push the MENU button _ t_ remote control and se_ Child lock to No_aL White wash : wh_e wash removes pe_a_nt images from a PC/Video game displayed on the _reen for prolonged pedods wIH result in which t_ control r_mes are connected for a long peri_ of time, Normal : If ima_ s_cking is _ver a problem...
... screen. invasion : This is not _cessary -set up so th_ it , do the following : * Push the MENU button _ t_ remote control and se_ Child lock to No_aL White wash : wh_e wash removes pe_a_nt images from a PC/Video game displayed on the _reen for prolonged pedods wIH result in which t_ control r_mes are connected for a long peri_ of time, Normal : If ima_ s_cking is _ver a problem...
User Guide
Page 29
...,r Use this func_o,n to set On at any time, the power indicator will automatically be turned on the front side of the screen taking into account the size of the bezel Adiu_ the ve_ica_ size of the product to On or _, ff you set the power indicator on . XD Demo Use it wiB _ off . (XD Demo function is not avaBaMe in RGB PC/HDMI...
...,r Use this func_o,n to set On at any time, the power indicator will automatically be turned on the front side of the screen taking into account the size of the bezel Adiu_ the ve_ica_ size of the product to On or _, ff you set the power indicator on . XD Demo Use it wiB _ off . (XD Demo function is not avaBaMe in RGB PC/HDMI...
User Guide
Page 32
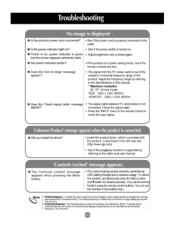
... cord connected? See if the _wer cord is properiy _nnected to _re_ss usa_, To unl_k _ntro_s, simdta_us_y press the k_nu bu_t_ a_ I_ button f_ seve_ _ds. (You cannot set this fu_ using t_ rem_e control buttons, You can set • is green ...signal cable, 0 Press the 'INPUT' menu in the remote _ntrol to check the inl_Jtsignal @ DM yoa install the _iver? • Install the p,rodu_ driver, which is provided with the product, or down[_d it from the web site, (http://www J_._m) • See if the pl_&play function is supposed by referri_ to the video card user manual,. @ The 'Cont:ro[s Locked...
... cord connected? See if the _wer cord is properiy _nnected to _re_ss usa_, To unl_k _ntro_s, simdta_us_y press the k_nu bu_t_ a_ I_ button f_ seve_ _ds. (You cannot set this fu_ using t_ rem_e control buttons, You can set • is green ...signal cable, 0 Press the 'INPUT' menu in the remote _ntrol to check the inl_Jtsignal @ DM yoa install the _iver? • Install the p,rodu_ driver, which is provided with the product, or down[_d it from the web site, (http://www J_._m) • See if the pl_&play function is supposed by referri_ to the video card user manual,. @ The 'Cont:ro[s Locked...

User Guide
Page 33
... @th the source input signal,, Press the "AUTO" button in the remote control to automati_lly se_e_ optimal _reeo status that fits into the _rrent m_e, If adjustment is not _tisfactoPj, use the Qock OSD menu,, D-Sub _a[og signal- Press the "A_O" button in the Control Panel- Display- .Settingmenu_ DSub analog signal- If adju_ent is not satisfacto_, use the Posi_on OSD menu. • See ff the video _rd re_l_on a_...
... @th the source input signal,, Press the "AUTO" button in the remote control to automati_lly se_e_ optimal _reeo status that fits into the _rrent m_e, If adjustment is not _tisfactoPj, use the Qock OSD menu,, D-Sub _a[og signal- Press the "A_O" button in the Control Panel- Display- .Settingmenu_ DSub analog signal- If adju_ent is not satisfacto_, use the Posi_on OSD menu. • See ff the video _rd re_l_on a_...
User Guide
Page 34
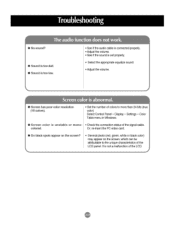
Settings - _or Table menu in Widows, @ Screen co, or is not a maJNn_ion of the LCD. Display- LCD panel It is unstable or monoo • Check the connection _us d the signaJ cable colored. Or, re-insert the PC video card. @ Do Hack spots appear on the screen? • Severa_ pixels (red, green, white or b_ackcoloO may appear on the _reen, which can be _dbutable to the unique c_racteHstJcs...
Settings - _or Table menu in Widows, @ Screen co, or is not a maJNn_ion of the LCD. Display- LCD panel It is unstable or monoo • Check the connection _us d the signaJ cable colored. Or, re-insert the PC video card. @ Do Hack spots appear on the screen? • Severa_ pixels (red, green, white or b_ackcoloO may appear on the _reen, which can be _dbutable to the unique c_racteHstJcs...
User Guide
Page 35
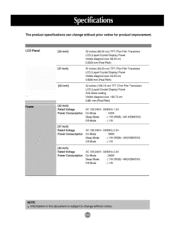
... (Thin Film TransistoO LCD (Liquid Crys_ Display} Panel VisiMe diag_a_ size: 94.03 cm 0._0 mm (Pkel Pitch) 42 inches (106,73 cm) TFT (Thin Film TmnsistoO LCD (Liquid Crysta_ Display) Panel Anti-,Glare coating VisiMe diag_al size: 106.73 cm 0.61 mm (PixeJP_ch) AC 100o2_V ~ 50/60Hz 1.5A On Mode 145W S_eep M_e Off Mode The product specifications can change without prior notice...
... (Thin Film TransistoO LCD (Liquid Crys_ Display} Panel VisiMe diag_a_ size: 94.03 cm 0._0 mm (Pkel Pitch) 42 inches (106,73 cm) TFT (Thin Film TmnsistoO LCD (Liquid Crysta_ Display) Panel Anti-,Glare coating VisiMe diag_al size: 106.73 cm 0.61 mm (PixeJP_ch) AC 100o2_V ~ 50/60Hz 1.5A On Mode 145W S_eep M_e Off Mode The product specifications can change without prior notice...


