
Owner's Manual
Page 2
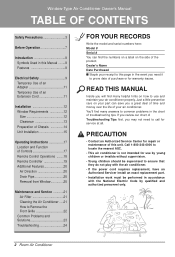
... Unit Installation 15 Operating Instructions 17 Location and Function of Controls 17 Remote Control Operations ........18 Remote Controller 19 Additional Features 20 Air Direction 20 Drain Pipe 20 Removal from Window 20 Maintenance and Service 21 Air Filter 21 Cleaning the Air Conditioner .....21 How to Remove the Front Grille 22...
... Unit Installation 15 Operating Instructions 17 Location and Function of Controls 17 Remote Control Operations ........18 Remote Controller 19 Additional Features 20 Air Direction 20 Drain Pipe 20 Removal from Window 20 Maintenance and Service 21 Air Filter 21 Cleaning the Air Conditioner .....21 How to Remove the Front Grille 22...

Owner's Manual
Page 6
... product, turn off the the power switch of the main body of fire or electric shock. Always insert the filter securely. Do not drink water drained from the batteries gets onto your health. This could cause burns orother or other health hazards. Do not use the remote if the batteries have...
... product, turn off the the power switch of the main body of fire or electric shock. Always insert the filter securely. Do not drink water drained from the batteries gets onto your health. This could cause burns orother or other health hazards. Do not use the remote if the batteries have...

Owner's Manual
Page 13
... Strip Mounted on Top of Inner Sill is more than the storm window frame (Storm Window Frame) or wood strip (Outdoors) to help condensation to drain properly to the outside. 3. See Figure. Install a second wood strip (approximately 6" long by the storm window frame. 2. The wood strip should be installed without interference...
... Strip Mounted on Top of Inner Sill is more than the storm window frame (Storm Window Frame) or wood strip (Outdoors) to help condensation to drain properly to the outside. 3. See Figure. Install a second wood strip (approximately 6" long by the storm window frame. 2. The wood strip should be installed without interference...
Owner's Manual
Page 20
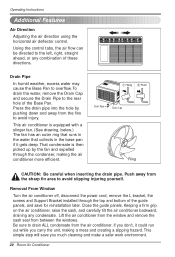
...firm grip on the air conditioner, raise the sash, and carefully tilt the air conditioner backward, draining any combination of the Base Pan. Drain Pipe Drain Cap Ring CAUTION: Be careful when inserting the drain pipe. Lift the air conditioner from the window and remove the sash seal from the air conditioner... control. Using the control tabs, the air flow can be directed to the rear hole of these directions. To drain the water, remove the Drain Cap and secure the Drain Pipe to the left, right, straight ahead, or any condensate. Close the guide panels. Be sure to overflow...
...firm grip on the air conditioner, raise the sash, and carefully tilt the air conditioner backward, draining any combination of the Base Pan. Drain Pipe Drain Cap Ring CAUTION: Be careful when inserting the drain pipe. Lift the air conditioner from the window and remove the sash seal from the air conditioner... control. Using the control tabs, the air flow can be directed to the rear hole of these directions. To drain the water, remove the Drain Cap and secure the Drain Pipe to the left, right, straight ahead, or any condensate. Close the guide panels. Be sure to overflow...
Service Manual
Page 13
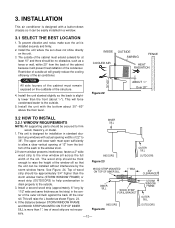
... the WOOD STRIP MOUNTED ON TOP OF INNER SILL 1" MAX. 3/4" CLEARANCE storm window frame (STORM WINDOW FRAME) or wood strip (OUTDOORS) to help condensation to drain properly to the inner window sill across the full INDOORS OUTDOORS width of the cabinet must extend outward for installation in a window. 3.1 SELECT THE BEST...
... the WOOD STRIP MOUNTED ON TOP OF INNER SILL 1" MAX. 3/4" CLEARANCE storm window frame (STORM WINDOW FRAME) or wood strip (OUTDOORS) to help condensation to drain properly to the inner window sill across the full INDOORS OUTDOORS width of the cabinet must extend outward for installation in a window. 3.1 SELECT THE BEST...
Service Manual
Page 15
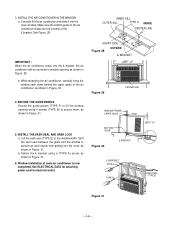
... 29 CENTER LINE WINDOW FRAME UPPER GUIDE BOTTOM GUIDE SEAL ABOUT 1/4" Figure 30 L BRACKET L BRACKET TYPE A TYPE B SASH SEAL (TYPE E) hang push Figure 31 DRAIN CAP DRAIN PIPE -14- While steadying the air conditioner, carefully bring the window sash down behind the upper guide of room air conditioner is now completed. See...
... 29 CENTER LINE WINDOW FRAME UPPER GUIDE BOTTOM GUIDE SEAL ABOUT 1/4" Figure 30 L BRACKET L BRACKET TYPE A TYPE B SASH SEAL (TYPE E) hang push Figure 31 DRAIN CAP DRAIN PIPE -14- While steadying the air conditioner, carefully bring the window sash down behind the upper guide of room air conditioner is now completed. See...
Service Manual
Page 16
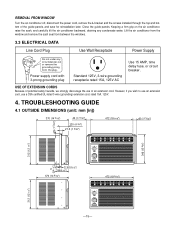
...-listed 3-wire (grounding) extension cord, rated 15A, 125V. 4. Keeping a firm grip on the air conditioner, raise the sash, and carefully tilt the air conditioner backward, draining any circumstances cut or remove the grounding prong from between the windows. 3.3 ELECTRICAL DATA Line Cord Plug Use Wall Receptacle Power Supply Do not under...
...-listed 3-wire (grounding) extension cord, rated 15A, 125V. 4. Keeping a firm grip on the air conditioner, raise the sash, and carefully tilt the air conditioner backward, draining any circumstances cut or remove the grounding prong from between the windows. 3.3 ELECTRICAL DATA Line Cord Plug Use Wall Receptacle Power Supply Do not under...


