
Owner's Manual
Page 2
... on the side of the product. Window-Type Air Conditioner Owner's Manual TABLE OF CONTENTS Safety Precautions 3 Before Operation 7 Introduction 8 Symbols Used in this Manual ........8 Features 8 Electrical Safety 9 Temporary Use of an Adapter 11 Temporary Use of an Extension Cord 11 Installation 12 Window Requirements 12 Size 12 Clearance 13 Preparation of Chassis...
... on the side of the product. Window-Type Air Conditioner Owner's Manual TABLE OF CONTENTS Safety Precautions 3 Before Operation 7 Introduction 8 Symbols Used in this Manual ........8 Features 8 Electrical Safety 9 Temporary Use of an Adapter 11 Temporary Use of an Extension Cord 11 Installation 12 Window Requirements 12 Size 12 Clearance 13 Preparation of Chassis...
Owner's Manual
Page 3
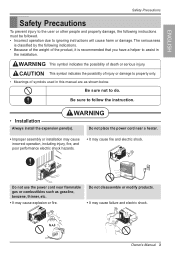
... the possibility of injury or damage to property only. • Meanings of death or serious injury. Gasolin Owner's Manual 3 WARNING • Installation Always install the expansion panel(s). The seriousness is classified by the following instructions must be followed. • Incorrect operation due to...instruction. Be sure not to assist in this manual are as gasoline, benzene, thinner, etc. • It may cause explosion or fire. Do not use the power cord near a heater. • Improper assembly or installation may cause incorrect operation, including injury, fire...
... the possibility of injury or damage to property only. • Meanings of death or serious injury. Gasolin Owner's Manual 3 WARNING • Installation Always install the expansion panel(s). The seriousness is classified by the following instructions must be followed. • Incorrect operation due to...instruction. Be sure not to assist in this manual are as gasoline, benzene, thinner, etc. • It may cause explosion or fire. Do not use the power cord near a heater. • Improper assembly or installation may cause incorrect operation, including injury, fire...
Owner's Manual
Page 4
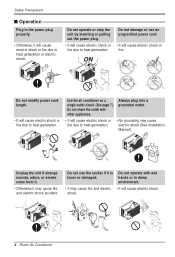
... not modify power cord length. • It will cause electric shock or fire due to heat generation. • No grounding may cause electric shock (See Installation Manual). Always plug into a grounded outlet. • It will cause electric shock or fire due to heat generation. Do not use an unspecified power cord. •...
... not modify power cord length. • It will cause electric shock or fire due to heat generation. • No grounding may cause electric shock (See Installation Manual). Always plug into a grounded outlet. • It will cause electric shock or fire due to heat generation. Do not use an unspecified power cord. •...
Owner's Manual
Page 5
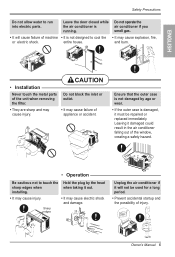
..., or electric shock. Hold the plug by age or wear. • If the outer case is not designed to run into electric parts. Owner's Manual 5 Leave the door closed while the air conditioner is not damaged by the head when taking it must be used for a long period. • ...possibility of appliance or accident. Safety Precautions Do not allow water to cool the • It may cause electric shock and damage. ENGLISH • Installation Never touch the metal parts of the unit when removing the filter. • They are sharp and may cause failure of injury. entire house. ...
..., or electric shock. Hold the plug by age or wear. • If the outer case is not designed to run into electric parts. Owner's Manual 5 Leave the door closed while the air conditioner is not damaged by the head when taking it must be used for a long period. • ...possibility of appliance or accident. Safety Precautions Do not allow water to cool the • It may cause electric shock and damage. ENGLISH • Installation Never touch the metal parts of the unit when removing the filter. • They are sharp and may cause failure of injury. entire house. ...
Owner's Manual
Page 7
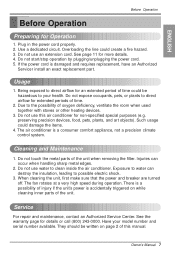
...used together with stoves or other heating devices. 3. The air conditioner is damaged and requires replacement, have an Authorized Servicer install an exact replacement part. See page 11 for Operation 1. Due to your model number and serial number available. When ...art objects). Cleaning and Maintenance 1. Have your health. Injuries can destroy the insulation, leading to clean inside the air conditioner. Owner's Manual 7 Exposure to direct airflow for non-specified special purposes (e.g. Being exposed to water can occur when handling sharp metal edges. 2. ...
...used together with stoves or other heating devices. 3. The air conditioner is damaged and requires replacement, have an Authorized Servicer install an exact replacement part. See page 11 for Operation 1. Due to your model number and serial number available. When ...art objects). Cleaning and Maintenance 1. Have your health. Injuries can destroy the insulation, leading to clean inside the air conditioner. Owner's Manual 7 Exposure to direct airflow for non-specified special purposes (e.g. Being exposed to water can occur when handling sharp metal edges. 2. ...

Owner's Manual
Page 13
... If the distance between Storm Window Frame and Wood Strip Mounted on Top of the window sill so that the unit can be installed without interference by 11/2" wide and same thickness as shown Figure. Inner Sill Indoors Outer Sill Outdoors Wood Strip Mounted on Top of... This will raise the L bracket as first strip) in the center of the sill flush against the back off the inner sill. B Owner's Manual 13 Installation Clearance Proper clearance enhances the cooling efficiency of the unit and prevents heat radiation of the sill. If a storm window presents interference, fasten a ...
... If the distance between Storm Window Frame and Wood Strip Mounted on Top of the window sill so that the unit can be installed without interference by 11/2" wide and same thickness as shown Figure. Inner Sill Indoors Outer Sill Outdoors Wood Strip Mounted on Top of... This will raise the L bracket as first strip) in the center of the sill flush against the back off the inner sill. B Owner's Manual 13 Installation Clearance Proper clearance enhances the cooling efficiency of the unit and prevents heat radiation of the sill. If a storm window presents interference, fasten a ...
Owner's Manual
Page 15
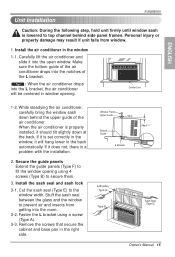
...conditioner drops into the room. 3-2. When the air conditioner is a problem with the installation. 2. Window Frame Upper Guide Bottom Guide Seal About 1/4" L Bracket L Bracket Type A Type B Sash Seal (Type E) Owner's Manual 15 Carefully lift the air conditioner and slide it into the notches of the L ...bracket. Center Line 1-2. Install the sash seal and sash lock 3-1. Secure the guide panels Extend the guide panels ...
...conditioner drops into the room. 3-2. When the air conditioner is a problem with the installation. 2. Window Frame Upper Guide Bottom Guide Seal About 1/4" L Bracket L Bracket Type A Type B Sash Seal (Type E) Owner's Manual 15 Carefully lift the air conditioner and slide it into the notches of the L ...bracket. Center Line 1-2. Install the sash seal and sash lock 3-1. Secure the guide panels Extend the guide panels ...
Service Manual
Page 3
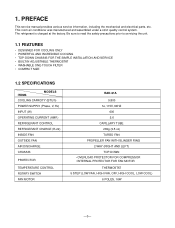
...precautions prior to servicing the unit. 1.1 FEATURES • DESIGNED FOR COOLING ONLY • POWERFUL AND INCREDIBLE COOLING • TOP-DOWN CHASSIS FOR THE SIMPLE INSTALLATION AND SERVICE • BUILT-IN ADJUSTABLE THERMOSTAT • WASHABLE ONE-TOUCH FILTER • COMPACT SIZE 1.2 SPECIFICATIONS ITEMS MODELS COOLING CAPACITY (BTU/h) POWER SUPPLY ... INTERNAL PROTECTOR FOR FAN MOTOR THERMOSTAT 5 STEP (LOW FAN, HIGH FAN, OFF, HIGH COOL, LOW COOL) 6 POLES, 16W -3- PREFACE This service manual provides various service information, including the mechanical and electrical parts, etc.
...precautions prior to servicing the unit. 1.1 FEATURES • DESIGNED FOR COOLING ONLY • POWERFUL AND INCREDIBLE COOLING • TOP-DOWN CHASSIS FOR THE SIMPLE INSTALLATION AND SERVICE • BUILT-IN ADJUSTABLE THERMOSTAT • WASHABLE ONE-TOUCH FILTER • COMPACT SIZE 1.2 SPECIFICATIONS ITEMS MODELS COOLING CAPACITY (BTU/h) POWER SUPPLY ... INTERNAL PROTECTOR FOR FAN MOTOR THERMOSTAT 5 STEP (LOW FAN, HIGH FAN, OFF, HIGH COOL, LOW COOL) 6 POLES, 16W -3- PREFACE This service manual provides various service information, including the mechanical and electrical parts, etc.
Service Manual
Page 4
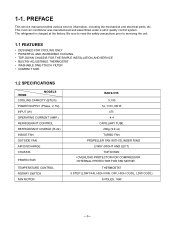
... the unit. 1.1 FEATURES • DESIGNED FOR COOLING ONLY • POWERFUL AND INCREDIBLE COOLING • TOP-DOWN CHASSIS FOR THE SIMPLE INSTALLATION AND SERVICE • BUILT-IN ADJUSTABLE THERMOSTAT • WASHABLE ONE-TOUCH FILTER • COMPACT SIZE 1.2 SPECIFICATIONS ITEMS MODELS COOLING CAPACITY (...FAN MOTOR THERMOSTAT 5 STEP (LOW FAN, HIGH FAN, OFF, HIGH COOL, LOW COOL) 6 POLES, 16W -3- PREFACE This service manual provides various service information, including the mechanical and electrical parts, etc. This room air conditioner was manufactured and assembled under a strict quality...
... the unit. 1.1 FEATURES • DESIGNED FOR COOLING ONLY • POWERFUL AND INCREDIBLE COOLING • TOP-DOWN CHASSIS FOR THE SIMPLE INSTALLATION AND SERVICE • BUILT-IN ADJUSTABLE THERMOSTAT • WASHABLE ONE-TOUCH FILTER • COMPACT SIZE 1.2 SPECIFICATIONS ITEMS MODELS COOLING CAPACITY (...FAN MOTOR THERMOSTAT 5 STEP (LOW FAN, HIGH FAN, OFF, HIGH COOL, LOW COOL) 6 POLES, 16W -3- PREFACE This service manual provides various service information, including the mechanical and electrical parts, etc. This room air conditioner was manufactured and assembled under a strict quality...

Service Manual
Page 6
...away from source of their slots. (See Figure 2) 4. Figure 1 Figure 2 2.1.2 CABINET 1. Remove the front grille. (Refer to Section 2.1.1) 3. Re-install by referring to the base pan and condenser. (See Figure 3) 4. NOTE : Controls, wires, and capacitor are now accessible for the fan motor and ...by referring to the procedures above . (Refer to control board. (See Figure 1) 3. Remove the two knobs by placing the tabs in this manual or inside control board.) Figure 3 Figure 4 Figure 5 -5- Discharge the capacitor before servicing. Remove the cabinet. (Refer to base pan and...
...away from source of their slots. (See Figure 2) 4. Figure 1 Figure 2 2.1.2 CABINET 1. Remove the front grille. (Refer to Section 2.1.1) 3. Re-install by referring to the base pan and condenser. (See Figure 3) 4. NOTE : Controls, wires, and capacitor are now accessible for the fan motor and ...by referring to the procedures above . (Refer to control board. (See Figure 1) 3. Remove the two knobs by placing the tabs in this manual or inside control board.) Figure 3 Figure 4 Figure 5 -5- Discharge the capacitor before servicing. Remove the cabinet. (Refer to base pan and...


