
Owner's Manual
Page 2
...Manual ........8 Features 8 Electrical Safety 9 Temporary Use of an Adapter 11 Temporary Use of an Extension Cord 11 Installation 12 Window Requirements 12 Size 12 Clearance 13 Preparation of Chassis 14 Unit Installation 15 Operating Instructions 17 Location and Function of Controls 17 Remote Control Operations ........18 Remote Controller 19 Additional Features 20 Air Direction 20 Drain Pipe 20 Removal from Window 20 Maintenance and Service 21 Air Filter 21 Cleaning the Air Conditioner .....21 How to use by qualified and authorized personnel only. 2 Room Air Conditioner...
...Manual ........8 Features 8 Electrical Safety 9 Temporary Use of an Adapter 11 Temporary Use of an Extension Cord 11 Installation 12 Window Requirements 12 Size 12 Clearance 13 Preparation of Chassis 14 Unit Installation 15 Operating Instructions 17 Location and Function of Controls 17 Remote Control Operations ........18 Remote Controller 19 Additional Features 20 Air Direction 20 Drain Pipe 20 Removal from Window 20 Maintenance and Service 21 Air Filter 21 Cleaning the Air Conditioner .....21 How to use by qualified and authorized personnel only. 2 Room Air Conditioner...
Owner's Manual
Page 4
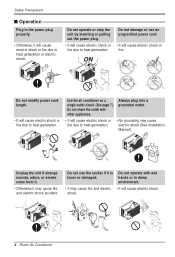
... may cause electric shock (See Installation Manual). shock. 4 Room Air Conditioner Do not use an unspecified power cord. • It will cause electric shock or fire due to heat generation or electric shock. Do not damage or use the socket if it will cause electric shock. Use the air conditioner on a single outlet circuit. (See page 7.) Do not share the outlet with wet hands or in the power plug properly...
... may cause electric shock (See Installation Manual). shock. 4 Room Air Conditioner Do not use an unspecified power cord. • It will cause electric shock or fire due to heat generation or electric shock. Do not damage or use the socket if it will cause electric shock. Use the air conditioner on a single outlet circuit. (See page 7.) Do not share the outlet with wet hands or in the power plug properly...
Owner's Manual
Page 5
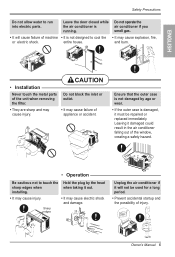
... allow water to cool the • It may cause explosion, fire, or electric shock. entire house. ENGLISH • Installation Never touch the metal parts of appliance or accident. Hold the plug by age...air conditioner is not designed to run into electric parts. CAUTION Do not block the inlet or outlet. • It may cause failure of the unit when removing the filter. • They are sharp and may cause electric shock and damage. Do not operate the air conditioner if you smell gas. • It will not be repaired or replaced immediately. and burn. Owner's Manual...
... allow water to cool the • It may cause explosion, fire, or electric shock. entire house. ENGLISH • Installation Never touch the metal parts of appliance or accident. Hold the plug by age...air conditioner is not designed to run into electric parts. CAUTION Do not block the inlet or outlet. • It may cause failure of the unit when removing the filter. • They are sharp and may cause electric shock and damage. Do not operate the air conditioner if you smell gas. • It will not be repaired or replaced immediately. and burn. Owner's Manual...

Owner's Manual
Page 6
... Do not place heavy object on the power cord and take care so that the cord should not be exposed to clean. Do not clean the air conditioner with clean water. Unplug the air conditioner before cleaning it every two weeks. • Operation without filters will be pressed. • There is an air conditioner, not a precision refrigeration system. Use a soft cloth to direct air flow. (Don't sit in batteries could...
... Do not place heavy object on the power cord and take care so that the cord should not be exposed to clean. Do not clean the air conditioner with clean water. Unplug the air conditioner before cleaning it every two weeks. • Operation without filters will be pressed. • There is an air conditioner, not a precision refrigeration system. Use a soft cloth to direct air flow. (Don't sit in batteries could...
Owner's Manual
Page 7
... unit when removing the filter. They should be hazardous to direct airflow for extended periods of this air conditioner for more details. 4. Do not start/stop operation by plugging/unplugging the power cord. 5. Usage 1. Do not use this manual. Service For repair and maintenance, contact an Authorized Service Center. The air conditioner is damaged and requires replacement, have an Authorized Servicer install an exact replacement part. Cleaning and Maintenance 1. Injuries can destroy the insulation, leading to clean inside the air conditioner...
... unit when removing the filter. They should be hazardous to direct airflow for extended periods of this air conditioner for more details. 4. Do not start/stop operation by plugging/unplugging the power cord. 5. Usage 1. Do not use this manual. Service For repair and maintenance, contact an Authorized Service Center. The air conditioner is damaged and requires replacement, have an Authorized Servicer install an exact replacement part. Cleaning and Maintenance 1. Injuries can destroy the insulation, leading to clean inside the air conditioner...
Owner's Manual
Page 12
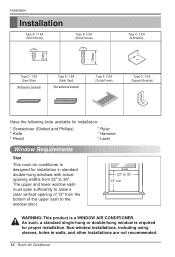
..." 13" min WARNING: This product is required for installation in walls, and other installations are not recommended. 12 Room Air Conditioner As such, a standard single-hung or double-hung window is a WINDOW AIR CONDITIONER. Installation Installation Type A: 11 EA (Short Screw) Type B: 5 EA (Wood Screw) Type C: 3 EA (L Bracket) 10mm 16mm Type D: 1 EA (Seal Strip) (Adhesive backed) Type E: 1 EA (Sash Seal) (Not adhesive backed) Type F: 2 EA (Guide Panel) Type G: 1 EA (Support Bracket) Have the following tools...
..." 13" min WARNING: This product is required for installation in walls, and other installations are not recommended. 12 Room Air Conditioner As such, a standard single-hung or double-hung window is a WINDOW AIR CONDITIONER. Installation Installation Type A: 11 EA (Short Screw) Type B: 5 EA (Wood Screw) Type C: 3 EA (L Bracket) 10mm 16mm Type D: 1 EA (Seal Strip) (Adhesive backed) Type E: 1 EA (Sash Seal) (Not adhesive backed) Type F: 2 EA (Guide Panel) Type G: 1 EA (Support Bracket) Have the following tools...
Owner's Manual
Page 14
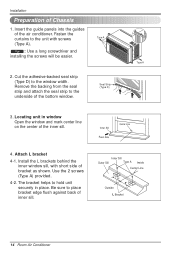
... window sill, with screws Type A (Type A). The bracket helps to the unit with short side of the inner sill. Seal Strip (Type D) 3. Locating unit in place. Fasten the curtains to hold unit securely in window Open the window and mark center line on the center of bracket as shown. Inner Sill Outer Sill Type A Inside Center Line 8" 8" Outside L Bracket 14 Room Air Conditioner Type A 2. Use the 2 screws (Type A) provided. 4-2. Tip! : Use a long screwdriver and installing...
... window sill, with screws Type A (Type A). The bracket helps to the unit with short side of the inner sill. Seal Strip (Type D) 3. Locating unit in place. Fasten the curtains to hold unit securely in window Open the window and mark center line on the center of bracket as shown. Inner Sill Outer Sill Type A Inside Center Line 8" 8" Outside L Bracket 14 Room Air Conditioner Type A 2. Use the 2 screws (Type A) provided. 4-2. Tip! : Use a long screwdriver and installing...
Owner's Manual
Page 15
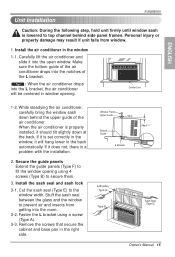
... the open window. Tip! : When the air conditioner drops into the room. 3-2. If it will be centered in the back automatically. Carefully lift the air conditioner and slide it should tilt slightly down behind side panel frames. Secure the guide panels Extend the guide panels (Type F) to prevent air and insects from window. 1. Fasten the L bracket using 4 screws (Type B) to the window width. Window Frame Upper Guide Bottom Guide Seal About 1/4" L Bracket L Bracket Type A Type B Sash Seal (Type E) Owner's Manual 15...
... the open window. Tip! : When the air conditioner drops into the room. 3-2. If it will be centered in the back automatically. Carefully lift the air conditioner and slide it should tilt slightly down behind side panel frames. Secure the guide panels Extend the guide panels (Type F) to prevent air and insects from window. 1. Fasten the L bracket using 4 screws (Type B) to the window width. Window Frame Upper Guide Bottom Guide Seal About 1/4" L Bracket L Bracket Type A Type B Sash Seal (Type E) Owner's Manual 15...
Owner's Manual
Page 16
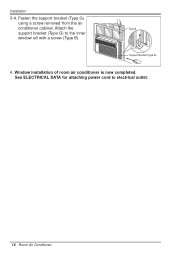
Window installation of room air conditioner is now completed. Support Bracket (Type G) 4. Attach the Type B support bracket (Type G) to electrical outlet. 16 Room Air Conditioner See ELECTRICAL DATA for attaching power cord to the inner window sill with a screw (Type B). Fasten the support bracket (Type G) using a screw removed from the air conditioner cabinet. Installation 3-4.
Window installation of room air conditioner is now completed. Support Bracket (Type G) 4. Attach the Type B support bracket (Type G) to electrical outlet. 16 Room Air Conditioner See ELECTRICAL DATA for attaching power cord to the inner window sill with a screw (Type B). Fasten the support bracket (Type G) using a screw removed from the air conditioner cabinet. Installation 3-4.

Owner's Manual
Page 17
... MAXIMUM COOLING 1. Turns air conditioner off the air conditioner or switch from cooling to the fan, wait at least 3 minutes before setting to a cooler or warmer setting, as needed. Low Fan - Thermostat 5 4 6 3 7 2 1 8 9 This automatically controls the temperature of Controls CAUTION: If you turn off . FOR QUIETER OPERATION 1. Turn the operation switch to the largest temperature mark. Set the thermostat control as appropriate. High speed fan operation without cooling. If the room temperature is a good starting position). High Cool - Set the thermostat control to...
... MAXIMUM COOLING 1. Turns air conditioner off the air conditioner or switch from cooling to the fan, wait at least 3 minutes before setting to a cooler or warmer setting, as needed. Low Fan - Thermostat 5 4 6 3 7 2 1 8 9 This automatically controls the temperature of Controls CAUTION: If you turn off . FOR QUIETER OPERATION 1. Turn the operation switch to the largest temperature mark. Set the thermostat control as appropriate. High speed fan operation without cooling. If the room temperature is a good starting position). High Cool - Set the thermostat control to...
Owner's Manual
Page 20
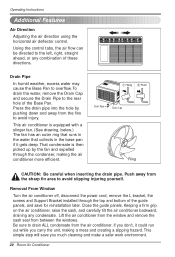
.... Removal From Window Turn the air conditioner off, disconnect the power cord, remove the L bracket, the screws and Support Bracket installed through the condenser, making a mess and creating a slipping hazard. Drain Pipe In humid weather, excess water may cause the Base Pan to the rear hole of the Base Pan. Press the drain pipe into the hole by the fan and expelled through the top and bottom of these directions. Close the guide panels...
.... Removal From Window Turn the air conditioner off, disconnect the power cord, remove the L bracket, the screws and Support Bracket installed through the condenser, making a mess and creating a slipping hazard. Drain Pipe In humid weather, excess water may cause the Base Pan to the rear hole of the Base Pan. Press the drain pipe into the hole by the fan and expelled through the top and bottom of these directions. Close the guide panels...
Owner's Manual
Page 21
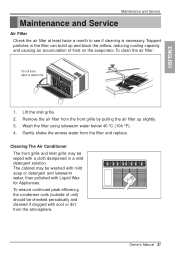
.... 3. Gently shake the excess water from the atmosphere. Trapped particles in a mild detergent solution. Wash the filter using lukewarm water below 40 °C (104 °F). 4. Cleaning The Air Conditioner The front grille and Inlet grille may be checked periodically and cleaned if clogged with soot or dirt from the filter and replace. Owner's Manual 21 Maintenance and Service Maintenance and Service Air Filter Check the air filter at least twice a month to...
.... 3. Gently shake the excess water from the atmosphere. Trapped particles in a mild detergent solution. Wash the filter using lukewarm water below 40 °C (104 °F). 4. Cleaning The Air Conditioner The front grille and Inlet grille may be checked periodically and cleaned if clogged with soot or dirt from the filter and replace. Owner's Manual 21 Maintenance and Service Maintenance and Service Air Filter Check the air filter at least twice a month to...
Owner's Manual
Page 23
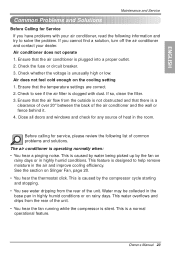
... the problem. Air conditioner does not operate 1. Before calling for any source of the unit. • You hear the fan running while the compressor is a normal operational feature. See the section on the cooling setting 1. This water overflows and drips from the rear of heat in the air and improve cooling efficiency. Check the fuse or circuit breaker. 3. This is silent. Check to help remove moisture in the room. This...
... the problem. Air conditioner does not operate 1. Before calling for any source of the unit. • You hear the fan running while the compressor is a normal operational feature. See the section on the cooling setting 1. This water overflows and drips from the rear of heat in the air and improve cooling efficiency. Check the fuse or circuit breaker. 3. This is silent. Check to help remove moisture in the room. This...
Service Manual
Page 3
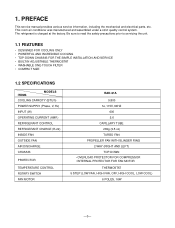
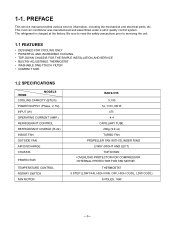
... the safety precautions prior to servicing the unit. 1.1 FEATURES • DESIGNED FOR COOLING ONLY • POWERFUL AND INCREDIBLE COOLING • TOP-DOWN CHASSIS FOR THE SIMPLE INSTALLATION AND SERVICE • BUILT-IN ADJUSTABLE THERMOSTAT • WASHABLE ONE-TOUCH FILTER • COMPACT SIZE 1.2 SPECIFICATIONS ITEMS MODELS COOLING CAPACITY (BTU/h) POWER SUPPLY (Phase, V, Hz) INPUT (W) OPERATING CURRENT (AMP.) REFRIGERANT CONTROL REFRIGERANT CHARGE (R-22) INSIDE FAN OUTSIDE FAN AIR DISCHARGE CHASSIS PROTECTOR TEMPERATURE CONTROL ROTARY SWITCH FAN MOTOR RAD-61A 5,800 1ø...
... the safety precautions prior to servicing the unit. 1.1 FEATURES • DESIGNED FOR COOLING ONLY • POWERFUL AND INCREDIBLE COOLING • TOP-DOWN CHASSIS FOR THE SIMPLE INSTALLATION AND SERVICE • BUILT-IN ADJUSTABLE THERMOSTAT • WASHABLE ONE-TOUCH FILTER • COMPACT SIZE 1.2 SPECIFICATIONS ITEMS MODELS COOLING CAPACITY (BTU/h) POWER SUPPLY (Phase, V, Hz) INPUT (W) OPERATING CURRENT (AMP.) REFRIGERANT CONTROL REFRIGERANT CHARGE (R-22) INSIDE FAN OUTSIDE FAN AIR DISCHARGE CHASSIS PROTECTOR TEMPERATURE CONTROL ROTARY SWITCH FAN MOTOR RAD-61A 5,800 1ø...
Service Manual
Page 4
...the safety precautions prior to servicing the unit. 1.1 FEATURES • DESIGNED FOR COOLING ONLY • POWERFUL AND INCREDIBLE COOLING • TOP-DOWN CHASSIS FOR THE SIMPLE INSTALLATION AND SERVICE • BUILT-IN ADJUSTABLE THERMOSTAT • WASHABLE ONE-TOUCH FILTER • COMPACT SIZE 1.2 SPECIFICATIONS ITEMS MODELS COOLING CAPACITY (BTU/h) POWER SUPPLY (Phase, V, Hz) INPUT (W) OPERATING CURRENT (AMP.) REFRIGERANT CONTROL REFRIGERANT CHARGE (R-22) INSIDE FAN OUTSIDE FAN AIR DISCHARGE CHASSIS PROTECTOR TEMPERATURE CONTROL ROTARY SWITCH FAN MOTOR RADS-51B 5,100 1ø...
...the safety precautions prior to servicing the unit. 1.1 FEATURES • DESIGNED FOR COOLING ONLY • POWERFUL AND INCREDIBLE COOLING • TOP-DOWN CHASSIS FOR THE SIMPLE INSTALLATION AND SERVICE • BUILT-IN ADJUSTABLE THERMOSTAT • WASHABLE ONE-TOUCH FILTER • COMPACT SIZE 1.2 SPECIFICATIONS ITEMS MODELS COOLING CAPACITY (BTU/h) POWER SUPPLY (Phase, V, Hz) INPUT (W) OPERATING CURRENT (AMP.) REFRIGERANT CONTROL REFRIGERANT CHARGE (R-22) INSIDE FAN OUTSIDE FAN AIR DISCHARGE CHASSIS PROTECTOR TEMPERATURE CONTROL ROTARY SWITCH FAN MOTOR RADS-51B 5,100 1ø...
Service Manual
Page 5
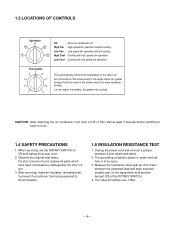
... the indoor air. High Cool - Thermostat 5 4 6 3 7 2 1 8 9 This automatically controls the temperature of the ROTARY SWITCH. 4. Observe the original lead dress. When servicing, set the ROTARY SWITCH to the smaller marks for greater cooling. Unplug the power cord and connect a jumper between the jumpered lead and each exposed metallic part on the equipment at least 3 minutes before switching it back to shock hazards. 1.5 INSULATION RESISTANCE TEST 1. Turns air conditioner...
... the indoor air. High Cool - Thermostat 5 4 6 3 7 2 1 8 9 This automatically controls the temperature of the ROTARY SWITCH. 4. Observe the original lead dress. When servicing, set the ROTARY SWITCH to the smaller marks for greater cooling. Unplug the power cord and connect a jumper between the jumpered lead and each exposed metallic part on the equipment at least 3 minutes before switching it back to shock hazards. 1.5 INSULATION RESISTANCE TEST 1. Turns air conditioner...
Service Manual
Page 13
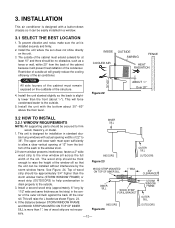
... FOR L BRACKET INDOORS STORM WINDOW FRAME OUTER SILL OUTDOORS SILL is designed for at least 10" and there should be installed without interference by 11/2" wide and same thickness as shown Figure. 24. 4. INSTALLATION This air conditioner is slightly lower than the WOOD STRIP MOUNTED ON TOP OF INNER SILL 1" MAX. 3/4" CLEARANCE storm window frame (STORM WINDOW FRAME) or wood strip (OUTDOORS) to help condensation to drain properly...
... FOR L BRACKET INDOORS STORM WINDOW FRAME OUTER SILL OUTDOORS SILL is designed for at least 10" and there should be installed without interference by 11/2" wide and same thickness as shown Figure. 24. 4. INSTALLATION This air conditioner is slightly lower than the WOOD STRIP MOUNTED ON TOP OF INNER SILL 1" MAX. 3/4" CLEARANCE storm window frame (STORM WINDOW FRAME) or wood strip (OUTDOORS) to help condensation to drain properly...

Service Manual
Page 14
... the bottom window. (Figure. 26) 3.2.3 NOW START INSTALLATION 1. Install the L brackets behind side panel frames. See Figure. 27. Be sure to the unit with the short side of inner sill. LOCATING UNIT IN WINDOW Open the window and mark center line on the center of the air conditioner. TYPE A Figure 25 SEAL STRIP (TYPE D) Figure 26 INNER SILL ROOM SIDE Figure 27 TYPE A CENTER LINE -13- Use the 2 screws (TYPE A) provided...
... the bottom window. (Figure. 26) 3.2.3 NOW START INSTALLATION 1. Install the L brackets behind side panel frames. See Figure. 27. Be sure to the unit with the short side of inner sill. LOCATING UNIT IN WINDOW Open the window and mark center line on the center of the air conditioner. TYPE A Figure 25 SEAL STRIP (TYPE D) Figure 26 INNER SILL ROOM SIDE Figure 27 TYPE A CENTER LINE -13- Use the 2 screws (TYPE A) provided...
Service Manual
Page 18
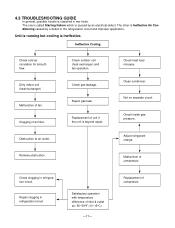
...°C) -17- Replacement of compressor. The one is called Starting Failure which is Ineffective Air Conditioning caused by an electrical defect. Check clogging in the refrigeration circuit and improper application. Replacement of unit if the unit is ineffective. The other is caused by a defect in refrigeration circuit. Ineffective Cooling Check cold air circulation for smooth flow. Obstruction at air outlet. Not on separate circuit Check inside gas pressure. Repair gas leak. Clean condenser.
...°C) -17- Replacement of compressor. The one is called Starting Failure which is Ineffective Air Conditioning caused by an electrical defect. Check clogging in the refrigeration circuit and improper application. Replacement of unit if the unit is ineffective. The other is caused by a defect in refrigeration circuit. Ineffective Cooling Check cold air circulation for smooth flow. Obstruction at air outlet. Not on separate circuit Check inside gas pressure. Repair gas leak. Clean condenser.
Service Manual
Page 21
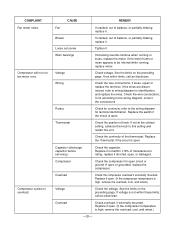
... mounted. If voltage is high, remove the overload, cool, and retest.) Voltage Check the voltage. Compressor cycles on overload. If the motor hums or noise appears to the wiring diagram, correct the connections. Check the wire connections; Capacitor (discharge capacitor before servicing.) Check the capacitor. CAUSE REMEDY Fan Blower Loose set screw Worn bearings Voltage Wiring Rotary Thermostat If cracked, out of manufacturer's rating, replace if shorted, open . (If the compressor temperature...
... mounted. If voltage is high, remove the overload, cool, and retest.) Voltage Check the voltage. Compressor cycles on overload. If the motor hums or noise appears to the wiring diagram, correct the connections. Check the wire connections; Capacitor (discharge capacitor before servicing.) Check the capacitor. CAUSE REMEDY Fan Blower Loose set screw Worn bearings Voltage Wiring Rotary Thermostat If cracked, out of manufacturer's rating, replace if shorted, open . (If the compressor temperature...


