
Owner's Manual
Page 1
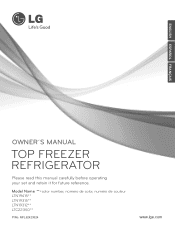
MFL62423824 www.lge.com ENGLISH ESPAÑOL FRANÇAIS Model Name **=color number, número de color, numéro de couleur LTN19415** LTN19315** LTN19312** LTC22350** P/No. OWNER´S MANUAL TOP FREEZER REFRIGERATOR Please read this manual carefully before operating your set and retain it for future reference.
MFL62423824 www.lge.com ENGLISH ESPAÑOL FRANÇAIS Model Name **=color number, número de color, numéro de couleur LTN19415** LTN19315** LTN19312** LTC22350** P/No. OWNER´S MANUAL TOP FREEZER REFRIGERATOR Please read this manual carefully before operating your set and retain it for future reference.
Owner's Manual
Page 3
...or plumbing, or correction of unauthorized repairs. 2. LG Refrigerator / Freezer Warranty Period Product Parts Labor Refrigerator / Freezer 1 year 1 year [In-Home Service (Except Model GR-051)] Sealed System 7 years 1 year [In-Home Service (Except Model GR-051)] (Compressor, Condenser, Evaporator) No ...other express warranty is provided. LG ELECTRONICS SHALL NOT BE LIABLE FOR THE LOSS OF USE OF ...
...or plumbing, or correction of unauthorized repairs. 2. LG Refrigerator / Freezer Warranty Period Product Parts Labor Refrigerator / Freezer 1 year 1 year [In-Home Service (Except Model GR-051)] Sealed System 7 years 1 year [In-Home Service (Except Model GR-051)] (Compressor, Condenser, Evaporator) No ...other express warranty is provided. LG ELECTRONICS SHALL NOT BE LIABLE FOR THE LOSS OF USE OF ...

Owner's Manual
Page 5
...warranty's terms. THIS LIMITED WARRANTY DOES NOT COVER: 1. LG ELECTRONICS CANADA, INC. Canada WARRANTY: Should your LG Refrigerator ("Product") fail due to perform during the warranty period set forth below Product Registration Information Model Serial Number: Date of the product to a defect in... product failure caused by unauthorized modification or alteration, or use for t.hirty (30) days LG CANADA'S SOLE LIABILITY IS LIMITED TO THE WARRANTY SET OUT ABOVE. Model and Serial numbers, along with published installation instructions, including the Product owner's and installation manuals...
...warranty's terms. THIS LIMITED WARRANTY DOES NOT COVER: 1. LG ELECTRONICS CANADA, INC. Canada WARRANTY: Should your LG Refrigerator ("Product") fail due to perform during the warranty period set forth below Product Registration Information Model Serial Number: Date of the product to a defect in... product failure caused by unauthorized modification or alteration, or use for t.hirty (30) days LG CANADA'S SOLE LIABILITY IS LIMITED TO THE WARRANTY SET OUT ABOVE. Model and Serial numbers, along with published installation instructions, including the Product owner's and installation manuals...
Owner's Manual
Page 9
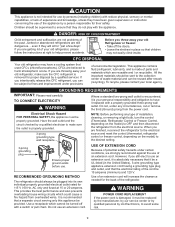
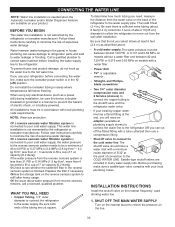
... a separate circuit serving only this appliance must be replaced by the manufacturer, by our service center or by qualified personal by LG Electronics, to the collection center of waste material and can be sent to avoid some risk. 9 POWER CORD REPLACEMENT If the...which are finished, reconnect the refrigerator to the electrical source and reset the control (thermostat, refrigerator control or freezer control, depending on the model) to harm stratospheric ozone. If you are reusable and / or recyclable. GROUNDING REQUIREMENTS IMPORTANT: Please read carefully. Have the wall outlet...
... a separate circuit serving only this appliance must be replaced by the manufacturer, by our service center or by qualified personal by LG Electronics, to the collection center of waste material and can be sent to avoid some risk. 9 POWER CORD REPLACEMENT If the...which are finished, reconnect the refrigerator to the electrical source and reset the control (thermostat, refrigerator control or freezer control, depending on the model) to harm stratospheric ozone. If you are reusable and / or recyclable. GROUNDING REQUIREMENTS IMPORTANT: Please read carefully. Have the wall outlet...
Owner's Manual
Page 10
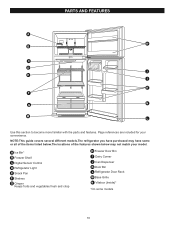
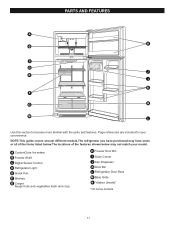
... Bin I K F N G M L Use this section to become more familiar with the parts and features. NOTE:This guide covers several different models.The refrigerator you have some models 10 Page references are included for your model. PARTS AND FEATURES A H B C D J E I Dairy Corner J Can Dispenser K Door Bin L Refrigerator Door Rack M Base Grille N Vitabox (Inside)* *On some or...
... Bin I K F N G M L Use this section to become more familiar with the parts and features. NOTE:This guide covers several different models.The refrigerator you have some models 10 Page references are included for your model. PARTS AND FEATURES A H B C D J E I Dairy Corner J Can Dispenser K Door Bin L Refrigerator Door Rack M Base Grille N Vitabox (Inside)* *On some or...
Owner's Manual
Page 11
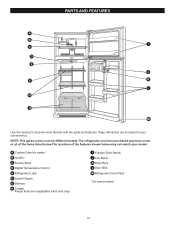
NOTE:This guide covers several different models.The refrigerator you have some models 11 PARTS AND FEATURES A H B C D J E I Dairy Corner J Can Dispenser K Door Bin L Refrigerator Door Rack M Base Grille N Vitabox (Inside)* *On some or all of the items listed ... vegetables fresh and crisp H Freezer Door Bin I K F G N M L Use this section to become more familiar with the parts and features. Page references are included for your model.
NOTE:This guide covers several different models.The refrigerator you have some models 11 PARTS AND FEATURES A H B C D J E I Dairy Corner J Can Dispenser K Door Bin L Refrigerator Door Rack M Base Grille N Vitabox (Inside)* *On some or all of the items listed ... vegetables fresh and crisp H Freezer Door Bin I K F G N M L Use this section to become more familiar with the parts and features. Page references are included for your model.
Owner's Manual
Page 12
... and vegetables fresh and crisp I D E J F K L G H Use this section to become more familiar with the parts and features. Page references are included for your model. PARTS AND FEATURES I Freezer Door Racks J Can Rack* K Dairy Bins L Door Bins M Refrigerator Door Rack N *On some or all of the items listed below.The... locations of the features shown below may have some models 12 NOTE:This guide covers several different models.The refrigerator you have purchased may not match your convenience.
... and vegetables fresh and crisp I D E J F K L G H Use this section to become more familiar with the parts and features. Page references are included for your model. PARTS AND FEATURES I Freezer Door Racks J Can Rack* K Dairy Bins L Door Bins M Refrigerator Door Rack N *On some or all of the items listed below.The... locations of the features shown below may have some models 12 NOTE:This guide covers several different models.The refrigerator you have purchased may not match your convenience.
Owner's Manual
Page 13
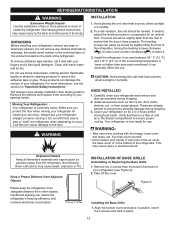
... the refrigerator's freezing efficiency and increase electricity consumption. (5.08 cm) 2" INSTALLATION OF BASE GRILLE Uninstalling or Replacing the Base Grille 1. Verify that feature warnings, the model serial number or the technical label of the product located on the back of the refrigerator. Insufficient spacing can easily be turned by slightly tilting...
... the refrigerator's freezing efficiency and increase electricity consumption. (5.08 cm) 2" INSTALLATION OF BASE GRILLE Uninstalling or Replacing the Base Grille 1. Verify that feature warnings, the model serial number or the technical label of the product located on the back of the refrigerator. Insufficient spacing can easily be turned by slightly tilting...
Owner's Manual
Page 18
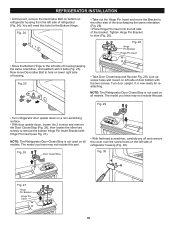
...screw holes on refrigerator housing from the left side of housing. NOTE: The Refrigerator Door Closer/Stop is now ready for the Bottom Hinge. The model you have may not include this point, remove the Decorative Bolt on bottom on the left side of refrigerator (Fig. 24). Fig. 24 ...• Take out the Hinge Pin Insert and move Decorative Bolt to the left side of refrigerator housing (Fig. 30). The model you have may not include this hole for reattaching. REFRIGERATOR INSTALLATION • At this part. Now move the Bracket to the other two screws to...
...screw holes on refrigerator housing from the left side of housing. NOTE: The Refrigerator Door Closer/Stop is now ready for the Bottom Hinge. The model you have may not include this point, remove the Decorative Bolt on bottom on the left side of refrigerator (Fig. 24). Fig. 24 ...• Take out the Hinge Pin Insert and move Decorative Bolt to the left side of refrigerator housing (Fig. 30). The model you have may not include this hole for reattaching. REFRIGERATOR INSTALLATION • At this part. Now move the Bracket to the other two screws to...

Owner's Manual
Page 24
... spilling food. 24 Failure to do so may result in damage to the tray. This units are heavy. Slide Out Shelves (in some models) You can slide some models) Icemaking If the tray is open, saving energy. To remove ice cubes,twist the tray. To remove ice cubes easily, pour water on...
... spilling food. 24 Failure to do so may result in damage to the tray. This units are heavy. Slide Out Shelves (in some models) You can slide some models) Icemaking If the tray is open, saving energy. To remove ice cubes,twist the tray. To remove ice cubes easily, pour water on...

Owner's Manual
Page 25
... CONTROL You can control the amount of fresh, leafy vegetables. 25 lets moist air out of the crisper for best storage of humidity in some models) While holding the crisper cover support, pull the cover up . 3.
... CONTROL You can control the amount of fresh, leafy vegetables. 25 lets moist air out of the crisper for best storage of humidity in some models) While holding the crisper cover support, pull the cover up . 3.
Owner's Manual
Page 26
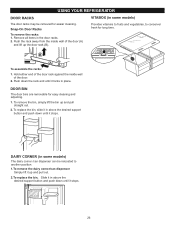
Push the rack away from the inside wall of the door (A) and lift up the door rack (B). VITABOX (in some models) The dairy corner /can dispenser can dispenser Simply lift it up and pull straight out. 2. B A To assemble the racks: 1. DAIRY CORNER (in place. Snap-On ... bin up and pull out. 2.To replace the bin, Slide it in above the desired support button and push down until it locks in some models) Provides vitamins to fruits and vegetables, to another position. 1.To remove the dairy corner/can be removed for easier cleaning. Remove all items in above...
Push the rack away from the inside wall of the door (A) and lift up the door rack (B). VITABOX (in some models) The dairy corner /can dispenser can dispenser Simply lift it up and pull straight out. 2. B A To assemble the racks: 1. DAIRY CORNER (in place. Snap-On ... bin up and pull out. 2.To replace the bin, Slide it in above the desired support button and push down until it locks in some models) Provides vitamins to fruits and vegetables, to another position. 1.To remove the dairy corner/can be removed for easier cleaning. Remove all items in above...
Owner's Manual
Page 28
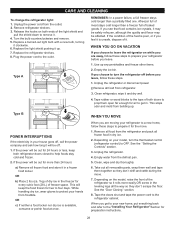
... them open far enough for more easily OR screw in the leveling legs all frozen food in a frozen food locker. Release the hooks on the model, raise the front of the food is poor, or if you choose to help foods stay cold and frozen. 2. Turn the bulb counterclockwise and remove... it may be safely refrozen, although the quality and flavor may be out for air to get to the tops of dry ice in your model, turn the refrigerator off . 1. WHEN YOU GO ON VACATION If you feel it is available, consume or perish food at once. Empty water from the...
... them open far enough for more easily OR screw in the leveling legs all frozen food in a frozen food locker. Release the hooks on the model, raise the front of the food is poor, or if you choose to help foods stay cold and frozen. 2. Turn the bulb counterclockwise and remove... it may be safely refrozen, although the quality and flavor may be out for air to get to the tops of dry ice in your model, turn the refrigerator off . 1. WHEN YOU GO ON VACATION If you feel it is available, consume or perish food at once. Empty water from the...
Owner's Manual
Page 29
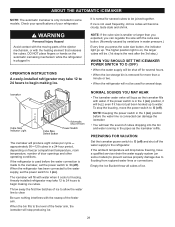
... Avoid contact with the moving parts of the ejector mechanism, or with the sweep of cubes dropping into the bin and water running in some models) to prevent serious property damage due to O (off for more than you expected, you press the cube size button, the indicator light go...two. NORMAL SOUNDS YOU MAY HEAR The icemaker water valve will drop below freezing, have a qualified servicer drain the water supply system (on some models. Throw away the first few batches of the feeler arm, the icemaker will become cloudy, taste stale and shrink. PREPARING FOR VACATION Set the icemaker...
... Avoid contact with the moving parts of the ejector mechanism, or with the sweep of cubes dropping into the bin and water running in some models) to prevent serious property damage due to O (off for more than you expected, you press the cube size button, the indicator light go...two. NORMAL SOUNDS YOU MAY HEAR The icemaker water valve will drop below freezing, have a qualified servicer drain the water supply system (on some models. Throw away the first few batches of the feeler arm, the icemaker will become cloudy, taste stale and shrink. PREPARING FOR VACATION Set the icemaker...
Owner's Manual
Page 30
... (2.4 m) as a power drill) during installation, be between 20 and 120 PSI or 0.137 and 0.82 MPa on models without a water filter and between 40 and 120 PSI or 0.275 and 0.82 MPa on models with a tube cutterand then use your refrigerator before installing the water supply line to the refrigerator. If you...
... (2.4 m) as a power drill) during installation, be between 20 and 120 PSI or 0.137 and 0.82 MPa on models without a water filter and between 40 and 120 PSI or 0.275 and 0.82 MPa on models with a tube cutterand then use your refrigerator before installing the water supply line to the refrigerator. If you...
Owner's Manual
Page 33
Because the sounds are new to the replacement. The thermostat control (or refrigerator control, depending on the model) will also click when cycling on and off by the condenser fan. Then... Light bulb is in the socket. Firmly plug the cord into a live ...
Because the sounds are new to the replacement. The thermostat control (or refrigerator control, depending on the model) will also click when cycling on and off by the condenser fan. Then... Light bulb is in the socket. Firmly plug the cord into a live ...
Owner's Manual
Page 34
... out of food warms the refrigerator. Then... Push bins all the way, see "Doors will run longer in and the refrigerator control was an older model. Level the refrigerator. Then... TROUBLESHOOTING GUIDE COMPRESSOR MOTOR SEEMS TO RUN TOO MUCH Check if... At normal room temperatures, expect your motor to 80% of...
... out of food warms the refrigerator. Then... Push bins all the way, see "Doors will run longer in and the refrigerator control was an older model. Level the refrigerator. Then... TROUBLESHOOTING GUIDE COMPRESSOR MOTOR SEEMS TO RUN TOO MUCH Check if... At normal room temperatures, expect your motor to 80% of...

Owner's Manual
Page 1
Model Name **=color number, número de color, numéro de couleur LTN19415** LTN19315** LTN19312** LTC22350** P/No. MFL62423824 www.lge.com ENGLISH ESPAÑOL FRANÇAIS OWNER´S MANUAL TOP FREEZER REFRIGERATOR Please read this manual carefully before operating your set and retain it for future reference.
Model Name **=color number, número de color, numéro de couleur LTN19415** LTN19315** LTN19312** LTC22350** P/No. MFL62423824 www.lge.com ENGLISH ESPAÑOL FRANÇAIS OWNER´S MANUAL TOP FREEZER REFRIGERATOR Please read this manual carefully before operating your set and retain it for future reference.


