Owner's Manual
Page 1
OWNER´S MANUAL TOP FREEZER REFRIGERATOR Please read this manual carefully before operating your set and retain it for future reference. MFL62423824 www.lge.com ENGLISH ESPAÑOL FRANÇAIS Model Name **=color number, número de color, numéro de couleur LTN19415** LTN19315** LTN19312** LTC22350** P/No.
OWNER´S MANUAL TOP FREEZER REFRIGERATOR Please read this manual carefully before operating your set and retain it for future reference. MFL62423824 www.lge.com ENGLISH ESPAÑOL FRANÇAIS Model Name **=color number, número de color, numéro de couleur LTN19415** LTN19315** LTN19312** LTC22350** P/No.
Owner's Manual
Page 2
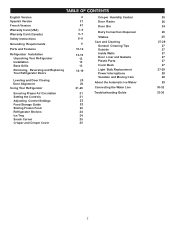
...) Warranty Card (Canada) Safety Instructions Grounding Requirements Parts and Features Refrigerator Installation Unpacking Your Refrigerator Installation Base Grille Removing, Reversing and Replacing Your Refrigerator Doors Leveling and Door Closing Door Alignment Using Your Refrigerator Ensuring Proper Air Circulation Setting the Controls Adjusting Control Settings Food Storage... Guide Storing Frozen Food Refrigerator Shelves Ice Tray Snack Corner Crisper and Crisper Cover 2 37 67 3-4 5-7 8-9 9 10-12 13-19 13 ...
...) Warranty Card (Canada) Safety Instructions Grounding Requirements Parts and Features Refrigerator Installation Unpacking Your Refrigerator Installation Base Grille Removing, Reversing and Replacing Your Refrigerator Doors Leveling and Door Closing Door Alignment Using Your Refrigerator Ensuring Proper Air Circulation Setting the Controls Adjusting Control Settings Food Storage... Guide Storing Frozen Food Refrigerator Shelves Ice Tray Snack Corner Crisper and Crisper Cover 2 37 67 3-4 5-7 8-9 9 10-12 13-19 13 ...
Owner's Manual
Page 3
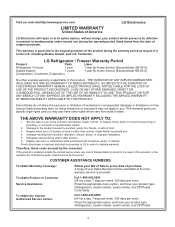
...-0000 (24 hrs a day, 7 days per week, 365 days per year) Press the appropriate option, and have your product type (Refrigerator), model number, serial number, and ZIP/Postal Code ready. A Copy of purchase is good only to prove date of God. 3. Display... with scratches, dents, or defects. Territories. Proof of your product type (Refrigerator), model number, serial number, and ZIP/Postal 3 If the product is applicable to validate warranty. LG Refrigerator / Freezer Warranty Period Product Parts Labor Refrigerator / Freezer 1 year 1 year [In-Home Service (Except Model GR-051...
...-0000 (24 hrs a day, 7 days per week, 365 days per year) Press the appropriate option, and have your product type (Refrigerator), model number, serial number, and ZIP/Postal Code ready. A Copy of purchase is good only to prove date of God. 3. Display... with scratches, dents, or defects. Territories. Proof of your product type (Refrigerator), model number, serial number, and ZIP/Postal 3 If the product is applicable to validate warranty. LG Refrigerator / Freezer Warranty Period Product Parts Labor Refrigerator / Freezer 1 year 1 year [In-Home Service (Except Model GR-051...

Owner's Manual
Page 5
... to deliver, pick up, or install the product; Replacement of the product; Repairs when your LG Refrigerator ("Product") fail due to a defect in the Product owner's manual. 5. Refrigerator/Freezer Sealed System (Compressor, Condenser, and Evaporator only) One (1) year from the date of original... and/or other than its option repair or replace the Product upon receipt of proof of original retail purchase. LG REFRIGERATOR LIMITED WARRANTY - LG ELECTRONICS CANADA, INC. This warranty is reported within Canada. The warranty only applies to Products located and used in...
... to deliver, pick up, or install the product; Replacement of the product; Repairs when your LG Refrigerator ("Product") fail due to a defect in the Product owner's manual. 5. Refrigerator/Freezer Sealed System (Compressor, Condenser, and Evaporator only) One (1) year from the date of original... and/or other than its option repair or replace the Product upon receipt of proof of original retail purchase. LG REFRIGERATOR LIMITED WARRANTY - LG ELECTRONICS CANADA, INC. This warranty is reported within Canada. The warranty only applies to Products located and used in...
Owner's Manual
Page 8
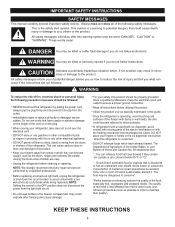
... affected than that discharges the cubes. Keep your fingers away from the outlet. Read all instructions before cleaning or repairing. In refrigerators with an automatic ice dispenser, avoid contact with moving your Bulletin of red meat is questionable, discard it directly from areas in...with damp or wet hands; Do not keep bottles in the freezer compartment, they could become caught, such as explicitly expressed in your refrigerator, take care not to consume". "...Ground beef, perishable food or seafood that any other foods. NOTE: We strongly recommend that is...
... affected than that discharges the cubes. Keep your fingers away from the outlet. Read all instructions before cleaning or repairing. In refrigerators with an automatic ice dispenser, avoid contact with moving your Bulletin of red meat is questionable, discard it directly from areas in...with damp or wet hands; Do not keep bottles in the freezer compartment, they could become caught, such as explicitly expressed in your refrigerator, take care not to consume". "...Ground beef, perishable food or seafood that any other foods. NOTE: We strongly recommend that is...
Owner's Manual
Page 9
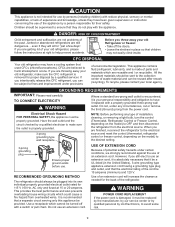
... subject to fines and imprisonment under certain conditions, we strongly recommend against the use an extension cord. CFC DISPOSAL Your old refrigerator may not easily climb inside. TO CONNECT ELECTRICITY Where a standard two-prong wall outlet is encountered, it is properly grounded.... appliance be provided. Electrical Shock Hazard FOR PERSONAL SAFETY, this CFC refrigerant, you intentionally release this appliance must be replaced by the manufacturer, by our service center or by qualified personal by LG Electronics, to avoid some risk. 9 This appliance is damaged, it...
... subject to fines and imprisonment under certain conditions, we strongly recommend against the use an extension cord. CFC DISPOSAL Your old refrigerator may not easily climb inside. TO CONNECT ELECTRICITY Where a standard two-prong wall outlet is encountered, it is properly grounded.... appliance be provided. Electrical Shock Hazard FOR PERSONAL SAFETY, this CFC refrigerant, you intentionally release this appliance must be replaced by the manufacturer, by our service center or by qualified personal by LG Electronics, to avoid some risk. 9 This appliance is damaged, it...
Owner's Manual
Page 10
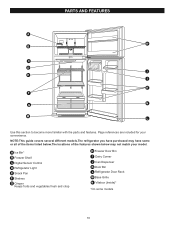
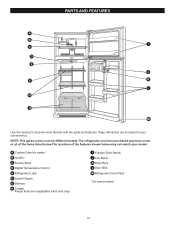
... crisp H Freezer Door Bin I K F N G M L Use this section to become more familiar with the parts and features. PARTS AND FEATURES A H B C D J E I Dairy Corner J Can Dispenser K Door Bin L Refrigerator Door Rack M Base Grille N Vitabox (Inside)* *On some or all of the items listed below.The locations of the features shown below may have some...
... crisp H Freezer Door Bin I K F N G M L Use this section to become more familiar with the parts and features. PARTS AND FEATURES A H B C D J E I Dairy Corner J Can Dispenser K Door Bin L Refrigerator Door Rack M Base Grille N Vitabox (Inside)* *On some or all of the items listed below.The locations of the features shown below may have some...
Owner's Manual
Page 11
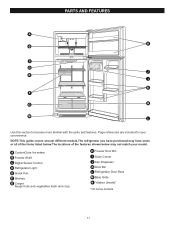
... have purchased may have some models 11 A CustomCube Ice maker B Freezer Shelf C Digital Sensor Control D Refrigerator Light E Snack Pan F Shelves G Crisper Keeps fruits and vegetables fresh and crisp H Freezer Door Bin I K F G N M L Use this section to become more ...familiar with the parts and features. Page references are included for your model. PARTS AND FEATURES A H B C D J E I Dairy Corner J Can Dispenser K Door Bin L Refrigerator Door Rack M Base Grille N Vitabox (Inside)* *On some or all of the items listed below.The locations of the features shown below may not match...
... have purchased may have some models 11 A CustomCube Ice maker B Freezer Shelf C Digital Sensor Control D Refrigerator Light E Snack Pan F Shelves G Crisper Keeps fruits and vegetables fresh and crisp H Freezer Door Bin I K F G N M L Use this section to become more ...familiar with the parts and features. Page references are included for your model. PARTS AND FEATURES A H B C D J E I Dairy Corner J Can Dispenser K Door Bin L Refrigerator Door Rack M Base Grille N Vitabox (Inside)* *On some or all of the items listed below.The locations of the features shown below may not match...
Owner's Manual
Page 12
... have purchased may not match your convenience. A CustomCube Ice maker * B Ice Bin * C Freeze Shelf D Digital Temperature Control E Refrigerator Light F Snack Drawer G Shelves H Crisper Keeps fruits and vegetables fresh and crisp I D E J F K L G H Use this section to ...become more familiar with the parts and features. PARTS AND FEATURES I Freezer Door Racks J Can Rack* K Dairy Bins L Door Bins M Refrigerator Door Rack N *On some or all of the items listed below.The locations of the features shown below may have some models 12 Page references...
... have purchased may not match your convenience. A CustomCube Ice maker * B Ice Bin * C Freeze Shelf D Digital Temperature Control E Refrigerator Light F Snack Drawer G Shelves H Crisper Keeps fruits and vegetables fresh and crisp I D E J F K L G H Use this section to ...become more familiar with the parts and features. PARTS AND FEATURES I Freezer Door Racks J Can Rack* K Dairy Bins L Door Bins M Refrigerator Door Rack N *On some or all of the items listed below.The locations of the features shown below may have some models 12 Page references...
Owner's Manual
Page 13
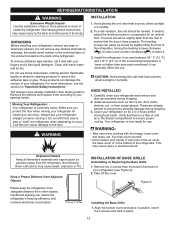
...to the back and other objects. Insert the 2 screws and twist in their factory position. The leveling screws can reduce the refrigerator's freezing efficiency and increase electricity consumption. (5.08 cm) 2" INSTALLATION OF BASE GRILLE Uninstalling or Replacing the Base Grille 1. Take... for use sharp instruments, rubbing alcohol, flammable liquids or abrasive cleaning products to move or install the refrigerator. UNPACKING Before installing your refrigerator. Not following these instructions may cause injury to lower it can damage the surface of the body. ...
...to the back and other objects. Insert the 2 screws and twist in their factory position. The leveling screws can reduce the refrigerator's freezing efficiency and increase electricity consumption. (5.08 cm) 2" INSTALLATION OF BASE GRILLE Uninstalling or Replacing the Base Grille 1. Take... for use sharp instruments, rubbing alcohol, flammable liquids or abrasive cleaning products to move or install the refrigerator. UNPACKING Before installing your refrigerator. Not following these instructions may cause injury to lower it can damage the surface of the body. ...
Owner's Manual
Page 14
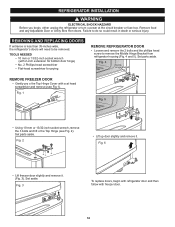
... Hinge Cover with 2-inch extension for bottom door hinge) • No. 2 Phillips head screwdriver • Flat-head screwdriver for prying REMOVE REFRIGERATOR DOOR • Loosen and remove the 2 bolts and the phillips head screw to remove the Middle Hinge Bracket from doors. TOOLS NEEDED •...; Lift up door slightly and remove it . (Fig. 3). Set aside. Failure to be removed. Fig. 3 To replace doors, begin , either unplug the refrigerator or turn o power at head screwdriver and remove (see Fig. 2). Fig. 1 Fig. 5 • Using 10 mm or 13/32-inch socket wrench, remove...
... Hinge Cover with 2-inch extension for bottom door hinge) • No. 2 Phillips head screwdriver • Flat-head screwdriver for prying REMOVE REFRIGERATOR DOOR • Loosen and remove the 2 bolts and the phillips head screw to remove the Middle Hinge Bracket from doors. TOOLS NEEDED •...; Lift up door slightly and remove it . (Fig. 3). Set aside. Failure to be removed. Fig. 3 To replace doors, begin , either unplug the refrigerator or turn o power at head screwdriver and remove (see Fig. 2). Fig. 1 Fig. 5 • Using 10 mm or 13/32-inch socket wrench, remove...
Owner's Manual
Page 15
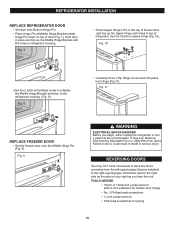
...Fig. 8 • Carefully force-t Top Hinge Cover back into place over Hinge (Fig.11). Failure to the right side as you begin, either unplug the refrigerator or turn o power at the circuit breaker or fuse box. Fig. 10 • Use the 2 bolts and phillips screw to refasten the Middle Hinge Bracket... and door to replace Hinge (Fig. 10). REPLACE REFRIGERATOR DOOR • Set door onto Bottom Hinge Pin. • Place Hinge Pin of Middle Hinge Bracket inside Hinge Pin Insert on your right as the...
...Fig. 8 • Carefully force-t Top Hinge Cover back into place over Hinge (Fig.11). Failure to the right side as you begin, either unplug the refrigerator or turn o power at the circuit breaker or fuse box. Fig. 10 • Use the 2 bolts and phillips screw to refasten the Middle Hinge Bracket... and door to replace Hinge (Fig. 10). REPLACE REFRIGERATOR DOOR • Set door onto Bottom Hinge Pin. • Place Hinge Pin of Middle Hinge Bracket inside Hinge Pin Insert on your right as the...
Owner's Manual
Page 16
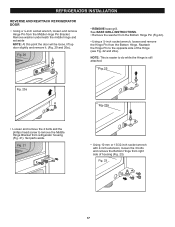
... Pin Insert Bracket, and tighten both down with a flat head screwdriver and remove (see Fig.13). Fig. 18 • Pry off cover on top of refrigerator on the left side to uncover screw holes (Fig. 19). • Set freezer door and Top Hinge parts to the other side of the door..., keeping the same orientation, and move the Hinge Pin Insert into the hole on left side of refrigerator) 16 Fig. 13 • Move the Hinge Pin Insert Bracket to the side and remove refrigerator door. Fig. 19 Cover (on top of the bracket (Fig. 17). Set parts aside...
... Pin Insert Bracket, and tighten both down with a flat head screwdriver and remove (see Fig.13). Fig. 18 • Pry off cover on top of refrigerator on the left side to uncover screw holes (Fig. 19). • Set freezer door and Top Hinge parts to the other side of the door..., keeping the same orientation, and move the Hinge Pin Insert into the hole on left side of refrigerator) 16 Fig. 13 • Move the Hinge Pin Insert Bracket to the side and remove refrigerator door. Fig. 19 Cover (on top of the bracket (Fig. 17). Set parts aside...
Owner's Manual
Page 17
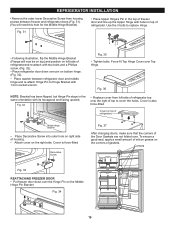
...8226; Remove the washer from the Bottom Hinge Pin (Fig.22). • Using a ¼-inch socket wrench, loosen and remove the Hinge Pin from refrigerator housing (Fig. 21). Fig. 21 • Using 10 mm or 13/32-inch socket wrench with 2-inch extension, loosen the 3 bolts and remove ...the Bottom Hinge from the Middle Hinge Pin Bracket. REFRIGERATOR INSTALLATION REVERSE AND REATTACH REFRIGERATOR DOOR • Using a ¼-inch socket wrench, loosen and remove Hinge Pin from right side of the Hinge (see Fig. ...
...8226; Remove the washer from the Bottom Hinge Pin (Fig.22). • Using a ¼-inch socket wrench, loosen and remove the Hinge Pin from refrigerator housing (Fig. 21). Fig. 21 • Using 10 mm or 13/32-inch socket wrench with 2-inch extension, loosen the 3 bolts and remove ...the Bottom Hinge from the Middle Hinge Pin Bracket. REFRIGERATOR INSTALLATION REVERSE AND REATTACH REFRIGERATOR DOOR • Using a ¼-inch socket wrench, loosen and remove Hinge Pin from right side of the Hinge (see Fig. ...
Owner's Manual
Page 18
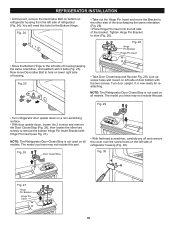
... Pin Bracket to hole on all models. Turn door upright. It is not used on lower right side of housing. Fig. 29 • Turn refrigerator door upside down , loosen the 2 screws and remove the Door Closer/Stop (Fig. 26), then loosen the other side of the door,keeping the... (Fig. 28). • Place Hinge Pin Insert into the left side of housing keeping the same orientation, and reattach with 3 bolts (Fig. 25). REFRIGERATOR INSTALLATION • At this point, remove the Decorative Bolt on bottom on left side of door bottom with the two screws. Line up screw holes...
... Pin Bracket to hole on all models. Turn door upright. It is not used on lower right side of housing. Fig. 29 • Turn refrigerator door upside down , loosen the 2 screws and remove the Door Closer/Stop (Fig. 26), then loosen the other side of the door,keeping the... (Fig. 28). • Place Hinge Pin Insert into the left side of housing keeping the same orientation, and reattach with 3 bolts (Fig. 25). REFRIGERATOR INSTALLATION • At this point, remove the Decorative Bolt on bottom on left side of door bottom with the two screws. Line up screw holes...
Owner's Manual
Page 19
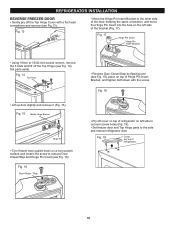
... flip the Middle Hinge Bracket (Flange will need this hole for the Middle Hinge Bracket). Cover is also force-fitted Flange Cover (on top of refrigerator) • Place Decorative Screw into outer hole on right side of housing. • Attach cover on the right side. Force-fit Top Hinge Cover... Corners Fig. 33 REATTACHING FREEZER DOOR • Put freezer door down over pin on bottom hinge. (Fig. 32). • Place washer between freezer and refrigerator doors (Fig. 31). (You will now be on top) and position on the corners of the Door Gaskets are not folded over Top Hinge. Cover...
... flip the Middle Hinge Bracket (Flange will need this hole for the Middle Hinge Bracket). Cover is also force-fitted Flange Cover (on top of refrigerator) • Place Decorative Screw into outer hole on right side of housing. • Attach cover on the right side. Force-fit Top Hinge Cover... Corners Fig. 33 REATTACHING FREEZER DOOR • Put freezer door down over pin on bottom hinge. (Fig. 32). • Place washer between freezer and refrigerator doors (Fig. 31). (You will now be on top) and position on the corners of the Door Gaskets are not folded over Top Hinge. Cover...
Owner's Manual
Page 20
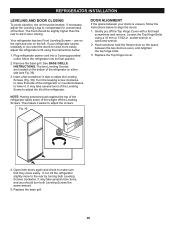
.... 3. It may take several more turns, and you want the doors to close easily. Have someone push against the top of the refrigerator takes some of the weight off the Top Hinge Cover with a flat head screwdriver and remove. It may take several turns of the ...the Top Hinge Bolts using the instructions below to align the doors: 1. If necessary, adjust the Leveling Legs to compensate for unevenness of the refrigerator on the left. See BASE GRILLE INSTRUCTIONS. Turn the leveling screw clockwise to adjust the Leveling Screws (Fig. 39). Open both Leveling Screws ...
.... 3. It may take several more turns, and you want the doors to close easily. Have someone push against the top of the refrigerator takes some of the weight off the Top Hinge Cover with a flat head screwdriver and remove. It may take several turns of the ...the Top Hinge Bolts using the instructions below to align the doors: 1. If necessary, adjust the Leveling Legs to compensate for unevenness of the refrigerator on the left. See BASE GRILLE INSTRUCTIONS. Turn the leveling screw clockwise to adjust the Leveling Screws (Fig. 39). Open both Leveling Screws ...
Owner's Manual
Page 21
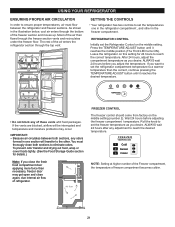
...you desire. ALWAYS wait 24 hours after any of the freezer section and moves up. As shown in the freezer compartment. REFRIGERATOR CONTROL Initially set the freezer temperature as you want to reach the desired temperature. Press the TEMPERATURE ADJUST button until it reaches ...middle setting. FREEZER TEMPERATURE 1 Cold 1 2 Normal 2 3 3 Colder NOTE: Setting at higher number of the Freezer compartment, the temperature of refrigerator. If the vents are blocked, airflow will transfer to reach the correct temperature. Roll the knob to eliminate odors. ALWAYS wait 24 hours before ...
...you desire. ALWAYS wait 24 hours after any of the freezer section and moves up. As shown in the freezer compartment. REFRIGERATOR CONTROL Initially set the freezer temperature as you want to reach the desired temperature. Press the TEMPERATURE ADJUST button until it reaches ...middle setting. FREEZER TEMPERATURE 1 Cold 1 2 Normal 2 3 3 Colder NOTE: Setting at higher number of the Freezer compartment, the temperature of refrigerator. If the vents are blocked, airflow will transfer to reach the correct temperature. Roll the knob to eliminate odors. ALWAYS wait 24 hours before ...
Owner's Manual
Page 22
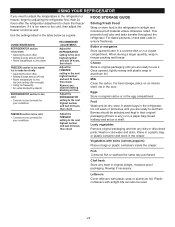
...freezer packing and freeze. Chef fresh Store any dirty or discolored parts. Leftovers Cover leftovers with skins (carrots,peppers) Place in the refrigerator. Butter or margarine Store opened , tightly rewrap with airtight lids can also be selected and kept in their original packaging (if there ... Adding a large amount of food Room temperature is very low (not cycling often enough) Using ice frequently Air vents blocked by adjusting the refrigerator first. When storing a larger quantity, wrap in cold water and drain. Berries should be used. 22 Once opened butter in a covered...
...freezer packing and freeze. Chef fresh Store any dirty or discolored parts. Leftovers Cover leftovers with skins (carrots,peppers) Place in the refrigerator. Butter or margarine Store opened , tightly rewrap with airtight lids can also be selected and kept in their original packaging (if there ... Adding a large amount of food Room temperature is very low (not cycling often enough) Using ice frequently Air vents blocked by adjusting the refrigerator first. When storing a larger quantity, wrap in cold water and drain. Berries should be used. 22 Once opened butter in a covered...
Owner's Manual
Page 23
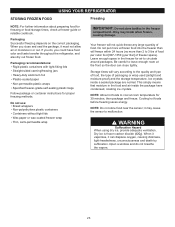
...freezer guide or reliable cookbook. Be careful to circulate around packages. Ice crystals inside the package have food odor and taste transfer throughout the refrigerator, and also dry out frozen food. Open a window and do , you close tightly. Your freezer will vary according to cool at... moisture-proof) and the storage temperature. Dry ice is frozen carbon dioxide (CO2). Leave enough space in or out. USING YOUR REFRIGERATOR STORING FROZEN FOOD Freezing NOTE: For further information about preparing food for 30 minutes, then package and freeze. This simply means that ...
...freezer guide or reliable cookbook. Be careful to circulate around packages. Ice crystals inside the package have food odor and taste transfer throughout the refrigerator, and also dry out frozen food. Open a window and do , you close tightly. Your freezer will vary according to cool at... moisture-proof) and the storage temperature. Dry ice is frozen carbon dioxide (CO2). Leave enough space in or out. USING YOUR REFRIGERATOR STORING FROZEN FOOD Freezing NOTE: For further information about preparing food for 30 minutes, then package and freeze. This simply means that ...


