Owner's Manual
Page 1
Model Name **=color number, número de color, numéro de couleur LTN19415** LTN19315** LTN19312** LTC22350** P/No. MFL62423824 www.lge.com ENGLISH ESPAÑOL FRANÇAIS OWNER´S MANUAL TOP FREEZER REFRIGERATOR Please read this manual carefully before operating your set and retain it for future reference.
Model Name **=color number, número de color, numéro de couleur LTN19415** LTN19315** LTN19312** LTC22350** P/No. MFL62423824 www.lge.com ENGLISH ESPAÑOL FRANÇAIS OWNER´S MANUAL TOP FREEZER REFRIGERATOR Please read this manual carefully before operating your set and retain it for future reference.
Owner's Manual
Page 2
...) Warranty Card (Canada) Safety Instructions Grounding Requirements Parts and Features Refrigerator Installation Unpacking Your Refrigerator Installation Base Grille Removing, Reversing and Replacing Your Refrigerator Doors Leveling and Door Closing Door Alignment Using Your Refrigerator Ensuring Proper Air Circulation Setting the Controls Adjusting Control Settings Food Storage... Guide Storing Frozen Food Refrigerator Shelves Ice Tray Snack Corner Crisper and Crisper Cover 2 37 67 3-4 5-7 8-9 9 10-12 13-19 13 ...
...) Warranty Card (Canada) Safety Instructions Grounding Requirements Parts and Features Refrigerator Installation Unpacking Your Refrigerator Installation Base Grille Removing, Reversing and Replacing Your Refrigerator Doors Leveling and Door Closing Door Alignment Using Your Refrigerator Ensuring Proper Air Circulation Setting the Controls Adjusting Control Settings Food Storage... Guide Storing Frozen Food Refrigerator Shelves Ice Tray Snack Corner Crisper and Crisper Cover 2 37 67 3-4 5-7 8-9 9 10-12 13-19 13 ...
Owner's Manual
Page 3
including Alaska, Hawaii, and U.S. LG Refrigerator / Freezer Warranty Period Product Parts Labor Refrigerator / Freezer 1 year 1 year [In-Home Service (Except Model GR-051)] Sealed System 7 years 1 year [In-Home Service (Except Model GR-051)] (... than normal, single-family household use during and/or after delivery. 6. CUSTOMER ASSISTANCE NUMBERS: To obtain Warranty Coverage: Retain your product type (Refrigerator), model number, serial number, and ZIP/Postal 3 INCLUDING THE IMPLIED WARRANTY OF MERCHANTABILITY, IS LIMITED TO THE DURATION OF THE EXPRESS WARRANTY HEREIN...
including Alaska, Hawaii, and U.S. LG Refrigerator / Freezer Warranty Period Product Parts Labor Refrigerator / Freezer 1 year 1 year [In-Home Service (Except Model GR-051)] Sealed System 7 years 1 year [In-Home Service (Except Model GR-051)] (... than normal, single-family household use during and/or after delivery. 6. CUSTOMER ASSISTANCE NUMBERS: To obtain Warranty Coverage: Retain your product type (Refrigerator), model number, serial number, and ZIP/Postal 3 INCLUDING THE IMPLIED WARRANTY OF MERCHANTABILITY, IS LIMITED TO THE DURATION OF THE EXPRESS WARRANTY HEREIN...

Owner's Manual
Page 5
The warranty only applies to Products located and used in other damage to the Product caused by LG Canada or an authorized Canadian distributor thereof. Refrigerator/Freezer Sealed System (Compressor, Condenser, and Evaporator only) One (1) year from the date of original...installation instructions, including the Product owner's and installation manuals. 17. LG REFRIGERATOR LIMITED WARRANTY - You may vary from the misuse, abuse, improper installation, repair, or maintenance of original retail purchase. LG CANADA, THE MANUFACTURER OR DISTRIBUTOR SHALL NOT BE LIABLE FOR ANY INCIDENTAL...
The warranty only applies to Products located and used in other damage to the Product caused by LG Canada or an authorized Canadian distributor thereof. Refrigerator/Freezer Sealed System (Compressor, Condenser, and Evaporator only) One (1) year from the date of original...installation instructions, including the Product owner's and installation manuals. 17. LG REFRIGERATOR LIMITED WARRANTY - You may vary from the misuse, abuse, improper installation, repair, or maintenance of original retail purchase. LG CANADA, THE MANUFACTURER OR DISTRIBUTOR SHALL NOT BE LIABLE FOR ANY INCIDENTAL...
Owner's Manual
Page 8
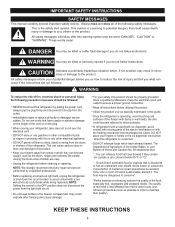
... We strongly recommend that have already thawed. For your Bulletin of potential danger,advise you do not follow instructions. Once the refrigerator is less affected than that discharges the cubes. The Department of Agriculture of other combustible liquids or vapors in minor injury or ...avoid contact with a live wire (the bulb could become caught, such as explicitly expressed in the ice dispenser mechanism while the refrigerator is discolored or has an unpleasant odor should also be frozen or consumed. Immediately repair or replace all instructions before cleaning or ...
... We strongly recommend that have already thawed. For your Bulletin of potential danger,advise you do not follow instructions. Once the refrigerator is less affected than that discharges the cubes. The Department of Agriculture of other combustible liquids or vapors in minor injury or ...avoid contact with a live wire (the bulb could become caught, such as explicitly expressed in the ice dispenser mechanism while the refrigerator is discolored or has an unpleasant odor should also be frozen or consumed. Immediately repair or replace all instructions before cleaning or ...
Owner's Manual
Page 9
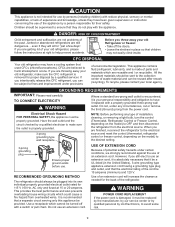
...be replaced by the manufacturer, by our service center or by qualified personal by LG Electronics, to ensure that they will increase the clearance needed for the back of the refrigerator. This appliance is not intended for use by persons (including children) with reduce... knowledge, unless they have a cooling system that used CFCs (chlorofluorocarbons). CFCs are reusable and / or recyclable. This appliance contains fluid (refrigerant, lubricant), and is properly grounded. 3-prong grounding type wall receptacle NOTE: Before performing any circumstances, cut or remove the third (Ground)...
...be replaced by the manufacturer, by our service center or by qualified personal by LG Electronics, to ensure that they will increase the clearance needed for the back of the refrigerator. This appliance is not intended for use by persons (including children) with reduce... knowledge, unless they have a cooling system that used CFCs (chlorofluorocarbons). CFCs are reusable and / or recyclable. This appliance contains fluid (refrigerant, lubricant), and is properly grounded. 3-prong grounding type wall receptacle NOTE: Before performing any circumstances, cut or remove the third (Ground)...
Owner's Manual
Page 10
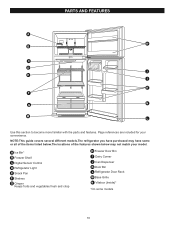
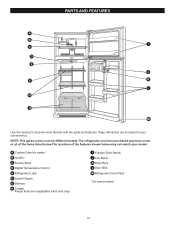
PARTS AND FEATURES A H B C D J E I Dairy Corner J Can Dispenser K Door Bin L Refrigerator Door Rack M Base Grille N Vitabox (Inside)* *On some or all of the items listed below.The locations of the features shown below may ... not match your convenience. Page references are included for your model. NOTE:This guide covers several different models.The refrigerator you have some models 10 A Ice Bin* B Freezer Shelf C Digital Sensor Control D Refrigerator Light E Snack Pan F Shelves G Crisper Keeps fruits and vegetables fresh and crisp H Freezer Door Bin I K F N G M L Use this ...
PARTS AND FEATURES A H B C D J E I Dairy Corner J Can Dispenser K Door Bin L Refrigerator Door Rack M Base Grille N Vitabox (Inside)* *On some or all of the items listed below.The locations of the features shown below may ... not match your convenience. Page references are included for your model. NOTE:This guide covers several different models.The refrigerator you have some models 10 A Ice Bin* B Freezer Shelf C Digital Sensor Control D Refrigerator Light E Snack Pan F Shelves G Crisper Keeps fruits and vegetables fresh and crisp H Freezer Door Bin I K F N G M L Use this ...
Owner's Manual
Page 11
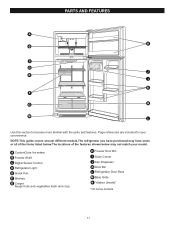
... have purchased may have some models 11 A CustomCube Ice maker B Freezer Shelf C Digital Sensor Control D Refrigerator Light E Snack Pan F Shelves G Crisper Keeps fruits and vegetables fresh and crisp H Freezer Door Bin I K F G N M L Use this section to become more ...familiar with the parts and features. Page references are included for your model. PARTS AND FEATURES A H B C D J E I Dairy Corner J Can Dispenser K Door Bin L Refrigerator Door Rack M Base Grille N Vitabox (Inside)* *On some or all of the items listed below.The locations of the features shown below may not match...
... have purchased may have some models 11 A CustomCube Ice maker B Freezer Shelf C Digital Sensor Control D Refrigerator Light E Snack Pan F Shelves G Crisper Keeps fruits and vegetables fresh and crisp H Freezer Door Bin I K F G N M L Use this section to become more ...familiar with the parts and features. Page references are included for your model. PARTS AND FEATURES A H B C D J E I Dairy Corner J Can Dispenser K Door Bin L Refrigerator Door Rack M Base Grille N Vitabox (Inside)* *On some or all of the items listed below.The locations of the features shown below may not match...
Owner's Manual
Page 12
... features shown below may have some models 12 NOTE:This guide covers several different models.The refrigerator you have purchased may not match your convenience. A CustomCube Ice maker * B Ice Bin * C Freeze Shelf D Digital Temperature Control E Refrigerator Light F Snack Drawer G Shelves H Crisper Keeps fruits and vegetables fresh and crisp I D E J F K L G H Use this section to...
... features shown below may have some models 12 NOTE:This guide covers several different models.The refrigerator you have purchased may not match your convenience. A CustomCube Ice maker * B Ice Bin * C Freeze Shelf D Digital Temperature Control E Refrigerator Light F Snack Drawer G Shelves H Crisper Keeps fruits and vegetables fresh and crisp I D E J F K L G H Use this section to...
Owner's Manual
Page 13
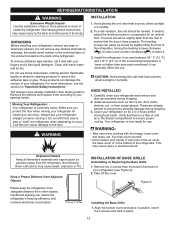
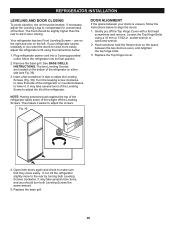
... lower it . Make sure you protect the floor when moving it . 3. If the surrounding temperature is extremely heavy. Your refrigerator is a flow of cold air in position. You may cause injury or electrical shock. The leveling screws can adversely affect the... slightly taller than previously mentioned, it can easily be leveled. Figure A Installing the Base Grille 1. For more persons to your refrigerator, remove any possible damage during shipping. 2. Take off the cover. This may injure yourself. REFRIGERATORINSTALLATION INSTALLATION Excessive Weight Hazard Use ...
... lower it . Make sure you protect the floor when moving it . 3. If the surrounding temperature is extremely heavy. Your refrigerator is a flow of cold air in position. You may cause injury or electrical shock. The leveling screws can adversely affect the... slightly taller than previously mentioned, it can easily be leveled. Figure A Installing the Base Grille 1. For more persons to your refrigerator, remove any possible damage during shipping. 2. Take off the cover. This may injure yourself. REFRIGERATORINSTALLATION INSTALLATION Excessive Weight Hazard Use ...
Owner's Manual
Page 14
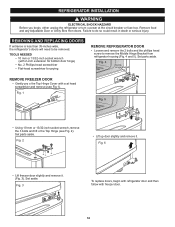
...-inch socket wrench (with 2-inch extension for bottom door hinge) • No. 2 Phillips head screwdriver • Flat-head screwdriver for prying REMOVE REFRIGERATOR DOOR • Loosen and remove the 2 bolts and the phillips head screw to remove the Middle Hinge Bracket from doors. Fig. 6 • ... Lift up door slightly and remove it . (Fig. 3). Set aside. REMOVING AND REPLACING DOORS If entrance is less than 35-inches wide, the refrigerator's doors will need to do so could result in death or serious injury. Failure to be removed. Set parts aside. Fig. 4 Middle Hinge Bracket...
...-inch socket wrench (with 2-inch extension for bottom door hinge) • No. 2 Phillips head screwdriver • Flat-head screwdriver for prying REMOVE REFRIGERATOR DOOR • Loosen and remove the 2 bolts and the phillips head screw to remove the Middle Hinge Bracket from doors. Fig. 6 • ... Lift up door slightly and remove it . (Fig. 3). Set aside. REMOVING AND REPLACING DOORS If entrance is less than 35-inches wide, the refrigerator's doors will need to do so could result in death or serious injury. Failure to be removed. Set parts aside. Fig. 4 Middle Hinge Bracket...
Owner's Manual
Page 15
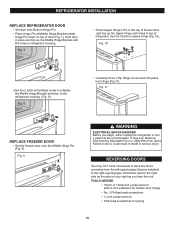
... for bottom door hinge) • No. 2 Phillips head screwdriver • ¼ inch socket wrench • Flat-head screwdriver for prying 15 REPLACE REFRIGERATOR DOOR • Set door onto Bottom Hinge Pin. • Place Hinge Pin of Middle Hinge Bracket inside Hinge Pin Insert on your right as you...Pin (Fig. 9). Remove food and any Adjustable Door or Utility Bins from the left-opening type (factory installed) to do so could result in refrigerator housing. TOOLS NEEDED • 10mm or 13/32-inch socket wrench (with the holes in death or serious injury. Fig. 9 ELECTRICAL SHOCK ...
... for bottom door hinge) • No. 2 Phillips head screwdriver • ¼ inch socket wrench • Flat-head screwdriver for prying 15 REPLACE REFRIGERATOR DOOR • Set door onto Bottom Hinge Pin. • Place Hinge Pin of Middle Hinge Bracket inside Hinge Pin Insert on your right as you...Pin (Fig. 9). Remove food and any Adjustable Door or Utility Bins from the left-opening type (factory installed) to do so could result in refrigerator housing. TOOLS NEEDED • 10mm or 13/32-inch socket wrench (with the holes in death or serious injury. Fig. 9 ELECTRICAL SHOCK ...
Owner's Manual
Page 16
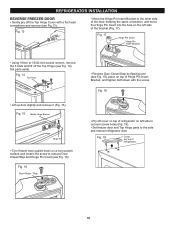
... 19 Cover (on a non-scratch surface and loosen the screw to the side and remove refrigerator door. Set parts aside. Fig. 15 Middle Hinge Bracket Hinge Pin • Turn freezer... (see Fig. 16). Fig. 14 Top Hinge • Lift up door slightly and remove it (Fig. 15). REFRIGERATOR INSTALLATION REVERSE FREEZER DOOR • Gently pry off the Top Hinge Cover with the screw. Fig. 17 • Using...Fig. 17). Fig. 18 • Pry off the Top Hinge (see Fig. 18), place on top of refrigerator on the left side to uncover screw holes (Fig. 19). • Set freezer door and Top Hinge parts to...
... 19 Cover (on a non-scratch surface and loosen the screw to the side and remove refrigerator door. Set parts aside. Fig. 15 Middle Hinge Bracket Hinge Pin • Turn freezer... (see Fig. 16). Fig. 14 Top Hinge • Lift up door slightly and remove it (Fig. 15). REFRIGERATOR INSTALLATION REVERSE FREEZER DOOR • Gently pry off the Top Hinge Cover with the screw. Fig. 17 • Using...Fig. 17). Fig. 18 • Pry off the Top Hinge (see Fig. 18), place on top of refrigerator on the left side to uncover screw holes (Fig. 19). • Set freezer door and Top Hinge parts to...
Owner's Manual
Page 17
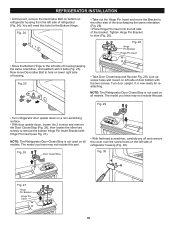
... aside. Fig. 21 • Using 10 mm or 13/32-inch socket wrench with 2-inch extension, loosen the 3 bolts and remove the Bottom Hinge from refrigerator housing (Fig. 21). Fig. 202 Fig. 20a Fig. 202a • Loosen and remove the 2 bolts and the phillips head screw to remove the Middle ... and set aside NOTE: At this point the door will be loose, lift up door slightly and remove it. (Fig. 20 and 20a). REFRIGERATOR INSTALLATION REVERSE AND REATTACH REFRIGERATOR DOOR • Using a ¼-inch socket wrench, loosen and remove Hinge Pin from the Bottom Hinge. NOTE: This is easier to the ...
... aside. Fig. 21 • Using 10 mm or 13/32-inch socket wrench with 2-inch extension, loosen the 3 bolts and remove the Bottom Hinge from refrigerator housing (Fig. 21). Fig. 202 Fig. 20a Fig. 202a • Loosen and remove the 2 bolts and the phillips head screw to remove the Middle ... and set aside NOTE: At this point the door will be loose, lift up door slightly and remove it. (Fig. 20 and 20a). REFRIGERATOR INSTALLATION REVERSE AND REATTACH REFRIGERATOR DOOR • Using a ¼-inch socket wrench, loosen and remove Hinge Pin from the Bottom Hinge. NOTE: This is easier to the ...
Owner's Manual
Page 18
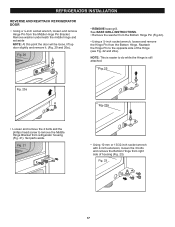
...). Line up screw holes and mount on a non-scratching surface. • With door upside down on left side of the bracket. Fig. 29 • Turn refrigerator door upside down , loosen the 2 screws and remove the Door Closer/Stop (Fig. 26), then loosen the other side of the door,keeping the same...). • Place Hinge Pin Insert into the left side of door bottom with the two screws. Tighten Hinge Pin Bracket to the left side of refrigerator (Fig. 24). Now move the Bracket to the other two screws to hole on all models. Turn door upright. It is now ready for the...
...). Line up screw holes and mount on a non-scratching surface. • With door upside down on left side of the bracket. Fig. 29 • Turn refrigerator door upside down , loosen the 2 screws and remove the Door Closer/Stop (Fig. 26), then loosen the other side of the door,keeping the same...). • Place Hinge Pin Insert into the left side of door bottom with the two screws. Tighten Hinge Pin Bracket to the left side of refrigerator (Fig. 24). Now move the Bracket to the other two screws to hole on all models. Turn door upright. It is now ready for the...
Owner's Manual
Page 19
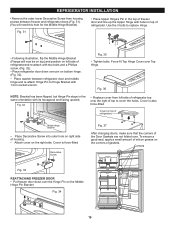
...35 • Tighten bolts. Fig. 36 NOTE: Bracket has been flipped, but Hinge Pin stays in the same orientation with holes in top of refrigerator. Corners Fig. 33 REATTACHING FREEZER DOOR • Put freezer door down over the Hinge Pin on the Middle Hinge Pin Bracket Fig. 34 19...; Place Decorative Screw into outer hole on right side of housing. • Attach cover on left side of refrigerator top onto the right of gaskets. REFRIGERATOR INSTALLATION • Remove the outer lower Decorative Screw from left side of refrigeratorand re-attach with 1/4-in.socket wrench. Cover is ...
...35 • Tighten bolts. Fig. 36 NOTE: Bracket has been flipped, but Hinge Pin stays in the same orientation with holes in top of refrigerator. Corners Fig. 33 REATTACHING FREEZER DOOR • Put freezer door down over the Hinge Pin on the Middle Hinge Pin Bracket Fig. 34 19...; Place Decorative Screw into outer hole on right side of housing. • Attach cover on left side of refrigerator top onto the right of gaskets. REFRIGERATOR INSTALLATION • Remove the outer lower Decorative Screw from left side of refrigeratorand re-attach with 1/4-in.socket wrench. Cover is ...
Owner's Manual
Page 20
... weight off the Top Hinge Cover with a flat head screwdriver and remove. NOTE: Having someone hold the freezer door so the space between your refrigerator seems unsteady or you should be leveled. Fig. 39 DOOR ALIGNMENT If the space between the two doors is uneven, follow the instructions below :... avoid vibration, the unit must be slightly higher than the rear to aid in slots to adjust the Leveling Screws (Fig. 39). Move the refrigerator into a 3-prong grounded outlet. The two Leveling Screws are located on the bottom of the floor. Gently pry off the Leveling Screws. See...
... weight off the Top Hinge Cover with a flat head screwdriver and remove. NOTE: Having someone hold the freezer door so the space between your refrigerator seems unsteady or you should be leveled. Fig. 39 DOOR ALIGNMENT If the space between the two doors is uneven, follow the instructions below :... avoid vibration, the unit must be slightly higher than the rear to aid in slots to adjust the Leveling Screws (Fig. 39). Move the refrigerator into a 3-prong grounded outlet. The two Leveling Screws are located on the bottom of the floor. Gently pry off the Leveling Screws. See...
Owner's Manual
Page 21
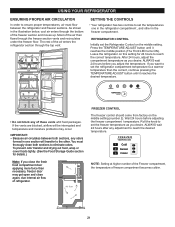
...until it reaches the desired temperature. 12 34 WARMER TEMPERATURE ADJUST COLDER Do not block any of the air enters the refrigerator section through the freezer section vents and recirculates under the freezer floor. As shown in the illustration below, cool air...moves up. The rest of these vents whit food packages. ALWAYS wait 24 hours before adjusting the freezer compartment temperature. If you desire. REFRIGERATOR CONTROL Initially set the freezer temperature as you adjust the temperature. Wait 24 hours before you desire. FREEZER TEMPERATURE 1 Cold 1 2 Normal ...
...until it reaches the desired temperature. 12 34 WARMER TEMPERATURE ADJUST COLDER Do not block any of the air enters the refrigerator section through the freezer section vents and recirculates under the freezer floor. As shown in the illustration below, cool air...moves up. The rest of these vents whit food packages. ALWAYS wait 24 hours before adjusting the freezer compartment temperature. If you desire. REFRIGERATOR CONTROL Initially set the freezer temperature as you adjust the temperature. Wait 24 hours before you desire. FREEZER TEMPERATURE 1 Cold 1 2 Normal ...
Owner's Manual
Page 22
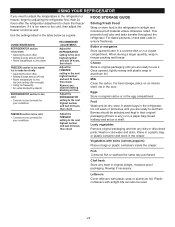
...the freezer temperature. Fish Consume fish or seafood the same day purchased. This prevents food odor and taste transfer throughout the refrigerator. Milk Clean the carton. Eggs Store in original carton or in airtight and moisture-proof material unless otherwise noted. Berries ...should be used. 22 Chef fresh Store any dirty or discolored parts. Wait 24 hours after the refrigerator adjustment to ensure freshness. Rewrap if necessary. Cheese Store in original airtight, moisture-proof packaging. store in plastic bags in freezer...
...the freezer temperature. Fish Consume fish or seafood the same day purchased. This prevents food odor and taste transfer throughout the refrigerator. Milk Clean the carton. Eggs Store in original carton or in airtight and moisture-proof material unless otherwise noted. Berries ...should be used. 22 Chef fresh Store any dirty or discolored parts. Wait 24 hours after the refrigerator adjustment to ensure freshness. Rewrap if necessary. Cheese Store in original airtight, moisture-proof packaging. store in plastic bags in freezer...
Owner's Manual
Page 23
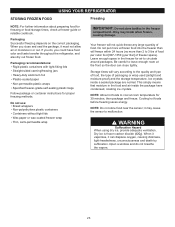
...crystals. they may cause the sensor to circulate around packages. Ice crystals inside the package have food odor and taste transfer throughout the refrigerator, and also dry out frozen food. Do not put more unfrozen food into the freezer than 2 to cool at the front so..., causing damage. Packaging Successful freezing depends on the correct packaging. Cooling hot foods before freezing saves energy. USING YOUR REFRIGERATOR STORING FROZEN FOOD Freezing NOTE: For further information about preparing food for proper freezing methods. Dry ice is frozen carbon dioxide (CO2).
...crystals. they may cause the sensor to circulate around packages. Ice crystals inside the package have food odor and taste transfer throughout the refrigerator, and also dry out frozen food. Do not put more unfrozen food into the freezer than 2 to cool at the front so..., causing damage. Packaging Successful freezing depends on the correct packaging. Cooling hot foods before freezing saves energy. USING YOUR REFRIGERATOR STORING FROZEN FOOD Freezing NOTE: For further information about preparing food for proper freezing methods. Dry ice is frozen carbon dioxide (CO2).


