Owner's Manual
Page 2
English Version Spanish Version French Version Warranty Card (USA) Warranty Card (Canada) Safety Instructions Grounding Requirements Parts and Features Refrigerator Installation Unpacking Your Refrigerator Installation Base Grille Removing, Reversing and Replacing Your Refrigerator Doors Leveling ...Racks Door Bin Dairy Corner/Can Dispenser Vitabox Care and Cleaning General Cleaning Tips Outside Inside Walls Door Liner and Gaskets Plastic Parts Cover Back Light Bulb Replacement Power Interruptions Vacation and Moving Care About the Automatic Ice Maker Connecting the Water Line Troubleshooting ...
English Version Spanish Version French Version Warranty Card (USA) Warranty Card (Canada) Safety Instructions Grounding Requirements Parts and Features Refrigerator Installation Unpacking Your Refrigerator Installation Base Grille Removing, Reversing and Replacing Your Refrigerator Doors Leveling ...Racks Door Bin Dairy Corner/Can Dispenser Vitabox Care and Cleaning General Cleaning Tips Outside Inside Walls Door Liner and Gaskets Plastic Parts Cover Back Light Bulb Replacement Power Interruptions Vacation and Moving Care About the Automatic Ice Maker Connecting the Water Line Troubleshooting ...
Owner's Manual
Page 3
...-0000 (24 hrs a day, 7 days per week, 365 days per year) Press the appropriate option, and have your LG product is used in the repair of the product, or the replacement of defective parts, shall be defective in the U.S. THE ABOVE WARRANTY DOES NOT APPLY TO: 1. Damage to prove date of purchase...
...-0000 (24 hrs a day, 7 days per week, 365 days per year) Press the appropriate option, and have your LG product is used in the repair of the product, or the replacement of defective parts, shall be defective in the U.S. THE ABOVE WARRANTY DOES NOT APPLY TO: 1. Damage to prove date of purchase...

Owner's Manual
Page 5
...valid only to the original retail purchaser of the product and applies only to any consumable parts. 14. LG Authorized Service Center warranties their repair work for warranty validation. 12. LG CANADA DOES NOT AUTHORIZE ANY PERSON TO CREATE OR ASSUME FOR IT ANY OTHER WARRANTY ... Purchase: 5 Model and Serial numbers, along with the above excluded circumstances shall be readily determined. Replacement products and parts are required for t.hirty (30) days LG CANADA'S SOLE LIABILITY IS LIMITED TO THE WARRANTY SET OUT ABOVE. Damage resulting from province to the Product caused by...
...valid only to the original retail purchaser of the product and applies only to any consumable parts. 14. LG Authorized Service Center warranties their repair work for warranty validation. 12. LG CANADA DOES NOT AUTHORIZE ANY PERSON TO CREATE OR ASSUME FOR IT ANY OTHER WARRANTY ... Purchase: 5 Model and Serial numbers, along with the above excluded circumstances shall be readily determined. Replacement products and parts are required for t.hirty (30) days LG CANADA'S SOLE LIABILITY IS LIMITED TO THE WARRANTY SET OUT ABOVE. Damage resulting from province to the Product caused by...
Owner's Manual
Page 8
... to avoid contact with moving your fingers away from the doors or shelves of the cord or on the length of the refrigerator. When moving parts of the freezer with the heating mechanism that is discolored or has an unpleasant odor should be performed by pulling the power cord, always grip...
... to avoid contact with moving your fingers away from the doors or shelves of the cord or on the length of the refrigerator. When moving parts of the freezer with the heating mechanism that is discolored or has an unpleasant odor should be performed by pulling the power cord, always grip...
Owner's Manual
Page 9
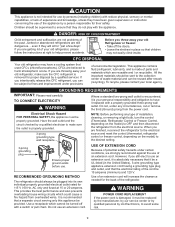
...to OFF and then disconnect the refrigerator from the electrical source. USE OF EXTENSION CORD Because of potential safety hazards under provisions of parts and materials which could cause a fire hazard from the power cord. Children should always be provided. CFC DISPOSAL Your old refrigerator ...is made of environmental legislation. However, if you can be replaced by the manufacturer, by our service center or by qualified personal by LG Electronics, to help prevent accidents. If you are getting rid of an extension cord will sit for "just a few days". CFCs are...
...to OFF and then disconnect the refrigerator from the electrical source. USE OF EXTENSION CORD Because of potential safety hazards under provisions of parts and materials which could cause a fire hazard from the power cord. Children should always be provided. CFC DISPOSAL Your old refrigerator ...is made of environmental legislation. However, if you can be replaced by the manufacturer, by our service center or by qualified personal by LG Electronics, to help prevent accidents. If you are getting rid of an extension cord will sit for "just a few days". CFCs are...
Owner's Manual
Page 10
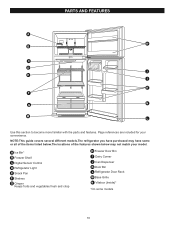
PARTS AND FEATURES A H B C D J E I Dairy Corner J Can Dispenser K Door Bin L Refrigerator Door Rack M Base Grille N Vitabox (Inside)* *On some or all of the items listed below.The ... D Refrigerator Light E Snack Pan F Shelves G Crisper Keeps fruits and vegetables fresh and crisp H Freezer Door Bin I K F N G M L Use this section to become more familiar with the parts and features. Page references are included for your model. NOTE:This guide covers several different models.The refrigerator you have purchased may have some models...
PARTS AND FEATURES A H B C D J E I Dairy Corner J Can Dispenser K Door Bin L Refrigerator Door Rack M Base Grille N Vitabox (Inside)* *On some or all of the items listed below.The ... D Refrigerator Light E Snack Pan F Shelves G Crisper Keeps fruits and vegetables fresh and crisp H Freezer Door Bin I K F N G M L Use this section to become more familiar with the parts and features. Page references are included for your model. NOTE:This guide covers several different models.The refrigerator you have purchased may have some models...
Owner's Manual
Page 11
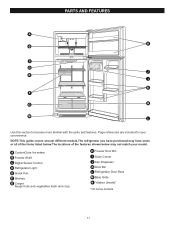
NOTE:This guide covers several different models.The refrigerator you have purchased may not match your convenience. PARTS AND FEATURES A H B C D J E I Dairy Corner J Can Dispenser K Door Bin L Refrigerator Door Rack M Base Grille N Vitabox (Inside)* *On some or all of the items listed below.The ... D Refrigerator Light E Snack Pan F Shelves G Crisper Keeps fruits and vegetables fresh and crisp H Freezer Door Bin I K F G N M L Use this section to become more familiar with the parts and features.
NOTE:This guide covers several different models.The refrigerator you have purchased may not match your convenience. PARTS AND FEATURES A H B C D J E I Dairy Corner J Can Dispenser K Door Bin L Refrigerator Door Rack M Base Grille N Vitabox (Inside)* *On some or all of the items listed below.The ... D Refrigerator Light E Snack Pan F Shelves G Crisper Keeps fruits and vegetables fresh and crisp H Freezer Door Bin I K F G N M L Use this section to become more familiar with the parts and features.
Owner's Manual
Page 12
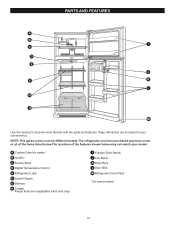
PARTS AND FEATURES I Freezer Door Racks J Can Rack* K Dairy Bins L Door Bins M Refrigerator Door Rack N *On some or all of the items listed below.The locations ... D Digital Temperature Control E Refrigerator Light F Snack Drawer G Shelves H Crisper Keeps fruits and vegetables fresh and crisp I D E J F K L G H Use this section to become more familiar with the parts and features. Page references are included for your model. NOTE:This guide covers several different models.The refrigerator you have purchased may have some models...
PARTS AND FEATURES I Freezer Door Racks J Can Rack* K Dairy Bins L Door Bins M Refrigerator Door Rack N *On some or all of the items listed below.The locations ... D Digital Temperature Control E Refrigerator Light F Snack Drawer G Shelves H Crisper Keeps fruits and vegetables fresh and crisp I D E J F K L G H Use this section to become more familiar with the parts and features. Page references are included for your model. NOTE:This guide covers several different models.The refrigerator you have purchased may have some models...
Owner's Manual
Page 13
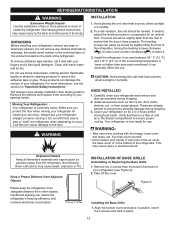
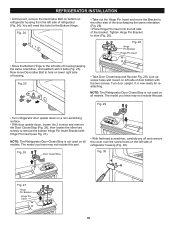
...come already installed in their proper places. Moving Your Refrigerator: Your refrigerator is a flow of cold air in position. Do not shift from other parts of the body. The front should be turned by slightly tilting the front of the refrigerator, turning the leveling screws clockwise ( ) to raise...cause damage to your hands or any stickers that the doors close properly. Install accessories such as gasoline) away from the bottom front part of your fingers and a little liquid detergent. Leave your refrigerator for an unlevel floor. To avoid vibration, the unit should be slightly...
...come already installed in their proper places. Moving Your Refrigerator: Your refrigerator is a flow of cold air in position. Do not shift from other parts of the body. The front should be turned by slightly tilting the front of the refrigerator, turning the leveling screws clockwise ( ) to raise...cause damage to your hands or any stickers that the doors close properly. Install accessories such as gasoline) away from the bottom front part of your fingers and a little liquid detergent. Leave your refrigerator for an unlevel floor. To avoid vibration, the unit should be slightly...
Owner's Manual
Page 14
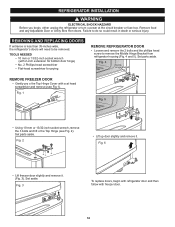
... screwdriver • Flat-head screwdriver for prying REMOVE REFRIGERATOR DOOR • Loosen and remove the 2 bolts and the phillips head screw to be removed. Set parts aside. Fig. 3 To replace doors, begin , either unplug the refrigerator or turn o power at head screwdriver and remove (see Fig. 2). Fig. 1 Fig. 5 • Using 10... in death or serious injury. Fig. 6 • Lift freezer door slightly and remove it . Fig. 2 • Lift up door slightly and remove it . (Fig. 3). Set parts aside.
... screwdriver • Flat-head screwdriver for prying REMOVE REFRIGERATOR DOOR • Loosen and remove the 2 bolts and the phillips head screw to be removed. Set parts aside. Fig. 3 To replace doors, begin , either unplug the refrigerator or turn o power at head screwdriver and remove (see Fig. 2). Fig. 1 Fig. 5 • Using 10... in death or serious injury. Fig. 6 • Lift freezer door slightly and remove it . Fig. 2 • Lift up door slightly and remove it . (Fig. 3). Set parts aside.
Owner's Manual
Page 16
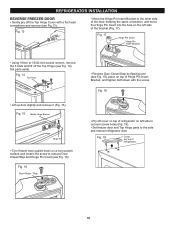
... (Fig. 17). Fig. 15 Middle Hinge Bracket Hinge Pin • Turn freezer door upside down with a flat head screwdriver and remove (see Fig. 16). Set parts aside. Fig. 17 • Using 10mm or 13/32-inch socket wrench, remove the 3 bolts and lift off cover on top of refrigerator on left... move the Hinge Pin Insert into the hole on the left side to uncover screw holes (Fig. 19). • Set freezer door and Top Hinge parts to remove Door Closer/Stop and Hinge Pin Insert (see Fig.13). Fig. 19 Cover (on top of Hinge Pin Insert Bracket, and tighten both...
... (Fig. 17). Fig. 15 Middle Hinge Bracket Hinge Pin • Turn freezer door upside down with a flat head screwdriver and remove (see Fig. 16). Set parts aside. Fig. 17 • Using 10mm or 13/32-inch socket wrench, remove the 3 bolts and lift off cover on top of refrigerator on left... move the Hinge Pin Insert into the hole on the left side to uncover screw holes (Fig. 19). • Set freezer door and Top Hinge parts to remove Door Closer/Stop and Hinge Pin Insert (see Fig.13). Fig. 19 Cover (on top of Hinge Pin Insert Bracket, and tighten both...
Owner's Manual
Page 17
... the 2 bolts and the phillips head screw to remove the Middle Hinge Bracket from right side of the Hinge (see Fig. 22 and 22a). Set parts aside. See BASE GRILL INSTRUCTIONS. • Remove the washer from the Bottom Hinge Pin (Fig.22). • Using a ¼-inch socket wrench, loosen and remove...
... the 2 bolts and the phillips head screw to remove the Middle Hinge Bracket from right side of the Hinge (see Fig. 22 and 22a). Set parts aside. See BASE GRILL INSTRUCTIONS. • Remove the washer from the Bottom Hinge Pin (Fig.22). • Using a ¼-inch socket wrench, loosen and remove...
Owner's Manual
Page 18
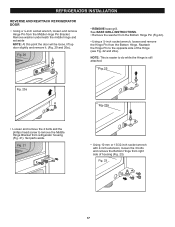
... Fig. 24 • Take out the Hinge Pin Insert and move Decorative Bolt to door (Fig. 28). The model you have may not include this part. Fig. 25 • Take Door Closer/stop and flip (see Fig. 27). NOTE: The Refrigerator Door Closer/Stop is not used on all models. REFRIGERATOR... used on all models. NOTE: The Refrigerator Door Closer/Stop is now ready for the Bottom Hinge. The model you have may not include this part. • With flat-head screwdriver, carefully pry off and remove the cover over the screw holes on lower right side of door bottom with 3 ...
... Fig. 24 • Take out the Hinge Pin Insert and move Decorative Bolt to door (Fig. 28). The model you have may not include this part. Fig. 25 • Take Door Closer/stop and flip (see Fig. 27). NOTE: The Refrigerator Door Closer/Stop is not used on all models. REFRIGERATOR... used on all models. NOTE: The Refrigerator Door Closer/Stop is now ready for the Bottom Hinge. The model you have may not include this part. • With flat-head screwdriver, carefully pry off and remove the cover over the screw holes on lower right side of door bottom with 3 ...
Owner's Manual
Page 22
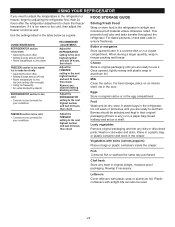
... often enough) Using ice frequently Air vents blocked by adjusting the refrigerator first. Berries should be used. 22 Chef fresh Store any dirty or discolored parts. Wait 24 hours after the refrigerator adjustment to the next highest number and wait 24 hours, then check FOOD STORAGE GUIDE Storing Fresh Food Wrap...
... often enough) Using ice frequently Air vents blocked by adjusting the refrigerator first. Berries should be used. 22 Chef fresh Store any dirty or discolored parts. Wait 24 hours after the refrigerator adjustment to the next highest number and wait 24 hours, then check FOOD STORAGE GUIDE Storing Fresh Food Wrap...
Owner's Manual
Page 27
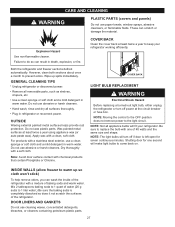
... paper towels, window sprays, abrasive cleansers, or flammable fluids. Note: Avoid door surface contact with a clean, soft cloth. NOTE: Not all removable parts, such as shelves, crispers, etc. Shutting door for seven continuous minutes. Mix 2 tablespoons baking soda to come back on. Explosion Hazard Use non-... is completely dissolved so does it not scratch the surfaces of 40 watts and the same size and shape. CARE AND CLEANING WARNING PLASTIC PARTS (covers and panels) Do not use abrasive or harsh cleaners. These can result in warm water. Failure to 1 liter water.) Be...
... paper towels, window sprays, abrasive cleansers, or flammable fluids. Note: Avoid door surface contact with a clean, soft cloth. NOTE: Not all removable parts, such as shelves, crispers, etc. Shutting door for seven continuous minutes. Mix 2 tablespoons baking soda to come back on. Explosion Hazard Use non-... is completely dissolved so does it not scratch the surfaces of 40 watts and the same size and shape. CARE AND CLEANING WARNING PLASTIC PARTS (covers and panels) Do not use abrasive or harsh cleaners. These can result in warm water. Failure to 1 liter water.) Be...
Owner's Manual
Page 28
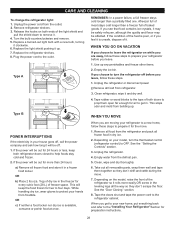
... your new home, put everything back and refer to OFF. Replace the light shield pushing it . Unplug the refrigerator or disconnect power 2.Remove all removable parts, wrap them well and tape them open far enough for 24 hours or less, keep the food frozen for every cubic foot (28 L) of baked...
... your new home, put everything back and refer to OFF. Replace the light shield pushing it . Unplug the refrigerator or disconnect power 2.Remove all removable parts, wrap them well and tape them open far enough for 24 hours or less, keep the food frozen for every cubic foot (28 L) of baked...
Owner's Manual
Page 29
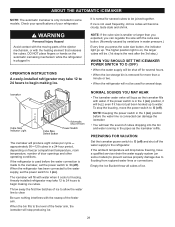
... and water running in a 24-hour period, depending on the automatic icemaking mechanism while the refrigerator is connected can regulate the size with the moving parts of ice. 29 When the bin fills to water. Throw away the first few batches of the feeler arm. ABOUT THE AUTOMATIC ICEMAKER NOTE: The...
... and water running in a 24-hour period, depending on the automatic icemaking mechanism while the refrigerator is connected can regulate the size with the moving parts of ice. 29 When the bin fills to water. Throw away the first few batches of the feeler arm. ABOUT THE AUTOMATIC ICEMAKER NOTE: The...
Owner's Manual
Page 30
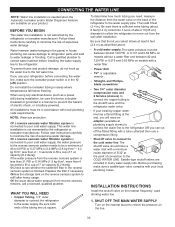
... storage tank on your refrigerator before installing the water supply line to the refrigerator. To determine how much tubing you can cause damage to refrigerator parts and lead to water leakage or flooding. A cold water supply .The water pressure must be a minimum of 40 to 60 PSI or 0.27 MPa to...
... storage tank on your refrigerator before installing the water supply line to the refrigerator. To determine how much tubing you can cause damage to refrigerator parts and lead to water leakage or flooding. A cold water supply .The water pressure must be a minimum of 40 to 60 PSI or 0.27 MPa to...


