Owner's Manual
Page 2
TABLE OF CONTENTS English Version Spanish Version Warranty (U.S.A.) Safety Instructions Grounding Requirements Parts and Features Refrigerator Installation Unpacking Your Refrigerator Installation Base Grille Removing, Reversing and Replacing Your Refrigerator Doors Pull out Drawer ...Out Drawer Basket Tilting Door Wire Durabase Frezzer Shelf Care and Cleaning General Cleaning Tips Outside Inside Walls Door Liner and Gaskets Plastic Parts Condenser Coils Light Bulb Replacement Power Interruptions When you go on vacation About the Custom Cube Icemaker Connecting the Water Line Troubleshooting ...
TABLE OF CONTENTS English Version Spanish Version Warranty (U.S.A.) Safety Instructions Grounding Requirements Parts and Features Refrigerator Installation Unpacking Your Refrigerator Installation Base Grille Removing, Reversing and Replacing Your Refrigerator Doors Pull out Drawer ...Out Drawer Basket Tilting Door Wire Durabase Frezzer Shelf Care and Cleaning General Cleaning Tips Outside Inside Walls Door Liner and Gaskets Plastic Parts Condenser Coils Light Bulb Replacement Power Interruptions When you go on vacation About the Custom Cube Icemaker Connecting the Water Line Troubleshooting ...
Owner's Manual
Page 3
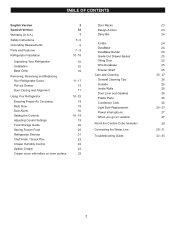
... ASSISTANCE NUMBERS: To obtain Warranty Coverage: Retain your product type (Refrigerator), model number, serial number, and ZIP/Postal Code ready. 3 LG Refrigerator / Freezer Warranty Period Product Parts Labor Refrigerator / Freezer 1 year 1 year [In-Home Service (Except Model GR-051)] Sealed System 7 years 1 year [In-Home... installed outside the normal service area, any cost of transportation involved in the repair of the product, or the replacement of defective parts, shall be defective in other rights which proves to this product. Call 1-800-243-0000 (24 hrs a day, 7 days...
... ASSISTANCE NUMBERS: To obtain Warranty Coverage: Retain your product type (Refrigerator), model number, serial number, and ZIP/Postal Code ready. 3 LG Refrigerator / Freezer Warranty Period Product Parts Labor Refrigerator / Freezer 1 year 1 year [In-Home Service (Except Model GR-051)] Sealed System 7 years 1 year [In-Home... installed outside the normal service area, any cost of transportation involved in the repair of the product, or the replacement of defective parts, shall be defective in other rights which proves to this product. Call 1-800-243-0000 (24 hrs a day, 7 days...
Owner's Manual
Page 5
... replacing a burned-out light bulb, unplug the refrigerator or turn off -color should not be refrozen and should be dangerous to the product. When moving parts of any off-odor or off power at either or both controls to the OFF position does not remove power to avoid contact with the...
... replacing a burned-out light bulb, unplug the refrigerator or turn off -color should not be refrozen and should be dangerous to the product. When moving parts of any off-odor or off power at either or both controls to the OFF position does not remove power to avoid contact with the...
Owner's Manual
Page 7
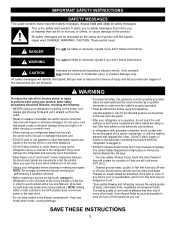
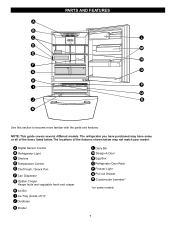
... G Optibin Crisper Keeps fruits and vegetable fresh and crisper H Ice Bin I Q J R K Use this section to become more familiar with the parts and features. NOTE: This guide covers several different models. The locations of the items listed below may have some models... 7 PARTS AND FEATURES A B C L D M E N F O G H P I Ice Tray (Inside of H)* J Durabase K Divider L Dairy Bin M Design-A-Door N Egg Box O Refrigerator Door Rack P Freezer Light Q Pull...
... G Optibin Crisper Keeps fruits and vegetable fresh and crisper H Ice Bin I Q J R K Use this section to become more familiar with the parts and features. NOTE: This guide covers several different models. The locations of the items listed below may have some models... 7 PARTS AND FEATURES A B C L D M E N F O G H P I Ice Tray (Inside of H)* J Durabase K Divider L Dairy Bin M Design-A-Door N Egg Box O Refrigerator Door Rack P Freezer Light Q Pull...

Owner's Manual
Page 8
The locations of the items listed below may have purchased may not match your model. The refrigerator you have some models 8 PARTS AND FEATURES A B J C K D L E M F N G H I Divider J Dairy Bin K Design-A-Door L Pull out Drawer M Refrigerator Door Rack N Freezer Light O Customcube Icemaker* *on some or all of the features shown ... E Optibin Crisper Keeps fruits and vegetable fresh and crisper F Ice Bin G Ice Tray (Inside of H)* H Durabase I O Use this section to become more familiar with the parts and features. NOTE: This guide covers several different models.
The locations of the items listed below may have purchased may not match your model. The refrigerator you have some models 8 PARTS AND FEATURES A B J C K D L E M F N G H I Divider J Dairy Bin K Design-A-Door L Pull out Drawer M Refrigerator Door Rack N Freezer Light O Customcube Icemaker* *on some or all of the features shown ... E Optibin Crisper Keeps fruits and vegetable fresh and crisper F Ice Bin G Ice Tray (Inside of H)* H Durabase I O Use this section to become more familiar with the parts and features. NOTE: This guide covers several different models.

Owner's Manual
Page 9
... E Optibin Crisper Keeps fruits and vegetable fresh and crisp F Ice Trays* G Ice Bin H Wire Durabase I C J D K E L F M G H N Use this section to become more familiar with the parts and features. PARTS AND FEATURES A B I Dairy Bin J Design-A-Door K Wire Freezer Shelf L Refrigerator Door Rack M Freezer Light N Freezer Door Rack *on some or all of the features...
... E Optibin Crisper Keeps fruits and vegetable fresh and crisp F Ice Trays* G Ice Bin H Wire Durabase I C J D K E L F M G H N Use this section to become more familiar with the parts and features. PARTS AND FEATURES A B I Dairy Bin J Design-A-Door K Wire Freezer Shelf L Refrigerator Door Rack M Freezer Light N Freezer Door Rack *on some or all of the features...
Owner's Manual
Page 11
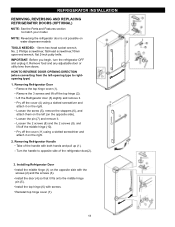
... handle with both hands and pull up (1). Reinstall top hinge cover (7). 9 8 10 7 11 REFRIGERATOR INSTALLATION REMOVING, REVERSING AND REPLACING REFRIGERATOR DOORS (OPTIONAL) NOTE: See the Parts and Features section to rightopening type) 1. Remove food and any adjustable door or utility bins from the left (on water dispenser models TOOLS NEEDED: 10mm...
... handle with both hands and pull up (1). Reinstall top hinge cover (7). 9 8 10 7 11 REFRIGERATOR INSTALLATION REMOVING, REVERSING AND REPLACING REFRIGERATOR DOORS (OPTIONAL) NOTE: See the Parts and Features section to rightopening type) 1. Remove food and any adjustable door or utility bins from the left (on water dispenser models TOOLS NEEDED: 10mm...
Owner's Manual
Page 14
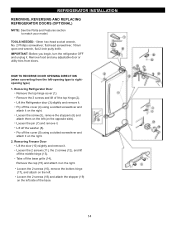
REFRIGERATOR INSTALLATION REMOVING, REVERSING AND REPLACING REFRIGERATOR DOORS (OPTIONAL) NOTE: See the Parts and Features section to rightopening type) 1. IMPORTANT: Before you begin, turn the refrigerator OFF and unplug it . Remove food and any adjustable door or utility ...
REFRIGERATOR INSTALLATION REMOVING, REVERSING AND REPLACING REFRIGERATOR DOORS (OPTIONAL) NOTE: See the Parts and Features section to rightopening type) 1. IMPORTANT: Before you begin, turn the refrigerator OFF and unplug it . Remove food and any adjustable door or utility ...
Owner's Manual
Page 25
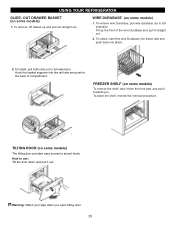
... and pull it towards you open tilting door.To adjust 25 TILTING DOOR (on some models) To remove the shelf, take it from the front part, and pull it straight out. 2. OUT DRAWER BASKET (on some models) 1.
... and pull it towards you open tilting door.To adjust 25 TILTING DOOR (on some models) To remove the shelf, take it from the front part, and pull it straight out. 2. OUT DRAWER BASKET (on some models) 1.

Owner's Manual
Page 26
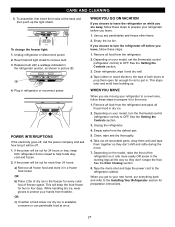
...clean condenser coils. Turn the bulb counterclockwise. 26 OUTSIDE Waxing external painted metal surfaces helps provide rust protection. Do not wax plastic parts. Remove refrigerator shelves. 3. Failure to remove it not scratch the surfaces of baking soda and warm water. Wipe up so cloth... and pull the shield down to do so can scratch or damage the material. Remove all removable parts, such as every other month. CARE AND CLEANING WARNING PLASTIC PARTS (covers and panels) Do not use cleaning waxes, concentrated detergents, bleaches, or cleaners containing petroleum ...
...clean condenser coils. Turn the bulb counterclockwise. 26 OUTSIDE Waxing external painted metal surfaces helps provide rust protection. Do not wax plastic parts. Remove refrigerator shelves. 3. Failure to remove it not scratch the surfaces of baking soda and warm water. Wipe up so cloth... and pull the shield down to do so can scratch or damage the material. Remove all removable parts, such as every other month. CARE AND CLEANING WARNING PLASTIC PARTS (covers and panels) Do not use cleaning waxes, concentrated detergents, bleaches, or cleaners containing petroleum ...
Owner's Manual
Page 27
... front of both refrigerator doors closed to the tops of the refrigerator so it rolls more easily OR screw in the leveling legs all removable parts, wrap them well and tape them open far enough for air to get to your refrigerator to the Installing Your Refrigerator section for more than...
... front of both refrigerator doors closed to the tops of the refrigerator so it rolls more easily OR screw in the leveling legs all removable parts, wrap them well and tape them open far enough for air to get to your refrigerator to the Installing Your Refrigerator section for more than...

Owner's Manual
Page 28
... due to freezing. PREPARING FOR VACATION Set the icemaker power switch to O (off)and shut off ). WARNING Personal Injury Hazard Avoid contact with the moving parts of the ejector mechanism, or with the sweep of the feeler arm, the icemaker will fill with water when it has not yet been hooked...
... due to freezing. PREPARING FOR VACATION Set the icemaker power switch to O (off)and shut off ). WARNING Personal Injury Hazard Avoid contact with the moving parts of the ejector mechanism, or with the sweep of the feeler arm, the icemaker will fill with water when it has not yet been hooked...
Owner's Manual
Page 29
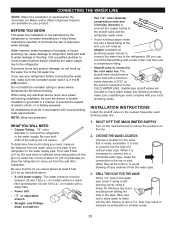
... pressure on the nearest frequently used drinking water line. 1. Follow these instructions carefully to water leakage or flooding. If you can cause damage to refrigerator parts and lead to minimize the risk of 5/32" at least 8 feet (2.4 m) as a power drill) during installation, be between 40 and 120 p.s.i. Straight- Before purchasing, make...
... pressure on the nearest frequently used drinking water line. 1. Follow these instructions carefully to water leakage or flooding. If you can cause damage to refrigerator parts and lead to minimize the risk of 5/32" at least 8 feet (2.4 m) as a power drill) during installation, be between 40 and 120 p.s.i. Straight- Before purchasing, make...


