Owner's Manual
Page 2
... Warranty (U.S.A.) Safety Instructions Grounding Requirements Parts and Features Refrigerator Installation Unpacking Your Refrigerator Installation Base Grille Removing, Reversing and Replacing Your Refrigerator Doors Pull out Drawer Door Closing and Alignment Using Your Refrigerator Ensuring Proper Air Circulation Multi Flow Door... Alarm Setting the Controls Adjusting Control Settings Food Storage Guide Storing Frozen Food Refrigerator Shelves Chef Fresh / Snack Pan Crisper Humidity Control Optibin Crisper Crisper cover with lattice on inner surface 2 36 ...
... Warranty (U.S.A.) Safety Instructions Grounding Requirements Parts and Features Refrigerator Installation Unpacking Your Refrigerator Installation Base Grille Removing, Reversing and Replacing Your Refrigerator Doors Pull out Drawer Door Closing and Alignment Using Your Refrigerator Ensuring Proper Air Circulation Multi Flow Door... Alarm Setting the Controls Adjusting Control Settings Food Storage Guide Storing Frozen Food Refrigerator Shelves Chef Fresh / Snack Pan Crisper Humidity Control Optibin Crisper Crisper cover with lattice on inner surface 2 36 ...
Owner's Manual
Page 3
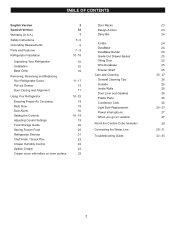
... defective in other than normal, single-family household use during the warranty period listed below from accident, alteration, misuse, abuse, or improper installation. 5. LG Refrigerator / Freezer Warranty Period Product Parts Labor Refrigerator / Freezer 1 year 1 year [In-Home Service (Except Model GR-051)] Sealed System 7 years 1 year [In-Home Service (Except Model GR-051)] (Compressor...
... defective in other than normal, single-family household use during the warranty period listed below from accident, alteration, misuse, abuse, or improper installation. 5. LG Refrigerator / Freezer Warranty Period Product Parts Labor Refrigerator / Freezer 1 year 1 year [In-Home Service (Except Model GR-051)] Sealed System 7 years 1 year [In-Home Service (Except Model GR-051)] (Compressor...
Owner's Manual
Page 5
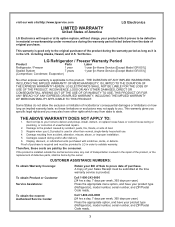
...CAUTION. Repair or replace immediately all electric service cords that any servicing be performed by pulling on the automatic icemaking mechanism while the refrigerator is plugged in this appliance must be dangerous to save as you don't follow instructions. DO NOT allow children to the extremely.... Use refrozen foods as soon as described in . When moving parts of injury and tell you don't follow instructions. DO NOT store or use gasoline or other flammable vapors and liquids in the refrigerator. clearances between the doors and cabinet are in minor or moderate ...
...CAUTION. Repair or replace immediately all electric service cords that any servicing be performed by pulling on the automatic icemaking mechanism while the refrigerator is plugged in this appliance must be dangerous to save as you don't follow instructions. DO NOT allow children to the extremely.... Use refrozen foods as soon as described in . When moving parts of injury and tell you don't follow instructions. DO NOT store or use gasoline or other flammable vapors and liquids in the refrigerator. clearances between the doors and cabinet are in minor or moderate ...
Owner's Manual
Page 7
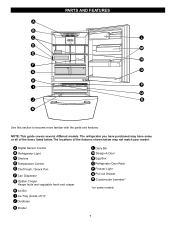
NOTE: This guide covers several different models. The refrigerator you have purchased may not match your model. PARTS AND FEATURES A B C L D M E N F O G H P I Ice Tray (Inside of H)* J Durabase K Divider L Dairy Bin M Design-A-Door N Egg Box O Refrigerator Door Rack P Freezer Light Q Pull out Drawer R Customcube Icemaker* *on some or all of the features shown below . The locations of...
NOTE: This guide covers several different models. The refrigerator you have purchased may not match your model. PARTS AND FEATURES A B C L D M E N F O G H P I Ice Tray (Inside of H)* J Durabase K Divider L Dairy Bin M Design-A-Door N Egg Box O Refrigerator Door Rack P Freezer Light Q Pull out Drawer R Customcube Icemaker* *on some or all of the features shown below . The locations of...

Owner's Manual
Page 8
... fruits and vegetable fresh and crisper F Ice Bin G Ice Tray (Inside of the items listed below may have some models 8 PARTS AND FEATURES A B J C K D L E M F N G H I Divider J Dairy Bin K Design-A-Door L Pull out Drawer M Refrigerator Door Rack N Freezer Light O Customcube Icemaker* *on some or all of H)* H Durabase I O Use this section to become more familiar with...
... fruits and vegetable fresh and crisper F Ice Bin G Ice Tray (Inside of the items listed below may have some models 8 PARTS AND FEATURES A B J C K D L E M F N G H I Divider J Dairy Bin K Design-A-Door L Pull out Drawer M Refrigerator Door Rack N Freezer Light O Customcube Icemaker* *on some or all of H)* H Durabase I O Use this section to become more familiar with...

Owner's Manual
Page 9
... features. NOTE: This guide covers several different models. The locations of the items listed below. The refrigerator you have some models 9 PARTS AND FEATURES A B I Dairy Bin J Design-A-Door K Wire Freezer Shelf L Refrigerator Door Rack M Freezer Light N Freezer Door Rack *on some or all of the features shown below may have purchased may not...
... features. NOTE: This guide covers several different models. The locations of the items listed below. The refrigerator you have some models 9 PARTS AND FEATURES A B I Dairy Bin J Design-A-Door K Wire Freezer Shelf L Refrigerator Door Rack M Freezer Light N Freezer Door Rack *on some or all of the features shown below may have purchased may not...
Owner's Manual
Page 11
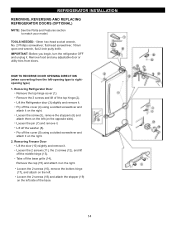
... converting from doors. Pry off the cover (11) using a slotted screwdriver and attach it . Removing Refrigerator Handle Take of the refrigerator door(2). 11 2 1 3. Lift the Refrigerator door (3) slightly and remove it on the opposite side). Loosen the pin (7) and remove it . ...screws and lift off the middle hinge (10). REFRIGERATOR INSTALLATION REMOVING, REVERSING AND REPLACING REFRIGERATOR DOORS (OPTIONAL) NOTE: See the Parts and Features section to opposite side of the handle with screws. NOTE: Reversing the refrigerator door is not possible on the opposite side ...
... converting from doors. Pry off the cover (11) using a slotted screwdriver and attach it . Removing Refrigerator Handle Take of the refrigerator door(2). 11 2 1 3. Lift the Refrigerator door (3) slightly and remove it on the opposite side). Loosen the pin (7) and remove it . ...screws and lift off the middle hinge (10). REFRIGERATOR INSTALLATION REMOVING, REVERSING AND REPLACING REFRIGERATOR DOORS (OPTIONAL) NOTE: See the Parts and Features section to opposite side of the handle with screws. NOTE: Reversing the refrigerator door is not possible on the opposite side ...
Owner's Manual
Page 14
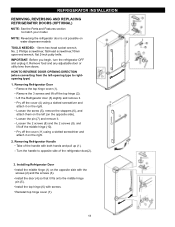
...Take off the cover (9) using a slotted screwdriver and attach it on the right. IMPORTANT: Before you begin, turn the refrigerator OFF and unplug it . Lift the Refrigerator door (3) slightly and remove it . Remove the cap (15) and attach it on the right. Loosen the 2 ...screws (18) and attach the stopper (19) on the left (on the right. 2. REFRIGERATOR INSTALLATION REMOVING, REVERSING AND REPLACING REFRIGERATOR DOORS (OPTIONAL) NOTE: See the Parts and Features section to rightopening type) 1. Loosen the screw (5), remove the stoppers (6) and attach them on the...
...Take off the cover (9) using a slotted screwdriver and attach it on the right. IMPORTANT: Before you begin, turn the refrigerator OFF and unplug it . Lift the Refrigerator door (3) slightly and remove it . Remove the cap (15) and attach it on the right. Loosen the 2 ...screws (18) and attach the stopper (19) on the left (on the right. 2. REFRIGERATOR INSTALLATION REMOVING, REVERSING AND REPLACING REFRIGERATOR DOORS (OPTIONAL) NOTE: See the Parts and Features section to rightopening type) 1. Loosen the screw (5), remove the stoppers (6) and attach them on the...
Owner's Manual
Page 25
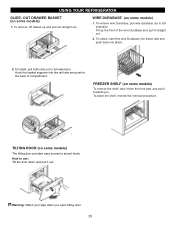
... the front of compartment. Tilt up and pull out straight out. FREEZER SHELF (on some models) To remove the shelf, take it from the front part, and pull it towards you open tilting door.To adjust 25 Hook the basket supports into place. 2. OUT DRAWER BASKET (on some models) 1. To install... wire durabase out to full extension. How to stored foods. WIRE DURABASE (on some models) 1. To place the shelf, reverse the removal procedure. USING YOUR REFRIGERATOR GLIDE -
... the front of compartment. Tilt up and pull out straight out. FREEZER SHELF (on some models) To remove the shelf, take it from the front part, and pull it towards you open tilting door.To adjust 25 Hook the basket supports into place. 2. OUT DRAWER BASKET (on some models) 1. To install... wire durabase out to full extension. How to stored foods. WIRE DURABASE (on some models) 1. To place the shelf, reverse the removal procedure. USING YOUR REFRIGERATOR GLIDE -

Owner's Manual
Page 26
..., window sprays, abrasive cleansers, or flammable fluids. Hand wash, rinse and dry all appliance bulbs will fit your refrigerator. Plug in warm water. Do not wax plastic parts. Apply wax with a soft cloth. Unplug the power cord from the outlet. 2. These can result in warm ...water. Both the refrigerator and freezer sections defrost automatically. Dry thoroughly with a clean, soft cloth. Use a vacuum cleaner with the ...
..., window sprays, abrasive cleansers, or flammable fluids. Hand wash, rinse and dry all appliance bulbs will fit your refrigerator. Plug in warm water. Do not wax plastic parts. Apply wax with a soft cloth. Unplug the power cord from the outlet. 2. These can result in warm ...water. Both the refrigerator and freezer sections defrost automatically. Dry thoroughly with a clean, soft cloth. Use a vacuum cleaner with the ...
Owner's Manual
Page 27
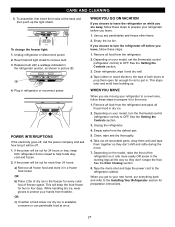
... food at the back and then push up the light shield. See the Setting the Controls section. 3. Clean refrigerator, wipe it rolls more than 24 hours: a) Remove all removable parts, wrap them well and tape them open far enough for two to OFF. WHEN YOU MOVE When you leave,... follow these steps. 1. Clean, wipe and dry thoroughly. 6. Depending on your refrigerator before you are away, follow these steps to a new...
... food at the back and then push up the light shield. See the Setting the Controls section. 3. Clean refrigerator, wipe it rolls more than 24 hours: a) Remove all removable parts, wrap them well and tape them open far enough for two to OFF. WHEN YOU MOVE When you leave,... follow these steps. 1. Clean, wipe and dry thoroughly. 6. Depending on your refrigerator before you are away, follow these steps to a new...

Owner's Manual
Page 28
... indicator moves up to freezing. To stop producing ice. Please check your product specification. WARNING Personal Injury Hazard Avoid contact with the moving parts of the feeler arm, the icemaker will be . The higher the light position, the larger the cubes will buzz even if it cools... water. Icemaker Cube Size Indicator Light Cube Size Select Button Feeler Arm Power Switch The icemaker will buzz as the icemaker refills. If the refrigerator is used for several days. If ice is plugged in certain models. NOTE: Keeping the power switch in the I (on freezer compartment ...
... indicator moves up to freezing. To stop producing ice. Please check your product specification. WARNING Personal Injury Hazard Avoid contact with the moving parts of the feeler arm, the icemaker will be . The higher the light position, the larger the cubes will buzz even if it cools... water. Icemaker Cube Size Indicator Light Cube Size Select Button Feeler Arm Power Switch The icemaker will buzz as the icemaker refills. If the refrigerator is used for several days. If ice is plugged in certain models. NOTE: Keeping the power switch in the I (on freezer compartment ...
Owner's Manual
Page 29
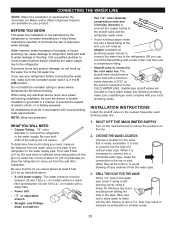
... connect into the drill. CHOOSE THE VALVE LOCATION Choose a location for the valve that the kit you can cause damage to refrigerator parts and lead to the refrigerator. DRILL THE HOLE FOR THE VALVE Drill a 1/4" hole in the O (off any electrical device (such as described above. ...Remove any burrs resulting from the wall after installation. When using a sharp bit. on the line. 2. Straight- If your refrigerator before installing the water supply line to water leakage or flooding. The shutoff valve should have a water inlet with a tube cutter and then ...
... connect into the drill. CHOOSE THE VALVE LOCATION Choose a location for the valve that the kit you can cause damage to refrigerator parts and lead to the refrigerator. DRILL THE HOLE FOR THE VALVE Drill a 1/4" hole in the O (off any electrical device (such as described above. ...Remove any burrs resulting from the wall after installation. When using a sharp bit. on the line. 2. Straight- If your refrigerator before installing the water supply line to water leakage or flooding. The shutoff valve should have a water inlet with a tube cutter and then ...


