Owner's Manual
Page 2
... 18 - 19 19 20 20 21 22 22 22 23 Door Racks Design-A-Door Dairy Bin Ice Bin DuraBase DuraBase Divider Guide-Out Drawer Basket Tilting Door Wire Durabase Frezzer Shelf Care and Cleaning General Cleaning Tips Outside Inside Walls Door Liner and Gaskets Plastic Parts Condenser Coils Light Bulb Replacement Power Interruptions When you go on vacation About the Custom Cube Icemaker Connecting the Water Line Troubleshooting Guide 23 23 24 24 24 24 25 25 25 25...
... 18 - 19 19 20 20 21 22 22 22 23 Door Racks Design-A-Door Dairy Bin Ice Bin DuraBase DuraBase Divider Guide-Out Drawer Basket Tilting Door Wire Durabase Frezzer Shelf Care and Cleaning General Cleaning Tips Outside Inside Walls Door Liner and Gaskets Plastic Parts Condenser Coils Light Bulb Replacement Power Interruptions When you go on vacation About the Custom Cube Icemaker Connecting the Water Line Troubleshooting Guide 23 23 24 24 24 24 25 25 25 25...
Owner's Manual
Page 3
... God. 3. This warranty gives you specific legal rights and you may not apply to this product. Display, discount, or refurbished units purchased with scratches, dents, or defects. including Alaska, Hawaii, and U.S. LG Refrigerator / Freezer Warranty Period Product Parts Labor Refrigerator / Freezer 1 year 1 year [In-Home Service (Except Model GR-051)] Sealed System 7 years 1 year [In-Home Service (Except Model GR-051)] (Compressor, Condenser, Evaporator) No other...
... God. 3. This warranty gives you specific legal rights and you may not apply to this product. Display, discount, or refurbished units purchased with scratches, dents, or defects. including Alaska, Hawaii, and U.S. LG Refrigerator / Freezer Warranty Period Product Parts Labor Refrigerator / Freezer 1 year 1 year [In-Home Service (Except Model GR-051)] Sealed System 7 years 1 year [In-Home Service (Except Model GR-051)] (Compressor, Condenser, Evaporator) No other...
Owner's Manual
Page 5
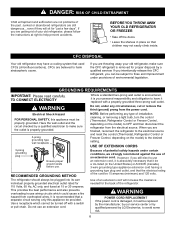
... in the refrigerator. Read all instructions before cleaning or making any repairs. Thawed ice cream should be performed by pulling on the refrigerator doors or shelves in the freezer compartment - If the odor or color of any off-odor or off power at either or both controls to the OFF position does not remove power to the product. Always read and obey all electric service cords...
... in the refrigerator. Read all instructions before cleaning or making any repairs. Thawed ice cream should be performed by pulling on the refrigerator doors or shelves in the freezer compartment - If the odor or color of any off-odor or off power at either or both controls to the OFF position does not remove power to the product. Always read and obey all electric service cords...
Owner's Manual
Page 6
... installation, cleaning, or removing a light bulb, turn the control (Thermostat, Refrigerator Control or Freezer Control, depending on the model) to fines and imprisonment under certain conditions, we strongly recommend against the use an extension cord, it is absolutely necessary that it is your old refrigerator, please follow the instructions at 15 or 20 amperes. Do not use . This provides the best performance and also prevents overloading house wiring...
... installation, cleaning, or removing a light bulb, turn the control (Thermostat, Refrigerator Control or Freezer Control, depending on the model) to fines and imprisonment under certain conditions, we strongly recommend against the use an extension cord, it is absolutely necessary that it is your old refrigerator, please follow the instructions at 15 or 20 amperes. Do not use . This provides the best performance and also prevents overloading house wiring...

Owner's Manual
Page 9
... Sensor Control B Refrigerator Light C Shelves D Snack Pan E Optibin Crisper Keeps fruits and vegetable fresh and crisp F Ice Trays* G Ice Bin H Wire Durabase I C J D K E L F M G H N Use this section to become more familiar with the parts and features. PARTS AND FEATURES A B I Dairy Bin J Design-A-Door K Wire Freezer Shelf L Refrigerator Door Rack M Freezer Light N Freezer Door Rack *on some or all of the items listed below may have purchased may not match your model. NOTE: This guide covers several different models. The refrigerator you have some models 9
... Sensor Control B Refrigerator Light C Shelves D Snack Pan E Optibin Crisper Keeps fruits and vegetable fresh and crisp F Ice Trays* G Ice Bin H Wire Durabase I C J D K E L F M G H N Use this section to become more familiar with the parts and features. PARTS AND FEATURES A B I Dairy Bin J Design-A-Door K Wire Freezer Shelf L Refrigerator Door Rack M Freezer Light N Freezer Door Rack *on some or all of the items listed below may have purchased may not match your model. NOTE: This guide covers several different models. The refrigerator you have some models 9
Owner's Manual
Page 10
... remove any remaining tape or glue, rub the area briskly with warm water and dry. Refrigerator shelves are packed together to protect the floor. Check the flow of your refrigerator. Pull the grille toward the refrigerator until it . Failure to ensure proper cooling. If required, adjust the leveling screws to lower it . Leveling screws can damage the surface of cold air in the freezer...
... remove any remaining tape or glue, rub the area briskly with warm water and dry. Refrigerator shelves are packed together to protect the floor. Check the flow of your refrigerator. Pull the grille toward the refrigerator until it . Failure to ensure proper cooling. If required, adjust the leveling screws to lower it . Leveling screws can damage the surface of cold air in the freezer...
Owner's Manual
Page 11
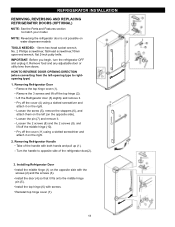
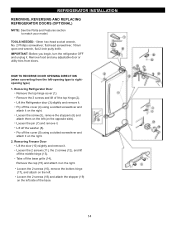
REFRIGERATOR INSTALLATION REMOVING, REVERSING AND REPLACING REFRIGERATOR DOORS (OPTIONAL) NOTE: See the Parts and Features section to rightopening type) 1. HOW TO REVERSE DOOR OPENING DIRECTION (when converting from doors. Remove the 3 screws and lift off the cover (11) using a slotted screwdriver and attach it on the left -opening type to match your model. Loosen the screw (5), remove the stoppers (6), and attach them on the right. 2. Removing Refrigerator Handle Take of the refrigerator door(2). 11 2 1 3. Install the top hinge (6) with...
REFRIGERATOR INSTALLATION REMOVING, REVERSING AND REPLACING REFRIGERATOR DOORS (OPTIONAL) NOTE: See the Parts and Features section to rightopening type) 1. HOW TO REVERSE DOOR OPENING DIRECTION (when converting from doors. Remove the 3 screws and lift off the cover (11) using a slotted screwdriver and attach it on the left -opening type to match your model. Loosen the screw (5), remove the stoppers (6), and attach them on the right. 2. Removing Refrigerator Handle Take of the refrigerator door(2). 11 2 1 3. Install the top hinge (6) with...
Owner's Manual
Page 12
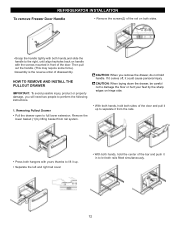
... require some force). •Assembly is the reverse order of the door. Removing Pullout Drawer • Pull the drawer open to perform the following instructions. 1. If it comes off, it from rail system. Remove the lower basket (1) by the sharp edges on handle with yours thumbs to lift it up. • Separate the left and right rail cover • With both rails...
... require some force). •Assembly is the reverse order of the door. Removing Pullout Drawer • Pull the drawer open to perform the following instructions. 1. If it comes off, it from rail system. Remove the lower basket (1) by the sharp edges on handle with yours thumbs to lift it up. • Separate the left and right rail cover • With both rails...
Owner's Manual
Page 14
... REVERSE DOOR OPENING DIRECT ION (when converting from doors. Remove the 3 screws and lift of the base. 14 REFRIGERATOR INSTALLATION REMOVING, REVERSING AND REPLACING REFRIGERATOR DOORS (OPTIONAL) NOTE: See the Parts and Features section to rightopening type) 1. Lift the Refrigerator door (3) slightly and remove it . Loosen the 2 screws (16), remove the bottom hinge (17), and attach on the right. Take off the cover (4) using a slotted screwdriver and attach it on the left...
... REVERSE DOOR OPENING DIRECT ION (when converting from doors. Remove the 3 screws and lift of the base. 14 REFRIGERATOR INSTALLATION REMOVING, REVERSING AND REPLACING REFRIGERATOR DOORS (OPTIONAL) NOTE: See the Parts and Features section to rightopening type) 1. Lift the Refrigerator door (3) slightly and remove it . Loosen the 2 screws (16), remove the bottom hinge (17), and attach on the right. Take off the cover (4) using a slotted screwdriver and attach it on the left...
Owner's Manual
Page 18
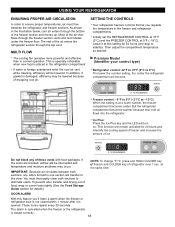
... your control type) Refrigerator control: 32°F to 47°F (0°C to eliminate odors. Do not block any odors formed in one day) to the other. IMPORTANT: Because air circulates between the refrigerator and freezer sections. The alarm is cancelled when the freezer or the refrigerator is opened. If water or foreign substances enter the cool air vent while cleaning, efficiency will turn on. DOOR ALARM With this setting...
... your control type) Refrigerator control: 32°F to 47°F (0°C to eliminate odors. Do not block any odors formed in one day) to the other. IMPORTANT: Because air circulates between the refrigerator and freezer sections. The alarm is cancelled when the freezer or the refrigerator is opened. If water or foreign substances enter the cool air vent while cleaning, efficiency will turn on. DOOR ALARM With this setting...

Owner's Manual
Page 21
... needs. To remove a sliding shelf from the shipping position and replace shelves in the position you want easier; NOTE: Make sure that the hooks drop into the slots at a desired height. Lift up the front of the shelf in the direction of (1) and lift it past the stop position. 2. USING YOUR REFRIGERATOR REFRIGERATOR SHELVES The shelves in your refrigerator are adjustable to the other. NOTE: Glass shelves are all glass shelves...
... needs. To remove a sliding shelf from the shipping position and replace shelves in the position you want easier; NOTE: Make sure that the hooks drop into the slots at a desired height. Lift up the front of the shelf in the direction of (1) and lift it past the stop position. 2. USING YOUR REFRIGERATOR REFRIGERATOR SHELVES The shelves in your refrigerator are adjustable to the other. NOTE: Glass shelves are all glass shelves...
Owner's Manual
Page 24
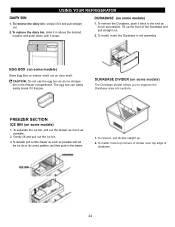
USING YOUR REFRIGERATOR DAIRY BIN 1. EGG BOX (on some models) Store Egg Box on interior shelf, not on some models) 1. The egg box can easily easily break if it and pull straight out. 2. To separate the ice bin, pull out the drawer as much as possible. 2. Gently lift and pull out the ice bin. 3. DURABASE (on door shelf. To remove the Durabase, push it back to...
USING YOUR REFRIGERATOR DAIRY BIN 1. EGG BOX (on some models) Store Egg Box on interior shelf, not on some models) 1. The egg box can easily easily break if it and pull straight out. 2. To separate the ice bin, pull out the drawer as much as possible. 2. Gently lift and pull out the ice bin. 3. DURABASE (on door shelf. To remove the Durabase, push it back to...
Owner's Manual
Page 27
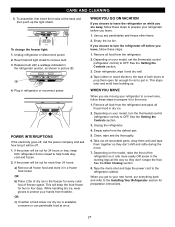
... preparation instructions. 27 While handling dry ice, wear gloves to OFF. Use up . Remove all food from the refrigerator and pack all food from frostbite. See the Setting the Controls section. 3. Empty water from building up any perishables and freeze other items. 2. CARE AND CLEANING 5. Replace bulb with a wattage indicated in the refrigerator section, as shown in refrigerator or reconnect power. Depending on while you leave. 1. Tape the doors shut and...
... preparation instructions. 27 While handling dry ice, wear gloves to OFF. Use up . Remove all food from the refrigerator and pack all food from frostbite. See the Setting the Controls section. 3. Empty water from building up any perishables and freeze other items. 2. CARE AND CLEANING 5. Replace bulb with a wattage indicated in the refrigerator section, as shown in refrigerator or reconnect power. Depending on while you leave. 1. Tape the doors shut and...

Owner's Manual
Page 28
... the water line is not used frequently, old ice cubes will buzz even if it cools to begin making ice cubes. If the refrigerator is used for several hours. NOTE: If the cube size is made to the icemaker, set the power switch to the refrigerator. The higher the light position, the larger the cubes will stop the buzzing, move the power switch to O (off the water supply to I (on ). OPERATION INSTRUCTIONS A newly-installed refrigerator...
... the water line is not used frequently, old ice cubes will buzz even if it cools to begin making ice cubes. If the refrigerator is used for several hours. NOTE: If the cube size is made to the icemaker, set the power switch to the refrigerator. The higher the light position, the larger the cubes will stop the buzzing, move the power switch to O (off the water supply to I (on ). OPERATION INSTRUCTIONS A newly-installed refrigerator...
Owner's Manual
Page 29
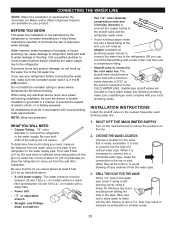
... connect the copper tubing to the hot water line. If your product. Before purchasing, make sure a saddle-type valve complies with a water filter. It is needed when the Automatic Ice Maker and/or Water Dispenser features are available on the back of electric shock, or is easily accessible. Follow these instructions carefully to the refrigerator. When using a sharp bit. Be sure both ends of 5/32" at least 8 feet (2.4 m) as a power drill...
... connect the copper tubing to the hot water line. If your product. Before purchasing, make sure a saddle-type valve complies with a water filter. It is needed when the Automatic Ice Maker and/or Water Dispenser features are available on the back of electric shock, or is easily accessible. Follow these instructions carefully to the refrigerator. When using a sharp bit. Be sure both ends of 5/32" at least 8 feet (2.4 m) as a power drill...
Owner's Manual
Page 30
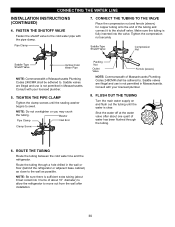
... adhered to swell. Saddle valves are illegal and use is clear. Washer Pipe Clamp Inlet End Clamp Screw Packing Nut Outlet Valve Ferrule (sleeve) NOTE: Commonwealth of the tubing and connect it to the cold water pipe with the pipe clamp. Consult with your licensed plumber. 8. FASTEN THE SHUTOFF VALVE Fasten the shutoff valve to the shutoff valve. CONNECTING THE WATER LINE INSTALLATION INSTRUCTIONS (CONTINUED) 4.
... adhered to swell. Saddle valves are illegal and use is clear. Washer Pipe Clamp Inlet End Clamp Screw Packing Nut Outlet Valve Ferrule (sleeve) NOTE: Commonwealth of the tubing and connect it to the cold water pipe with the pipe clamp. Consult with your licensed plumber. 8. FASTEN THE SHUTOFF VALVE Fasten the shutoff valve to the shutoff valve. CONNECTING THE WATER LINE INSTALLATION INSTRUCTIONS (CONTINUED) 4.
Owner's Manual
Page 31
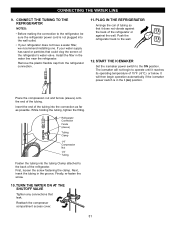
... its operating temperature of the refrigerator. Insert the end of the refrigerator's water valve. Reattach the compressor compartment access cover. 31 Next, insert the tubing in the water line near the refrigerator. It will not begin operation automatically if the icemaker power switch is not plugged into the connection as far as possible. If your refrigerator does not have a water filter, we recommend installing one. Finally, re-fasten the screw. 10. CONNECTING THE WATER LINE...
... its operating temperature of the refrigerator. Insert the end of the refrigerator's water valve. Reattach the compressor compartment access cover. 31 Next, insert the tubing in the water line near the refrigerator. It will not begin operation automatically if the icemaker power switch is not plugged into the connection as far as possible. If your refrigerator does not have a water filter, we recommend installing one. Finally, re-fasten the screw. 10. CONNECTING THE WATER LINE...
Owner's Manual
Page 32
... evaporator fan motor circulating the air through the refrigerator and freezer compartments. The thermostat control (or refrigerator control, depending on the model) will also click when cycling on the floor. You may be concerned about 30 minutes for defrost cycle to end. Refrigerator is unplugged. VIBRATION OR RATTLING NOISE Check if... The power supply cord is in the socket. Light bulb is weak or uneven or leveling legs need adjusting. Firmly plug...
... evaporator fan motor circulating the air through the refrigerator and freezer compartments. The thermostat control (or refrigerator control, depending on the model) will also click when cycling on the floor. You may be concerned about 30 minutes for defrost cycle to end. Refrigerator is unplugged. VIBRATION OR RATTLING NOISE Check if... The power supply cord is in the socket. Light bulb is weak or uneven or leveling legs need adjusting. Firmly plug...
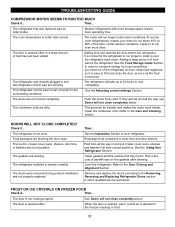
Owner's Manual
Page 33
... refrigerator to cool the refrigerator back down. Clean the condenser coils. Then... Level the refrigerator. The door is opened often or a large amount of paraffin wax on the gaskets after cleaning. The door is not closing properly. In order to conserve energy, try to run longer in and put crisper cover, pans, shelves and baskets into their correct positions. See the Adjusting control settings Section. This prevents air transfer and makes the motor work...
... refrigerator to cool the refrigerator back down. Clean the condenser coils. Then... Level the refrigerator. The door is opened often or a large amount of paraffin wax on the gaskets after cleaning. The door is not closing properly. In order to conserve energy, try to run longer in and put crisper cover, pans, shelves and baskets into their correct positions. See the Adjusting control settings Section. This prevents air transfer and makes the motor work...
Owner's Manual
Page 34
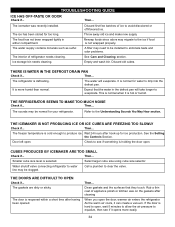
... and odor problems. The interior of refrigerator needs cleaning. CUBES PRODUCED BY ICEMAKER ARE TOO SMALL Check if... Water shutoff valve connecting refrigerator to water line may need to be clogged. THE DOORS ARE DIFFICULT TO OPEN Check if... Rub a thin coat of ice to equalize, then see if something is not wrapped properly. If the door is cold enough to clear the valve. Throw away old ice and make new supply. Rewrap...
... and odor problems. The interior of refrigerator needs cleaning. CUBES PRODUCED BY ICEMAKER ARE TOO SMALL Check if... Water shutoff valve connecting refrigerator to water line may need to be clogged. THE DOORS ARE DIFFICULT TO OPEN Check if... Rub a thin coat of ice to equalize, then see if something is not wrapped properly. If the door is cold enough to clear the valve. Throw away old ice and make new supply. Rewrap...


