LG LRBP1031W - 10 Cu. Ft. Cabinet Depth Bottom Freezer Refrigerator Support and Manuals
Get Help and Manuals for this LG item
View All Support Options Below
Free LG LRBP1031W manuals!
Problems with LG LRBP1031W?
Ask a Question
Free LG LRBP1031W manuals!
Problems with LG LRBP1031W?
Ask a Question
Most Recent LG LRBP1031W Questions

Top Fridge Compartment
I have the manual with specifications. However, I'm trying to figure out the top fridge INSIDE compa...
I have the manual with specifications. However, I'm trying to figure out the top fridge INSIDE compa...
(Posted by mbucknousmc 3 years ago)

How Much Power Does It Take In Wattage
(Posted by pauljriley 10 years ago)

Names Of Canadian Retailers Please
(Posted by adesmarais 11 years ago)
Popular LG LRBP1031W Manual Pages
User Guide - Page 1
....
It is necessary to ascertain the function of the column.
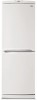
SERVICING PRECAUTIONS
Air Recharging in Compressor
Test the refrigeration by connecting it is advisable to keep the Freon for addition .... The refrigeration system must add 165 grams to the gas pressure different scales reported as the
quantity of the extension piece at its narrow point. (Figure 1) Replace the filter...
User Guide - Page 3
... Comer (movable) Bottle Holder -2J_ Bottle Door Basket
Screw
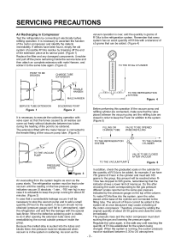
NOTE : This is subject to keep fruits and vegetables, etc. fresh and crisp. The shape of refrigerator is a basic model. PARTS IDENTIFICATION
Freezer Temperature _ Control
Removable Glass Shelf(2 or 3)
Lam Multi-air Flow Fresh Meat Kee
(Optional)
Temperature Control
Used to change.
-5-
User Guide - Page 4
...@.
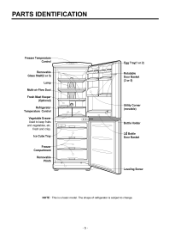
3) Move the position of order,
4) Be careful not to get out of upper hinge pin @, and cap @. Assemble the refrigerator door @. Separating the freezer door @ in disassembling or assembling the freezer or the refrigerator door.
2. And, seperate screw O, lower hinge !_, and remove pin O. REPLACEMENT OF DOOR OPENING TYPE
1. PRECAUTION
1) Before reversing the door, first...
User Guide - Page 5
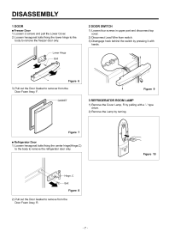
Figure 10
e,C
Figure 8 2) Pull out the Door Gasket to remove the refrigerator door only. Lower Hinge
2 DOOR SWITCH
1) Loosen four screws in upper part and disconnect top cover.
2) Disconnect Lead Wire from switch. 3) Disengage hook behind the switch by pressing it with a '-' type
driver. 2) Remove the Lamp by pulling with
hands.
_
Figure 6
3) Pull out the...
User Guide - Page 6
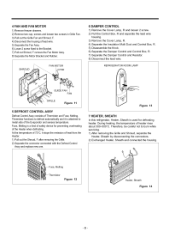
..., Melting is a kind of safety device for defrosting heater. Figure 13
7 HEATER, SHEATH In this refrigerator, Heater, Sheath is attached to burn while servicing. 1) After removing the Grille and Shroud, separate the
Heater, Sheath by disconnecting the connectors. 2) Exchanged...F after removing the Gdlle, 2) Separate the connector connected with the Defrost Control
Assy and replace new one.
User Guide - Page 7
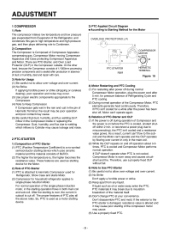
...replacing the Compressor. As a result, current can't flow to Keep Compressor. Therefore, use a properly fixed OLP without fail.
6) Note to Use PTC-Starter (1) Be careful not to allow over-voltage and over -current. (2) No Strike
Don't apply a forcible power or strike. (3) Keep apart from Evaporator of the Refrigerator...repair with care.
3) Note for household refrigerator...Compressor gets wet...
User Guide - Page 8
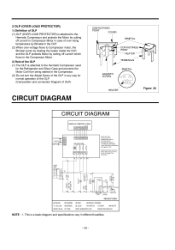
...and connection Diagram of the OLP in different localities.
-10- This is attached to the Compressor Motor. 2) Role of the OLP (1) The OLP is a basic diagram and specifications vary in any way for the Refrigerator and Show Case and prevents the Motor Coil from ...:SKY BLUE PK:PINK
RD;RED
BO BRIGHTORANGE
BL:BLUE
PR;PURPLE GY:GRAY
WH:WHITE
GN/YL:GREENHELLOW
WH/BK;WHITEtBLACK
NOTE : 1.
User Guide - Page 9
... -+10% below. PTC-Starter.
_I Sthaertcekr. YES
Csthaertcinkg state.
YES
_
OLP disconnected? manindimcouomling
the
_
the voltage of
Motor
Compressor.
_
among M-C, S-C and M-S in PTC- CRheeccoknnceocnt.nection
YES Replace Compressor. ComponentsI start in forcible OLP operation by OtounLrnPainngwdoiornkfsfs.tanwtithpinower b
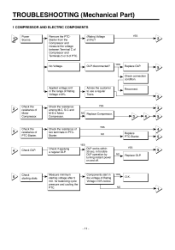
Replace OLP. TROUBLESHOOTING (Mechanical Part...
User Guide - Page 12
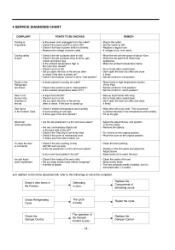
...-position.
• Place foods in high temperature section. (Front Part)
• Set the control to "mid-position". • Set the control to solve the complaint.
Check if dew forms in the Exterior Case. The cycle is poor.
Dew forms in the Freezer.
Repair the cycle. Replace the Damper Control
POINTS TO BE CHECKED
REMEDY
, Is...
User Guide - Page 13
... to Compressor
and check coo ng operat on.
Whether Compressor runs or not,
Whether frost
YES
forms or not in inlet only.
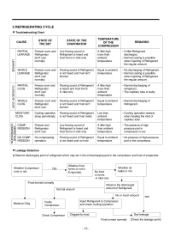
5 REFRIGERATING CYCLE • Troubleshooting Chart
CAUSE
STATE OF THE SET
STATE OF THE EVAPORATOR
PARTIAL LEAKAGE
mr> >
WHOLE LEAKAGE
o PARTIAL CLOG
mu
£U
-< WHOLE CLOG
03
MOISTURE CLOG
Freezer room and...
User Guide - Page 14
...
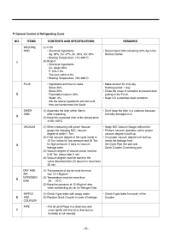
CONTENTS AND SPECIFICATIONS
REMARKS
(1) H 30 • Chemical Ingredients Ag: 30%, Cu: 27%, Zn: 23%, Cd: 20% • Brazing Temperature: 710~840°C
(2) Bcup-2 • Chemical Ingredients Cu: About 93...: 1 day
• Close the cover of Refrigerating Cycle
NO. • General Control of container to it in a stainless steel container.
(1) Assemble the drier within 30min. after 5...
User Guide - Page 16
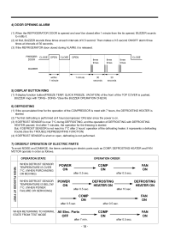
...REFRIGERATOR DOOR is opened , BUZZER sounds to 7°C after 0.5 sec.
FAN =" ON DEFROSTING "_ HEATER ON after 7 min.
-18-
HEATER and FAN
OPERATION STATE
WHEN DEFROST SENSOR TEMPERATURE IS OVER 7°C, (WHEN PURCHASING OR MOVING)
r-
Parts OFF after 10...TEMPERATURE IS BELOW
7°C. (WHEN POWER FAILURE OR SERVICING)
..1
OPERATION ORDER
POWER
COMP
ON
_ ON
after ...
User Guide - Page 17
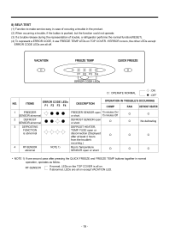
...-TEST (1) Function to make service easy in case of occuring a trouble in normal
operation, operates as follow. ITEMS
ERROR CODE LEDs FI F2 F3 F4
DESCRIPTION
i
O [ OPERATE
NORMAL
_
O I
O
No defrosting
3
DEFROSTING
FUNCTION
is pushed, but the function could not operate. (3) If a toruble release during the representation of trouble, a refrigerator performs the normal function(RESET...
User Guide - Page 18
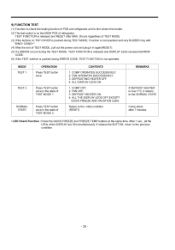
... ON simultaneously. ALL DISPLAY LEDS ON.
1.
9) FUNCTION TEST (1) Function to check the testing function of PCB and refrigerator and to find where the trouble. (2) The test switch is on TOP COVER is pushed during ERROR CODE, TEST FUNCTION is not operated. ALL THE DISPLAY LEDS OFF EXCEPT
QUICK FREEZE AND VACATION LEDS. Comp starts...
User Guide - Page 22
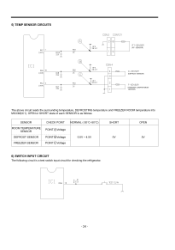
5) TEMP SENSOR CIRCUITS
R67 (AN7)
CClO_ 223/?[ 7
R65 10 (AN5)
R64 (AN4)
cc8_
cc71
223 f?[7
CON3 CON101
\\\ T RF3
R19
_
261KF
2K
@
\\\
R16
_,_
"_'
\
RF2 26.1KF
_RFI
R15
_162KF
CON4 4_ ]
2
1
RT SENSOR (RT-SENSOR)
D ... circuit is as follows.
ICl
R56 _s
TEST S/W Go
- 24 - OPEN or SHORT state of each SENSOR is a test switch input circuit for checking the refrigerator.
LG LRBP1031W Reviews
We have not received any reviews for LG yet.