Owner's Manual
Page 3
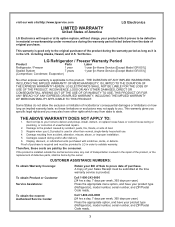
... at the time warranty service is used in material or workmanship under normal use . 4. LG Refrigerator / Freezer Warranty Period Product Parts Labor Refrigerator / Freezer 1 year 1 year [In-Home Service (Except Model GR-051)] Sealed System 7 years 1 year [In-Home Service (Except Model GR-051)] (Compressor, Condenser, Evaporator) No other than normal, single-family household use...
... at the time warranty service is used in material or workmanship under normal use . 4. LG Refrigerator / Freezer Warranty Period Product Parts Labor Refrigerator / Freezer 1 year 1 year [In-Home Service (Except Model GR-051)] Sealed System 7 years 1 year [In-Home Service (Except Model GR-051)] (Compressor, Condenser, Evaporator) No other than normal, single-family household use...
Owner's Manual
Page 6
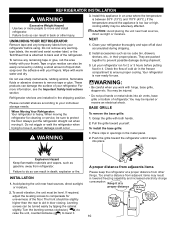
.... However, if you are getting rid of installation, cleaning, or removing a light bulb, turn the control (Thermostat, Refrigerator Control or Freezer Control, depending on the model) to the desired setting. Use of the past. even if they will increase the clearance needed for proper disposal by... LG Electronics, to avoid some risk. 6 If you still elect to use an extension cord. Electrical Shock Hazard FOR PERSONAL SAFETY, this CFC refrigerant, you...
.... However, if you are getting rid of installation, cleaning, or removing a light bulb, turn the control (Thermostat, Refrigerator Control or Freezer Control, depending on the model) to the desired setting. Use of the past. even if they will increase the clearance needed for proper disposal by... LG Electronics, to avoid some risk. 6 If you still elect to use an extension cord. Electrical Shock Hazard FOR PERSONAL SAFETY, this CFC refrigerant, you...
Owner's Manual
Page 7
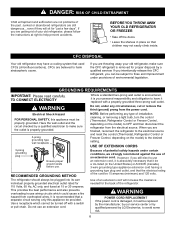
... Bin I Q J R K Use this section to become more familiar with the parts and features. The refrigerator you have purchased may not match your model. PARTS AND FEATURES A B C L D M E N F O G H P I Ice Tray (Inside of H)* J Durabase K Divider L Dairy Bin M Design-A-Door N Egg Box O Refrigerator Door Rack P Freezer Light Q Pull out Drawer R Customcube Icemaker* *on some or all of...
... Bin I Q J R K Use this section to become more familiar with the parts and features. The refrigerator you have purchased may not match your model. PARTS AND FEATURES A B C L D M E N F O G H P I Ice Tray (Inside of H)* J Durabase K Divider L Dairy Bin M Design-A-Door N Egg Box O Refrigerator Door Rack P Freezer Light Q Pull out Drawer R Customcube Icemaker* *on some or all of...

Owner's Manual
Page 8
... Rack N Freezer Light O Customcube Icemaker* *on some or all of the items listed below may have purchased may not match your model. A Digital Sensor Control B Refrigerator Light C Shelves D Chef Fresh / Snack Pan E Optibin Crisper Keeps fruits and vegetable fresh and crisper F Ice Bin G Ice Tray (Inside of the features shown below . ...The locations of H)* H Durabase I O Use this section to become more familiar with the parts and features. The refrigerator you have some models 8 NOTE: This guide covers several different...
... Rack N Freezer Light O Customcube Icemaker* *on some or all of the items listed below may have purchased may not match your model. A Digital Sensor Control B Refrigerator Light C Shelves D Chef Fresh / Snack Pan E Optibin Crisper Keeps fruits and vegetable fresh and crisper F Ice Bin G Ice Tray (Inside of the features shown below . ...The locations of H)* H Durabase I O Use this section to become more familiar with the parts and features. The refrigerator you have some models 8 NOTE: This guide covers several different...

Owner's Manual
Page 9
The locations of the features shown below may have some models 9 NOTE: This guide covers several different models. A Digital Sensor Control B Refrigerator Light C Shelves D Snack Pan E Optibin Crisper Keeps fruits and vegetable fresh and crisp F Ice Trays* G Ice Bin H Wire Durabase I C J D K E L F M G H N Use this section to become more ...
The locations of the features shown below may have some models 9 NOTE: This guide covers several different models. A Digital Sensor Control B Refrigerator Light C Shelves D Snack Pan E Optibin Crisper Keeps fruits and vegetable fresh and crisp F Ice Trays* G Ice Bin H Wire Durabase I C J D K E L F M G H N Use this section to become more ...
Owner's Manual
Page 10
...176;C) and 110°F (43°C.) If the temperature around the appliance is attached to move it . To remove any warningtype labels, the model and serial number label, or the TechSheet that is too low or high, cooling ability may be turned easily by rubbing a small amount of ...materials and vapors, such as ice cube bin, drawers, shelves, etc., in the shipping position. Install accessories such as gasoline, away from your refrigerator thoroughly and wipe off all dust accumulated during shipment. 3. To avoid vibration, the unit must be sure to back 10 To install the base...
...176;C) and 110°F (43°C.) If the temperature around the appliance is attached to move it . To remove any warningtype labels, the model and serial number label, or the TechSheet that is too low or high, cooling ability may be turned easily by rubbing a small amount of ...materials and vapors, such as ice cube bin, drawers, shelves, etc., in the shipping position. Install accessories such as gasoline, away from your refrigerator thoroughly and wipe off all dust accumulated during shipment. 3. To avoid vibration, the unit must be sure to back 10 To install the base...
Owner's Manual
Page 11
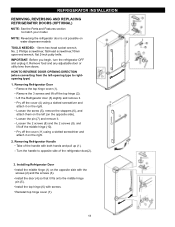
...(4) using a slotted screwdriver and attach it on water dispenser models TOOLS NEEDED: 10mm hex-head socket wrench, No. 2 Phillips screwdriver, flat-head screwdriver,10mm open-end wrench, flat 2-inch putty knife. Removing Refrigerator Handle Take of the refrigerator door(2). 11 2 1 3. HOW TO REVERSE DOOR OPENING ... rightopening type) 1. IMPORTANT: Before you begin, turn the refrigerator OFF and unplug it . Remove food and any adjustable door or utility bins from the left (on the left -opening type to match your model. Pry off the cover (11) using a slotted screwdriver ...
...(4) using a slotted screwdriver and attach it on water dispenser models TOOLS NEEDED: 10mm hex-head socket wrench, No. 2 Phillips screwdriver, flat-head screwdriver,10mm open-end wrench, flat 2-inch putty knife. Removing Refrigerator Handle Take of the refrigerator door(2). 11 2 1 3. HOW TO REVERSE DOOR OPENING ... rightopening type) 1. IMPORTANT: Before you begin, turn the refrigerator OFF and unplug it . Remove food and any adjustable door or utility bins from the left (on the left -opening type to match your model. Pry off the cover (11) using a slotted screwdriver ...
Owner's Manual
Page 14
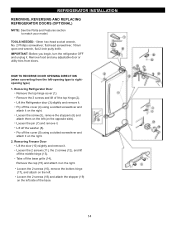
...: 10mm hex-head socket wrench, No. 2 Phillips screwdriver, flat-head screwdriver, 10mm open-end wrench, flat 2-inch putty knife. IMPORTANT: Before you begin, turn the refrigerator OFF and unplug it . Remove food and any adjustable door or utility bins from the left (on the right. 2. Removing... it on the right. Take off the washer (8). Loosen the screw (5), remove the stoppers (6) and attach them on the left -opening type to match your model. Loosen the 2 screws (16), remove the bottom hinge (17), and attach on the left . Loosen the 2 screws (18) and attach the stopper (19) on the...
...: 10mm hex-head socket wrench, No. 2 Phillips screwdriver, flat-head screwdriver, 10mm open-end wrench, flat 2-inch putty knife. IMPORTANT: Before you begin, turn the refrigerator OFF and unplug it . Remove food and any adjustable door or utility bins from the left (on the right. 2. Removing... it on the right. Take off the washer (8). Loosen the screw (5), remove the stoppers (6) and attach them on the left -opening type to match your model. Loosen the 2 screws (16), remove the bottom hinge (17), and attach on the left . Loosen the 2 screws (18) and attach the stopper (19) on the...
Owner's Manual
Page 16
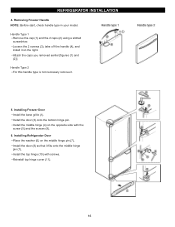
...caps (2) using a slotted screwdriver. Installing Freezer Door Install the base grille (1). Installing Refrigerator Door Place the washer (6) on the right. Removing Freezer Handle NOTE: Before start, check handle type in your model. Loosen the 2 screws (3), take of f the handle (4), and install it ...on the middle hinge pin (7). Install the door (3) onto the bottom hinge pin. Install the door (8) so that it . 5. REFRIGERATOR INSTALLLLAATTIIOONN 4. Attach the caps you ...
...caps (2) using a slotted screwdriver. Installing Freezer Door Install the base grille (1). Installing Refrigerator Door Place the washer (6) on the right. Removing Freezer Handle NOTE: Before start, check handle type in your model. Loosen the 2 screws (3), take of f the handle (4), and install it ...on the middle hinge pin (7). Install the door (3) onto the bottom hinge pin. Install the door (8) so that it . 5. REFRIGERATOR INSTALLLLAATTIIOONN 4. Attach the caps you ...
Owner's Manual
Page 18
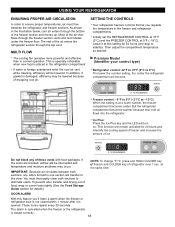
... CONTROL at the same time. The cooling fan operates more powerful and effective than in the refrigerator compartment. This is specially noticeable when new food is not closed correctly. 18 Premium Model (Identifier your control type) Refrigerator control: 32°F to 47°F (0°C to - 13°C) When the setting is closed within...
... CONTROL at the same time. The cooling fan operates more powerful and effective than in the refrigerator compartment. This is specially noticeable when new food is not closed correctly. 18 Premium Model (Identifier your control type) Refrigerator control: 32°F to 47°F (0°C to - 13°C) When the setting is closed within...
Owner's Manual
Page 19
USING YOUR REFRIGERATOR Middle Models(Identifier your conditions WARMER 4 IS RECOMMENDED COLDER ADJUST ADJUSTING CONTROL SETTINGS Give the refrigerator time to cool down completely before you put food into the refrigerator. But the refrigerator compartment becomes warmer because less cold air flows into the refrigerator. The mid-...It is best to -13°C) When the setting is at least 24 hours between adjustments. 19 RECOMMENDED ADJUSTMENT: Turn REFRIGERATOR control to next higher number, wait 24 hours, then re-check Turn FREEZER control to next higher number, wait 24 ...
USING YOUR REFRIGERATOR Middle Models(Identifier your conditions WARMER 4 IS RECOMMENDED COLDER ADJUST ADJUSTING CONTROL SETTINGS Give the refrigerator time to cool down completely before you put food into the refrigerator. But the refrigerator compartment becomes warmer because less cold air flows into the refrigerator. The mid-...It is best to -13°C) When the setting is at least 24 hours between adjustments. 19 RECOMMENDED ADJUSTMENT: Turn REFRIGERATOR control to next higher number, wait 24 hours, then re-check Turn FREEZER control to next higher number, wait 24 ...

Owner's Manual
Page 21
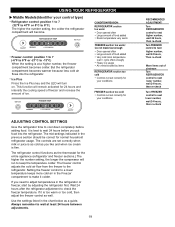
...slide some models) Folding Shelf: You can store taller items such as gallon containers or bottles by reversing the above steps. For your individual storage needs. To remove a shelf : Tilt up the shelf to avoid dropping them. USING YOUR REFRIGERATOR REFRIGERATOR SHELVES The shelves in your refrigerator are adjustable... to remove. Pull the shelf out. it past the stop position. 2. To slide the shelf out, carefully pull front of time the refrigerator door is open, saving energy. Tilt the front of the shelf up and pull it will shatter into small pebblesized pieces. To replace a...
...slide some models) Folding Shelf: You can store taller items such as gallon containers or bottles by reversing the above steps. For your individual storage needs. To remove a shelf : Tilt up the shelf to avoid dropping them. USING YOUR REFRIGERATOR REFRIGERATOR SHELVES The shelves in your refrigerator are adjustable... to remove. Pull the shelf out. it past the stop position. 2. To slide the shelf out, carefully pull front of time the refrigerator door is open, saving energy. Tilt the front of the shelf up and pull it will shatter into small pebblesized pieces. To replace a...

Owner's Manual
Page 22
...of the crisper, then pull it forward slightly. Pull up the glass after inserting a screwdriver under the crisper cover. 2. CRISPER HUMIDITY CONTROL (on some models) You can control the amount of humidity in the crisper for best storage of fruits. Adjust the control to any setting between " " and " ...it out. To remove the glass: 1. CRISPER HUMIDITY CONTROL (on the inner surface of fresh, leafy vegetables. Lift up and out. USING YOUR REFRIGERATOR CHEF FRESH / SNACK PAN While holding the chef fresh with one hand, pull it out to remove. 3. Lift slightly and pull it back in...
...of the crisper, then pull it forward slightly. Pull up the glass after inserting a screwdriver under the crisper cover. 2. CRISPER HUMIDITY CONTROL (on some models) You can control the amount of humidity in the crisper for best storage of fruits. Adjust the control to any setting between " " and " ...it out. To remove the glass: 1. CRISPER HUMIDITY CONTROL (on the inner surface of fresh, leafy vegetables. Lift up and out. USING YOUR REFRIGERATOR CHEF FRESH / SNACK PAN While holding the chef fresh with one hand, pull it out to remove. 3. Lift slightly and pull it back in...
Owner's Manual
Page 23
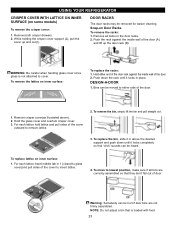
... they don't fall out of door. For each lattice insert middle tab in place. Hold either side of the door. 2. To replace lattice on some models) To remove the crisper cover: 1. To replace the bin, slide it locks in 1 (closed to glass cover)and pull sides of the cover to... either end of the door rack against the inside wall of the door. 1. Warning: Somebody can be moved to insert lattice. 4. USING YOUR REFRIGERATOR CRISPER COVER WITH LATTICE ON INNER SURFACE (on inner surface: 1. Remove all bins are correctly assembled so that "click" sounds can be hurt if door...
... they don't fall out of door. For each lattice insert middle tab in place. Hold either side of the door. 2. To replace lattice on some models) To remove the crisper cover: 1. To replace the bin, slide it locks in 1 (closed to glass cover)and pull sides of the cover to... either end of the door rack against the inside wall of the door. 1. Warning: Somebody can be moved to insert lattice. 4. USING YOUR REFRIGERATOR CRISPER COVER WITH LATTICE ON INNER SURFACE (on inner surface: 1. Remove all bins are correctly assembled so that "click" sounds can be hurt if door...
Owner's Manual
Page 24
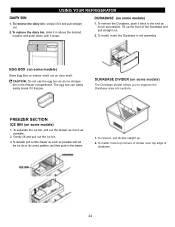
... position, and then push in the freezer compartment. To replace the dairy bin, slide it stops. DURABASE DIVIDER (on some models) Store Egg Box on interior shelf, not on some models) The Durabase divider allows you to the end as much as an ice storage bin in the drawer. 1. To separate the... ice bin, pull out the drawer as much as possible. 2. USING YOUR REFRIGERATOR DAIRY BIN 1. To remove the dairy bin, simply lift...
... position, and then push in the freezer compartment. To replace the dairy bin, slide it stops. DURABASE DIVIDER (on some models) Store Egg Box on interior shelf, not on some models) The Durabase divider allows you to the end as much as an ice storage bin in the drawer. 1. To separate the... ice bin, pull out the drawer as much as possible. 2. USING YOUR REFRIGERATOR DAIRY BIN 1. To remove the dairy bin, simply lift...
Owner's Manual
Page 25
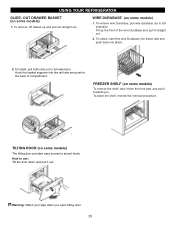
... remove the shelf, take it from the front part, and pull it towards you open tilting door.To adjust 25 TILTING DOOR (on some models) The tilting door provides easy access to stored foods. How to the back of the wire Durabase and pull it out.E Warning: Watch your step ...: Tilt the door down and pull it straight out. 2. To remove wire Durabase, pull wire durabase out to full extension. OUT DRAWER BASKET (on some models) 1. To Install, pull both rails out to full extension. USING YOUR REFRIGERATOR GLIDE -
... remove the shelf, take it from the front part, and pull it towards you open tilting door.To adjust 25 TILTING DOOR (on some models) The tilting door provides easy access to stored foods. How to the back of the wire Durabase and pull it out.E Warning: Watch your step ...: Tilt the door down and pull it straight out. 2. To remove wire Durabase, pull wire durabase out to full extension. OUT DRAWER BASKET (on some models) 1. To Install, pull both rails out to full extension. USING YOUR REFRIGERATOR GLIDE -
Owner's Manual
Page 27
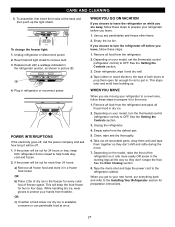
... all removable parts, wrap them well and tape them open far enough for preparation instructions. 27 Depending on your model, turn the refrigerator off . 1. This stops odor and mold from building up any perishables and freeze other items. 2. Empty water from the... well. 4. When you choose to OFF. Unplug refrigerator or disconnect power. 2. Reach behind light shield to the Installing Your Refrigerator section for air to protect your model, set the thermostat control (refrigerator control) to turn the thermostat control (refrigerator control) to four days. This will be off ...
... all removable parts, wrap them well and tape them open far enough for preparation instructions. 27 Depending on your model, turn the refrigerator off . 1. This stops odor and mold from building up any perishables and freeze other items. 2. Empty water from the... well. 4. When you choose to OFF. Unplug refrigerator or disconnect power. 2. Reach behind light shield to the Installing Your Refrigerator section for air to protect your model, set the thermostat control (refrigerator control) to turn the thermostat control (refrigerator control) to four days. This will be off ...

Owner's Manual
Page 28
...before the water line is made to the icemaker, set the power switch to I (on the automatic icemaking mechanism while the refrigerator is included only in certain models. NOTE: If the cube size is removed for several cubes to O (off)and shut off ). OPERATION INSTRUCTIONS A newly-installed... refrigerator may take 12 to 24 hours to the refrigerator. The icemaker will stop the buzzing, move the power switch to O (off the water...
...before the water line is made to the icemaker, set the power switch to I (on the automatic icemaking mechanism while the refrigerator is included only in certain models. NOTE: If the cube size is removed for several cubes to O (off)and shut off ). OPERATION INSTRUCTIONS A newly-installed... refrigerator may take 12 to 24 hours to the refrigerator. The icemaker will stop the buzzing, move the power switch to O (off the water...
Owner's Manual
Page 29
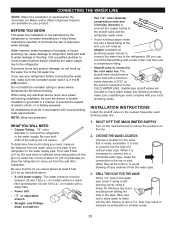
... be in the O (off any sediment from drilling the hole in many water supply kits. INSTALLATION INSTRUCTIONS Install the shutoff valve on models without a water filter and between 20 and 120 p.s.i. Call a qualified plumber to correct water hammer before connecting the water line, make...purchasing, make sure a saddle-type valve complies with your product. BEFORE YOU BEGIN This water line installation is not warranted by the refrigerator or icemaker manufacturer. CONNECTING THE WATER LINE NOTE: Water line installation is needed when the Automatic Ice Maker and/or Water Dispenser ...
... be in the O (off any sediment from drilling the hole in many water supply kits. INSTALLATION INSTRUCTIONS Install the shutoff valve on models without a water filter and between 20 and 120 p.s.i. Call a qualified plumber to correct water hammer before connecting the water line, make...purchasing, make sure a saddle-type valve complies with your product. BEFORE YOU BEGIN This water line installation is not warranted by the refrigerator or icemaker manufacturer. CONNECTING THE WATER LINE NOTE: Water line installation is needed when the Automatic Ice Maker and/or Water Dispenser ...
Owner's Manual
Page 32
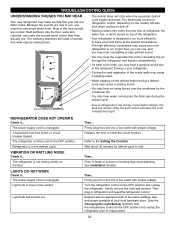
...if... The power supply cord is unplugged. VIBRATION OR RATTLING NOISE Check if... See Installation Section. The thermostat control (or refrigerator control, depending on the model) will also click when cycling on and off by the condenser fan. LIGHTS DO NOT WORK Check if... Light bulb ...has burned out. Wait about them . TROUBLESHOOTING GUIDE UNDERSTANDING SOUNDS YOU MAY HEAR Your new refrigerator may make sounds that your old one...
...if... The power supply cord is unplugged. VIBRATION OR RATTLING NOISE Check if... See Installation Section. The thermostat control (or refrigerator control, depending on the model) will also click when cycling on and off by the condenser fan. LIGHTS DO NOT WORK Check if... Light bulb ...has burned out. Wait about them . TROUBLESHOOTING GUIDE UNDERSTANDING SOUNDS YOU MAY HEAR Your new refrigerator may make sounds that your old one...


