Owners Manual
Page 3
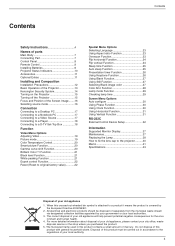
... 10 Accessories 11 Optional Extras 11 Installing and Composition Installation Precautions 12 Basic Operation of the Projector 13 Kensington Security System 14 Turning on the Projector 15 Turning off the Projector 15 Focus and Position of the Screen Image........16 Selecting source mode 16 Connection Connecting to ... Vertical Function 31 RS-232C External Control Device Setup 32 Information Supported Monitor Display 37 Maintenance 37 Replacing the Lamp 38 How to fix the lens cap to the projector ..........40 Memo 41 Specifications 43 Disposal of your local authority. 3
... 10 Accessories 11 Optional Extras 11 Installing and Composition Installation Precautions 12 Basic Operation of the Projector 13 Kensington Security System 14 Turning on the Projector 15 Turning off the Projector 15 Focus and Position of the Screen Image........16 Selecting source mode 16 Connection Connecting to ... Vertical Function 31 RS-232C External Control Device Setup 32 Information Supported Monitor Display 37 Maintenance 37 Replacing the Lamp 38 How to fix the lens cap to the projector ..........40 Memo 41 Specifications 43 Disposal of your local authority. 3
Owners Manual
Page 6
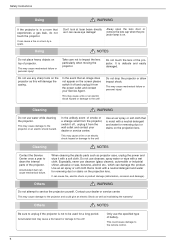
...for removing dust or stains on the projection lens. Alway open the lens door or remove the lens cap when the projector lamp is delicate and easily damaged. Do not drop the projector or allow impact shock. This may cause a fire hazard or damage to the remote control. 6 Use an air spray... the warranty! It can cause fire, electric shock or product damage (deformation, corrosion and damage). NOTES Do not place heavy objects on the projector as it from the wall outlet and contact your dealer or service centre. This may cause mechanical failure or personal injury! It is on the...
...for removing dust or stains on the projection lens. Alway open the lens door or remove the lens cap when the projector lamp is delicate and easily damaged. Do not drop the projector or allow impact shock. This may cause a fire hazard or damage to the remote control. 6 Use an air spray... the warranty! It can cause fire, electric shock or product damage (deformation, corrosion and damage). NOTES Do not place heavy objects on the projector as it from the wall outlet and contact your dealer or service centre. This may cause mechanical failure or personal injury! It is on the...

Owners Manual
Page 9
... the remote control. • Insert the specified type of parts RATIO Button INPUT Button MENU Button Contrast Button COLOR ADJ Button SLEEP Button KEYSTONE Button LAMP Button PICTURE Button W.PEAK Button Installing Batteries CAUTION RISK OF EXPLOSION IF BATTERY IS REPLACED WITH AN INCORRECT TYPE. Don't mix used batteries with "-". •...
... the remote control. • Insert the specified type of parts RATIO Button INPUT Button MENU Button Contrast Button COLOR ADJ Button SLEEP Button KEYSTONE Button LAMP Button PICTURE Button W.PEAK Button Installing Batteries CAUTION RISK OF EXPLOSION IF BATTERY IS REPLACED WITH AN INCORRECT TYPE. Don't mix used batteries with "-". •...
Owners Manual
Page 10
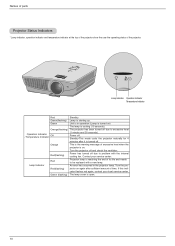
... service center. Green Unit is cooling (10 seconds). Red(flashing) Power has turned off . Red(flashing) jector on ) The lamp is in the projector lamp. Green(flashing) Lamp is open. 10 Green (flashing) The lamp cover is starting up. Orange This is turned off due to excessive heat Operation Indicator Off / Temperature Indicator (1 minute and...
... service center. Green Unit is cooling (10 seconds). Red(flashing) Power has turned off . Red(flashing) jector on ) The lamp is in the projector lamp. Green(flashing) Lamp is open. 10 Green (flashing) The lamp cover is starting up. Orange This is turned off due to excessive heat Operation Indicator Off / Temperature Indicator (1 minute and...

Owners Manual
Page 11
...5V 2 Batteries Owner's manual Power Cord Computer Cable Lens cap and Strap Optional Extras * Contact your dealer to purchase these items. * The lamp is consumable and needs to be replaced with a new one when it is burned out. * Contact your dealer or service center for a replacement... lamp. * Optional parts can be changed without notice to RCA jack Ceiling installer for projector S-Video Cable HDMI Cable Component Cable RS-232C Cable / Mini 8 pin Conversion Cable Video Cable 11
...5V 2 Batteries Owner's manual Power Cord Computer Cable Lens cap and Strap Optional Extras * Contact your dealer to purchase these items. * The lamp is consumable and needs to be replaced with a new one when it is burned out. * Contact your dealer or service center for a replacement... lamp. * Optional parts can be changed without notice to RCA jack Ceiling installer for projector S-Video Cable HDMI Cable Component Cable RS-232C Cable / Mini 8 pin Conversion Cable Video Cable 11
Owners Manual
Page 12
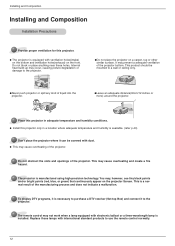
... continuously appear on a carpet, rug or other similar surface. Do not block or place anything near these holes. G The projector is equipped with electronic ballast or a three-wavelength lamp is installed. Replace those lamps with dust. This product should be covered with international standard products to a wall or ceiling only. GDo not place...
... continuously appear on a carpet, rug or other similar surface. Do not block or place anything near these holes. G The projector is equipped with electronic ballast or a three-wavelength lamp is installed. Replace those lamps with dust. This product should be covered with international standard products to a wall or ceiling only. GDo not place...
Owners Manual
Page 15
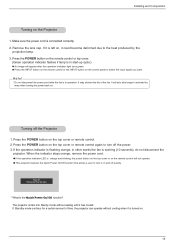
... cord. Please press Power key again. * What is working (10 seconds), do not disconnect the projector. Installing and Composition Turning on the control panel to select the input signal you want. * Do...it has cooled. Power off the Projector 1. Remove the lens cap. Press the POWER button on the remote control or top cover. (Green operation indicator flashes if lamp is orange and blinking, the ...power button on the top cover or on and off the power. 3. The projector enters into Stanby mode without cooling when ...
... cord. Please press Power key again. * What is working (10 seconds), do not disconnect the projector. Installing and Composition Turning on the control panel to select the input signal you want. * Do...it has cooled. Power off the Projector 1. Remove the lens cap. Press the POWER button on the remote control or top cover. (Green operation indicator flashes if lamp is orange and blinking, the ...power button on the top cover or on and off the power. 3. The projector enters into Stanby mode without cooling when ...

Owners Manual
Page 27
...function color. G To temporarily turn off to use , button to 'Selecting blank image color') 2. To exit STILL, press any objects when the projector is under operation as this could cause the objects to get the attention of the audience during presentations, meetings or briefings. 1. Press the , ...button to exit the menu screen. Keystone Blank Image Color ADJ Lamp mode Lamp time MENU Prev. 0 Logo High Bright 11 Hr Move Select 27 G Press the MENU button twice or the EXIT button to select ...
...function color. G To temporarily turn off to use , button to 'Selecting blank image color') 2. To exit STILL, press any objects when the projector is under operation as this could cause the objects to get the attention of the audience during presentations, meetings or briefings. 1. Press the , ...button to exit the menu screen. Keystone Blank Image Color ADJ Lamp mode Lamp time MENU Prev. 0 Logo High Bright 11 Hr Move Select 27 G Press the MENU button twice or the EXIT button to select ...
Owners Manual
Page 29
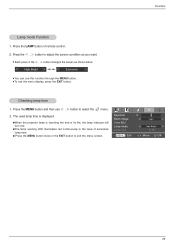
...case of the , button changes the screen as you want. Keystone 0 Blank Image Logo GWhen the projector lamp is displayed. G Press the MENU button twice or the EXIT button to adjust the screen condition as shown below. Lamp mode Lamp time MENU Exit High Bright 11 Hr Move OK 29 Press the... LAMP button of its life, the lamp indicator will Color ADJ turn red. Press the , button to exit the menu screen. G...
...case of the , button changes the screen as you want. Keystone 0 Blank Image Logo GWhen the projector lamp is displayed. G Press the MENU button twice or the EXIT button to adjust the screen condition as shown below. Lamp mode Lamp time MENU Exit High Bright 11 Hr Move OK 29 Press the... LAMP button of its life, the lamp indicator will Color ADJ turn red. Press the , button to exit the menu screen. G...

Owners Manual
Page 36
... Source Menu OK Still ARC Blank Auto 40 Keystone A4 41 Exit 5B 02 4E 03 4F AD Mode 4D EF Color ADJ 6A 43 Lamp 68 44 Timer 26 BC Sleep 0E 79 W.Peak 69 84 Picture 6E 92 Auto Configure (Command:ju) ➜ To adjust picture position and minimize... On Ack [q] [ ] [Set ID] [ ] [OK] [Data] [x] Data 0 : Low Power Off 1 : Low Power On 36 18. Key (Command:mc) ➜ To send Key code of the projector. Ack [w] [ ] [Set ID] [ ] [OK] [Data] [x] Data Min : 0 ~ Max : 64 17. Green ADC gain Adjustment (Color G) (Command:jy) ➜ Adjust the Green gain of ADC part...
... Source Menu OK Still ARC Blank Auto 40 Keystone A4 41 Exit 5B 02 4E 03 4F AD Mode 4D EF Color ADJ 6A 43 Lamp 68 44 Timer 26 BC Sleep 0E 79 W.Peak 69 84 Picture 6E 92 Auto Configure (Command:ju) ➜ To adjust picture position and minimize... On Ack [q] [ ] [Set ID] [ ] [OK] [Data] [x] Data 0 : Low Power Off 1 : Low Power On 36 18. Key (Command:mc) ➜ To send Key code of the projector. Ack [w] [ ] [Set ID] [ ] [OK] [Data] [x] Data Min : 0 ~ Max : 64 17. Green ADC gain Adjustment (Color G) (Command:jy) ➜ Adjust the Green gain of ADC part...

Owners Manual
Page 38
... heat source. - G The message "Replace the lamp" appears on the screen when turning the projector on page 43. Keep the Lamp away from an LG Electronics Service Center. Pull out the lamp only when replacing the lamp. - Allow the lamp to the projector. Information Replacing the Lamp Lamp Replacement The change interval of the lamp depends on the control panel or...
... heat source. - G The message "Replace the lamp" appears on the screen when turning the projector on page 43. Keep the Lamp away from an LG Electronics Service Center. Pull out the lamp only when replacing the lamp. - Allow the lamp to the projector. Information Replacing the Lamp Lamp Replacement The change interval of the lamp depends on the control panel or...
Owners Manual
Page 39
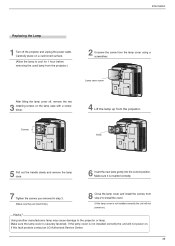
...2 to install the cover. (If the lamp cover is not installed correctly the unit will not power on a cushioned surface. (Allow the lamp to the projector or lamp. If this fault persists contact an LG Authorized Service Center. 39 Information Replacing the Lamp 1 Turn off , remove the two 3... retaining screws on .) Using another manufacturers lamp may cause damage to cool for 1 hour ...
...2 to install the cover. (If the lamp cover is not installed correctly the unit will not power on a cushioned surface. (Allow the lamp to the projector or lamp. If this fault persists contact an LG Authorized Service Center. 39 Information Replacing the Lamp 1 Turn off , remove the two 3... retaining screws on .) Using another manufacturers lamp may cause damage to cool for 1 hour ...
Owners Manual
Page 40
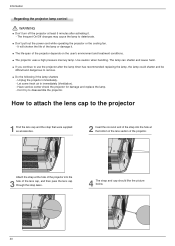
... use the projector after activating it . Unplug the projector immediately. - Information Regarding the projector lamp control WARNING G Don't turn off the projector at the bottom of the lens section of the projector. Attach the strap at the hole of the projector into the hole at least 5 minutes after the lamp timer has recommended replacing the lamp, the lamp could shatter...
... use the projector after activating it . Unplug the projector immediately. - Information Regarding the projector lamp control WARNING G Don't turn off the projector at the bottom of the lens section of the projector. Attach the strap at the hole of the projector into the hole at least 5 minutes after the lamp timer has recommended replacing the lamp, the lamp could shatter...
Owners Manual
Page 43
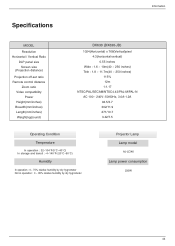
Specifications Information MODEL Resolution Horizontal / Vertical Ratio DLP panel size Screen size (Projection distance) Projection off-set ratio Remote control distance Zoom ratio Video compatibility Power Height(mm/inches) Breadth(mm/inches) Length(mm/inches) Weight(kg/pound) DX630 (DX630-JD) 1024(Horizontal) x 768(Vertical)pixel 4:3(horizontal:vertical) 0.55 inches Wide : ...20°C~60°C) Humidity In operation : 0~ 75% relative humidity by dry hygrometer Not in operation : 0 ~ 85% relative humidity by dry hygrometer Projector Lamp Lamp model AJ-LDX6 Lamp power consumption 230W 43
Specifications Information MODEL Resolution Horizontal / Vertical Ratio DLP panel size Screen size (Projection distance) Projection off-set ratio Remote control distance Zoom ratio Video compatibility Power Height(mm/inches) Breadth(mm/inches) Length(mm/inches) Weight(kg/pound) DX630 (DX630-JD) 1024(Horizontal) x 768(Vertical)pixel 4:3(horizontal:vertical) 0.55 inches Wide : ...20°C~60°C) Humidity In operation : 0~ 75% relative humidity by dry hygrometer Not in operation : 0 ~ 85% relative humidity by dry hygrometer Projector Lamp Lamp model AJ-LDX6 Lamp power consumption 230W 43


