

Owners Manual
Page 5
...37 Mute 38 Freeze 38 Screen Setup for PC mode 39 External Control Device Setup IR Codes Programming the Remote Programming Codes Troubleshooting Checklist Maintenance Product Specifications 40~45 46~47 48 49~50 51 52 53 Setup and ... and operational setup options.) 1. Select viewing source for TV. Contents Warning/Caution Safety Instructions 2 3-4 Introduction Controls 6 Connection Options Remote Control Key Functions ........... 7 8-9 Installation Accessories 10 Installation Instructions 10-11 How to join the product assembly to the wall to ...
...37 Mute 38 Freeze 38 Screen Setup for PC mode 39 External Control Device Setup IR Codes Programming the Remote Programming Codes Troubleshooting Checklist Maintenance Product Specifications 40~45 46~47 48 49~50 51 52 53 Setup and ... and operational setup options.) 1. Select viewing source for TV. Contents Warning/Caution Safety Instructions 2 3-4 Introduction Controls 6 Connection Options Remote Control Key Functions ........... 7 8-9 Installation Accessories 10 Installation Instructions 10-11 How to join the product assembly to the wall to ...
Owners Manual
Page 7
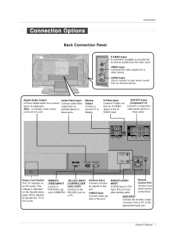
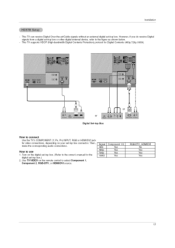
Note: In standby mode, these jacks. Never attempt to operate the TV on a PC. RGB/DVI AUDIO Remote INPUT Control Port In RGB input or DVI input, this jack. I DVD/DTV Input (Component 1-2) Connect a component video/audio device to these ports... a DVl(Video) signal to HDMI/DVI, RS-232C INPUT (CONTROL!SER VICE) PORT Connect to the RS-232C port on DC power. Connect your wired remote plies Analog audio, control here. Introduction M M M MMM M M M MMM M M M MMM M M M MMM M M M MM Back Connection Panel S-VIDEO Input _ A connection available to provide bet- / ter ...
Note: In standby mode, these jacks. Never attempt to operate the TV on a PC. RGB/DVI AUDIO Remote INPUT Control Port In RGB input or DVI input, this jack. I DVD/DTV Input (Component 1-2) Connect a component video/audio device to these ports... a DVl(Video) signal to HDMI/DVI, RS-232C INPUT (CONTROL!SER VICE) PORT Connect to the RS-232C port on DC power. Connect your wired remote plies Analog audio, control here. Introduction M M M MMM M M M MMM M M M MMM M M M MMM M M M MM Back Connection Panel S-VIDEO Input _ A connection available to provide bet- / ter ...

Owners Manual
Page 8
... the screen. MENU _ Brings up the main menu to operate an external device. with new ones. When using the remote control, aim it at the remote control sensor on -screen displays and returns to TV viewing from any menu. TIMER Lets you watch the TV, information displays on the... - MUTE Switches the sound on or off automatically. Don't mix old or used batteries with -). • Install two 1.5V AA batteries. MODE Selects the remote operating mode: TV, DVD, VCR, AUDIO, CABLE or STB. Not available in regular sequence: Antenna, Cable, Video, Front Video, Component 1-2, RGB-DTV (or...
... the screen. MENU _ Brings up the main menu to operate an external device. with new ones. When using the remote control, aim it at the remote control sensor on -screen displays and returns to TV viewing from any menu. TIMER Lets you watch the TV, information displays on the... - MUTE Switches the sound on or off automatically. Don't mix old or used batteries with -). • Install two 1.5V AA batteries. MODE Selects the remote operating mode: TV, DVD, VCR, AUDIO, CABLE or STB. Not available in regular sequence: Antenna, Cable, Video, Front Video, Component 1-2, RGB-DTV (or...
Owners Manual
Page 10
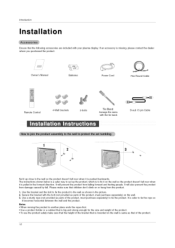
... the bolt to fix the product to fix it becomes horizontal between the wall and the product. W / / / /' / Owner's Manual Batteries Power Cord 75_ Round Cable Remote Control 4-Wall brackets 2-bolts Tie Band Arrange the wires with your plasma display. It will also prevent the product from damage caused by fall over...
... the bolt to fix the product to fix it becomes horizontal between the wall and the product. W / / / /' / Owner's Manual Batteries Power Cord 75_ Round Cable Remote Control 4-Wall brackets 2-bolts Tie Band Arrange the wires with your plasma display. It will also prevent the product from damage caused by fall over...
Owners Manual
Page 13
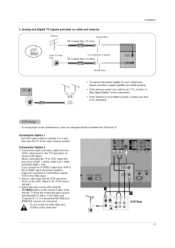
... Audio Right = red). 3. Connection Option 2 1. When connecting the TV to the VCR owner's manual.) 3. Insert a video tape into the VCR and press PLAY on the remote control. If the antenna is presumed that this TV finds the connected input sources automatically for assistance. - compared to connecting a regular VCR to the S-VIDEO...
... Audio Right = red). 3. Connection Option 2 1. When connecting the TV to the VCR owner's manual.) 3. Insert a video tape into the VCR and press PLAY on the remote control. If the antenna is presumed that this TV finds the connected input sources automatically for assistance. - compared to connecting a regular VCR to the S-VIDEO...
Owners Manual
Page 14
... player to the component input ports as shown below. How to use 1. Use the TV/VlDEO button on the remote control. Select the input source with using the TV/VIDEO button on the remote control to select Component the Video or Front Video external input source.) 3. It is presumed that this to...
... player to the component input ports as shown below. How to use 1. Use the TV/VlDEO button on the remote control. Select the input source with using the TV/VIDEO button on the remote control to select Component the Video or Front Video external input source.) 3. It is presumed that this to...
Owners Manual
Page 15
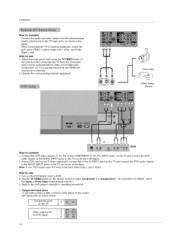
... Yes Yes 15 This TV supports HDCP (High-bandwidth Digital Contents Protection) protocol for video connections, depending on your set -top box. Turn on the remote control to connect Use the TV's COMPONENT (Y, PB, PR) INPUT, RGB or HDMI/DVI jack for Digital Contents (480p,720p,1080i).
... Yes Yes 15 This TV supports HDCP (High-bandwidth Digital Contents Protection) protocol for video connections, depending on your set -top box. Turn on the remote control to connect Use the TV's COMPONENT (Y, PB, PR) INPUT, RGB or HDMI/DVI jack for Digital Contents (480p,720p,1080i).
Owners Manual
Page 20
... SET. Notes: - As shown the lower picture, press the ADJUST button to Screen. Check the image on the TV SET and HDMI/DVl Source Devices remote control. 3. If the refresh rate of the PC graphics card can not changed, change the refresh rate or adjust the brightness and contrast on the...
... SET. Notes: - As shown the lower picture, press the ADJUST button to Screen. Check the image on the TV SET and HDMI/DVl Source Devices remote control. 3. If the refresh rate of the PC graphics card can not changed, change the refresh rate or adjust the brightness and contrast on the...
Owners Manual
Page 21
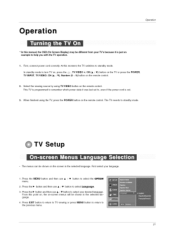
... A / • button to select Language. 3. From this point on, the on the screen in the selected language. 4. When finished using TV/VIDEO button on the remote control. Press EXIT button to return to TV viewing or press MENU button to return to standby mode. In standby mode to turn TV on..., press the 0/I, TV/VlDEO _, CH (_, / •) button on the TV or press the POWER, TV INPUT, TV/VIDEO, CH Number (0 ~ 9) button on the remote control. First, connect power cord correctly. Select the viewing source by using the TV, press the POWER button on the...
... A / • button to select Language. 3. From this point on, the on the screen in the selected language. 4. When finished using TV/VIDEO button on the remote control. Press EXIT button to return to TV viewing or press MENU button to return to standby mode. In standby mode to turn TV on..., press the 0/I, TV/VlDEO _, CH (_, / •) button on the TV or press the POWER, TV INPUT, TV/VIDEO, CH Number (0 ~ 9) button on the remote control. First, connect power cord correctly. Select the viewing source by using the TV, press the POWER button on the...

Owners Manual
Page 23
... in black color, and the channels deleted from the Custom List are to /from the Favorite List. 1. There are available after EZ Scan on the remote control when a channel is highlighted you can add or delete the channel by toggling each channel on or off with channel numbers and a preview picture...
... in black color, and the channels deleted from the Custom List are to /from the Favorite List. 1. There are available after EZ Scan on the remote control when a channel is highlighted you can add or delete the channel by toggling each channel on or off with channel numbers and a preview picture...

Owners Manual
Page 28
... to listen to select BBE. 3. Mono sound is automatically received if the broadcast is only in turn. • If other languages are available on the remote control, this TV can receive MTS stereo programs and any SAP (Secondary Audio Program) that accompanies the stereo program; button and then use A / • button...
... to listen to select BBE. 3. Mono sound is automatically received if the broadcast is only in turn. • If other languages are available on the remote control, this TV can receive MTS stereo programs and any SAP (Secondary Audio Program) that accompanies the stereo program; button and then use A / • button...

Owners Manual
Page 35
... set the ratings limit by inputting a new password twice. • Block Channel.: Select a channel number that you wish to your password, key in '7" '7" '7" '7' on the remote control. 35 Once the option is required to gain access to block specific channels, ratings, and external viewing sources. - ings limits specified, so children cannot...
... set the ratings limit by inputting a new password twice. • Block Channel.: Select a channel number that you wish to your password, key in '7" '7" '7" '7' on the remote control. 35 Once the option is required to gain access to block specific channels, ratings, and external viewing sources. - ings limits specified, so children cannot...

Owners Manual
Page 41
... ID to 'Real Data Mapping'. Color 10. Transmit 'FF' data to specify a monitor ID number. Refer to choose the desired monitor ID number. Bass k 16. Remote Control Lock Mode k 14. Brightness 09. Press the IP-button and then use A / • button to page 45 41 See page 42. 1. Volume Control k f 0 - 64...
... ID to 'Real Data Mapping'. Color 10. Transmit 'FF' data to specify a monitor ID number. Refer to choose the desired monitor ID number. Bass k 16. Remote Control Lock Mode k 14. Brightness 09. Press the IP-button and then use A / • button to page 45 41 See page 42. 1. Volume Control k f 0 - 64...

Owners Manual
Page 42
... i[k][e][ ][Set IU][ ][Uata][Cr] J Data 0 : Volume mute off (Volume on) 1 : Volume mute on /off (Picture on) 1 : Screen mute on remote control. Contrast (Command2:g) I_ To adjust screen contrast. You can also adjust the screen format using the MUTE button on...menu. Acknowledqement [[g][ ][Set IU][ ][OK][Uata][x] J 08. Brightness (Command2:h) I_ To adjust screen brightness. You can also adjust mute using the RATIO button on remote control. Acknowledqement i[h][ ][Set IU][ ][OK][Uata][x] ] Real data mapping 0 Step 0 A Step 10 (SET ID 10) F Step 15 (SET ID 15...
... i[k][e][ ][Set IU][ ][Uata][Cr] J Data 0 : Volume mute off (Volume on) 1 : Volume mute on /off (Picture on) 1 : Screen mute on remote control. Contrast (Command2:g) I_ To adjust screen contrast. You can also adjust the screen format using the MUTE button on...menu. Acknowledqement [[g][ ][Set IU][ ][OK][Uata][x] J 08. Brightness (Command2:h) I_ To adjust screen brightness. You can also adjust mute using the RATIO button on remote control. Acknowledqement i[h][ ][Set IU][ ][OK][Uata][x] ] Real data mapping 0 Step 0 A Step 10 (SET ID 10) F Step 15 (SET ID 15...

Owners Manual
Page 43
... Screen Display) on [[m][ ][Set IU][ ][OK][Uata][x] I [k][t][ ][Set IU][ ][Uata][Cr] ] Data Min: 0 _ Max: 64 • Refer to 'Real data mapping'. Remote Control Lock Mode (Command2:m) • To lock the remote control and the front panel controls on the set. Transmission I [k][s][ ][Set IU][ ][Uata][Cr] ] Data Min: 0 _ Max: 64 • Refer to...
... Screen Display) on [[m][ ][Set IU][ ][OK][Uata][x] I [k][t][ ][Set IU][ ][Uata][Cr] ] Data Min: 0 _ Max: 64 • Refer to 'Real data mapping'. Remote Control Lock Mode (Command2:m) • To lock the remote control and the front panel controls on the set. Transmission I [k][s][ ][Set IU][ ][Uata][Cr] ] Data Min: 0 _ Max: 64 • Refer to...

Owners Manual
Page 44
... by only physical channel. If the physical channel sending is meaningful, you should set this bit low(0). Key (Command: m c) x 1 11 1 Resewed I_ To send IR remote key code Transmission [[m][c][ ][Set ID][ ][Data][Cr] ] Data Key code: Refer to following physical/major/minor number Transmission I[m][a][SeDt ][][Data0][]D[ atal]][[Data2][]D[ ata3]][[Data4]][[Datab...
... by only physical channel. If the physical channel sending is meaningful, you should set this bit low(0). Key (Command: m c) x 1 11 1 Resewed I_ To send IR remote key code Transmission [[m][c][ ][Set ID][ ][Data][Cr] ] Data Key code: Refer to following physical/major/minor number Transmission I[m][a][SeDt ][][Data0][]D[ atal]][[Data2][]D[ ata3]][[Data4]][[Datab...

Owners Manual
Page 46
IRCodes I_ Connect your wired remote control to the Remote Control port on the TV. I_ Output waveform Single pulse, modulated with 37.917KHz signal at 455KHz Tc __J--I__I--[__ I-°-t Tt Carrier frequency ...
IRCodes I_ Connect your wired remote control to the Remote Control port on the TV. I_ Output waveform Single pulse, modulated with 37.917KHz signal at 455KHz Tc __J--I__I--[__ I-°-t Tt Carrier frequency ...

Owners Manual
Page 48
... MENU and MUTE button continuously at a time. Enter code numbers using the number button on the remote by refering the code table on the remote. If not, repeat from step 2. 3. If not, the remote should be illuminated. In that case, you don't press any button for 2 seconds, the current... selected device button will be programmed. After blinking twice, this code is a multi-brand or a universal remote, It can operate the device without programming, turn on the device such as a VCR and press the corresponding mode button on the following pages....
... MENU and MUTE button continuously at a time. Enter code numbers using the number button on the remote by refering the code table on the remote. If not, repeat from step 2. 3. If not, the remote should be illuminated. In that case, you don't press any button for 2 seconds, the current... selected device button will be programmed. After blinking twice, this code is a multi-brand or a universal remote, It can operate the device without programming, turn on the device such as a VCR and press the corresponding mode button on the following pages....
Owners Manual
Page 51
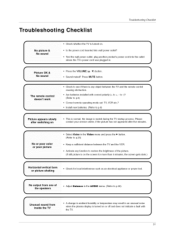
... minutes • Select Color in the Video menu and press the I_ button. (Refer to p.25) • Activate any object between the TV and the remote control causing obstruction Are batteries installed with the TV. 51 Chec kIist TroubleshoCothinegcklist Picture OK & where the TV's power cord was plugged in " Press the...
... minutes • Select Color in the Video menu and press the I_ button. (Refer to p.25) • Activate any object between the TV and the remote control causing obstruction Are batteries installed with the TV. 51 Chec kIist TroubleshoCothinegcklist Picture OK & where the TV's power cord was plugged in " Press the...


