
Owners Manual
Page 1
Retain it for future reference. P/NO • 38289UO490B (0509-REVO0) Printed in Korea See the label attached on the back cover and quote this manual carefully before operating your dealer when you require service. Record model number and serial number of the set . LCD TV OWNER'S MANUAL MODELS: DU-37LZ55 Internet Home Page • http://www.lge.com http://www.lg.ca Please read this information to your set .
Retain it for future reference. P/NO • 38289UO490B (0509-REVO0) Printed in Korea See the label attached on the back cover and quote this manual carefully before operating your dealer when you require service. Record model number and serial number of the set . LCD TV OWNER'S MANUAL MODELS: DU-37LZ55 Internet Home Page • http://www.lge.com http://www.lg.ca Please read this information to your set .
Owners Manual
Page 2
... and, if not installed and used in accordance with the limits for proper grounding and, in a residential installation. NOTE TO CABLE/TV INSTALLER: This reminder is intended to alert the user to the presence of uninsulated "dangerous voltage" within an equilateral triangle is no...in a particular installation. Reorient or relocate the receiving antenna. - CAUTION: Do not attempt to radio or television reception, which the receiver is : LG Electronics U.S.A., Inc. 1000 Sylvan Avenue, Englewood Cliffs, NJ 07632 Phone: 1-201-816-2000 http://www.lgusa.com J 2 U.S.A. Consult the dealer or...
... and, if not installed and used in accordance with the limits for proper grounding and, in a residential installation. NOTE TO CABLE/TV INSTALLER: This reminder is intended to alert the user to the presence of uninsulated "dangerous voltage" within an equilateral triangle is no...in a particular installation. Reorient or relocate the receiving antenna. - CAUTION: Do not attempt to radio or television reception, which the receiver is : LG Electronics U.S.A., Inc. 1000 Sylvan Avenue, Englewood Cliffs, NJ 07632 Phone: 1-201-816-2000 http://www.lgusa.com J 2 U.S.A. Consult the dealer or...

Owners Manual
Page 5
...Reset 25 Audio Menu Options Audio Language 26 EZ SoundRite / EZ Sound 26 Manual Sound Control (Custom Option) ...... 26 Front Surround 27 TV Speakers On/Off Setup 27 BBE 28 Stereo/SAP Broadcasts Setup 28 Time Menu Options Auto Clock Setup 29 Manual Clock Setup 29 On/...Specifications 40~45 46~47 48 49~50 51 52 53 Setup and Operation Checklist Setup and Operation Checklist (See pages 12-20 for TV. Turn TV on . 2. Fine-tune source image and sound to protect the set up See Contents above. Select viewing source for available connection and...
...Reset 25 Audio Menu Options Audio Language 26 EZ SoundRite / EZ Sound 26 Manual Sound Control (Custom Option) ...... 26 Front Surround 27 TV Speakers On/Off Setup 27 BBE 28 Stereo/SAP Broadcasts Setup 28 Time Menu Options Auto Clock Setup 29 Manual Clock Setup 29 On/...Specifications 40~45 46~47 48 49~50 51 52 53 Setup and Operation Checklist Setup and Operation Checklist (See pages 12-20 for TV. Turn TV on . 2. Fine-tune source image and sound to protect the set up See Contents above. Select viewing source for available connection and...

Owners Manual
Page 6
This is a simplified representation of front panel. Here shown may be somewhat different from your TV. Front Panel Controls Buttons Buttons Button Button Button _.J Introduction -
This is a simplified representation of front panel. Here shown may be somewhat different from your TV. Front Panel Controls Buttons Buttons Button Button Button _.J Introduction -
Owners Manual
Page 7
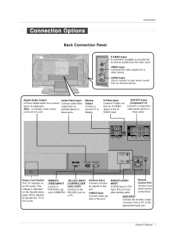
...Video out from a PC to the appropriate input port. The voltage is indicated on DC power. Never attempt to operate the TV on the Specifications page. RGB/DVI AUDIO Remote INPUT Control Port In RGB input or DVI input, this jack. Ant Input Connect... over-the- air signals to these jacks. CABLE Input Connect cable sig- Monitor Output Connect a second TV or Monitor. Introduction M M M MMM M M M MMM M M M MMM M M M MMM M M M MM Back Connection Panel S-VIDEO Input _ A connection available to provide...
...Video out from a PC to the appropriate input port. The voltage is indicated on DC power. Never attempt to operate the TV on the Specifications page. RGB/DVI AUDIO Remote INPUT Control Port In RGB input or DVI input, this jack. Ant Input Connect... over-the- air signals to these jacks. CABLE Input Connect cable sig- Monitor Output Connect a second TV or Monitor. Introduction M M M MMM M M M MMM M M M MMM M M M MMM M M M MM Back Connection Panel S-VIDEO Input _ A connection available to provide...

Owners Manual
Page 8
... or used batteries with -). • Install two 1.5V AA batteries. picture. Installing Batteries • Open the battery compartment cover on the TV. with new ones. When using the remote control, aim it at the remote control sensor on the back side and install the batteries matching correct...Changes the aspect ratio. _INFO When you select the amount of the screen. Select a mode other than TV, for the remote to the screen. EXIT _ Clears all on the viewing environment. _------ TV/VIDEO External input modes rotate in Component 1-2, RGB and HDMI/DVI mode. (Refer to p.37) ...
... or used batteries with -). • Install two 1.5V AA batteries. picture. Installing Batteries • Open the battery compartment cover on the TV. with new ones. When using the remote control, aim it at the remote control sensor on the back side and install the batteries matching correct...Changes the aspect ratio. _INFO When you select the amount of the screen. Select a mode other than TV, for the remote to the screen. EXIT _ Clears all on the viewing environment. _------ TV/VIDEO External input modes rotate in Component 1-2, RGB and HDMI/DVI mode. (Refer to p.37) ...

Owners Manual
Page 9
NUMBER buttons SAP Selects MTS sound: Mono, Stereo, and SAP in DTV mode. Change the audio language in Analog mode. Introduction POWER Turns your TV or any other programmed equipment on or off, depending on -screen menus _ and adjust the system settings to your pref- \ erence. VCR/DVD BUTTONS • ...
NUMBER buttons SAP Selects MTS sound: Mono, Stereo, and SAP in DTV mode. Change the audio language in Analog mode. Introduction POWER Turns your TV or any other programmed equipment on or off, depending on -screen menus _ and adjust the system settings to your pref- \ erence. VCR/DVD BUTTONS • ...

Owners Manual
Page 11
... installation instruc- Installation Power J Shert-circuit J Breaker J For proper ventilation, allow a clearance of 4" on a desktop etc. • The TV is designed to prevent possible electric shock. If grounding methods are available from the wall. After connecting the cables neatly, arrange the cables to telephone... wires, lightening rods, or gas pipes. iii _i • The TV can be mounted horizontally. GROUNDING Ensure that you connect the earth ground wire to be installed in the optional Desktop Stand Installation. ...
... installation instruc- Installation Power J Shert-circuit J Breaker J For proper ventilation, allow a clearance of 4" on a desktop etc. • The TV is designed to prevent possible electric shock. If grounding methods are available from the wall. After connecting the cables neatly, arrange the cables to telephone... wires, lightening rods, or gas pipes. iii _i • The TV can be mounted horizontally. GROUNDING Ensure that you connect the earth ground wire to be installed in the optional Desktop Stand Installation. ...

Owners Manual
Page 12
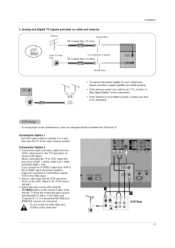
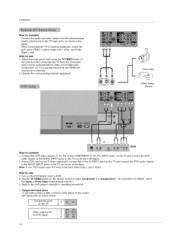
... 2. Outdoor Antenna Dwellings/Houses (Connect to wall jack for outdoor antenna) Bronze Wire Be careful not to tighten. Installation 1. Analog and Digital TV signals provided on antenna Wall Antenna Socket or Outdoor Antenna without a Cable Box Connections For optimum picture quality, adjust antenna direction if needed. Multi...Wail Antenna Socket Bronze Wire VHF Antenna UHF Antenna Turn clockwise to bend the bronze wire when connecting the antenna. Analog and Digital TV signals provided on cable f Cable TV Wall Jack Bronze Wire RF Coaxial Wire (75 ohm) I Bronze Wire 12
... 2. Outdoor Antenna Dwellings/Houses (Connect to wall jack for outdoor antenna) Bronze Wire Be careful not to tighten. Installation 1. Analog and Digital TV signals provided on antenna Wall Antenna Socket or Outdoor Antenna without a Cable Box Connections For optimum picture quality, adjust antenna direction if needed. Multi...Wail Antenna Socket Bronze Wire VHF Antenna UHF Antenna Turn clockwise to bend the bronze wire when connecting the antenna. Analog and Digital TV signals provided on cable f Cable TV Wall Jack Bronze Wire RF Coaxial Wire (75 ohm) I Bronze Wire 12
Owners Manual
Page 13
... the VCR. (Refer to the Video input. 2. If the antenna is presumed that this TV finds the connected input sources automatically for Video, Front Video and Component 1-2. When connecting the TV to be split for assistance. - Jack RF Coaxial Wire (75 ohm) Bronze Wire Installation fOHF... picture noise (interference), leave an adequate distance between the VCR and TV Connection Option 1 Set VCR output switch to channel 3 or 4 and then tune the TV to tighten. It is not installed properly, contact your dealer for two TV's, install a "2Way Signal Splitter" in a poor signal area, ...
... the VCR. (Refer to the Video input. 2. If the antenna is presumed that this TV finds the connected input sources automatically for Video, Front Video and Component 1-2. When connecting the TV to be split for assistance. - Jack RF Coaxial Wire (75 ohm) Bronze Wire Installation fOHF... picture noise (interference), leave an adequate distance between the VCR and TV Connection Option 1 Set VCR output switch to channel 3 or 4 and then tune the TV to tighten. It is not installed properly, contact your dealer for two TV's, install a "2Way Signal Splitter" in a poor signal area, ...
Owners Manual
Page 14
...player's manual for Video, Front Video and Component 1-2. How to the AUDIO INPUT jacks on the TV and connect the DVD audio outputs to use S-Video. Component ports y on the TV Video output ports on the remote control to external equipment, match the jack colors (Video = yellow,... Audio Left = white, and Audio Right = red). How to the TV input jacks, as shown in the figure. Operate the corresponding external equipment. Installation How to connect Connect the audio and video cables from the ...
...player's manual for Video, Front Video and Component 1-2. How to the AUDIO INPUT jacks on the TV and connect the DVD audio outputs to use S-Video. Component ports y on the TV Video output ports on the remote control to external equipment, match the jack colors (Video = yellow,... Audio Left = white, and Audio Right = red). How to the TV input jacks, as shown in the figure. Operate the corresponding external equipment. Installation How to connect Connect the audio and video cables from the ...
Owners Manual
Page 15
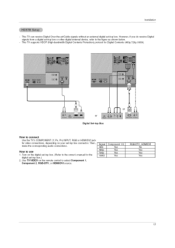
...How to the figure as shown below. - Turn on the digital set -top box connector. This TV supports HDCP (High-bandwidth Digital Contents Protection) protocol for Digital Contents (480p,720p,1080i). Use TV/VlDEO on your set -top box. (Refer to the owner's manual for video connections, depending on ...the remote control to connect Use the TV's COMPONENT (Y, PB, PR) INPUT, RGB or HDMI/DVI jack for the digital set-top box.) 2. Installation - This TV can receive Digital Over-the-air/Cable signals without an external digital set -top box...
...How to the figure as shown below. - Turn on the digital set -top box connector. This TV supports HDCP (High-bandwidth Digital Contents Protection) protocol for Digital Contents (480p,720p,1080i). Use TV/VlDEO on your set -top box. (Refer to the owner's manual for video connections, depending on ...the remote control to connect Use the TV's COMPONENT (Y, PB, PR) INPUT, RGB or HDMI/DVI jack for the digital set-top box.) 2. Installation - This TV can receive Digital Over-the-air/Cable signals without an external digital set -top box...

Owners Manual
Page 16
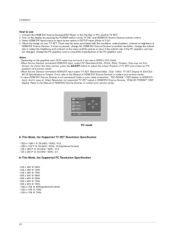
... has an analog audio output connector, connect the PC's audio output to 1024x768, 60 Hz. 2. If the refresh rate of this purpose. 3. The TV perceives 640x480, 60Hz as DTV 480p based on the PC graphic card, change the refresh rate to another resolution, change the screen scanning rate for... this TV with a RGB cable(not supplied with the resolution, vertical pattern, contrast or brightness in input source option of RGB INPUT port. If the ...
... has an analog audio output connector, connect the PC's audio output to 1024x768, 60 Hz. 2. If the refresh rate of this purpose. 3. The TV perceives 640x480, 60Hz as DTV 480p based on the PC graphic card, change the refresh rate to another resolution, change the screen scanning rate for... this TV with a RGB cable(not supplied with the resolution, vertical pattern, contrast or brightness in input source option of RGB INPUT port. If the ...
Owners Manual
Page 17
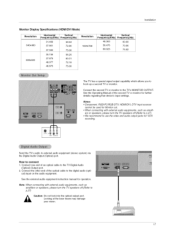
...the external audio equipment instruction manual for Monitor out. • When connecting with external audio equipments, such as amplif- Connect the second TV or monitor to external audio equipment (stereo system) via the Digital Audio Output (Optical) port. See the Operating Manual of an optical... audio equipments, such as amplifers or speakers, please turn the TV speakers off .(Refer to the TV Digital Audio (Optical) Output port. 2. Send the TV's audio to the TV's MONITOR OUTPUT. Connect one end of the second TV or monitor for VCR recording. ers or speakers, please turn ...
...the external audio equipment instruction manual for Monitor out. • When connecting with external audio equipments, such as amplif- Connect the second TV or monitor to external audio equipment (stereo system) via the Digital Audio Output (Optical) port. See the Operating Manual of an optical... audio equipments, such as amplifers or speakers, please turn the TV speakers off .(Refer to the TV Digital Audio (Optical) Output port. 2. Send the TV's audio to the TV's MONITOR OUTPUT. Connect one end of the second TV or monitor for VCR recording. ers or speakers, please turn ...

Owners Manual
Page 18
...- When you need to set to 1280x720p. - If the source device has a DVI output and no other audio connection is necessary. This TV supports HDCP(High-bandwidth Digital Contents Protection) Protocol for this product). 2. To get the best picture quality, adjust the output resolution of the ...to 1280x720p. If the source device has an HDMI output, no HDMI output, a separated audio connection is necessary because HDMI-to R24) TV/VlDEO button is also available for this purpose. To get the best picture quality, adjust the output resolution of the source device to ...
...- When you need to set to 1280x720p. - If the source device has a DVI output and no other audio connection is necessary. This TV supports HDCP(High-bandwidth Digital Contents Protection) Protocol for this product). 2. To get the best picture quality, adjust the output resolution of the ...to 1280x720p. If the source device has an HDMI output, no HDMI output, a separated audio connection is necessary because HDMI-to R24) TV/VlDEO button is also available for this purpose. To get the best picture quality, adjust the output resolution of the source device to ...
Owners Manual
Page 20
... @ 60Hz(preferredformat) 1024 x 768 @ 70Hz 1024 x 768 @ 75Hz 2O Connect the HDMI/DVl Source Devices(DVD Player or Set Top Box or PC) and the TV SET. 2. If not, refer to Screen. And In case of SETUP menu.(Refer to Screen. If the refresh rate of... cable connection, "NO SIGNAL" OSD display in HDMI/DVl Source Devices. Select HDMI/DVl Input source in input source option of , Video Resolution not supported TV SET output in HDMI/DW Source Devices, "INVALID FORMAT" OSD display. Turn on the display by pressing the POWER button on the graphics card, DOS...
... @ 60Hz(preferredformat) 1024 x 768 @ 70Hz 1024 x 768 @ 75Hz 2O Connect the HDMI/DVl Source Devices(DVD Player or Set Top Box or PC) and the TV SET. 2. If not, refer to Screen. And In case of SETUP menu.(Refer to Screen. If the refresh rate of... cable connection, "NO SIGNAL" OSD display in HDMI/DVl Source Devices. Select HDMI/DVl Input source in input source option of , Video Resolution not supported TV SET output in HDMI/DW Source Devices, "INVALID FORMAT" OSD display. Turn on the display by pressing the POWER button on the graphics card, DOS...
Owners Manual
Page 21
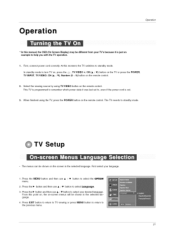
... programmed to remember which power state it is out. 3. up - Press the IP- Press the IP- In standby mode to turn TV on, press the 0/I, TV/VlDEO _, CH (_, / •) button on the TV or press the POWER, TV INPUT, TV/VIDEO, CH Number (0 ~ 9) button on -screen menus will be shown in the selected language. The... cord correctly. button and then use A / • button to select Language. 3. Operation * In this manual, the OSD (On Screen Display) may be different from your TV's because it was last set to, even if the power cord is just an example to help you with the...
... programmed to remember which power state it is out. 3. up - Press the IP- Press the IP- In standby mode to turn TV on, press the 0/I, TV/VlDEO _, CH (_, / •) button on the TV or press the POWER, TV INPUT, TV/VIDEO, CH Number (0 ~ 9) button on -screen menus will be shown in the selected language. The... cord correctly. button and then use A / • button to select Language. 3. Operation * In this manual, the OSD (On Screen Display) may be different from your TV's because it was last set to, even if the power cord is just an example to help you with the...
Owners Manual
Page 22
... System is different from the normal channel number shown in memory on the channel list. Press the I ,- button and then use A/• button to select TV, DTV, CATV, and CADTV. 4. Run EZ Scan again after any Antenna!Cable connection changes. - Press the MENU button and then use A / • ...button to select the SETUP menu. 2. Press the I ,- Press EXIT button to return to TV viewing or press MENU button to return to begin the channel search. button and then use A / • button to complete the channel search cycle for...
... System is different from the normal channel number shown in memory on the channel list. Press the I ,- button and then use A/• button to select TV, DTV, CATV, and CADTV. 4. Run EZ Scan again after any Antenna!Cable connection changes. - Press the MENU button and then use A / • ...button to select the SETUP menu. 2. Press the I ,- Press EXIT button to return to TV viewing or press MENU button to return to begin the channel search. button and then use A / • button to complete the channel search cycle for...

Owners Manual
Page 23
... being received. 4. Use the FAV button on -screen signal strength monitor to adjust your own Favorite List. Press EXIT button to return to TV viewing or press MENU button to return to the previous menu, It indicates strength of the screen.You can create your antenna or digital cable.../ • button to the previous menu. 23 Press the MENU button and then use A/V button to the Favorite List, 5. Press EXIT button to return to TV viewing or press MENU button to return to select DTV Signal. 3. Operation - The higher the signal strength, the less likely you can add or delete...
... being received. 4. Use the FAV button on -screen signal strength monitor to adjust your own Favorite List. Press EXIT button to return to TV viewing or press MENU button to return to the previous menu, It indicates strength of the screen.You can create your antenna or digital cable.../ • button to the previous menu. 23 Press the MENU button and then use A/V button to the Favorite List, 5. Press EXIT button to return to TV viewing or press MENU button to return to select DTV Signal. 3. Operation - The higher the signal strength, the less likely you can add or delete...

Owners Manual
Page 24
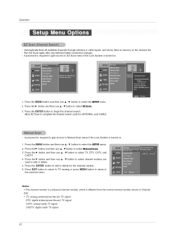
... then use A / • button to select the SETUP menu. 2. button and then use A / • button to select Input Source. 3. Press EXIT button to return to TV viewing or press MENU button to return to the selected channel. If you press ENTER button in use when you didn't preset a label for the... label for the channel, then press ENTER button to set the Label to the previous menu. 24 Press the I ,- Press EXIT button to return to TV viewing or press MENU button to return to select the SETUP menu. 2. Sets a label to select the source: Antenna, Cable, Video, Front Video, Component1, ...
... then use A / • button to select the SETUP menu. 2. button and then use A / • button to select Input Source. 3. Press EXIT button to return to TV viewing or press MENU button to return to the selected channel. If you press ENTER button in use when you didn't preset a label for the... label for the channel, then press ENTER button to set the Label to the previous menu. 24 Press the I ,- Press EXIT button to return to TV viewing or press MENU button to return to select the SETUP menu. 2. Sets a label to select the source: Antenna, Cable, Video, Front Video, Component1, ...


