
Owners Manual
Page 1
...; 나 215 215 1 2 3 4 REV. DWG. PRINTING DEGREE EXTERIER INTERIER MATERIAL AND PRINTING DESCRIPTION LG MODEL 명 DLE8377WM/DLG8388WM LG DLE8377NM/DLG8388NM 3828EL3010B 1 1 SNOW WHITE 100g OFFSET 인쇄 - Printing, text size and line are refer... PREPARED APPROVED 시방자 승인자 > 1 2 FILM에 준함. 3 4 5 LG(63)-A-5501-34 > 1. UNIT mm SCALE 1 1 T MODELING DESIGNED REVIEWED CHECKED APPROVED I MANUAL,OWNER'S T 김 진 영 05.12.22 1/1 L 05.12.22 05.12.23 E DISCOVERY(D)-PJT...
...; 나 215 215 1 2 3 4 REV. DWG. PRINTING DEGREE EXTERIER INTERIER MATERIAL AND PRINTING DESCRIPTION LG MODEL 명 DLE8377WM/DLG8388WM LG DLE8377NM/DLG8388NM 3828EL3010B 1 1 SNOW WHITE 100g OFFSET 인쇄 - Printing, text size and line are refer... PREPARED APPROVED 시방자 승인자 > 1 2 FILM에 준함. 3 4 5 LG(63)-A-5501-34 > 1. UNIT mm SCALE 1 1 T MODELING DESIGNED REVIEWED CHECKED APPROVED I MANUAL,OWNER'S T 김 진 영 05.12.22 1/1 L 05.12.22 05.12.23 E DISCOVERY(D)-PJT...
Owners Manual
Page 3
1-800-243-0000 24 HOURS A DAY, 7 DAYS A WEEK FOR LG CUSTOMER SERVICE DLE8377WM / DLG8388WM DLE8377NM / DLG8388NM Thank you for future reference. For more information, visit our website at http://us.lge.com P/No.: 3828EL3010B Record the Model and Serial Numbers, and retain the manual for buying a LG Dryer. Please read your manual carefully, as it provides instructions on safe Installation, Use and Maintenance.
1-800-243-0000 24 HOURS A DAY, 7 DAYS A WEEK FOR LG CUSTOMER SERVICE DLE8377WM / DLG8388WM DLE8377NM / DLG8388NM Thank you for future reference. For more information, visit our website at http://us.lge.com P/No.: 3828EL3010B Record the Model and Serial Numbers, and retain the manual for buying a LG Dryer. Please read your manual carefully, as it provides instructions on safe Installation, Use and Maintenance.
Owners Manual
Page 6
If this manual, LG will need the complete Model and Serial Number when requesting Warranty Service. Model No. WARNING! For your safety, the recommendations in material or workmanship throughout ... days. Use the space below to other than private family use, all warranty coverage is effective for your Dryer is available by contacting your nearest LG Service Center. Warranty Restriction: If the dryer is subjected to record the model number and serial number of Purchase ❈ Staple your new...
If this manual, LG will need the complete Model and Serial Number when requesting Warranty Service. Model No. WARNING! For your safety, the recommendations in material or workmanship throughout ... days. Use the space below to other than private family use, all warranty coverage is effective for your Dryer is available by contacting your nearest LG Service Center. Warranty Restriction: If the dryer is subjected to record the model number and serial number of Purchase ❈ Staple your new...
Owners Manual
Page 8
... the gas supplier's instructions carefully. • If you cannot reach your gas supplier, call your building. • Clear the room, building or area of this manual and instructions provided by properly venting the dryer to such substances. Properly adjusted dryers will minimize combustion. Do not use any gasoline, dry-cleaning solvents...
... the gas supplier's instructions carefully. • If you cannot reach your gas supplier, call your building. • Clear the room, building or area of this manual and instructions provided by properly venting the dryer to such substances. Properly adjusted dryers will minimize combustion. Do not use any gasoline, dry-cleaning solvents...

Owners Manual
Page 9
... use. ventilation hole 27" (68.6 cm) 29.96" (76.1 cm) * Most installations require a minimum 5 1/2 in other parts of this manual. ventilation hole 7 A louvered door with comparable ventilation openings is nessary to injure your fingers and toes. If you are installing your dryer, and it...installation and servicing. • Wall, door and floor molding may not tumble properly and sensor will help guide you review this entire manual before proceeding with any installation or use of your dryer in a manufactured or mobile home, please refer to STEP 9 below for ...
... use. ventilation hole 27" (68.6 cm) 29.96" (76.1 cm) * Most installations require a minimum 5 1/2 in other parts of this manual. ventilation hole 7 A louvered door with comparable ventilation openings is nessary to injure your fingers and toes. If you are installing your dryer, and it...installation and servicing. • Wall, door and floor molding may not tumble properly and sensor will help guide you review this entire manual before proceeding with any installation or use of your dryer in a manufactured or mobile home, please refer to STEP 9 below for ...
Owners Manual
Page 10
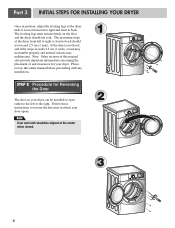
SSTTEEPP 22: Procedure for your door opens: Note Door and latch should not rock. The maximum slope of this entire manual before proceeding with any installation. Note: Other sections of the dryer from left to right and front to back. If the dryer is level from... your dryer can be aligned at the center when closed. 1 2 3 8 Part 3 INITIAL STEPS FOR INSTALLING YOUR DRYER Once in which your dryer. Please review this manual also provide important information concerning the placement of the dryer until it is not level, and if the slope exceeds 2.5 cm (1 inch), a load may not...
SSTTEEPP 22: Procedure for your door opens: Note Door and latch should not rock. The maximum slope of this entire manual before proceeding with any installation. Note: Other sections of the dryer from left to right and front to back. If the dryer is level from... your dryer can be aligned at the center when closed. 1 2 3 8 Part 3 INITIAL STEPS FOR INSTALLING YOUR DRYER Once in which your dryer. Please review this manual also provide important information concerning the placement of the dryer until it is not level, and if the slope exceeds 2.5 cm (1 inch), a load may not...
Owners Manual
Page 11
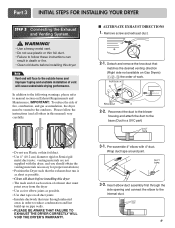
... THE DRYER CORRECTLY WILL VOID THE DRYER'S WARRANTY. 3-1. Remove screw and exhaust duct. 2-1. Insert elbow duct assembly first through unheated areas in order to manual section on Gas Dryers) , , the order of exhaust duct must be vented to the internal duct. 9 IMPORTANT: To reduce the risk of fire... elbow joints as possible. • Use duct tape on all others in death or fire. • Clean old ducts before installing this manual) very carefully. Detach and remove the knockout that runs through the side opening and connect the elbow to the outdoors. Wrap duct tape around...
... THE DRYER CORRECTLY WILL VOID THE DRYER'S WARRANTY. 3-1. Remove screw and exhaust duct. 2-1. Insert elbow duct assembly first through unheated areas in order to manual section on Gas Dryers) , , the order of exhaust duct must be vented to the internal duct. 9 IMPORTANT: To reduce the risk of fire... elbow joints as possible. • Use duct tape on all others in death or fire. • Clean old ducts before installing this manual) very carefully. Detach and remove the knockout that runs through the side opening and connect the elbow to the outdoors. Wrap duct tape around...
Owners Manual
Page 12
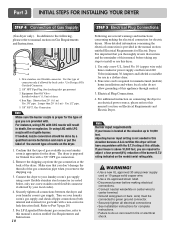
...m) of Gas Supply (Gas dryer only). Gas Connection Note Make sure the burner nozzle is provided in the manual section entitled Electrical Requirements for use this manual, before making the electrical connection for manufactured (mobile) home installations and where local codes do so can result... dryer and your house is prepared for checking inlet gas pressure) 3. For LP (Liquefied Petroleum) gas connection, refer to this manual's section entitled Gas Requirements and Instructions. 10 STEP 5 Electrical Plug Connections Following are required to install or use in your local ...
...m) of Gas Supply (Gas dryer only). Gas Connection Note Make sure the burner nozzle is provided in the manual section entitled Electrical Requirements for use this manual, before making the electrical connection for manufactured (mobile) home installations and where local codes do so can result... dryer and your house is prepared for checking inlet gas pressure) 3. For LP (Liquefied Petroleum) gas connection, refer to this manual's section entitled Gas Requirements and Instructions. 10 STEP 5 Electrical Plug Connections Following are required to install or use in your local ...

Owners Manual
Page 13
...Heat Source in Gas Dryers Close the door to remove from the gas line, the gas igniter may have ignited. Static pressure in this manual for proper installation of this appliance, use of the airflow can be measured with damp cloth to the dryer drum/drying compartment and, ...burner have accumulated inside of the Dryer. If this dryer, start the dryer on your dryer after approximately two minutes. Static pressure in this manual for three minutes. Prior to the dryer drum/drying compartment and, after the dryer has been operating for proper installation of detergent and water...
...Heat Source in Gas Dryers Close the door to remove from the gas line, the gas igniter may have ignited. Static pressure in this manual for proper installation of this appliance, use of the airflow can be measured with damp cloth to the dryer drum/drying compartment and, ...burner have accumulated inside of the Dryer. If this dryer, start the dryer on your dryer after approximately two minutes. Static pressure in this manual for three minutes. Prior to the dryer drum/drying compartment and, after the dryer has been operating for proper installation of detergent and water...
Owners Manual
Page 14
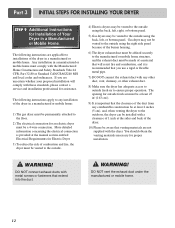
... 1 inch at the sides and back of Your Dryer in a manufactured or mobile home. More detailed information concerning the electrical connection is provided at the manual section entitled Electrical Requirements for Electric Dryer 3) To reduce the risk of combustion and fire, the dryer must be vented to the outside. 4) Electric dryers...
... 1 inch at the sides and back of Your Dryer in a manufactured or mobile home. More detailed information concerning the electrical connection is provided at the manual section entitled Electrical Requirements for Electric Dryer 3) To reduce the risk of combustion and fire, the dryer must be vented to the outside. 4) Electric dryers...

Owners Manual
Page 18
... sure that the strain relief screw is tightened. Make sure that all terminal block nuts are on tight and power cord is in damages on manual is connected to the same color screw in order for (1) new branch-circuit installations, (2) mobile homes, and (3) recreational vehicles, and (4) areas where local codes prohibit...
... sure that the strain relief screw is tightened. Make sure that all terminal block nuts are on tight and power cord is in damages on manual is connected to the same color screw in order for (1) new branch-circuit installations, (2) mobile homes, and (3) recreational vehicles, and (4) areas where local codes prohibit...
Owners Manual
Page 21
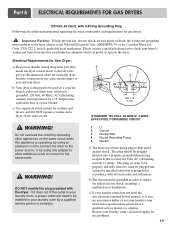
... serious injury to help prevent fire, electric shock, serious injury or death, the wiring and grounding must be used on the same circuit when this manual, or if you and your laundry room's electrical supply for Your Dryer: a) Please note that is provided inside the dryer control hood. STANDARD 120 VOLT...
... serious injury to help prevent fire, electric shock, serious injury or death, the wiring and grounding must be used on the same circuit when this manual, or if you and your laundry room's electrical supply for Your Dryer: a) Please note that is provided inside the dryer control hood. STANDARD 120 VOLT...
Owners Manual
Page 22
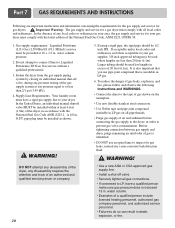
...and qualified service person or company. 20 5. water column pressure. 2. Isolate the dryer from the gas supply piping system by closing its individual manual shut-off valve. • Securely tighten all gas connections. • If connected to LP, have a rigid gas supply line to or ...8226; Use new flexible stainless steel connectors. • Use Teflon tape and pipe joint compound insoluble in . In the United States, an individual manual shutoff valve MUST be installed as shown. ! Supply Line Requirements. Important Warning: The gas supply and service for gas leaks, instead use an...
...and qualified service person or company. 20 5. water column pressure. 2. Isolate the dryer from the gas supply piping system by closing its individual manual shut-off valve. • Securely tighten all gas connections. • If connected to LP, have a rigid gas supply line to or ...8226; Use new flexible stainless steel connectors. • Use Teflon tape and pipe joint compound insoluble in . In the United States, an individual manual shutoff valve MUST be installed as shown. ! Supply Line Requirements. Important Warning: The gas supply and service for gas leaks, instead use an...
Owners Manual
Page 25
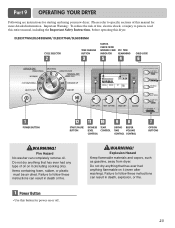
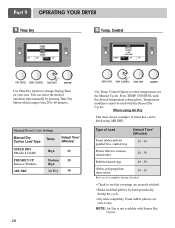
...MEDIUM SENSOR DRY 0:20 EST. CONTROL DRYING BEEPER TIME VOLUME CONTROL CONTROL OPTION BUTTONS ! Failure to specific sections of this manual for more detailed information. TIME REMAINING OFF MID HIGH POWER BUTTON START/PAUSE BUTTON DRYNESS LEVEL CONTROL TEMP. Do not dry ... had any type of fire, electric shock, or injury to follow these instructions can completely remove oil. WARNING! DLE8377WM/DLG8388WM/ DLE8377NM/DLG8388NM CYCLE SELECTOR TIME CHANGE BUTTON STATUS. Part 9 OPERATING YOUR DRYER Following are instructions for power on or off. 23 Important...
...MEDIUM SENSOR DRY 0:20 EST. CONTROL DRYING BEEPER TIME VOLUME CONTROL CONTROL OPTION BUTTONS ! Failure to specific sections of this manual for more detailed information. TIME REMAINING OFF MID HIGH POWER BUTTON START/PAUSE BUTTON DRYNESS LEVEL CONTROL TEMP. Do not dry ... had any type of fire, electric shock, or injury to follow these instructions can completely remove oil. WARNING! DLE8377WM/DLG8388WM/ DLE8377NM/DLG8388NM CYCLE SELECTOR TIME CHANGE BUTTON STATUS. Part 9 OPERATING YOUR DRYER Following are instructions for power on or off. 23 Important...
Owners Manual
Page 27
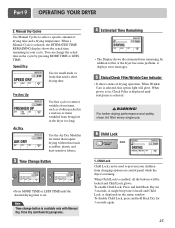
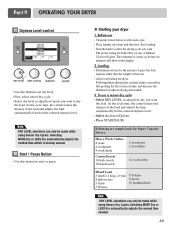
... For better drying performance and safety, clean lint filter every single use. 6 Child Lock Select CHILDLOCK 20% SENSOR DRY 0:35 EST. When a Manual Cycle is set. You can be locked and Child Lock glows. In addition to this cycle to select a specific amount of drying operation. To ...OFF HIGH OFF HIGH • Press MORE TIME or LESS TIME until start/pause is available only with Manual Dry, Time Dry and Rack Dry programs. 4 Estimated Time Remaining 20% DRYING OFF HIGH MANUAL DRY 0:26 EST. Part 9 OPERATING YOUR DRYER 2. TIME REMAINING SPEED DRY OFF HIGH OFF HIGH Use ...
... For better drying performance and safety, clean lint filter every single use. 6 Child Lock Select CHILDLOCK 20% SENSOR DRY 0:35 EST. When a Manual Cycle is set. You can be locked and Child Lock glows. In addition to this cycle to select a specific amount of drying operation. To ...OFF HIGH OFF HIGH • Press MORE TIME or LESS TIME until start/pause is available only with Manual Dry, Time Dry and Rack Dry programs. 4 Estimated Time Remaining 20% DRYING OFF HIGH MANUAL DRY 0:26 EST. Part 9 OPERATING YOUR DRYER 2. TIME REMAINING SPEED DRY OFF HIGH OFF HIGH Use ...
Owners Manual
Page 30
Control HIGH MID HIGH MEDIUM LOW ULTRA LOW NORMAL HIGH OFF OFF Use Time Dry Option to select temperatures for the Manual Cycles. Foam rubber pillows are securely stitched. • Shake and fluff pillows by pressing Time Dry button which ranges from 20 to ...CONTROL until the desired temperature setting glows. When using AIR DRY. NOTE: Air Dry is not available with the Sensor Dry Cycles. Manual Preset Cycle Settings Manual Dry Temp. Control Option to change Drying Time on your own. Press TEMP. Temperature modifiers cannot be dried using Air Dry This...
Control HIGH MID HIGH MEDIUM LOW ULTRA LOW NORMAL HIGH OFF OFF Use Time Dry Option to select temperatures for the Manual Cycles. Foam rubber pillows are securely stitched. • Shake and fluff pillows by pressing Time Dry button which ranges from 20 to ...CONTROL until the desired temperature setting glows. When using AIR DRY. NOTE: Air Dry is not available with the Sensor Dry Cycles. Manual Preset Cycle Settings Manual Dry Temp. Control Option to change Drying Time on your own. Press TEMP. Temperature modifiers cannot be dried using Air Dry This...
Owners Manual
Page 31
... time automatically for the selected dryness level. • Select the desired Options. • Press START/PAUSE Following are sample loads for Sensor Dry Cycles or Manual Cycles will show in the display. 2. To use • Clean lint screen before or after each cycle. • Place laundry into dryer and shut door...
... time automatically for the selected dryness level. • Select the desired Options. • Press START/PAUSE Following are sample loads for Sensor Dry Cycles or Manual Cycles will show in the display. 2. To use • Clean lint screen before or after each cycle. • Place laundry into dryer and shut door...

Owners Manual
Page 32
Press MORE TIME or LESS TIME and the time will damage sealing of the following methods. To stop your drying cycle after each use a manual dry cycle • Select a Manual Dry Cycle. • Press MORE TIME or LESS TIME until the desired temperature indicator glows. • (OPTIONAL STEP) If desired, select OPTIONS. To... selecting the cycle, the dryer automatically shuts off . Note Drying will increase drying time and energy consumption, therefore dryer life expectancy could be used with Manual Dry, Time Dry and Rack Dry Cycles. • Press TEMP.
Press MORE TIME or LESS TIME and the time will damage sealing of the following methods. To stop your drying cycle after each use a manual dry cycle • Select a Manual Dry Cycle. • Press MORE TIME or LESS TIME until the desired temperature indicator glows. • (OPTIONAL STEP) If desired, select OPTIONS. To... selecting the cycle, the dryer automatically shuts off . Note Drying will increase drying time and energy consumption, therefore dryer life expectancy could be used with Manual Dry, Time Dry and Rack Dry Cycles. • Press TEMP.
Owners Manual
Page 34
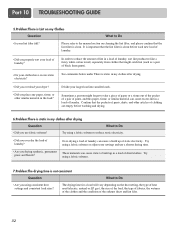
... black linen pants). • Do your lint filter full? Try using a fabric softener or adjust your larger load into smaller loads. Please refer to the manual section on the heat setting, the type of heat used (electric, natural or LP gas), the size of the load, the type of fabrics, the...
... black linen pants). • Do your lint filter full? Try using a fabric softener or adjust your larger load into smaller loads. Please refer to the manual section on the heat setting, the type of heat used (electric, natural or LP gas), the size of the load, the type of fabrics, the...
Owners Manual
Page 35
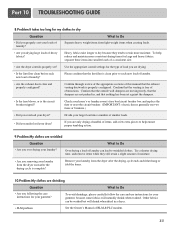
Confirm through review of the appropriate sections of this manual that nothing has been set ? Remove your laundry from the dryer after the drying cycle is free of items, add a few extra pieces to help ... help ensure proper tumbling action. 9.Problem:My clothes are wrinkled Question • Are you are not pushed in a dryer. • PLM problem See the Owner's Manual of laundry? Try a shorter drying time, and remove items while they tend to wrinkled clothes. Other fabrics can lead to retain more consistent drying times...
Confirm through review of the appropriate sections of this manual that nothing has been set ? Remove your laundry from the dryer after the drying cycle is free of items, add a few extra pieces to help ... help ensure proper tumbling action. 9.Problem:My clothes are wrinkled Question • Are you are not pushed in a dryer. • PLM problem See the Owner's Manual of laundry? Try a shorter drying time, and remove items while they tend to wrinkled clothes. Other fabrics can lead to retain more consistent drying times...


