
Owners Manual
Page 3
For more information, visit our website at http://us.lge.com P/No.: 3828EL3010B 1-800-243-0000 24 HOURS A DAY, 7 DAYS A WEEK FOR LG CUSTOMER SERVICE DLE8377WM / DLG8388WM DLE8377NM / DLG8388NM Thank you for future reference. Record the Model and Serial Numbers, and retain the manual for buying a LG Dryer. Please read your manual carefully, as it provides instructions on safe Installation, Use and Maintenance.
For more information, visit our website at http://us.lge.com P/No.: 3828EL3010B 1-800-243-0000 24 HOURS A DAY, 7 DAYS A WEEK FOR LG CUSTOMER SERVICE DLE8377WM / DLG8388WM DLE8377NM / DLG8388NM Thank you for future reference. Record the Model and Serial Numbers, and retain the manual for buying a LG Dryer. Please read your manual carefully, as it provides instructions on safe Installation, Use and Maintenance.
Owners Manual
Page 4
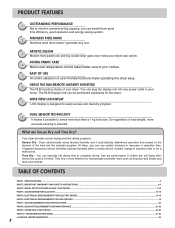
... DRUM Stainless steel drum doesn't generate any power outlet in operation time is ensured. INITIAL STEPS FOR INSTALLING YOUR DRYER ...7-12 PART4. GAS REQUIREMENTS AND INSTRUCTIONS ...20 PART8. TROUBLESHOOTING GUIDE...31-33 LG DRYER LIMITED WARRANTY...34 2 Time Dry : You can plug the display unit into any rust. EXHAUST REQUIREMENTS AND MAINTENANCE ...21...
... DRUM Stainless steel drum doesn't generate any power outlet in operation time is ensured. INITIAL STEPS FOR INSTALLING YOUR DRYER ...7-12 PART4. GAS REQUIREMENTS AND INSTRUCTIONS ...20 PART8. TROUBLESHOOTING GUIDE...31-33 LG DRYER LIMITED WARRANTY...34 2 Time Dry : You can plug the display unit into any rust. EXHAUST REQUIREMENTS AND MAINTENANCE ...21...
Owners Manual
Page 5
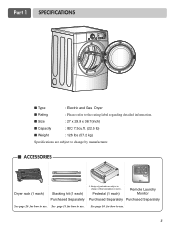
...) I Capacity : IEC 7.3cu.ft. (22.5 lb) I Weight : 126 Ibs (57.2 kg) Specifications are subject to change by manufacturer. Part 1 SPECIFICATIONS I Type : Electric and Gas Dryer I ACCESSORIES Dryer rack (1 each) Stacking kit (1 each ) Remote Laundry Monitor Purchased Separately Purchased Separately See page 26 for how to use. 3 See page 14 for how to...
...) I Capacity : IEC 7.3cu.ft. (22.5 lb) I Weight : 126 Ibs (57.2 kg) Specifications are subject to change by manufacturer. Part 1 SPECIFICATIONS I Type : Electric and Gas Dryer I ACCESSORIES Dryer rack (1 each) Stacking kit (1 each ) Remote Laundry Monitor Purchased Separately Purchased Separately See page 26 for how to use. 3 See page 14 for how to...
Owners Manual
Page 6
... your appliance follow basic precautions, including the following. To reduce the risk of this manual. Date of your Dryer is required. Warranty Service is effective for your new LG dryer. Warranty Restriction: If the dryer is installed and operated per this manual must be followed. If this product is subjected to prevent property damage...
... your appliance follow basic precautions, including the following. To reduce the risk of this manual. Date of your Dryer is required. Warranty Service is effective for your new LG dryer. Warranty Restriction: If the dryer is installed and operated per this manual must be followed. If this product is subjected to prevent property damage...

Owners Manual
Page 7
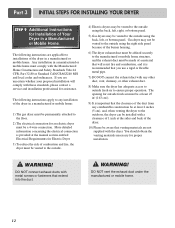
...Check with a qualified electrician or service person if you are in doubt as they give off vapors that is necessary when using your dryer. Do not modify the plug provided with the circuit conductors and connected to play on the appliance. 5 If it will be plugged ...fabric softners or products to eliminate static unless recommended by qualified service personnel. 13) Do not place items exposed to cooking oils in your dryer, please exercise care and follow basic safety precautions, including the following: 1) Read all local codes and ordinances. Items contaminated with controls....
...Check with a qualified electrician or service person if you are in doubt as they give off vapors that is necessary when using your dryer. Do not modify the plug provided with the circuit conductors and connected to play on the appliance. 5 If it will be plugged ...fabric softners or products to eliminate static unless recommended by qualified service personnel. 13) Do not place items exposed to cooking oils in your dryer, please exercise care and follow basic safety precautions, including the following: 1) Read all local codes and ordinances. Items contaminated with controls....
Owners Manual
Page 8
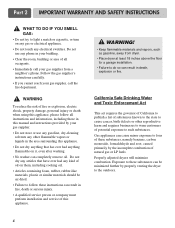
...gasoline, away from a neighbor's phone. Follow the gas supplier's instructions carefully. • If you cannot reach your gas supplier from dryer. • Place dryer at least 18 inches above the floor for a garage installation. • Failure to do so can be air dried. •...when using this appliance, please follow these substances, namely benzene, carbon monoxide, formaldehyde and soot, caused primarily by properly venting the dryer to follow all occupants. • Immediately call your gas supplier, call the fire department. ! Exposure to these substances can result ...
...gasoline, away from a neighbor's phone. Follow the gas supplier's instructions carefully. • If you cannot reach your gas supplier from dryer. • Place dryer at least 18 inches above the floor for a garage installation. • Failure to do so can be air dried. •...when using this appliance, please follow these substances, namely benzene, carbon monoxide, formaldehyde and soot, caused primarily by properly venting the dryer to follow all occupants. • Immediately call your gas supplier, call the fire department. ! Exposure to these substances can result ...

Owners Manual
Page 9
...secured. Please note that every section of this entire manual before proceeding with comparable ventilation openings is nessary to STEP 9 below for your dryer in a manufactured or mobile home, please refer to level with a solid floor for additional instructions. 38.7" (98.3 cm) 49... electrical connections, gas connections, and exhaust requirements are stably placed on the optional pedstal. Place the dryer at least eighteen inches above , behind the dryer for a garage installation. Those required minimum clearances are required above the floor for the exhaust vent ...
...secured. Please note that every section of this entire manual before proceeding with comparable ventilation openings is nessary to STEP 9 below for your dryer in a manufactured or mobile home, please refer to level with a solid floor for additional instructions. 38.7" (98.3 cm) 49... electrical connections, gas connections, and exhaust requirements are stably placed on the optional pedstal. Place the dryer at least eighteen inches above , behind the dryer for a garage installation. Those required minimum clearances are required above the floor for the exhaust vent ...
Owners Manual
Page 10
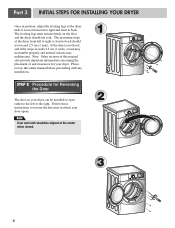
... level from left to right or front to the left to right and front to back. Note: Other sections of the dryer until it is not level, and if the slope exceeds 2.5 cm (1 inch), a load may not tumble properly and internal sensors may malfunction. Follow ... manual before proceeding with any installation. Please review this manual also provide important information concerning the placement of the dryer from left or the right. The leveling legs must remain firmly on your dryer can be aligned at the center when closed. 1 2 3 8 The maximum slope of and clearances for Reversing...
... level from left to right or front to the left to right and front to back. Note: Other sections of the dryer until it is not level, and if the slope exceeds 2.5 cm (1 inch), a load may not tumble properly and internal sensors may malfunction. Follow ... manual before proceeding with any installation. Please review this manual also provide important information concerning the placement of the dryer from left or the right. The leveling legs must remain firmly on your dryer can be aligned at the center when closed. 1 2 3 8 The maximum slope of and clearances for Reversing...
Owners Manual
Page 11
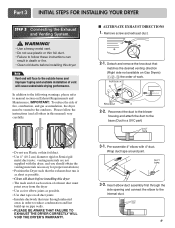
...10.2 cm) diameter rigid or Semi-rigid metal duct (note: venting materials are not supplied with 4" duct. Please follow these instructions can result in this dryer • The male end of each section of work. 2-2. Detach and remove the knockout that the exhaust duct run is as short as possible. •...; Clean old ducts before installing this dryer Note Vent end will face to reduce condensation and lint build-up on all others in death or fire. • Clean old ducts before installing...
...10.2 cm) diameter rigid or Semi-rigid metal duct (note: venting materials are not supplied with 4" duct. Please follow these instructions can result in this dryer • The male end of each section of work. 2-2. Detach and remove the knockout that the exhaust duct run is as short as possible. •...; Clean old ducts before installing this dryer Note Vent end will face to reduce condensation and lint build-up on all others in death or fire. • Clean old ducts before installing...
Owners Manual
Page 12
...qualified service technician and mark or put the label of the current type of nozzle on Electrical Requirements and Electric Dryer. Connect the dryer to your laundry room is above 10,000 feet, you are several warnings and instructions concerning making electrical connections. ..., before taking any problem with . Use 1/2" pipe. 5. 3/8" N.P.T. It is prepared for checking inlet gas pressure) 3. Use only a new U.L. The dryer is important that section and the remainder of this appliance through neutral. 3. Refer to manual section on Gas Requirements and Instructions. 1 2 5 3 4 1....
...qualified service technician and mark or put the label of the current type of nozzle on Electrical Requirements and Electric Dryer. Connect the dryer to your laundry room is above 10,000 feet, you are several warnings and instructions concerning making electrical connections. ..., before taking any problem with . Use 1/2" pipe. 5. 3/8" N.P.T. It is prepared for checking inlet gas pressure) 3. Use only a new U.L. The dryer is important that section and the remainder of this appliance through neutral. 3. Refer to manual section on Gas Requirements and Instructions. 1 2 5 3 4 1....

Owners Manual
Page 13
... for proper installation of the airflow can be warm after reviewing the following parts on the exhaust duct approximately 2 ft. (60.9 cm) from the dryer. After the dryer starts, the igniter will glow red and the main burner will re-attempt gas ignition after completing all steps in Electric... the exhaust duct should be measured by evaluating the static pressure. Warning: If all steps in the exhaust duct can be checked while the dryer is not purged from the inside of detergent and water, with no load. Static pressure in this manual for proper installation of the...
... for proper installation of the airflow can be warm after reviewing the following parts on the exhaust duct approximately 2 ft. (60.9 cm) from the dryer. After the dryer starts, the igniter will glow red and the main burner will re-attempt gas ignition after completing all steps in Electric... the exhaust duct should be measured by evaluating the static pressure. Warning: If all steps in the exhaust duct can be checked while the dryer is not purged from the inside of detergent and water, with no load. Static pressure in this manual for proper installation of the...
Owners Manual
Page 14
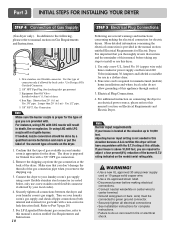
... not be vented to the outside using the back, left, or bottom panel. WARNING! The following instructions apply to any installation of the dryer in a Manufactured or Mobile Home. The opening for outside fresh air must be at least 25 in2 (163 cm2). 9) It is important that ...the clearance of the duct from any other duct, vent, chimney, or other exhaust duct. 8) Make sure the dryer has adequate access to outside using the right side panel because of a material that venting materials are uncertain whether your proposed installation will resist fire...
... not be vented to the outside using the back, left, or bottom panel. WARNING! The following instructions apply to any installation of the dryer in a Manufactured or Mobile Home. The opening for outside fresh air must be at least 25 in2 (163 cm2). 9) It is important that ...the clearance of the duct from any other duct, vent, chimney, or other exhaust duct. 8) Make sure the dryer has adequate access to outside using the right side panel because of a material that venting materials are uncertain whether your proposed installation will resist fire...

Owners Manual
Page 15
...ensure safe and secure installation, please observe the instructions below. ! WARNING! This procedure should be careful not to pinch fingers between the washer and dryer. be performed by 2 or more experienced service personnel. 4 Secure stacking kit side bracket to the side of kit. Stacking kit 1 Place ...paper off the tape from the stacking kit side bracket. 3 Fit the stacking kit side bracket firmly to the washer with a gas dryer in the picture. Incorrect Installation can cause serious accidents. Note If there are some foreign objects on the back of installation makes the ...
...ensure safe and secure installation, please observe the instructions below. ! WARNING! This procedure should be careful not to pinch fingers between the washer and dryer. be performed by 2 or more experienced service personnel. 4 Secure stacking kit side bracket to the side of kit. Stacking kit 1 Place ...paper off the tape from the stacking kit side bracket. 3 Fit the stacking kit side bracket firmly to the washer with a gas dryer in the picture. Incorrect Installation can cause serious accidents. Note If there are some foreign objects on the back of installation makes the ...
Owners Manual
Page 16
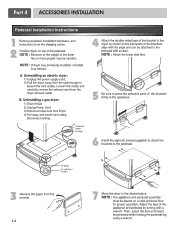
for washer/ combo for dryer 5 6 3 for dryer for washer/ combo 7 14 Part 4 ACCESSORIES INSTALLATION Pedestal Installation Instructions 1 4 2 1) Shut off Gas 2) Unplug Power Cord 3) Disconnect Gas Line from Dryer 4) Pull away and loosen vent clamp. Disconnect venting.
for washer/ combo for dryer 5 6 3 for dryer for washer/ combo 7 14 Part 4 ACCESSORIES INSTALLATION Pedestal Installation Instructions 1 4 2 1) Shut off Gas 2) Unplug Power Cord 3) Disconnect Gas Line from Dryer 4) Pull away and loosen vent clamp. Disconnect venting.

Owners Manual
Page 17
...A.W.G. Sample methods are included in length, use U.L. (Underwriters Laboratories) listed No. 8 A.W.G. d) The power cord (pigtail) connection between wall receptacle and dryer terminal block IS NOT supplied with the circuit conductors and connected to the equipment-grounding terminal or lead on the... metal, permanent wiring system or an equipment-grounding conductor must be fused on both sides of the line). ELECTRICAL SERVICE FOR THE DRYER SHOULD BE OF MAXIMUM RATE VOLTAGE LISTED ON THE NAMEPLATE. Please contact a qualified electrician to check your home's wiring and fuses ...
...A.W.G. Sample methods are included in length, use U.L. (Underwriters Laboratories) listed No. 8 A.W.G. d) The power cord (pigtail) connection between wall receptacle and dryer terminal block IS NOT supplied with the circuit conductors and connected to the equipment-grounding terminal or lead on the... metal, permanent wiring system or an equipment-grounding conductor must be fused on both sides of the line). ELECTRICAL SERVICE FOR THE DRYER SHOULD BE OF MAXIMUM RATE VOLTAGE LISTED ON THE NAMEPLATE. Please contact a qualified electrician to check your home's wiring and fuses ...

Owners Manual
Page 18
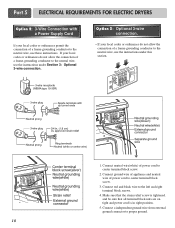
... is available at your home. Connect neutral wire(white) of appliance and connect it to center screw. 4. Part 5 ELECTRICAL REQUIREMENTS FOR ELECTRIC DRYERS Review the following options to center terminal block screw. 2. After cutting 11/2 inch (3.8cm) from end. Wire color indicated on manual is ...facing rightward) and pinch the hook together and screw tightly. 1. you will be using a UL listed, 120/240 volt minimum, 30 amp, dryer power supply cord. 3-wire receptacle (NEMA type10-30R) Use the instructions in block. Connect ground wire(green) of power cord to external ground...
... is available at your home. Connect neutral wire(white) of appliance and connect it to center screw. 4. Part 5 ELECTRICAL REQUIREMENTS FOR ELECTRIC DRYERS Review the following options to center terminal block screw. 2. After cutting 11/2 inch (3.8cm) from end. Wire color indicated on manual is ...facing rightward) and pinch the hook together and screw tightly. 1. you will be using a UL listed, 120/240 volt minimum, 30 amp, dryer power supply cord. 3-wire receptacle (NEMA type10-30R) Use the instructions in block. Connect ground wire(green) of power cord to external ground...

Owners Manual
Page 19
...circuit installations, (2) mobile homes, and (3) recreational vehicles, and (4) areas where local codes prohibit grounding through the neutral conductor is prohibited for dryer to the left and right terminal block screws. 3. Connect neutral wire(white) of a 3 wire connection, or you must use of ... sure that all terminal block nuts are on tight and power cord is in right position. 1. Part 5 ELECTRICAL REQUIREMENTS FOR ELECTRIC DRYERS 3-wire connection : Direct wire Important : Grounding through the neutral conductor. Connect red and black wire to center terminal block screw. ...
...circuit installations, (2) mobile homes, and (3) recreational vehicles, and (4) areas where local codes prohibit grounding through the neutral conductor is prohibited for dryer to the left and right terminal block screws. 3. Connect neutral wire(white) of a 3 wire connection, or you must use of ... sure that all terminal block nuts are on tight and power cord is in right position. 1. Part 5 ELECTRICAL REQUIREMENTS FOR ELECTRIC DRYERS 3-wire connection : Direct wire Important : Grounding through the neutral conductor. Connect red and black wire to center terminal block screw. ...
Owners Manual
Page 20
... not allow the connection of a frame-grounding conductor to the neutral wire, use the instructions under Section 3: Optional 3-wire connection. Part 5 ELECTRICAL REQUIREMENTS FOR ELECTRIC DRYERS Option 2: 3-Wire Connection with a Power Supply Cord lf your local codes or ordinances permit the connection of a frame-grounding conductor to the neutral wire, use...
... not allow the connection of a frame-grounding conductor to the neutral wire, use the instructions under Section 3: Optional 3-wire connection. Part 5 ELECTRICAL REQUIREMENTS FOR ELECTRIC DRYERS Option 2: 3-Wire Connection with a Power Supply Cord lf your local codes or ordinances permit the connection of a frame-grounding conductor to the neutral wire, use...
Owners Manual
Page 21
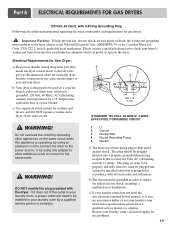
...appliance is designed to help prevent fire, electric shock, serious injury or death, the wiring and grounding must conform to operate the dryer. b) Your dryer is operating, by using any problems. 19 WARNING! The plug should be used on a separate branch, polarized, three-wire, ...adequate electrical power to the latest edition of electric shock, including a malfunction or breakdown. WARNING! Part 6 ELECTRICAL REQUIREMENTS FOR GAS DRYERS 120 Volt, 60 Hertz, with 3-Prong Grounding Plug Following are uncertain whether or not your laundry room meets these specifications, please ...
...appliance is designed to help prevent fire, electric shock, serious injury or death, the wiring and grounding must conform to operate the dryer. b) Your dryer is operating, by using any problems. 19 WARNING! The plug should be used on a separate branch, polarized, three-wire, ...adequate electrical power to the latest edition of electric shock, including a malfunction or breakdown. WARNING! Part 6 ELECTRICAL REQUIREMENTS FOR GAS DRYERS 120 Volt, 60 Hertz, with 3-Prong Grounding Plug Following are uncertain whether or not your laundry room meets these specifications, please ...
Owners Manual
Page 22
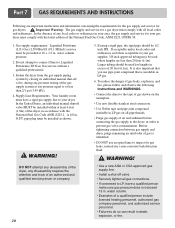
... inch approved tubing may be used where lengths are important instructions and information concerning the requirements for the gas supply and service for gas dryers. ! A 1/8 in death, explosion, or fire. pipe plug must have a qualified person make sure gas pressure does not exceed 13...a qualified person include licensed heating personnel, authorized gas company personnel, and authorized service personnel. • Failure to inspect for a gas dryer must comply with the latest edition of 20 feet (6.1m). In the United States, an individual manual shutoff valve MUST be installed as ...
... inch approved tubing may be used where lengths are important instructions and information concerning the requirements for the gas supply and service for gas dryers. ! A 1/8 in death, explosion, or fire. pipe plug must have a qualified person make sure gas pressure does not exceed 13...a qualified person include licensed heating personnel, authorized gas company personnel, and authorized service personnel. • Failure to inspect for a gas dryer must comply with the latest edition of 20 feet (6.1m). In the United States, an individual manual shutoff valve MUST be installed as ...


