
Owners Manual
Page 1
...; 영 05.12.22 1/1 L 05.12.22 05.12.23 E DISCOVERY(D)-PJT (LCD) LG LG Electronics Inc. DWG. NO. 기호 REVISION DESCRIPTION REF. The part should not contain prohibited substances(Pb,Cd,Hg,Cr+6,PBB,PBDE) and details should comply with...68 SPANISH REMARK LGEUS RELEASING THIS DRAWING WITHOUT PERMISSION LG Electronics SHOULD BE ACCUSED ACCORDING TO THE LAWS AND COMPANY RULES. RELATED DWG. PRINTING DEGREE EXTERIER INTERIER MATERIAL AND PRINTING DESCRIPTION LG MODEL 명 DLE8377WM/DLG8388WM LG DLE8377NM/DLG8388NM 3828EL3010B 1 1 SNOW WHITE 100g OFFSET ...
...; 영 05.12.22 1/1 L 05.12.22 05.12.23 E DISCOVERY(D)-PJT (LCD) LG LG Electronics Inc. DWG. NO. 기호 REVISION DESCRIPTION REF. The part should not contain prohibited substances(Pb,Cd,Hg,Cr+6,PBB,PBDE) and details should comply with...68 SPANISH REMARK LGEUS RELEASING THIS DRAWING WITHOUT PERMISSION LG Electronics SHOULD BE ACCUSED ACCORDING TO THE LAWS AND COMPANY RULES. RELATED DWG. PRINTING DEGREE EXTERIER INTERIER MATERIAL AND PRINTING DESCRIPTION LG MODEL 명 DLE8377WM/DLG8388WM LG DLE8377NM/DLG8388NM 3828EL3010B 1 1 SNOW WHITE 100g OFFSET ...
Owners Manual
Page 5
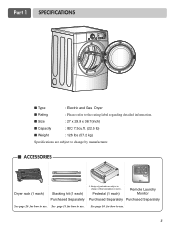
...) I Rating : Please refer to the rating label regarding detailed information. Pedestal (1 each ) Purchased Separately ❊ Design of pedestals are subject to change without manafaturers notice. Part 1 SPECIFICATIONS I Type : Electric and Gas Dryer I Weight : 126 Ibs (57.2 kg) Specifications are subject to change by manufacturer.
...) I Rating : Please refer to the rating label regarding detailed information. Pedestal (1 each ) Purchased Separately ❊ Design of pedestals are subject to change without manafaturers notice. Part 1 SPECIFICATIONS I Type : Electric and Gas Dryer I Weight : 126 Ibs (57.2 kg) Specifications are subject to change by manufacturer.
Owners Manual
Page 6
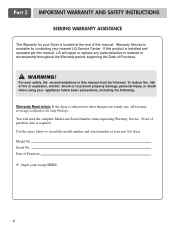
...throughout the Warranty period, beginning the Date of this manual must be followed. Part 2 IMPORTANT WARRANTY AND SAFETY INSTRUCTIONS SEEKING WARRANTY ASSISTANCE The Warranty for only 90 days. Model No. Serial No. For your new LG dryer. Use the space below to record the model number and serial number.... 4 Proof of Purchase ❈ Staple your Dryer is located at the end of Purchase. ! WARNING! You will repair or replace any parts defective in this manual. If this product is subjected to prevent property damage, personal injury, or death when using your nearest...
...throughout the Warranty period, beginning the Date of this manual must be followed. Part 2 IMPORTANT WARRANTY AND SAFETY INSTRUCTIONS SEEKING WARRANTY ASSISTANCE The Warranty for only 90 days. Model No. Serial No. For your new LG dryer. Use the space below to record the model number and serial number.... 4 Proof of Purchase ❈ Staple your Dryer is located at the end of Purchase. ! WARNING! You will repair or replace any parts defective in this manual. If this product is subjected to prevent property damage, personal injury, or death when using your nearest...

Owners Manual
Page 7
... including the following: 1) Read all local codes and ordinances. Items contaminated with controls. 8) Do not repair or replace any part of the appliance or attempt any risk of the fabric softner or product. SAVE THESE INSTRUCTIONS GROUNDING INSTRUCTIONS This appliance must be...appropriate outlet that is moving. 6) Do not install or store this appliance where it will be cleaned periodically by a qualified electrician. Part 2 IMPORTANT WARRANTY AND SAFETY INSTRUCTIONS IMPORTANT SAFETY INSTRUCTIONS ! Close supervision of children is necessary when using the appliance. 2) Do not...
... including the following: 1) Read all local codes and ordinances. Items contaminated with controls. 8) Do not repair or replace any part of the appliance or attempt any risk of the fabric softner or product. SAVE THESE INSTRUCTIONS GROUNDING INSTRUCTIONS This appliance must be...appropriate outlet that is moving. 6) Do not install or store this appliance where it will be cleaned periodically by a qualified electrician. Part 2 IMPORTANT WARRANTY AND SAFETY INSTRUCTIONS IMPORTANT SAFETY INSTRUCTIONS ! Close supervision of children is necessary when using the appliance. 2) Do not...
Owners Manual
Page 8
... potential exposure to such substances. Do not dry any electrical switches. WARNING! • Keep flammable materials and vapors, such as gasoline, away from a neighbor's phone. Part 2 IMPORTANT WARRANTY AND SAFETY INSTRUCTIONS ! Follow the gas supplier's instructions carefully. • If you cannot reach your gas supplier. • Do not store or use...
... potential exposure to such substances. Do not dry any electrical switches. WARNING! • Keep flammable materials and vapors, such as gasoline, away from a neighbor's phone. Part 2 IMPORTANT WARRANTY AND SAFETY INSTRUCTIONS ! Follow the gas supplier's instructions carefully. • If you cannot reach your gas supplier. • Do not store or use...

Owners Manual
Page 9
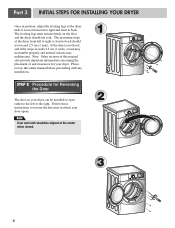
...leveling, please be secured. ventilation hole 7 More detailed instructions concerning electrical connections, gas connections, and exhaust requirements are provided in other parts of this manual provides important information regarding the preparation and use of this manual. ventilation hole 27" (68.6 cm) 29.96"..., and it has the required clearances shown below . Those required minimum clearances are stably placed on the optional pedstal. Part 3 INITIAL STEPS FOR INSTALLING YOUR DRYER The following instructions in mind when installing in a closet or recessed area: •...
...leveling, please be secured. ventilation hole 7 More detailed instructions concerning electrical connections, gas connections, and exhaust requirements are provided in other parts of this manual provides important information regarding the preparation and use of this manual. ventilation hole 27" (68.6 cm) 29.96"..., and it has the required clearances shown below . Those required minimum clearances are stably placed on the optional pedstal. Part 3 INITIAL STEPS FOR INSTALLING YOUR DRYER The following instructions in mind when installing in a closet or recessed area: •...
Owners Manual
Page 10
... from left to right or front to back should not exceed 2.5 cm (1 inch). Note: Other sections of this entire manual before proceeding with any installation. Part 3 INITIAL STEPS FOR INSTALLING YOUR DRYER Once in which your door opens: Note Door and latch should be installed to open either to the left...
... from left to right or front to back should not exceed 2.5 cm (1 inch). Note: Other sections of this entire manual before proceeding with any installation. Part 3 INITIAL STEPS FOR INSTALLING YOUR DRYER Once in which your door opens: Note Door and latch should be installed to open either to the left...
Owners Manual
Page 11
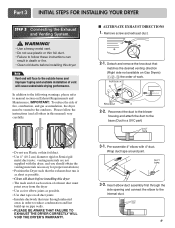
... FAILURE TO EXHAUST THE DRYER CORRECTLY WILL VOID THE DRYER'S WARRANTY. 3-1. Please follow these instructions can result in order to the base.(Duct is a SVC part) • Do not use plastic or thin foil duct. • Failure to follow the instructions (and all others in this dryer • The male end... thin foil duct. • Use 4" (10.2 cm) diameter rigid or Semi-rigid metal duct (note: venting materials are not supplied with 4" duct. I ALTERNATE EXHAUST DIRECTIONS 1. Part 3 INITIAL STEPS FOR INSTALLING YOUR DRYER STEP 3 Connecting the Exhaust and Venting System. !
... FAILURE TO EXHAUST THE DRYER CORRECTLY WILL VOID THE DRYER'S WARRANTY. 3-1. Please follow these instructions can result in order to the base.(Duct is a SVC part) • Do not use plastic or thin foil duct. • Failure to follow the instructions (and all others in this dryer • The male end... thin foil duct. • Use 4" (10.2 cm) diameter rigid or Semi-rigid metal duct (note: venting materials are not supplied with 4" duct. I ALTERNATE EXHAUST DIRECTIONS 1. Part 3 INITIAL STEPS FOR INSTALLING YOUR DRYER STEP 3 Connecting the Exhaust and Venting System. !
Owners Manual
Page 12
... Dryer. For instance, using LNG with the B.T.U rating at this altitude. Remove the shipping cap from the gas connection at the elevation up to Part 7(page 20) 5. Equipment Shut-Off Valve- Shorter than 20' (6.1 m) - If needed in this elevation because A.G.A certifies this dryer. 1. ...as noted below, only use this dryer will not have any steps to this manual's section on Electrical Requirements and Electric Dryer. Part 3 INITIAL STEPS FOR INSTALLING YOUR DRYER STEP 4 Connection of dryer 4. Gas Connection Note Make sure the burner nozzle is appropriate for...
... Dryer. For instance, using LNG with the B.T.U rating at this altitude. Remove the shipping cap from the gas connection at the elevation up to Part 7(page 20) 5. Equipment Shut-Off Valve- Shorter than 20' (6.1 m) - If needed in this elevation because A.G.A certifies this dryer. 1. ...as noted below, only use this dryer will not have any steps to this manual's section on Electrical Requirements and Electric Dryer. Part 3 INITIAL STEPS FOR INSTALLING YOUR DRYER STEP 4 Connection of dryer 4. Gas Connection Note Make sure the burner nozzle is appropriate for...

Owners Manual
Page 13
...Static pressure M1anometer E2xhaust Duct MAXIMUM STATIC PRESSURE IN WATER COLUMN 0.6 inche (1.5 cm) 11 Warning: If all air is running with no load. Part 3 INITIAL STEPS FOR INSTALLING YOUR DRYER STEP 6 Preparation of this happens, the igniter will ignite. Plug-in Electric Dryers Close the door to ...in this manual for three minutes. The dryer should be measured with damp cloth to the dryer drum/drying compartment and, after reviewing the following parts on a heat setting. If this dryer, start the dryer on the exhaust duct approximately 2 ft. (60.9 cm) from the inside of ...
...Static pressure M1anometer E2xhaust Duct MAXIMUM STATIC PRESSURE IN WATER COLUMN 0.6 inche (1.5 cm) 11 Warning: If all air is running with no load. Part 3 INITIAL STEPS FOR INSTALLING YOUR DRYER STEP 6 Preparation of this happens, the igniter will ignite. Plug-in Electric Dryers Close the door to ...in this manual for three minutes. The dryer should be measured with damp cloth to the dryer drum/drying compartment and, after reviewing the following parts on a heat setting. If this dryer, start the dryer on the exhaust duct approximately 2 ft. (60.9 cm) from the inside of ...
Owners Manual
Page 14
... ensure proper operation. DO NOT connect exhaust ducts with the Manufactured Home Construction and Safety Standards Title 24 CFR, Part 32-80 or Standard CAN/CSA0Z240 MH and local codes and ordinances. Part 3 INITIAL STEPS FOR INSTALLING YOUR DRYER STEP 9 Additional Instructions for Installation of the dryer in a manufactured or mobile home...
... ensure proper operation. DO NOT connect exhaust ducts with the Manufactured Home Construction and Safety Standards Title 24 CFR, Part 32-80 or Standard CAN/CSA0Z240 MH and local codes and ordinances. Part 3 INITIAL STEPS FOR INSTALLING YOUR DRYER STEP 9 Additional Instructions for Installation of the dryer in a manufactured or mobile home...

Owners Manual
Page 15
Part 4 ACCESSORIES INSTALLATION Stacking Kit Installation Instructions To ensure safe and secure installation, please observe the instructions below. ! Slide dryer slowly backwards to the stopper of ...
Part 4 ACCESSORIES INSTALLATION Stacking Kit Installation Instructions To ensure safe and secure installation, please observe the instructions below. ! Slide dryer slowly backwards to the stopper of ...
Owners Manual
Page 16
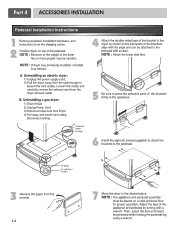
Disconnect venting. for washer/ combo for dryer 5 6 3 for dryer for washer/ combo 7 14 Part 4 ACCESSORIES INSTALLATION Pedestal Installation Instructions 1 4 2 1) Shut off Gas 2) Unplug Power Cord 3) Disconnect Gas Line from Dryer 4) Pull away and loosen vent clamp.
Disconnect venting. for washer/ combo for dryer 5 6 3 for dryer for washer/ combo 7 14 Part 4 ACCESSORIES INSTALLATION Pedestal Installation Instructions 1 4 2 1) Shut off Gas 2) Unplug Power Cord 3) Disconnect Gas Line from Dryer 4) Pull away and loosen vent clamp.

Owners Manual
Page 17
.... wire (copper wire only), or as required by local codes. ELECTRICAL SERVICE FOR THE DRYER SHOULD BE OF MAXIMUM RATE VOLTAGE LISTED ON THE NAMEPLATE. Part 5 ELECTRICAL REQUIREMENTS FOR ELECTRIC DRYERS Following are additional instructions regarding electrical connections and requirements for field installation in wiring so dryer can be moved from...
.... wire (copper wire only), or as required by local codes. ELECTRICAL SERVICE FOR THE DRYER SHOULD BE OF MAXIMUM RATE VOLTAGE LISTED ON THE NAMEPLATE. Part 5 ELECTRICAL REQUIREMENTS FOR ELECTRIC DRYERS Following are additional instructions regarding electrical connections and requirements for field installation in wiring so dryer can be moved from...

Owners Manual
Page 18
... (3.8cm) from end. Colored wire should be connecting to a fused disconnect or circuit breaker box Note • Screw power supply wire to the terminal block. Part 5 ELECTRICAL REQUIREMENTS FOR ELECTRIC DRYERS Review the following options to determine the appropriate electrical connection for your home: 4-wire receptacle (NEMA type14-30R) Use the...
... (3.8cm) from end. Colored wire should be connecting to a fused disconnect or circuit breaker box Note • Screw power supply wire to the terminal block. Part 5 ELECTRICAL REQUIREMENTS FOR ELECTRIC DRYERS Review the following options to determine the appropriate electrical connection for your home: 4-wire receptacle (NEMA type14-30R) Use the...

Owners Manual
Page 19
... in order for (1) new branch-circuit installations, (2) mobile homes, and (3) recreational vehicles, and (4) areas where local codes prohibit grounding through the neutral conductor is tightened. Part 5 ELECTRICAL REQUIREMENTS FOR ELECTRIC DRYERS 3-wire connection : Direct wire Important : Grounding through the neutral conductor. Make sure that all terminal block nuts are installing your...
... in order for (1) new branch-circuit installations, (2) mobile homes, and (3) recreational vehicles, and (4) areas where local codes prohibit grounding through the neutral conductor is tightened. Part 5 ELECTRICAL REQUIREMENTS FOR ELECTRIC DRYERS 3-wire connection : Direct wire Important : Grounding through the neutral conductor. Make sure that all terminal block nuts are installing your...
Owners Manual
Page 20
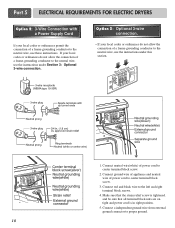
Make sure that all terminal block nuts are on tight and power cord is tightened. Part 5 ELECTRICAL REQUIREMENTS FOR ELECTRIC DRYERS Option 2: 3-Wire Connection with a Power Supply Cord lf your local codes or ordinances permit the connection of power cord to ...
Make sure that all terminal block nuts are on tight and power cord is tightened. Part 5 ELECTRICAL REQUIREMENTS FOR ELECTRIC DRYERS Option 2: 3-Wire Connection with a Power Supply Cord lf your local codes or ordinances permit the connection of power cord to ...
Owners Manual
Page 21
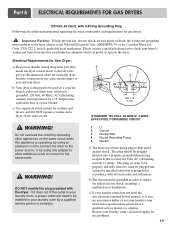
... home has adequate electrical power to be plugged into a properly grounded three-prong receptacle that the wiring diagram is grounded in accordance with the dryer. Part 6 ELECTRICAL REQUIREMENTS FOR GAS DRYERS 120 Volt, 60 Hertz, with 3-Prong Grounding Plug Following are uncertain whether or not your laundry room meets these specifications...
... home has adequate electrical power to be plugged into a properly grounded three-prong receptacle that the wiring diagram is grounded in accordance with the dryer. Part 6 ELECTRICAL REQUIREMENTS FOR GAS DRYERS 120 Volt, 60 Hertz, with 3-Prong Grounding Plug Following are uncertain whether or not your laundry room meets these specifications...
Owners Manual
Page 22
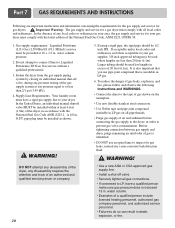
... contamination. If using a rigid pipe, the rigid pipe should be provided at test pressure equal to Liquified Petroleum (LP Gas) Gas service without a qualified professional. 3. Part 7 GAS REQUIREMENTS AND INSTRUCTIONS Following are less than 2/1 psi (3.45 kPa). 4. Important Warning: The gas supply and service for gas dryers. ! A 1/8 in your area, the...
... contamination. If using a rigid pipe, the rigid pipe should be provided at test pressure equal to Liquified Petroleum (LP Gas) Gas service without a qualified professional. 3. Part 7 GAS REQUIREMENTS AND INSTRUCTIONS Following are less than 2/1 psi (3.45 kPa). 4. Important Warning: The gas supply and service for gas dryers. ! A 1/8 in your area, the...

Owners Manual
Page 23
... to make a connection with hinged dampers to prevent back-draft when the dryer is not recommended to clean any old ducts before installing your dryer. ! Part 8 EXHAUST REQUIREMENTS AND MAINTENANCE Following are not provided with plastic or thin foil ducting. Venting materials are important instructions and information concerning the exhaust requirements...
... to make a connection with hinged dampers to prevent back-draft when the dryer is not recommended to clean any old ducts before installing your dryer. ! Part 8 EXHAUST REQUIREMENTS AND MAINTENANCE Following are not provided with plastic or thin foil ducting. Venting materials are important instructions and information concerning the exhaust requirements...


