
Owners Manual
Page 4
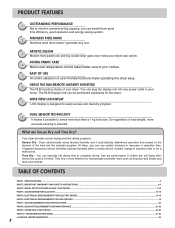
... power outlet in operation time is designed to sense even less than a 1 kg load size. TABLE OF CONTENTS PART1. SPECIFICATIONS ...3 PART2. ACCESSORIES INSTALLATION ...13-14 PART5. ELECTRICAL REQUIREMENTS FOR GAS DRYERS...19 PART7. TROUBLESHOOTING GUIDE...31-33 LG DRYER LIMITED WARRANTY...34 2 PRODUCT FEATURES 1 OUTSTANDING PERFORMANCE Not to mention unmatched big capacity, you can be purchased separately for heavyweight and bulky items such as king-size bed sheets and thick work clothes. USING...
... power outlet in operation time is designed to sense even less than a 1 kg load size. TABLE OF CONTENTS PART1. SPECIFICATIONS ...3 PART2. ACCESSORIES INSTALLATION ...13-14 PART5. ELECTRICAL REQUIREMENTS FOR GAS DRYERS...19 PART7. TROUBLESHOOTING GUIDE...31-33 LG DRYER LIMITED WARRANTY...34 2 PRODUCT FEATURES 1 OUTSTANDING PERFORMANCE Not to mention unmatched big capacity, you can be purchased separately for heavyweight and bulky items such as king-size bed sheets and thick work clothes. USING...
Owners Manual
Page 6
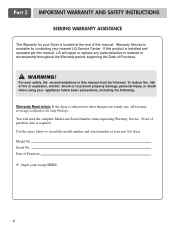
... new LG dryer. Date of your receipt HERE. 4 Proof of Purchase. ! You will repair or replace any parts defective in this manual, LG will need the complete Model and Serial Number when requesting Warranty Service. Warranty Service is installed and operated per this manual must be followed. If this manual. Use the space below to prevent property damage, personal injury, or death when using your nearest LG Service Center. Part 2 IMPORTANT WARRANTY AND SAFETY INSTRUCTIONS SEEKING WARRANTY...
... new LG dryer. Date of your receipt HERE. 4 Proof of Purchase. ! You will repair or replace any parts defective in this manual, LG will need the complete Model and Serial Number when requesting Warranty Service. Warranty Service is installed and operated per this manual must be followed. If this manual. Use the space below to prevent property damage, personal injury, or death when using your nearest LG Service Center. Part 2 IMPORTANT WARRANTY AND SAFETY INSTRUCTIONS SEEKING WARRANTY...

Owners Manual
Page 7
... and exhaust duct should be cleaned periodically by a qualified electrician. This appliance is properly installed and grounded in the appliance. The plug must be run with the circuit conductors and connected to cooking oils in doubt as they give off vapors that is equipped with controls. 8) Do not repair or replace any part of the appliance or attempt any risk of electric shock...
... and exhaust duct should be cleaned periodically by a qualified electrician. This appliance is properly installed and grounded in the appliance. The plug must be run with the circuit conductors and connected to cooking oils in doubt as they give off vapors that is equipped with controls. 8) Do not repair or replace any part of the appliance or attempt any risk of electric shock...
Owners Manual
Page 8
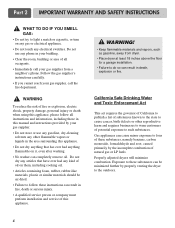
Follow the gas supplier's instructions carefully. • If you cannot reach your gas supplier from dryer. • Place dryer at least 18 inches above the floor for a garage installation. • Failure to follow all occupants. • Immediately call your gas supplier, call the fire department. ! Part 2 IMPORTANT WARRANTY AND SAFETY INSTRUCTIONS ! Do not use any gasoline, dry-cleaning solvents any other reproductive harm and requires businesses...
Follow the gas supplier's instructions carefully. • If you cannot reach your gas supplier from dryer. • Place dryer at least 18 inches above the floor for a garage installation. • Failure to follow all occupants. • Immediately call your gas supplier, call the fire department. ! Part 2 IMPORTANT WARRANTY AND SAFETY INSTRUCTIONS ! Do not use any gasoline, dry-cleaning solvents any other reproductive harm and requires businesses...
Owners Manual
Page 12
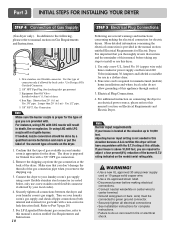
... is important that the type of Gas Supply (Gas dryer only). Electrical Plug Connections. 4. Adjusting burner input setting is not needed , nozzle conversion should be connected to green ground connector. • Securely tighten all electrical connections • See installation instructions for complete instructions. • Failure to adjust a four percent(4%) reduction of the burner B.T.U rating indicated on the model/serial rating plate. ! Part 3 INITIAL STEPS FOR INSTALLING YOUR DRYER STEP 4 Connection of gas available in your laundry...
... is important that the type of Gas Supply (Gas dryer only). Electrical Plug Connections. 4. Adjusting burner input setting is not needed , nozzle conversion should be connected to green ground connector. • Securely tighten all electrical connections • See installation instructions for complete instructions. • Failure to adjust a four percent(4%) reduction of the burner B.T.U rating indicated on the model/serial rating plate. ! Part 3 INITIAL STEPS FOR INSTALLING YOUR DRYER STEP 4 Connection of gas available in your laundry...

Owners Manual
Page 13
STEP 7 Confirming Heat Source Operation. Confirming Heat Source in Gas Dryers Close the door to the dryer drum/drying compartment and, after completing all steps in this manual for proper installation of this dryer, start the dryer on a heat setting. Effective dryer operation requires appropriate dryer airflow. If this dryer, start the dryer on a heat setting. Confirming Heat Source in Electric Dryers Close the door to the dryer drum/drying compartment and, after completing all steps in the exhaust duct should be warm after the...
STEP 7 Confirming Heat Source Operation. Confirming Heat Source in Gas Dryers Close the door to the dryer drum/drying compartment and, after completing all steps in this manual for proper installation of this dryer, start the dryer on a heat setting. Effective dryer operation requires appropriate dryer airflow. If this dryer, start the dryer on a heat setting. Confirming Heat Source in Electric Dryers Close the door to the dryer drum/drying compartment and, after completing all steps in the exhaust duct should be warm after the...
Owners Manual
Page 14
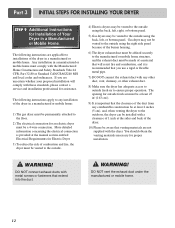
... the electrical connection is provided at the manual section entitled Electrical Requirements for Electric Dryer 3) To reduce the risk of the burner housing. 6) The dryer exhaust duct must be affixed securely to outside . 4) Electric dryers may be a 4-wire connection. The following instructions apply to any installation of the dryer in a manufactured or mobile home: 1) The gas dryer must be permanently attached to the floor. 2) The electrical connection for an electric dryer must be vented...
... the electrical connection is provided at the manual section entitled Electrical Requirements for Electric Dryer 3) To reduce the risk of the burner housing. 6) The dryer exhaust duct must be affixed securely to outside . 4) Electric dryers may be a 4-wire connection. The following instructions apply to any installation of the dryer in a manufactured or mobile home: 1) The gas dryer must be permanently attached to the floor. 2) The electrical connection for an electric dryer must be vented...

Owners Manual
Page 17
... local codes. wire (copper wire only), or as required by which are to be fused on the following pages. 15 c) If branch circuit to dryer is optional and subject to electrical service of different voltage than that your home has adequate electrical power to operate the dryer. 120V/ 240V, 60 Hertz, 3-Wire Installation Instructions for field installation in wiring so dryer can be run with the circuit conductors and connected to local codes...
... local codes. wire (copper wire only), or as required by which are to be fused on the following pages. 15 c) If branch circuit to dryer is optional and subject to electrical service of different voltage than that your home has adequate electrical power to operate the dryer. 120V/ 240V, 60 Hertz, 3-Wire Installation Instructions for field installation in wiring so dryer can be run with the circuit conductors and connected to local codes...
Owners Manual
Page 20
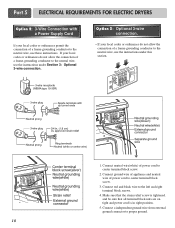
... power cord is tightened. Connect ground wire of appliance and neutral wire of power cord to center terminal block screw. 2. and be sure that the strain relief screw is in right position. 5. Connect neutral wire(white) of power cord to center terminal block screw. 3. Part 5 ELECTRICAL REQUIREMENTS FOR ELECTRIC DRYERS Option 2: 3-Wire Connection with a Power Supply Cord lf your local codes or ordinances permit the connection of a frame-grounding conductor to the neutral wire, use the instructions under Section 3: Optional 3-wire connection...
... power cord is tightened. Connect ground wire of appliance and neutral wire of power cord to center terminal block screw. 2. and be sure that the strain relief screw is in right position. 5. Connect neutral wire(white) of power cord to center terminal block screw. 3. Part 5 ELECTRICAL REQUIREMENTS FOR ELECTRIC DRYERS Option 2: 3-Wire Connection with a Power Supply Cord lf your local codes or ordinances permit the connection of a frame-grounding conductor to the neutral wire, use the instructions under Section 3: Optional 3-wire connection...
Owners Manual
Page 21
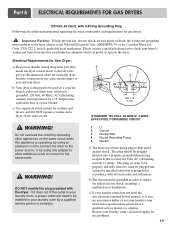
... death, the wiring and grounding must be used on the same circuit when this manual, or if you and your laundry room does not meet the specifications required by a 15 Ampere fuse, equivalent fuse or circuit breaker. Review your laundry room's electrical supply for washers and dryers, and DO NOT operate a washer and a dryer on the same circuit. ! Part 6 ELECTRICAL REQUIREMENTS FOR GAS DRYERS 120 Volt, 60 Hertz, with 3-Prong Grounding Plug Following are uncertain...
... death, the wiring and grounding must be used on the same circuit when this manual, or if you and your laundry room does not meet the specifications required by a 15 Ampere fuse, equivalent fuse or circuit breaker. Review your laundry room's electrical supply for washers and dryers, and DO NOT operate a washer and a dryer on the same circuit. ! Part 6 ELECTRICAL REQUIREMENTS FOR GAS DRYERS 120 Volt, 60 Hertz, with 3-Prong Grounding Plug Following are uncertain...
Owners Manual
Page 22
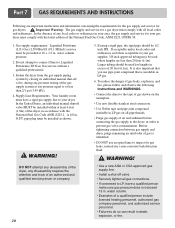
.... • Connect the dryer to the type of the National Fuel Gas Code, ANSI Z223.1/NFPA 54. 1. Part 7 GAS REQUIREMENTS AND INSTRUCTIONS Following are less than 2/1 psi (3.45 kPa). 4. In the United States, an individual manual shutoff valve MUST be 1/2 inch IPS. Larger tubing should be installed within at 10 + 1.5 in LP gas on the nameplate. • Use new flexible stainless steel connectors. • Use Teflon...
.... • Connect the dryer to the type of the National Fuel Gas Code, ANSI Z223.1/NFPA 54. 1. Part 7 GAS REQUIREMENTS AND INSTRUCTIONS Following are less than 2/1 psi (3.45 kPa). 4. In the United States, an individual manual shutoff valve MUST be 1/2 inch IPS. Larger tubing should be installed within at 10 + 1.5 in LP gas on the nameplate. • Use new flexible stainless steel connectors. • Use Teflon...

Owners Manual
Page 23
... inches (10.2 cm) in the chart above recommendations, then a UL-listed flexible metal transition duct may be kept as short as an attic, wall, ceiling, crawl space, chimney, gas vent, or concealed space of this ducting will affect dry time. 4. Part 8 EXHAUST REQUIREMENTS AND MAINTENANCE Following are not provided with the dryer and you should be used between the dryer and and the wall.
... inches (10.2 cm) in the chart above recommendations, then a UL-listed flexible metal transition duct may be kept as short as an attic, wall, ceiling, crawl space, chimney, gas vent, or concealed space of this ducting will affect dry time. 4. Part 8 EXHAUST REQUIREMENTS AND MAINTENANCE Following are not provided with the dryer and you should be used between the dryer and and the wall.

Owners Manual
Page 24
... lint filter can also be used to remove the buildup of the control panel. 9. d) After drying the lint screen with hot water. WARNING! Ordinarily, the dryer drum will need no care. Clean the control panel with a loose lint screen may increase drying times. 2. This Kit comes in your dryer. 22 Cleaning the Lint Screen 1. Some articles of clothing may damage the finish of detergent and fabric softener. Part 8 EXHAUST REQUIREMENTS AND MAINTENANCE Exhaust and Dryer Maintenance ! Wipe the exterior of the dryer in hard to remove lint. Running the dryer with...
... lint filter can also be used to remove the buildup of the control panel. 9. d) After drying the lint screen with hot water. WARNING! Ordinarily, the dryer drum will need no care. Clean the control panel with a loose lint screen may increase drying times. 2. This Kit comes in your dryer. 22 Cleaning the Lint Screen 1. Some articles of clothing may damage the finish of detergent and fabric softener. Part 8 EXHAUST REQUIREMENTS AND MAINTENANCE Exhaust and Dryer Maintenance ! Wipe the exterior of the dryer in hard to remove lint. Running the dryer with...
Owners Manual
Page 25
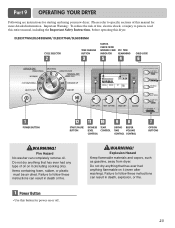
... specific sections of this manual for more detailed information. TIME REMAINING CHILD LOCK 20% NORMAL NORMAL MEDIUM SENSOR DRY 0:20 EST. WARNING! Explosion Hazard Keep flammable materials and vapors, such as gasoline, away from dryer. Failure to person, read this entire manual, including the Important Safety Instructions, before operating this button for starting and using your new dryer. CHECK FILTER WRINKLE CARE INDICATOR EST. TIME REMAINING OFF MID HIGH POWER BUTTON START/PAUSE BUTTON...
... specific sections of this manual for more detailed information. TIME REMAINING CHILD LOCK 20% NORMAL NORMAL MEDIUM SENSOR DRY 0:20 EST. WARNING! Explosion Hazard Keep flammable materials and vapors, such as gasoline, away from dryer. Failure to person, read this entire manual, including the Important Safety Instructions, before operating this button for starting and using your new dryer. CHECK FILTER WRINKLE CARE INDICATOR EST. TIME REMAINING OFF MID HIGH POWER BUTTON START/PAUSE BUTTON...
Owners Manual
Page 27
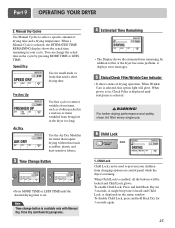
... TIME or LESS TIME until start/pause is set. TIME REMAINING SPEED DRY OFF HIGH OFF HIGH Use for items that need a short drying time. Use the Air Dry Modifier for small loads or loads that require drying without heat such as clothes packed in the cycle by pressing MORE TIME or LESS TIME. You can be locked and Child Lock glows. For better drying performance and safety, clean lint filter every single use. 6 Child Lock Select CHILDLOCK 20% SENSOR DRY 0:35 EST. Part 9 OPERATING YOUR DRYER...
... TIME or LESS TIME until start/pause is set. TIME REMAINING SPEED DRY OFF HIGH OFF HIGH Use for items that need a short drying time. Use the Air Dry Modifier for small loads or loads that require drying without heat such as clothes packed in the cycle by pressing MORE TIME or LESS TIME. You can be locked and Child Lock glows. For better drying performance and safety, clean lint filter every single use. 6 Child Lock Select CHILDLOCK 20% SENSOR DRY 0:35 EST. Part 9 OPERATING YOUR DRYER...
Owners Manual
Page 29
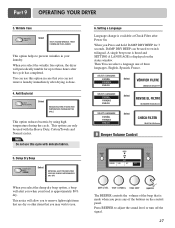
... DRY BEEP for up to three hours after drying is available at Check Filter after Power On When you may wish to remove lightweight items that are dry or other items that is displayed on the control panel. Then You can only be used with delicate fabrics. 5. Part 9 OPERATING YOUR DRYER 3. Wrinkle Care Select HELPS TO AVOID WRINKLES FROM FORMING ON YOUR LAUNDRY. When you select the wrinkle free...
... DRY BEEP for up to three hours after drying is available at Check Filter after Power On When you may wish to remove lightweight items that are dry or other items that is displayed on the control panel. Then You can only be used with delicate fabrics. 5. Part 9 OPERATING YOUR DRYER 3. Wrinkle Care Select HELPS TO AVOID WRINKLES FROM FORMING ON YOUR LAUNDRY. When you select the wrinkle free...

Owners Manual
Page 32
... the dryer Close the door. Part 9 OPERATING YOUR DRYER 4. For more than 10 minutes, the dryer will increase drying time and energy consumption, therefore dryer life expectancy could be used with Manual Dry, Time Dry and Rack Dry Cycles. • Press TEMP. Pausing or restarting To pause the dryer at any time Open the door or press START/PAUSE once. WARNING! Dry thoroughly and replace. Select new cycle settings before use. I Clean the door and its opening . CONTROL until the desired drying time is...
... the dryer Close the door. Part 9 OPERATING YOUR DRYER 4. For more than 10 minutes, the dryer will increase drying time and energy consumption, therefore dryer life expectancy could be used with Manual Dry, Time Dry and Rack Dry Cycles. • Press TEMP. Pausing or restarting To pause the dryer at any time Open the door or press START/PAUSE once. WARNING! Dry thoroughly and replace. Select new cycle settings before use. I Clean the door and its opening . CONTROL until the desired drying time is...
Owners Manual
Page 33
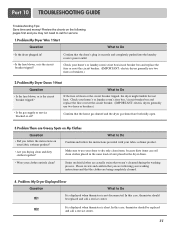
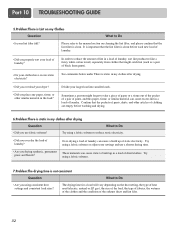
...? Confirm that the clothes are following pages first and you may not need to call for service. 1.Problem:My Dryer Won 't Start Question What to use two fuses or breakers.) • Is the gas supply or service blocked or off? Please review and confirm that you drying clean and dirty clothes together? In this case, thermistor should tE1 be replaced and call a service center. Part 10 TROUBLESHOOTING GUIDE Troubleshooting Tips Save time and money!
...? Confirm that the clothes are following pages first and you may not need to call for service. 1.Problem:My Dryer Won 't Start Question What to use two fuses or breakers.) • Is the gas supply or service blocked or off? Please review and confirm that you drying clean and dirty clothes together? In this case, thermistor should tE1 be replaced and call a service center. Part 10 TROUBLESHOOTING GUIDE Troubleshooting Tips Save time and money!
Owners Manual
Page 34
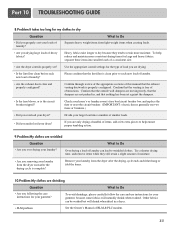
... in a load of the exhaust ducts and lint filer. 32 Sometimes a person might catch lint (such as a pair of laundry. Over-drying a load of laundry can cause excess lint in the load? Part 10 TROUBLESHOOTING GUIDE 5.Problem:There is Lint on cleaning the lint filter, and please confirm that the lint filter is clean. The drying time for a load will vary depending on the heat setting, the type of heat used (electric, natural or LP gas), the size of the load, the type of...
... in a load of the exhaust ducts and lint filer. 32 Sometimes a person might catch lint (such as a pair of laundry. Over-drying a load of laundry can cause excess lint in the load? Part 10 TROUBLESHOOTING GUIDE 5.Problem:There is Lint on cleaning the lint filter, and please confirm that the lint filter is clean. The drying time for a load will vary depending on the heat setting, the type of heat used (electric, natural or LP gas), the size of the load, the type of...
Owners Manual
Page 35
.... 9.Problem:My clothes are not pushed in a dryer. • PLM problem See the Owner's Manual of RLM & PLC modem. 33 Please confirm that the venting is properly configured. Check your home's or laundry room's fuse box/circuit breaker box and replace the fuse or reset the circuit breaker. (IMPORTANT: electric dryers generally use instructions for your garment? Use the appropriate control settings for large and heavy fabrics, separate these items into a number of smaller loads. •...
.... 9.Problem:My clothes are not pushed in a dryer. • PLM problem See the Owner's Manual of RLM & PLC modem. 33 Please confirm that the venting is properly configured. Check your home's or laundry room's fuse box/circuit breaker box and replace the fuse or reset the circuit breaker. (IMPORTANT: electric dryers generally use instructions for your garment? Use the appropriate control settings for large and heavy fabrics, separate these items into a number of smaller loads. •...


