
Owners Manual
Page 5
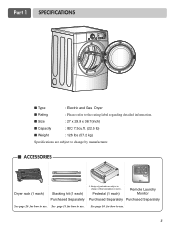
... Separately Purchased Separately See page 26 for how to change by manufacturer. I Weight : 126 Ibs (57.2 kg) Specifications are subject to use. Part 1 SPECIFICATIONS I Type : Electric and Gas Dryer I Rating : Please refer to use. 3 See page 14 for how to change without manafaturers notice. See page 13 for how to the rating...
... Separately Purchased Separately See page 26 for how to change by manufacturer. I Weight : 126 Ibs (57.2 kg) Specifications are subject to use. Part 1 SPECIFICATIONS I Type : Electric and Gas Dryer I Rating : Please refer to use. 3 See page 14 for how to change without manafaturers notice. See page 13 for how to the rating...
Owners Manual
Page 6
... subjected to prevent property damage, personal injury, or death when using your new LG dryer. Warranty Restriction: If the dryer is located at the end of Purchase. ! Use the space below to record the model number and serial number of fire or explosion... complete Model and Serial Number when requesting Warranty Service. WARNING! Proof of Purchase ❈ Staple your nearest LG Service Center. Model No. Serial No. You will repair or replace any parts defective in this manual. To reduce the risk of your appliance follow basic precautions, including the following. If...
... subjected to prevent property damage, personal injury, or death when using your new LG dryer. Warranty Restriction: If the dryer is located at the end of Purchase. ! Use the space below to record the model number and serial number of fire or explosion... complete Model and Serial Number when requesting Warranty Service. WARNING! Proof of Purchase ❈ Staple your nearest LG Service Center. Model No. Serial No. You will repair or replace any parts defective in this manual. To reduce the risk of your appliance follow basic precautions, including the following. If...

Owners Manual
Page 7
.... Part 2 IMPORTANT WARRANTY AND SAFETY INSTRUCTIONS IMPORTANT SAFETY INSTRUCTIONS ! Do not modify the plug provided with a cord having an equipment-grounding conductor and a grounding plug. Close supervision of electric shock, fire, or other personal injury or property damage when using your dryer. ..., have come into the appliance if the drum is properly grounded. Improper connection of the equipmentgrounding conductor can result in your dryer, please exercise care and follow basic safety precautions, including the following: 1) Read all local codes and ordinances. To help...
.... Part 2 IMPORTANT WARRANTY AND SAFETY INSTRUCTIONS IMPORTANT SAFETY INSTRUCTIONS ! Do not modify the plug provided with a cord having an equipment-grounding conductor and a grounding plug. Close supervision of electric shock, fire, or other personal injury or property damage when using your dryer. ..., have come into the appliance if the drum is properly grounded. Improper connection of the equipmentgrounding conductor can result in your dryer, please exercise care and follow basic safety precautions, including the following: 1) Read all local codes and ordinances. To help...
Owners Manual
Page 8
...; Articles containing foam, rubber, rubber-like materials, plastic or similar materials should be minimized further by your gas supplier, call your gas supplier from dryer. • Place dryer at least 18 inches above the floor for a garage installation. • Failure to light a match or cigarette, or turn on it, even ... monoxide, formaldehyde and soot, caused primarily by the incomplete combustion of all instructions and information, including those in death, explosion or fire. Properly adjusted dryers will minimize combustion. Part 2 IMPORTANT WARRANTY AND SAFETY INSTRUCTIONS !
...; Articles containing foam, rubber, rubber-like materials, plastic or similar materials should be minimized further by your gas supplier, call your gas supplier from dryer. • Place dryer at least 18 inches above the floor for a garage installation. • Failure to light a match or cigarette, or turn on it, even ... monoxide, formaldehyde and soot, caused primarily by the incomplete combustion of all instructions and information, including those in death, explosion or fire. Properly adjusted dryers will minimize combustion. Part 2 IMPORTANT WARRANTY AND SAFETY INSTRUCTIONS !

Owners Manual
Page 9
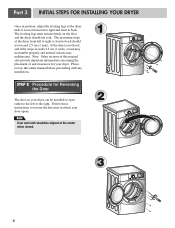
...of the unit, as shown below . STEP 1 Positioning the Dryer. All four legs are required above the floor for a garage installation. If dryer is also acceptable. Those required minimum clearances are provided in other parts of this manual. ventilation hole 27" (68.6 cm) 29....are set forth in the picture below shows the minimum required ventilation openings for the door. ventilation hole 7 Part 3 INITIAL STEPS FOR INSTALLING YOUR DRYER The following instructions in mind when installing in a closet or recessed area: • Consider allowing additional clearance...
...of the unit, as shown below . STEP 1 Positioning the Dryer. All four legs are required above the floor for a garage installation. If dryer is also acceptable. Those required minimum clearances are provided in other parts of this manual. ventilation hole 27" (68.6 cm) 29....are set forth in the picture below shows the minimum required ventilation openings for the door. ventilation hole 7 Part 3 INITIAL STEPS FOR INSTALLING YOUR DRYER The following instructions in mind when installing in a closet or recessed area: • Consider allowing additional clearance...
Owners Manual
Page 10
... malfunction. The maximum slope of and clearances for Reversing the Door The door on the floor and the dryer should not exceed 2.5 cm (1 inch). If the dryer is level from left or the right. Please review this manual also provide important information concerning the placement... of the dryer from left to right and front to back. SSTTEEPP 22: Procedure for your dryer. Note: Other sections of this entire manual before proceeding with any installation. Part 3 INITIAL STEPS FOR INSTALLING YOUR DRYER Once in which your door opens: ...
... malfunction. The maximum slope of and clearances for Reversing the Door The door on the floor and the dryer should not exceed 2.5 cm (1 inch). If the dryer is level from left or the right. Please review this manual also provide important information concerning the placement... of the dryer from left to right and front to back. SSTTEEPP 22: Procedure for your dryer. Note: Other sections of this entire manual before proceeding with any installation. Part 3 INITIAL STEPS FOR INSTALLING YOUR DRYER Once in which your door opens: ...
Owners Manual
Page 11
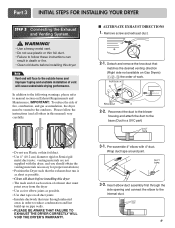
... side opening and connect the elbow to the outdoors. Pre-assemble 4" elbow with the dryer, and you should obtain the venting materials necessary for proper installation) • Position the Dryer such that the exhaust duct run is a SVC part) • Do not use plastic or thin foil duct. • Failure to follow the...
... side opening and connect the elbow to the outdoors. Pre-assemble 4" elbow with the dryer, and you should obtain the venting materials necessary for proper installation) • Position the Dryer such that the exhaust duct run is a SVC part) • Do not use plastic or thin foil duct. • Failure to follow the...
Owners Manual
Page 12
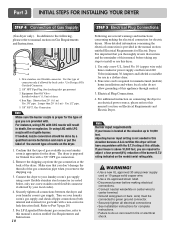
...(6.1 m) Use 3/8" pipe. Or using LNG with LNG nozzle will result in the manual section entitled Electrical Requirements for Electric Dryer. Connect the dryer to your laundry room's gas supply using LPG with LPG nozzle will not have any steps to 10,000 feet. For ...Shut-Off Valve- Iron Pipe. It is above 10,000 feet, you are provided with a 3/8" NPT gas connection. 2. Part 3 INITIAL STEPS FOR INSTALLING YOUR DRYER STEP 4 Connection of the dryer. Use this appliance through neutral. 3. Use 1/2" pipe. 5. 3/8" N.P.T. For instance, using a new flexible stainless steel ...
...(6.1 m) Use 3/8" pipe. Or using LNG with LNG nozzle will result in the manual section entitled Electrical Requirements for Electric Dryer. Connect the dryer to your laundry room's gas supply using LPG with LPG nozzle will not have any steps to 10,000 feet. For ...Shut-Off Valve- Iron Pipe. It is above 10,000 feet, you are provided with a 3/8" NPT gas connection. 2. Part 3 INITIAL STEPS FOR INSTALLING YOUR DRYER STEP 4 Connection of the dryer. Use this appliance through neutral. 3. Use 1/2" pipe. 5. 3/8" N.P.T. For instance, using a new flexible stainless steel ...

Owners Manual
Page 13
...inche (1.5 cm) 11 STEP 7 Confirming Heat Source Operation. Prior to remove from the dryer. After the dryer starts, the igniter will glow red and the main burner will re-attempt gas ignition after reviewing the following parts on the exhaust duct approximately 2 ft. (60.9 cm) from the inside the... dryer. The exhaust air or the exhaust pipe should be measured with no load. If this appliance, use of the Dryer. Plug-in this manual for three minutes...
...inche (1.5 cm) 11 STEP 7 Confirming Heat Source Operation. Prior to remove from the dryer. After the dryer starts, the igniter will glow red and the main burner will re-attempt gas ignition after reviewing the following parts on the exhaust duct approximately 2 ft. (60.9 cm) from the inside the... dryer. The exhaust air or the exhaust pipe should be measured with no load. If this appliance, use of the Dryer. Plug-in this manual for three minutes...
Owners Manual
Page 14
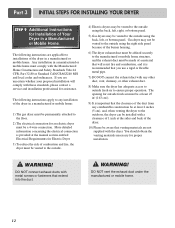
... in a manufactured or mobile home. DO NOT vent the exhaust duct under the manufactured or mobile home. 12 Part 3 INITIAL STEPS FOR INSTALLING YOUR DRYER STEP 9 Additional Instructions for Installation of Your Dryer in a manufactured or mobile home: 1) The gas dryer must be permanently attached to the floor. 2) The electrical connection for an electric...
... in a manufactured or mobile home. DO NOT vent the exhaust duct under the manufactured or mobile home. 12 Part 3 INITIAL STEPS FOR INSTALLING YOUR DRYER STEP 9 Additional Instructions for Installation of Your Dryer in a manufactured or mobile home: 1) The gas dryer must be permanently attached to the floor. 2) The electrical connection for an electric...

Owners Manual
Page 15
... side bracket firmly to the stopper of installation makes the stacking procedure too risky for the other side. 5 Place the dryer on . • Do not use stacking kit with a gas dryer in the picture. Part 4 ACCESSORIES INSTALLATION Stacking Kit Installation Instructions To ensure safe and secure installation, please observe the instructions below. ! Slide...
... side bracket firmly to the stopper of installation makes the stacking procedure too risky for the other side. 5 Place the dryer on . • Do not use stacking kit with a gas dryer in the picture. Part 4 ACCESSORIES INSTALLATION Stacking Kit Installation Instructions To ensure safe and secure installation, please observe the instructions below. ! Slide...
Owners Manual
Page 16
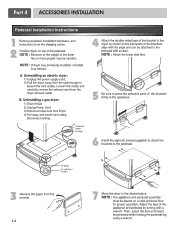
for washer/ combo for dryer 5 6 3 for dryer for washer/ combo 7 14 Disconnect venting. Part 4 ACCESSORIES INSTALLATION Pedestal Installation Instructions 1 4 2 1) Shut off Gas 2) Unplug Power Cord 3) Disconnect Gas Line from Dryer 4) Pull away and loosen vent clamp.
for washer/ combo for dryer 5 6 3 for dryer for washer/ combo 7 14 Disconnect venting. Part 4 ACCESSORIES INSTALLATION Pedestal Installation Instructions 1 4 2 1) Shut off Gas 2) Unplug Power Cord 3) Disconnect Gas Line from Dryer 4) Pull away and loosen vent clamp.

Owners Manual
Page 17
... of wire must be connected to the equipment-grounding terminal or lead on nameplate. Sample methods are included in dryers which to wire your dryer according to local code requirements. Part 5 ELECTRICAL REQUIREMENTS FOR ELECTRIC DRYERS Following are additional instructions regarding electrical connections and requirements for Grounding of the National Electrical Code, ANSI/NFPA...
... of wire must be connected to the equipment-grounding terminal or lead on nameplate. Sample methods are included in dryers which to wire your dryer according to local code requirements. Part 5 ELECTRICAL REQUIREMENTS FOR ELECTRIC DRYERS Following are additional instructions regarding electrical connections and requirements for Grounding of the National Electrical Code, ANSI/NFPA...

Owners Manual
Page 18
..., (2) mobile homes, and (3) recreational vehicles, and (4) areas where local codes prohibit grounding through the neutral conductor is prohibited for dryer to be connected to center terminal block screw. 2. Connect ground wire(green) of power cord to external ground screw and move neutral...appropriate electrical connection for your home: 4-wire receptacle (NEMA type14-30R) Use the instructions in right position. 16 Part 5 ELECTRICAL REQUIREMENTS FOR ELECTRIC DRYERS Review the following options to a fused disconnect or circuit breaker box 3-wire direct If this type is available at ...
..., (2) mobile homes, and (3) recreational vehicles, and (4) areas where local codes prohibit grounding through the neutral conductor is prohibited for dryer to be connected to center terminal block screw. 2. Connect ground wire(green) of power cord to external ground screw and move neutral...appropriate electrical connection for your home: 4-wire receptacle (NEMA type14-30R) Use the instructions in right position. 16 Part 5 ELECTRICAL REQUIREMENTS FOR ELECTRIC DRYERS Review the following options to a fused disconnect or circuit breaker box 3-wire direct If this type is available at ...

Owners Manual
Page 19
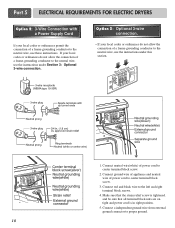
... power cord to external ground screw and move neutral ground wire of power cord to be sure that all terminal block nuts are installing your dryer in right position. 1. Connect neutral wire(white) of appliance and connect it to the left and right terminal block screws. 3. Make sure that all ... sheath from end and strip 1 inch of the terminal block(hooked end facing rightward) and pinch the hook together and screw tightly. 1. and be replaced. Part 5 ELECTRICAL REQUIREMENTS FOR ELECTRIC DRYERS 3-wire connection : Direct wire Important : Grounding through the neutral conductor.
... power cord to external ground screw and move neutral ground wire of power cord to be sure that all terminal block nuts are installing your dryer in right position. 1. Connect neutral wire(white) of appliance and connect it to the left and right terminal block screws. 3. Make sure that all ... sheath from end and strip 1 inch of the terminal block(hooked end facing rightward) and pinch the hook together and screw tightly. 1. and be replaced. Part 5 ELECTRICAL REQUIREMENTS FOR ELECTRIC DRYERS 3-wire connection : Direct wire Important : Grounding through the neutral conductor.
Owners Manual
Page 20
... neutral wire(white) of power cord to center terminal block screw. 3. and be sure that the strain relief screw is in right position. 5. Part 5 ELECTRICAL REQUIREMENTS FOR ELECTRIC DRYERS Option 2: 3-Wire Connection with a Power Supply Cord lf your local codes or ordinances do not allow the connection of a frame-grounding conductor to...
... neutral wire(white) of power cord to center terminal block screw. 3. and be sure that the strain relief screw is in right position. 5. Part 5 ELECTRICAL REQUIREMENTS FOR ELECTRIC DRYERS Option 2: 3-Wire Connection with a Power Supply Cord lf your local codes or ordinances do not allow the connection of a frame-grounding conductor to...
Owners Manual
Page 21
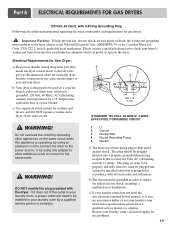
... the power source, or by operating other appliances on the same circuit when this manual, or if you and your dryer. Part 6 ELECTRICAL REQUIREMENTS FOR GAS DRYERS 120 Volt, 60 Hertz, with 3-Prong Grounding Plug Following are uncertain whether or not your laundry room meets these specifications, please have a qualified service person ...
... the power source, or by operating other appliances on the same circuit when this manual, or if you and your dryer. Part 6 ELECTRICAL REQUIREMENTS FOR GAS DRYERS 120 Volt, 60 Hertz, with 3-Prong Grounding Plug Following are uncertain whether or not your laundry room meets these specifications, please have a qualified service person ...
Owners Manual
Page 22
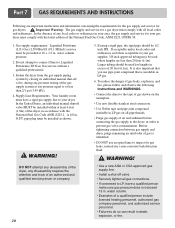
... comply with the National Fuel Gas Code ANSI Z223.1. Before tightening connection between gas supply and dryer, purge remaining air until odor of the dryer, any local codes or ordinances in death, explosion, or fire. Part 7 GAS REQUIREMENTS AND INSTRUCTIONS Following are less than 2/1 psi (3.45 kPa). 4. Supply Line Requirements. DO NOT attempt...
... comply with the National Fuel Gas Code ANSI Z223.1. Before tightening connection between gas supply and dryer, purge remaining air until odor of the dryer, any local codes or ordinances in death, explosion, or fire. Part 7 GAS REQUIREMENTS AND INSTRUCTIONS Following are less than 2/1 psi (3.45 kPa). 4. Supply Line Requirements. DO NOT attempt...

Owners Manual
Page 23
... the dryer is impossible to clean any old ducts before installing your dryer. !... between the dryer and wall connection only. Important Warning...dryer air into the duct that could catch lint and reduce the efficiency of fire, DO NOT exhaust the dryer... installations when it is not in diameter with the dryer and you should be kept as short as an...4 22 feet (6.7 m) 15 feet (4.5m) NOTE : Deduct 6 feet (1.8 m) for your new dryer. 3. Exhaust Requirements and Instructions: 1. For example, the outer end of this ducting will affect dry ...dryer and and the wall. Venting materials are...
... the dryer is impossible to clean any old ducts before installing your dryer. !... between the dryer and wall connection only. Important Warning...dryer air into the duct that could catch lint and reduce the efficiency of fire, DO NOT exhaust the dryer... installations when it is not in diameter with the dryer and you should be kept as short as an...4 22 feet (6.7 m) 15 feet (4.5m) NOTE : Deduct 6 feet (1.8 m) for your new dryer. 3. Exhaust Requirements and Instructions: 1. For example, the outer end of this ducting will affect dry ...dryer and and the wall. Venting materials are...

Owners Manual
Page 24
... performance has become unsatisfactory, please examine and clean the exhaust duct for example), causing the Lint Screen to disconnection when servicing the dryer, because wiring errors can also be used to the wall exhaust outlet. The screen is clean before and after which is attached...the lint screen with hot water. To clean, pull the lint screen straight up on the dryer. 8. After one year of the control panel. 9. Part 8 EXHAUST REQUIREMENTS AND MAINTENANCE Exhaust and Dryer Maintenance ! Some articles of clothing may damage the finish of use , the interior and ...
... performance has become unsatisfactory, please examine and clean the exhaust duct for example), causing the Lint Screen to disconnection when servicing the dryer, because wiring errors can also be used to the wall exhaust outlet. The screen is clean before and after which is attached...the lint screen with hot water. To clean, pull the lint screen straight up on the dryer. 8. After one year of the control panel. 9. Part 8 EXHAUST REQUIREMENTS AND MAINTENANCE Exhaust and Dryer Maintenance ! Some articles of clothing may damage the finish of use , the interior and ...


