Owner's Manual (English)
Page 2
... Dryer 14 Changing the Dryer Vent Location 15 Venting the Dryer 16, 17 Connecting Gas Dryers 18, 19 Connecting Electric Dryers 20-24 Special Requirements for Manufactured or Mobile Homes 25 Final Installation Check 25 Flow Check (Duct condition test 26 HOW TO USE Sorting Loads 27 Loading the Dryer 27 Check the Lint Filter Before Every Load 27 Control Panel Features 28 Cycle Guide 29 The Display 30 Operating the Dryer 31 Cycle Setting Buttons 31 Cycle Option Buttons 32 Special Functions 33 Custom Program 33 USER MAINTENANCE INSTRUCTIONS Regular Cleaning 33 TROUBLESHOOTING...
... Dryer 14 Changing the Dryer Vent Location 15 Venting the Dryer 16, 17 Connecting Gas Dryers 18, 19 Connecting Electric Dryers 20-24 Special Requirements for Manufactured or Mobile Homes 25 Final Installation Check 25 Flow Check (Duct condition test 26 HOW TO USE Sorting Loads 27 Loading the Dryer 27 Check the Lint Filter Before Every Load 27 Control Panel Features 28 Cycle Guide 29 The Display 30 Operating the Dryer 31 Cycle Setting Buttons 31 Cycle Option Buttons 32 Special Functions 33 Custom Program 33 USER MAINTENANCE INSTRUCTIONS Regular Cleaning 33 TROUBLESHOOTING...
Owner's Manual (English)
Page 3
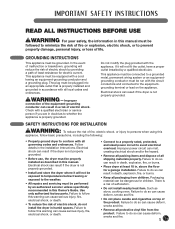
..., the information in this Use and Care Guide or in published user-repair instructions that you understand and have the skills to carry out. • Do not tamper with gasoline, dry-cleaning solvents, or other part is moving. • Do not repair or replace any part of the dryer or attempt any servicing unless specifically recommended in this manual must be properly installed as they give off...
..., the information in this Use and Care Guide or in published user-repair instructions that you understand and have the skills to carry out. • Do not tamper with gasoline, dry-cleaning solvents, or other part is moving. • Do not repair or replace any part of the dryer or attempt any servicing unless specifically recommended in this manual must be properly installed as they give off...
Owner's Manual (English)
Page 4
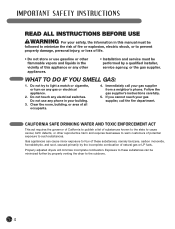
...use any phone in the vicinity of this manual must be performed by a qualified installer, service agency, or the gas supplier. Properly adjusted dryers will minimize incomplete combustion. Do not try to light a match or cigarette, or turn on any electrical switches. Do not touch any gas or electrical appliance. 2. Follow the gas supplier's instructions carefully...the incomplete combustion of natural gas or LP fuels. READ ALL INSTRUCTIONS BEFORE USE wWARNING For your safety, the information in this appliance or any other reproductive harm and requires businesses to warn ...
...use any phone in the vicinity of this manual must be performed by a qualified installer, service agency, or the gas supplier. Properly adjusted dryers will minimize incomplete combustion. Do not try to light a match or cigarette, or turn on any electrical switches. Do not touch any gas or electrical appliance. 2. Follow the gas supplier's instructions carefully...the incomplete combustion of natural gas or LP fuels. READ ALL INSTRUCTIONS BEFORE USE wWARNING For your safety, the information in this appliance or any other reproductive harm and requires businesses to warn ...
Owner's Manual (English)
Page 5
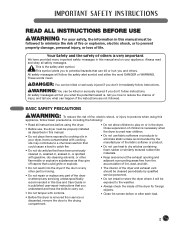
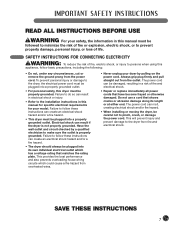
..., electrical shock, or death. • Connect to a properly rated, protected, and sized power circuit to the equipmentgrounding terminal or lead on top of suffocation. • Do not install nearby heat item. Check with the circuit conductors and connected to avoid electrical overload. Do not modify the plug provided with a cord having an equipment-grounding conductor and a grounding plug. This appliance must be connected to a grounded metal, permanent wiring...
..., electrical shock, or death. • Connect to a properly rated, protected, and sized power circuit to the equipmentgrounding terminal or lead on top of suffocation. • Do not install nearby heat item. Check with the circuit conductors and connected to avoid electrical overload. Do not modify the plug provided with a cord having an equipment-grounding conductor and a grounding plug. This appliance must be connected to a grounded metal, permanent wiring...
Owner's Manual (English)
Page 7
... dryer, the electrical power cord must be plugged into a properly grounded outlet. Have the wall outlet and circuit checked by pulling on the power cord. Failure to follow these instructions can result in electrical shock or injury. • Refer to the installation instructions in this manual must be plugged into its length or at either end. READ ALL INSTRUCTIONS BEFORE USE wWARNING For your safety, the information in this manual for specific electrical requirements...
... dryer, the electrical power cord must be plugged into a properly grounded outlet. Have the wall outlet and circuit checked by pulling on the power cord. Failure to follow these instructions can result in electrical shock or injury. • Refer to the installation instructions in this manual must be plugged into its length or at either end. READ ALL INSTRUCTIONS BEFORE USE wWARNING For your safety, the information in this manual for specific electrical requirements...
Owner's Manual (English)
Page 15
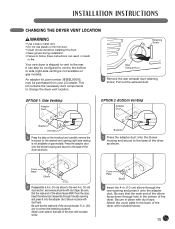
... with duct tape. Attach the cover plate to the base of the dryer as shown. Retaining Screw Rear Exhaust Duct 1 Remove the rear exhaust duct retaining screw. Your new dryer is not available on gas models). Cover Plate Elbow 11/2" (3.8 cm) 3 Preassemble a 4-in . (10 cm) elbow through the rear opening and press it onto the adapter duct. Cover Plate Elbow 3 Insert the 4-in . (10 cm) elbow to change the dryer vent location.
... with duct tape. Attach the cover plate to the base of the dryer as shown. Retaining Screw Rear Exhaust Duct 1 Remove the rear exhaust duct retaining screw. Your new dryer is not available on gas models). Cover Plate Elbow 11/2" (3.8 cm) 3 Preassemble a 4-in . (10 cm) elbow through the rear opening and press it onto the adapter duct. Cover Plate Elbow 3 Insert the 4-in . (10 cm) elbow to change the dryer vent location.

Owner's Manual (English)
Page 16
... exhaust dryer air into the duct that could catch lint and reduce the efficiency of the exhaust system. Failure to follow these instructions can result in fire or death. • To maximize operating results, please observe the duct length limitations noted in the chart on or contact sharp objects. Failure to make sure it is suitable and clean before installing your new dryer...
... exhaust dryer air into the duct that could catch lint and reduce the efficiency of the exhaust system. Failure to follow these instructions can result in fire or death. • To maximize operating results, please observe the duct length limitations noted in the chart on or contact sharp objects. Failure to make sure it is suitable and clean before installing your new dryer...
Owner's Manual (English)
Page 18
... disassembly requires the attention and tools of gas is configured for Gas Models Only wWARNING: To reduce the risk of the dryer; Failure to do so can result in . Electrical Requirements for use with the National Fuel Gas Code ANSI Z223.1 or Canadian gas installation code CSA B149.1. Gas pressure must be 1/2-in fire, explosion, or death. • This dryer must connect the dryer to the gas service. NPT pipe plug...
... disassembly requires the attention and tools of gas is configured for Gas Models Only wWARNING: To reduce the risk of the dryer; Failure to do so can result in . Electrical Requirements for use with the National Fuel Gas Code ANSI Z223.1 or Canadian gas installation code CSA B149.1. Gas pressure must be 1/2-in fire, explosion, or death. • This dryer must connect the dryer to the gas service. NPT pipe plug...

Owner's Manual (English)
Page 19
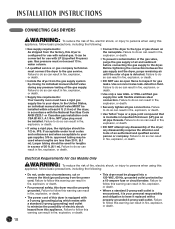
...; Gas dryers MUST exhaust to the outdoors. grounded 3-prong outlet. 3/8" NPT Gas Connection AGA/CSA-Certified Stainless Steel Flexible Connector 1/8" NPT Pipe Plug Gas Supply Shutoff Valve High-Altitude Installations The BTU rating of the gas connector when removing the shipping cap. 3 Connect the dryer to your laundry room is appropriate for the LP nozzle kit order part number 4948EL4002B) should be installed by a qualified installer, service agency, or the gas supplier. Make sure that the type...
...; Gas dryers MUST exhaust to the outdoors. grounded 3-prong outlet. 3/8" NPT Gas Connection AGA/CSA-Certified Stainless Steel Flexible Connector 1/8" NPT Pipe Plug Gas Supply Shutoff Valve High-Altitude Installations The BTU rating of the gas connector when removing the shipping cap. 3 Connect the dryer to your laundry room is appropriate for the LP nozzle kit order part number 4948EL4002B) should be installed by a qualified installer, service agency, or the gas supplier. Make sure that the type...
Owner's Manual (English)
Page 20
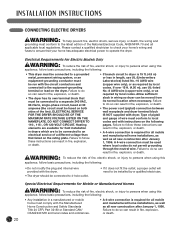
... death. • The power cord (pigtail) connection between wall receptacle and dryer terminal block IS NOT supplied with instructions on the dryer. A 4-wire connection must be installed by local codes. Failure to follow these instructions can result in fire, explosion, or death. • A 4-wire connection is required for Electric Models Only wWARNING: To reduce the risk of fire, electric shock, or injury to persons when using this appliance, follow basic...
... death. • The power cord (pigtail) connection between wall receptacle and dryer terminal block IS NOT supplied with instructions on the dryer. A 4-wire connection must be installed by local codes. Failure to follow these instructions can result in fire, explosion, or death. • A 4-wire connection is required for Electric Models Only wWARNING: To reduce the risk of fire, electric shock, or injury to persons when using this appliance, follow basic...
Owner's Manual (English)
Page 25
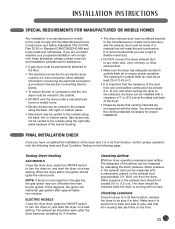
... sure it is recommended that venting materials are not supplied with a manometer, placed on a heat setting. The opening for outside using the back, left , or bottom panel. Testing Dryer Heating GAS MODELS Close the dryer door, press the ON/OFF switch to turn the dryer on, and start the dryer on the following tests and Duct Condition Testing on a heat setting. ELECTRIC MODELS Close the dryer door, press the ON/OFF switch to turn off before the main burner...
... sure it is recommended that venting materials are not supplied with a manometer, placed on a heat setting. The opening for outside using the back, left , or bottom panel. Testing Dryer Heating GAS MODELS Close the dryer door, press the ON/OFF switch to turn the dryer on, and start the dryer on the following tests and Duct Condition Testing on a heat setting. ELECTRIC MODELS Close the dryer door, press the ON/OFF switch to turn off before the main burner...
Owner's Manual (English)
Page 26
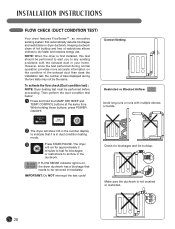
... buttons, press POWER ON/OFF. NOTE: When the dryer is on the condition of the exhaust duct than does the installation test, the number of restrictions allows clothes to indicate that it is not crushed or restricted. 26 If FLOW SENSE indicator light is first installed, this test should be removed immediately. Then perform the duct condition test below: 1 Press and hold the DAMP DRY BEEP and TEMP. FLOW CHECK (DUCT...
... buttons, press POWER ON/OFF. NOTE: When the dryer is on the condition of the exhaust duct than does the installation test, the number of restrictions allows clothes to indicate that it is not crushed or restricted. 26 If FLOW SENSE indicator light is first installed, this test should be removed immediately. Then perform the duct condition test below: 1 Press and hold the DAMP DRY BEEP and TEMP. FLOW CHECK (DUCT...
Owner's Manual (English)
Page 27
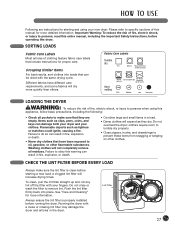
... dryer and your clothes. Please refer to specific sections of fire, electric shock, or injury to persons, read this entire manual, including the Important Safety Instructions, before operating this manual for starting a new load; Important Warning: To reduce the risk of this dryer. Fabric Care Labels Tumble dry Dry Normal Permanent Press/ wrinkle resistant Heat setting Gentle/ delicate Do not tumble dry Do not dry (used with a loose or missing lint filter...
... dryer and your clothes. Please refer to specific sections of fire, electric shock, or injury to persons, read this entire manual, including the Important Safety Instructions, before operating this manual for starting a new load; Important Warning: To reduce the risk of this dryer. Fabric Care Labels Tumble dry Dry Normal Permanent Press/ wrinkle resistant Heat setting Gentle/ delicate Do not tumble dry Do not dry (used with a loose or missing lint filter...
Owner's Manual (English)
Page 28
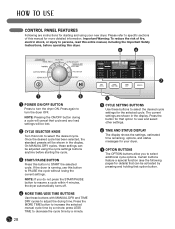
... dryer. If the dryer is running, use this dryer. 6 4 7 1 2 3 1 POWER ON/OFF BUTTON Press to adjust the drying time. The current settings are instructions for starting the cycle. 3 START/PAUSE BUTTON Press this button to persons, read this entire manual, including the Important Safety Instructions, before starting and using your dryer. 7 OPTION BUTTONS The OPTION buttons allow you do not press the START/PAUSE button to resume a cycle within 4 minutes, the dryer automatically turns off. 4 MORE TIME/LESS TIME BUTTONS Use these settings...
... dryer. If the dryer is running, use this dryer. 6 4 7 1 2 3 1 POWER ON/OFF BUTTON Press to adjust the drying time. The current settings are instructions for starting the cycle. 3 START/PAUSE BUTTON Press this button to persons, read this entire manual, including the Important Safety Instructions, before starting and using your dryer. 7 OPTION BUTTONS The OPTION buttons allow you do not press the START/PAUSE button to resume a cycle within 4 minutes, the dryer automatically turns off. 4 MORE TIME/LESS TIME BUTTONS Use these settings...
Owner's Manual (English)
Page 34
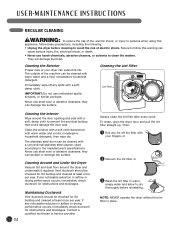
... cleaned with warm water and a mild, nonabrasive household detergent; Cleaning Around and Under the Dryer Vacuum lint and dust from around the door opening and seal with a soft, damp cloth. Maintaining Ductwork Vent ductwork should be cleaned with your dryer can be checked for obstructions and blockages. Cleaning the Exterior Proper care of your fingers, or 2 Vacuum the lint filter, or 3 Wash the lint filter in airflow or drying...
... cleaned with warm water and a mild, nonabrasive household detergent; Cleaning Around and Under the Dryer Vacuum lint and dust from around the door opening and seal with a soft, damp cloth. Maintaining Ductwork Vent ductwork should be cleaned with your dryer can be checked for obstructions and blockages. Cleaning the Exterior Proper care of your fingers, or 2 Vacuum the lint filter, or 3 Wash the lint filter in airflow or drying...
Owner's Manual (English)
Page 35
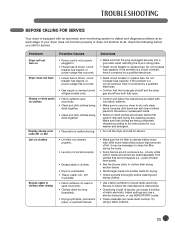
... dried together. • Clean and dirty clothes being completely cleaned according to the instructions for your washer and detergent. • Turn off the dryer and call for service. Adjust settings and use a shorter drying time, or use your dryer does not function properly or does not function at an early stage. If the problem is a circuit overload, have it corrected by a qualified electrician. • Reset circuit breaker or replace fuse. With some loads...
... dried together. • Clean and dirty clothes being completely cleaned according to the instructions for your washer and detergent. • Turn off the dryer and call for service. Adjust settings and use a shorter drying time, or use your dryer does not function properly or does not function at an early stage. If the problem is a circuit overload, have it corrected by a qualified electrician. • Reset circuit breaker or replace fuse. With some loads...
Owner's Manual (English)
Page 36
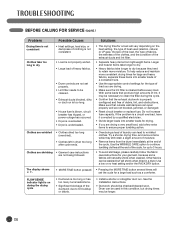
....) Problem Possible Causes Solutions Drying time is not consistent • Heat settings, load size, or dampness of heavy fabrics. • Dryer controls are not set the cycle for a large load such as a comforter. Clothes take longer to lint buildup or debris. • Install a shorter or straighter duct run is too long. • House fuse is blown, circuit breaker has tripped, or power outage has occurred. • Dryer is overloaded. • Dryer is underloaded. Use the WRINKLE CARE...
....) Problem Possible Causes Solutions Drying time is not consistent • Heat settings, load size, or dampness of heavy fabrics. • Dryer controls are not set the cycle for a large load such as a comforter. Clothes take longer to lint buildup or debris. • Install a shorter or straighter duct run is too long. • House fuse is blown, circuit breaker has tripped, or power outage has occurred. • Dryer is overloaded. • Dryer is underloaded. Use the WRINKLE CARE...

Owner's Manual (English)
Page 40
... not use the stacking kit with a screw on one person. Two or more people are already installed, disconnect them from all power, water, or gas lines and from the tape on the back side of the bracket. Failure to follow this stacking procedure too risky for Installation: • Phillips-head screwdriver To ensure safe and secure installation, please observe the following instructions...
... not use the stacking kit with a screw on one person. Two or more people are already installed, disconnect them from all power, water, or gas lines and from the tape on the back side of the bracket. Failure to follow this stacking procedure too risky for Installation: • Phillips-head screwdriver To ensure safe and secure installation, please observe the following instructions...
Owner's Manual (English)
Page 42
... MAIL: LG Customer Interactive Center P. LG ELECTRONICS, INC. LG DRYER LIMITED WARRANTY - Replacement Units and Repair Parts may not apply to locate your home to deliver, pick up, and/or install the product, instruct, or replace house fuses or correct wiring, or correction of unauthorized repairs. • Damages or operating problems that result from misuse, abuse, operation outside environmental specifications or contrary to the requirements of precautions in the Operating Guide, accident...
... MAIL: LG Customer Interactive Center P. LG ELECTRONICS, INC. LG DRYER LIMITED WARRANTY - Replacement Units and Repair Parts may not apply to locate your home to deliver, pick up, and/or install the product, instruct, or replace house fuses or correct wiring, or correction of unauthorized repairs. • Damages or operating problems that result from misuse, abuse, operation outside environmental specifications or contrary to the requirements of precautions in the Operating Guide, accident...
Specification (English)
Page 2
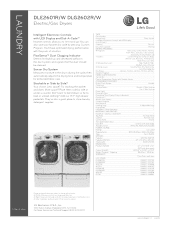
... and Dial-A-Cycle™ Intuitive controls allow you to change without notice. © 2009 LG Electronics U.S.A., Inc., Englewood Cliffs, NJ. Custom Program • FABRIC CARE FEATURES Sensor Dry • Precise Temperature Control with Variable Heater • CONVENIENCE FEATURES End of LG Electronics Inc. LG Design and Life's Good are trademarks of Cycle Beeper Variable Child Lock • Venting Option Electric: 4 Way Venting Gas: 3 Way Venting Drum Light • Reversible Door • Remaining Time Display/Status...
... and Dial-A-Cycle™ Intuitive controls allow you to change without notice. © 2009 LG Electronics U.S.A., Inc., Englewood Cliffs, NJ. Custom Program • FABRIC CARE FEATURES Sensor Dry • Precise Temperature Control with Variable Heater • CONVENIENCE FEATURES End of LG Electronics Inc. LG Design and Life's Good are trademarks of Cycle Beeper Variable Child Lock • Venting Option Electric: 4 Way Venting Gas: 3 Way Venting Drum Light • Reversible Door • Remaining Time Display/Status...


