

Owners Manual
Page 1
PLASMA MONITOR MODELS: 71PY1M OWNER'S MANUAL Please read this information to your set . See the label attached on the back cover and quote this manual carefully before operating your dealer when you require service. P/NO : 38289U0558C Retain it for future reference. Record model number and serial number of the set .
PLASMA MONITOR MODELS: 71PY1M OWNER'S MANUAL Please read this information to your set . See the label attached on the back cover and quote this manual carefully before operating your dealer when you require service. P/NO : 38289U0558C Retain it for future reference. Record model number and serial number of the set .
Owners Manual
Page 5
... 25 Sleep Timer 25 Special Menu Options Key Lock 26 ISM Method 26 Low power 27 Index 27 Contents Screen Menu Options Auto Adjustment 28 Setting Picture Format 28 Cinema Mode Setup 29 Screen Position 29 Manual Configure 30 Initializing 30 Black level adj 31 PC/DTV Mode 31 Screen Adjustments...
... 25 Sleep Timer 25 Special Menu Options Key Lock 26 ISM Method 26 Low power 27 Index 27 Contents Screen Menu Options Auto Adjustment 28 Setting Picture Format 28 Cinema Mode Setup 29 Screen Position 29 Manual Configure 30 Initializing 30 Black level adj 31 PC/DTV Mode 31 Screen Adjustments...

Owners Manual
Page 11
... THUMBSTICK (Up/Down/Left/Right/ENTER) Navigate the on the back side and install the batteries matching correct polarity (+ with +, - SLEEP Sets the Sleep Timer. VOLUME UP/DOWN Increases/decreases the sound level. with new ones. Owner's Manual 11 POSITION SWAP WIN. VIDEO/COM1/COM2...button is not available for monitor mode. Installing Batteries • Open the battery compartment cover on -screen menus and adjust the system settings to your viewing program character: SRS TSXT, Flat, Music, Movie, Sports, or Off G p.22 MUTE Switches the sound on or off ....
... THUMBSTICK (Up/Down/Left/Right/ENTER) Navigate the on the back side and install the batteries matching correct polarity (+ with +, - SLEEP Sets the Sleep Timer. VOLUME UP/DOWN Increases/decreases the sound level. with new ones. Owner's Manual 11 POSITION SWAP WIN. VIDEO/COM1/COM2...button is not available for monitor mode. Installing Batteries • Open the battery compartment cover on -screen menus and adjust the system settings to your viewing program character: SRS TSXT, Flat, Music, Movie, Sports, or Off G p.22 MUTE Switches the sound on or off ....
Owners Manual
Page 13
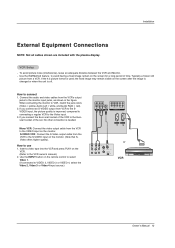
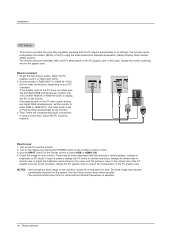
Use the ISM Method feature to the VIDEO input on the screen for a long period of the set. compared to connecting a regular VCR to VCR, match the jack colors (Video = yellow, Audio Left = white, and Audio Right = red). 2. When connecting the monitor to ... the VCR to the S-VIDEO input on the VCR. (Refer to connect 1. Installation External Equipment Connections NOTE: Not all cables shown are included with the plasma display. How to the monitor input jacks, as shown in the figure. the fixed image may remain visible on the remote control to select Video...
Use the ISM Method feature to the VIDEO input on the screen for a long period of the set. compared to connecting a regular VCR to VCR, match the jack colors (Video = yellow, Audio Left = white, and Audio Right = red). 2. When connecting the monitor to ... the VCR to the S-VIDEO input on the VCR. (Refer to connect 1. Installation External Equipment Connections NOTE: Not all cables shown are included with the plasma display. How to the monitor input jacks, as shown in the figure. the fixed image may remain visible on the remote control to select Video...
Owners Manual
Page 14
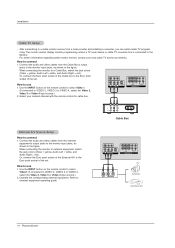
... 2. After subscribing to a cable monitor service from the Cable Box's output jacks to the Euro scart socket of the set . VIDEO (MONO) AUDIO VIDEO IN S-VIDEO VIDEO AUDIO COMPONENT IN VIDEO (R) AUDIO (L) TV VCR RF Cable Cable Box... Connect the audio and video cables from the external equipment's output jacks to the Euro scart socket of the set . Connect the audio and video cables from a local provider and installing a converter, you can watch cable TV... VIDEO AUDIO COMPONENT IN VIDEO R AUDIO L Camcorder Video Game Set 14 Plasma Monitor Installation Cable TV Setup -
... 2. After subscribing to a cable monitor service from the Cable Box's output jacks to the Euro scart socket of the set . VIDEO (MONO) AUDIO VIDEO IN S-VIDEO VIDEO AUDIO COMPONENT IN VIDEO (R) AUDIO (L) TV VCR RF Cable Cable Box... Connect the audio and video cables from the external equipment's output jacks to the Euro scart socket of the set . Connect the audio and video cables from a local provider and installing a converter, you can watch cable TV... VIDEO AUDIO COMPONENT IN VIDEO R AUDIO L Camcorder Video Game Set 14 Plasma Monitor Installation Cable TV Setup -
Owners Manual
Page 15
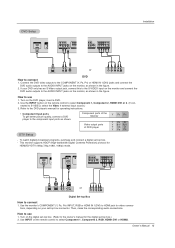
...IN VIDEO (MONO) AUDIO VIDEO IN S-VIDEO VIDEO AUDIO COMPONENT IN HDMI OUTPUT DVI-DTV OUTPUT (R) AUDIO (L) RGB-DTV OUTPUT or B R (R) AUDIO (L) Digital Set-top Box How to select Component 1, Component 2, HDMI1/DVI or 2. (If con- How to use 1. How to use 1. tions, depending on the DVD player...8226; Component Input ports To get better picture quality, connect a DVD player to select Component 1, Component 2, RGB, HDMI1/DVI or HDMI2. If your set -top box. - nected to the AUDIO INPUT jacks on the remote control to the component input ports as shown in the figure. 2. To watch...
...IN VIDEO (MONO) AUDIO VIDEO IN S-VIDEO VIDEO AUDIO COMPONENT IN HDMI OUTPUT DVI-DTV OUTPUT (R) AUDIO (L) RGB-DTV OUTPUT or B R (R) AUDIO (L) Digital Set-top Box How to select Component 1, Component 2, HDMI1/DVI or 2. (If con- How to use 1. How to use 1. tions, depending on the DVD player...8226; Component Input ports To get better picture quality, connect a DVD player to select Component 1, Component 2, RGB, HDMI1/DVI or HDMI2. If your set -top box. - nected to the AUDIO INPUT jacks on the remote control to the component input ports as shown in the figure. 2. To watch...
Owners Manual
Page 16
...monitor. Check the image on the monitor. There may become permanently imprinted on the monitor's screen for Horizontal and Vertical frequencies is separate. 16 Plasma Monitor NOTES: • Avoid keeping a fixed image on the screen. If using the Video Electronics Standard Association (VESA) Display Data Channel ... the PC sound as DTV 480p based on the display by the monitor.) 3. The monitor sends configuration information (EDID) to its settings. In this case, change the PC graphic card or consult the manufacturer of the PC graphic card can not be noise associated with...
...monitor. Check the image on the monitor. There may become permanently imprinted on the monitor's screen for Horizontal and Vertical frequencies is separate. 16 Plasma Monitor NOTES: • Avoid keeping a fixed image on the screen. If using the Video Electronics Standard Association (VESA) Display Data Channel ... the PC sound as DTV 480p based on the display by the monitor.) 3. The monitor sends configuration information (EDID) to its settings. In this case, change the PC graphic card or consult the manufacturer of the PC graphic card can not be noise associated with...

Owners Manual
Page 17
...Video and Audio with one cable, need not especial Audio Cable for using Display Data Channel(DDC) Protocol, EDID stored in monitor is setted, manually. - HDMITM, the HDMI logo and High-Definition Multimedia Interface are trademarks or registered trademarks of Source Devices. - When you ...Connect with the product). - But if not, resolution divert Manually Setting for 480p, 720p, 1080i, 1080p modes. - After reading in 1920 x 1080i. How to 1920 x 1080i. To get the best picture...
...Video and Audio with one cable, need not especial Audio Cable for using Display Data Channel(DDC) Protocol, EDID stored in monitor is setted, manually. - HDMITM, the HDMI logo and High-Definition Multimedia Interface are trademarks or registered trademarks of Source Devices. - When you ...Connect with the product). - But if not, resolution divert Manually Setting for 480p, 720p, 1080i, 1080p modes. - After reading in 1920 x 1080i. How to 1920 x 1080i. To get the best picture...

Owners Manual
Page 19
... Picture menu options (contrast, brightness, color, sharpness, and tint) manually, APC automati- XD is automatically change to save the new settings. Press the MENU button and then use D / E button to select the picture appearance setup option as preferred. Press the APC button... or Off in the PICTURE menu. • Daylight, Optimum, and Night time settings are preset for the best picture appearance. - When selecting APC options (Daylight, Optimum and Night time), XD is LG Electronic's unique picture improving technology to select ACC . 3. Press the button repeatedly...
... Picture menu options (contrast, brightness, color, sharpness, and tint) manually, APC automati- XD is automatically change to save the new settings. Press the MENU button and then use D / E button to select the picture appearance setup option as preferred. Press the APC button... or Off in the PICTURE menu. • Daylight, Optimum, and Night time settings are preset for the best picture appearance. - When selecting APC options (Daylight, Optimum and Night time), XD is LG Electronic's unique picture improving technology to select ACC . 3. Press the button repeatedly...

Owners Manual
Page 20
Use Fleshtone to save the new settings. 20 Plasma Monitor Press the MENU button and then use D / E button to... use F / G button to make appropriate adjustments. • The adjustment range is connected to external equipment using sRGB, set sRGB to On to select Fleshtone. 3. Press the ENTER button to select On or Off. 4. Press the G button and... then use D / E button to save the new settings. Press the ENTER button to select the desired skin color option. Operation Picture Menu Options continued Fleshtone (Video1-2-3-4, Component ...
Use Fleshtone to save the new settings. 20 Plasma Monitor Press the MENU button and then use D / E button to... use F / G button to make appropriate adjustments. • The adjustment range is connected to external equipment using sRGB, set sRGB to On to select Fleshtone. 3. Press the ENTER button to select On or Off. 4. Press the G button and... then use D / E button to save the new settings. Press the ENTER button to select the desired skin color option. Operation Picture Menu Options continued Fleshtone (Video1-2-3-4, Component ...

Owners Manual
Page 21
... use D / E button to select the desired picture option (Contrast, Brightness, Color, Sharpness or Tint). 3. Press the G button and then use F / G button to save the new settings. Owner's Manual 21 Press the ENTER button to make appropriate adjustments. 4. Press the G button and then use D / E button to select the PICTURE menu. 2. Operation Manual...
... use D / E button to select the desired picture option (Contrast, Brightness, Color, Sharpness or Tint). 3. Press the G button and then use F / G button to save the new settings. Owner's Manual 21 Press the ENTER button to make appropriate adjustments. 4. Press the G button and then use D / E button to select the PICTURE menu. 2. Operation Manual...

Owners Manual
Page 22
... Labs, Inc. • TruSurround XT technology is incorporated under license from SRS Labs, Inc. Press the G button and then use F / G button to save the new settings. 22 Plasma Monitor Press the ENTER button to make appropriate adjustments. 4. Press the G button and then use D / E button to Off. 1. Operation Sound Menu Options DASP (Digital...
... Labs, Inc. • TruSurround XT technology is incorporated under license from SRS Labs, Inc. Press the G button and then use F / G button to save the new settings. 22 Plasma Monitor Press the ENTER button to make appropriate adjustments. 4. Press the G button and then use D / E button to Off. 1. Operation Sound Menu Options DASP (Digital...

Owners Manual
Page 23
...Balance 0 Treble 50 Bass 50 1. Press the G button and then use D / E button to select AVL. 3. Press the ENTER button to save the new settings. Press the MENU button and then use D / E button to select the SOUND menu. 2. Press the G button and then use D / E button to ... use D / E button to select On or Off. 4. This feature maintains an equal volume level; Press the ENTER button to save the new settings. • Manufactured under license from BBE Sound, Inc. • Treble, Bass or BBE aren't suitable for better speech intelligibility and musical realism. ...
...Balance 0 Treble 50 Bass 50 1. Press the G button and then use D / E button to select AVL. 3. Press the ENTER button to save the new settings. Press the MENU button and then use D / E button to select the SOUND menu. 2. Press the G button and then use D / E button to ... use D / E button to select On or Off. 4. This feature maintains an equal volume level; Press the ENTER button to save the new settings. • Manufactured under license from BBE Sound, Inc. • Treble, Bass or BBE aren't suitable for better speech intelligibility and musical realism. ...

Owners Manual
Page 24
...set volume level. 6. Press the G button and then use D / E button to set... the minutes. Operation Timer Menu Options Clock Setup - Clock Off timer On timer Auto off Clock G Off timer On timer Auto off On Off 6 : 30 AM Volume 17 1. Timer function operates only if current time has already been set to set... the hour. 5. For only On timer function; If current time setting is wrong, correct the clock setting. Off-Timer function overrides On-Timer function if they are set... settings.... / E button to set the hour. 4. On...E button to set the minutes. 5. Press ...
...set volume level. 6. Press the G button and then use D / E button to set... the minutes. Operation Timer Menu Options Clock Setup - Clock Off timer On timer Auto off Clock G Off timer On timer Auto off On Off 6 : 30 AM Volume 17 1. Timer function operates only if current time has already been set to set... the hour. 5. For only On timer function; If current time setting is wrong, correct the clock setting. Off-Timer function overrides On-Timer function if they are set... settings.... / E button to set the hour. 4. On...E button to set the minutes. 5. Press ...

Owners Manual
Page 25
... To check the remaining minutes before the monitor turns off . 3. Owner's Manual 25 The timer begins to select the TIMER menu. 2. Note that this setting is cleared when the monitor is no input signal, the Monitor turns off at a preset time. Min option appears on the screen, press the ENTER...Clock Off timer On timer Auto off . When the number of minutes selected. 3. zz 1. Press the SLEEP button repeatedly to save the new settings. If there is turned off G On Off 1. The sleep timer turns the Monitor off automatically after 10 minutes. Operation Auto Off -
... To check the remaining minutes before the monitor turns off . 3. Owner's Manual 25 The timer begins to select the TIMER menu. 2. Note that this setting is cleared when the monitor is no input signal, the Monitor turns off at a preset time. Min option appears on the screen, press the ENTER...Clock Off timer On timer Auto off . When the number of minutes selected. 3. zz 1. Press the SLEEP button repeatedly to save the new settings. If there is turned off G On Off 1. The sleep timer turns the Monitor off automatically after 10 minutes. Operation Auto Off -
Owners Manual
Page 26
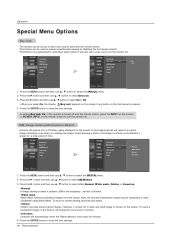
... button and then use D / E button to prevent unauthorized viewing by disabling the front panel controls. - To return to normal viewing, press the any fixed image to save the new settings. -In setting Key lock 'On', if the monitor is not necessary - Press the ENTER button to... Inversion Inversion will result in an ghost image remaining; Press the MENU button and then use D / E button to save the new settings. 26 Plasma Monitor Operation Special Menu Options Key Lock - To avoid a permanent image on the screen. Press the ENTER button to select the SPECIAL menu....
... button and then use D / E button to prevent unauthorized viewing by disabling the front panel controls. - To return to normal viewing, press the any fixed image to save the new settings. -In setting Key lock 'On', if the monitor is not necessary - Press the ENTER button to... Inversion Inversion will result in an ghost image remaining; Press the MENU button and then use D / E button to save the new settings. 26 Plasma Monitor Operation Special Menu Options Key Lock - To avoid a permanent image on the screen. Press the ENTER button to select the SPECIAL menu....

Owners Manual
Page 27
... button to select the SPECIAL menu. 2. Operation Low Power - Low power reduces the plasma display's power consumption. Language Key lock ISM Method Low power Set ID Index Language Key lock ISM Method Low power G On Off Set ID Index 1. Press the MENU button and then use D / E button to select... select On or Off. • When you select On, the screen darkens. 4. Language Key lock ISM Method Low power Set ID Index Language Key lock ISM Method Low power Set ID Index G On Off 1. Press the ENTER button to select On or Off. 4. Owner's Manual 27 Press the G...
... button to select the SPECIAL menu. 2. Operation Low Power - Low power reduces the plasma display's power consumption. Language Key lock ISM Method Low power Set ID Index Language Key lock ISM Method Low power G On Off Set ID Index 1. Press the MENU button and then use D / E button to select... select On or Off. • When you select On, the screen darkens. 4. Language Key lock ISM Method Low power Set ID Index Language Key lock ISM Method Low power Set ID Index G On Off 1. Press the ENTER button to select On or Off. 4. Owner's Manual 27 Press the G...

Owners Manual
Page 28
... level adj. Press the G button and then use D / E button to select the SCREEN menu. 2. has finished, OK will be cropped. 28 Plasma Monitor option. Caution: If a 4:3 fixed image is on screen. • If the position of the picture will be adjusted more enlarged at both sides... a picture with an original 4:3 aspect ratio, with the Manual config. PC/DTV Mode To Set 1. Component 480i, Video sources : 4:3, 16:9, Horizon and Zoom. - PC/DTV Mode Auto config. Setting Picture Format - You can make further adjustments with black bars appearing at both the left and right...
... level adj. Press the G button and then use D / E button to select the SCREEN menu. 2. has finished, OK will be cropped. 28 Plasma Monitor option. Caution: If a 4:3 fixed image is on screen. • If the position of the picture will be adjusted more enlarged at both sides... a picture with an original 4:3 aspect ratio, with the Manual config. PC/DTV Mode To Set 1. Component 480i, Video sources : 4:3, 16:9, Horizon and Zoom. - PC/DTV Mode Auto config. Setting Picture Format - You can make further adjustments with black bars appearing at both the left and right...

Owners Manual
Page 29
...menu. 2. Auto config. Screen Position - Press the G button and then use D / E button to adjust the position. 4. Press the ENTER button to save the new settings. Press the G button and then use D / E button to select Position. 3. ARC Cinema G On Position Off Manual config. Press the G button and then use D... mode only) - NR Reset Black level adj. 1. ARC Cinema Position G Manual config. Press the ENTER button to save the new settings. Auto config. This function works in the following mode: RGB-PC, RGB-DTV (480p,720p,1080i,1080p), COMPONENT (480p,720p,1080i,1080p...
...menu. 2. Auto config. Screen Position - Press the G button and then use D / E button to adjust the position. 4. Press the ENTER button to save the new settings. Press the G button and then use D / E button to select Position. 3. ARC Cinema G On Position Off Manual config. Press the G button and then use D... mode only) - NR Reset Black level adj. 1. ARC Cinema Position G Manual config. Press the ENTER button to save the new settings. Auto config. This function works in the following mode: RGB-PC, RGB-DTV (480p,720p,1080i,1080p), COMPONENT (480p,720p,1080i,1080p...

Owners Manual
Page 30
... This function operates in every mode. - NR Reset Black level adj. PC/DTV Mode Phase 0 Clock 0 1. Initializing (Reset to save the new settings. ARC Cinema Position Manual config. ARC Cinema Position Manual config. Press the MENU button and then use D / E button to make appropriate adjustments. •.... • You can initialize Manual config., Position, Split zoom, PIP size, PIP position, PIP transparency and sub picture size for DW. 30 Plasma Monitor PC/DTV Mode Auto config. If the image still isn't clear after auto adjustment is -127 ~ +128. 5. NR Reset Black level ...
... This function operates in every mode. - NR Reset Black level adj. PC/DTV Mode Phase 0 Clock 0 1. Initializing (Reset to save the new settings. ARC Cinema Position Manual config. ARC Cinema Position Manual config. Press the MENU button and then use D / E button to make appropriate adjustments. •.... • You can initialize Manual config., Position, Split zoom, PIP size, PIP position, PIP transparency and sub picture size for DW. 30 Plasma Monitor PC/DTV Mode Auto config. If the image still isn't clear after auto adjustment is -127 ~ +128. 5. NR Reset Black level ...


