
Owner's Manual
Page 1
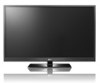
OWNER'S MANUAL PLASMA TV Please read this manual carefully before operating your set and retain it for future reference. 42PT200 50PT200 42PT330 50PT330 42PT350 50PT350 50PV400 60PV400 50PV430 60PV430 50PV450 60PV450 42PT250U 50PT250U 50PV550U 60PV550U 42PT350C 50PT350C 50PV450C 60PV450C P/NO : SAC34173308 (1102-REV01) www.lg.com
OWNER'S MANUAL PLASMA TV Please read this manual carefully before operating your set and retain it for future reference. 42PT200 50PT200 42PT330 50PT330 42PT350 50PT350 50PV400 60PV400 50PV430 60PV430 50PV450 60PV450 42PT250U 50PT250U 50PV550U 60PV550U 42PT350C 50PT350C 50PV450C 60PV450C P/NO : SAC34173308 (1102-REV01) www.lg.com
Owner's Manual
Page 6
... Out Connection 27 PC Setup 28 WATCHING TV / CHANNEL CONTROL Remote Control Functions 34 Turning On TV 36 Channel Selection 36 Volume Adjustment 36 Initial Setting 37 On-Screen Menus Selection 38 Quick Menu 39 Channel Setup - Add / Delete Channel (Manual Tuning 41 - Channel Editing 42 Channel List 43 Favorite Channel... Movie List 62 DivX Registration Code 68 Deactivation 69 PICTURE CONTROL Picture Size (Aspect Ratio) Control 70 Picture Wizard 72 Energy Saving 74 Preset Picture Settings(Picture Mode 75 Manual Picture Adjustment -
... Out Connection 27 PC Setup 28 WATCHING TV / CHANNEL CONTROL Remote Control Functions 34 Turning On TV 36 Channel Selection 36 Volume Adjustment 36 Initial Setting 37 On-Screen Menus Selection 38 Quick Menu 39 Channel Setup - Add / Delete Channel (Manual Tuning 41 - Channel Editing 42 Channel List 43 Favorite Channel... Movie List 62 DivX Registration Code 68 Deactivation 69 PICTURE CONTROL Picture Size (Aspect Ratio) Control 70 Picture Wizard 72 Energy Saving 74 Preset Picture Settings(Picture Mode 75 Manual Picture Adjustment -
Owner's Manual
Page 7
...94 - Analog Broadcasting System Captions 93 - Auto Clock Setup 96 Manual Clock Setup 97 Auto On/Off Time Setting 98 Sleep Timer Setting 99 PARENTAL CONTROL / RATINGS Set Password & Lock System 100 Channel Blocking 103 Movie & TV Rating 104 Downloadable Rating 109 External Input Blocking ...APPENDIX Troubleshooting 112 Maintenance 114 Product Specifications 114 IR Codes 116 External Control Through RS-232C 118 7 Caption Option 95 TIME SETTING Clock Setting - User Mode 85 Infinite Surround 86 Balance 87 TV Speakers On/Off Setup 88 Audio Reset 89 Stereo/SAP Broadcast ...
...94 - Analog Broadcasting System Captions 93 - Auto Clock Setup 96 Manual Clock Setup 97 Auto On/Off Time Setting 98 Sleep Timer Setting 99 PARENTAL CONTROL / RATINGS Set Password & Lock System 100 Channel Blocking 103 Movie & TV Rating 104 Downloadable Rating 109 External Input Blocking ...APPENDIX Troubleshooting 112 Maintenance 114 Product Specifications 114 IR Codes 116 External Control Through RS-232C 118 7 Caption Option 95 TIME SETTING Clock Setting - User Mode 85 Infinite Surround 86 Balance 87 TV Speakers On/Off Setup 88 Audio Reset 89 Stereo/SAP Broadcast ...
Owner's Manual
Page 8
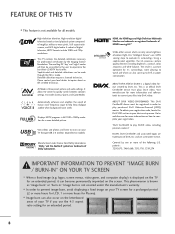
... by DivX, Inc. Displays HDTV programs in full 1920 x 1080p resolution for a more of Dolby Laboratories. Using a sophisticated algorithm, the LG processes picture quality elements including brightness, contrast, color, sharpness and white balance. ABOUT DIVX VIDEO: DivX® is displayed on -Demand (... TV contains the detailed calibrations necessary for an extended period. 8 Please contact your TV if you use the 4:3 aspect ratio setting for professional certification by one or more detailed picture. Automatically enhances and amplifies the sound of HDMI Licensing LLC." HDMI, the...
... by DivX, Inc. Displays HDTV programs in full 1920 x 1080p resolution for a more of Dolby Laboratories. Using a sophisticated algorithm, the LG processes picture quality elements including brightness, contrast, color, sharpness and white balance. ABOUT DIVX VIDEO: DivX® is displayed on -Demand (... TV contains the detailed calibrations necessary for an extended period. 8 Please contact your TV if you use the 4:3 aspect ratio setting for professional certification by one or more detailed picture. Automatically enhances and amplifies the sound of HDMI Licensing LLC." HDMI, the...
Owner's Manual
Page 18
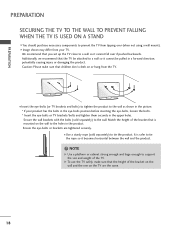
Additionally, we recommend that you set up the TV close to a wall so it cannot fall over (when not using a wall mount). Secure the wall brackets with the bolts (sold separately) ...
Additionally, we recommend that you set up the TV close to a wall so it cannot fall over (when not using a wall mount). Secure the wall brackets with the bolts (sold separately) ...
Owner's Manual
Page 20
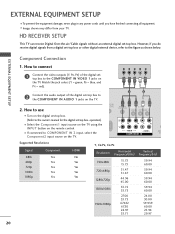
... Y PB PR L R 2 Connect the audio output of the digital settop box to the COMPONENT IN VIDEO 1 jacks on the digital set-top box. (Refer to the owner's manual for the digital set-top box. EXTERNAL EQUIPMENT SETUP s To prevent the equipment damage, never plug in any power cords until you do receive... on the TV using the INPUT button on the remote control. However, if you have finished connecting all equipment. s Image shown may differ from a digital set-top box or other digital external device, refer to COMPONENT IN 2 input, select the Component2 input source on the TV. 2.
... Y PB PR L R 2 Connect the audio output of the digital settop box to the COMPONENT IN VIDEO 1 jacks on the digital set-top box. (Refer to the owner's manual for the digital set-top box. EXTERNAL EQUIPMENT SETUP s To prevent the equipment damage, never plug in any power cords until you do receive... on the TV using the INPUT button on the remote control. However, if you have finished connecting all equipment. s Image shown may differ from a digital set-top box or other digital external device, refer to COMPONENT IN 2 input, select the Component2 input source on the TV. 2.
Owner's Manual
Page 21
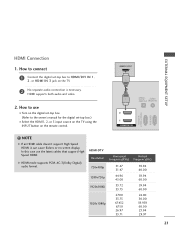
...& SERVICE) RGB IN(PC) ! How to use the latest cables that support High Speed HDMI. How to connect 1 Connect the digital set-top box to the owner's manual for the digital set -top box. (Refer to HDMI/DVI IN 1, 2, or HDMI IN 3 jack on the remote control. EXTERNAL EQUIPMENT SETUP HDMI Connection... 1. In this case use I Turn on the digital set -top box.) I Select the HDMI1, 2, or 3 input source on the TV using the INPUT button on the TV. 2 No separate audio connection is necessary.
...& SERVICE) RGB IN(PC) ! How to use the latest cables that support High Speed HDMI. How to connect 1 Connect the digital set-top box to the owner's manual for the digital set -top box. (Refer to HDMI/DVI IN 1, 2, or HDMI IN 3 jack on the remote control. EXTERNAL EQUIPMENT SETUP HDMI Connection... 1. In this case use I Turn on the digital set -top box.) I Select the HDMI1, 2, or 3 input source on the TV using the INPUT button on the TV. 2 No separate audio connection is necessary.
Owner's Manual
Page 22
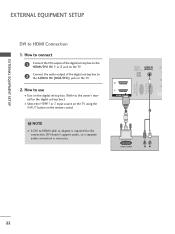
... box.) I Select the HDMI1 or 2 input source on the TV using the INPUT button on the remote control. ! How to use I Turn on the digital set -top box to HDMI Connection 1. NOTE G A DVI to the owner's manual for this connection. OPTICAL DIGITAL AUDIO OUT AUDIO IN (RGB/DVI) R CO RS-232C... SETUP EXTERNAL EQUIPMENT SETUP DVI to the AUDIO IN (RGB/DVI) jack on the TV. 2. How to connect 1 Connect the DVI output of the digital set-top box to the HDMI/DVI IN 1 or 2 jack on the TV. 2 Connect the audio output of the digital...
... box.) I Select the HDMI1 or 2 input source on the TV using the INPUT button on the remote control. ! How to use I Turn on the digital set -top box to HDMI Connection 1. NOTE G A DVI to the owner's manual for this connection. OPTICAL DIGITAL AUDIO OUT AUDIO IN (RGB/DVI) R CO RS-232C... SETUP EXTERNAL EQUIPMENT SETUP DVI to the AUDIO IN (RGB/DVI) jack on the TV. 2. How to connect 1 Connect the DVI output of the digital set-top box to the HDMI/DVI IN 1 or 2 jack on the TV. 2 Connect the audio output of the digital...

Owner's Manual
Page 25
... to the same channel number. How to the VCR owner's manual.) ANT OUT S-VIDEO VIDEO L R ANT IN OUTPUT SWITCH 2 Wall Jack Antenna Composite (RCA) Connection 1. I Set VCR output switch to 3 or 4 and then tune TV to the VCR owner's manual.) I Insert a video tape into the VCR and press PLAY on the...
... to the same channel number. How to the VCR owner's manual.) ANT OUT S-VIDEO VIDEO L R ANT IN OUTPUT SWITCH 2 Wall Jack Antenna Composite (RCA) Connection 1. I Set VCR output switch to 3 or 4 and then tune TV to the VCR owner's manual.) I Insert a video tape into the VCR and press PLAY on the...
Owner's Manual
Page 26
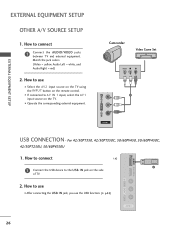
EXTERNAL EQUIPMENT SETUP OTHER A/V SOURCE SETUP 1. For 42/50PT350, 42/50PT350C, 50/60PV450, 50/60PV450C, 42/50PT250U, 50/60PV550U 1. How to use the USB function. (G p.52) AV IN 2 26 How to use I After connecting the USB I N jack, you ..., Audio Left = white, and Audio Right = red) 2. How to connect 1 Connect the AUDIO/VIDEO jacks between TV and external equipment. USB IN Camcorder Video Game Set VIDEO L R 1 EXTERNAL EQUIPMENT SETUP VIDEO L/MONO AUDIO R HDMI IN 3 AV IN 2 VIDEO L/MONO AUDIO R HDMI IN 3 USB IN USB CONNECTION -
EXTERNAL EQUIPMENT SETUP OTHER A/V SOURCE SETUP 1. For 42/50PT350, 42/50PT350C, 50/60PV450, 50/60PV450C, 42/50PT250U, 50/60PV550U 1. How to use the USB function. (G p.52) AV IN 2 26 How to use I After connecting the USB I N jack, you ..., Audio Left = white, and Audio Right = red) 2. How to connect 1 Connect the AUDIO/VIDEO jacks between TV and external equipment. USB IN Camcorder Video Game Set VIDEO L R 1 EXTERNAL EQUIPMENT SETUP VIDEO L/MONO AUDIO R HDMI IN 3 AV IN 2 VIDEO L/MONO AUDIO R HDMI IN 3 USB IN USB CONNECTION -
Owner's Manual
Page 27
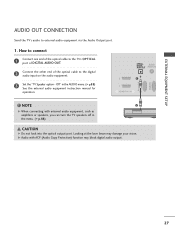
...(PC) 2 1 1 HDMII/DVI IN ! EXTERNAL EQUIPMENT SETUP (CONTROL & SERVICE) AUDIO OUT CONNECTION Send the TV's audio to the digital audio input on the audio equipment. 3 Set the "TV Speaker option - G Audio with external audio equipment, such as amplifiers or speakers, you can turn the TV speakers off in the AUDIO menu...
...(PC) 2 1 1 HDMII/DVI IN ! EXTERNAL EQUIPMENT SETUP (CONTROL & SERVICE) AUDIO OUT CONNECTION Send the TV's audio to the digital audio input on the audio equipment. 3 Set the "TV Speaker option - G Audio with external audio equipment, such as amplifiers or speakers, you can turn the TV speakers off in the AUDIO menu...
Owner's Manual
Page 29
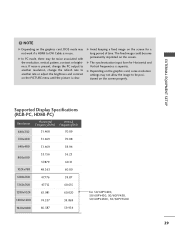
... HDMI to be noise associated with the resolution, vertical pattern, contrast or brightness. G Avoid keeping a fixed image on the graphics card, some resolution settings may be positioned on the screen properly. G The synchronization input form for a long period of time. G Depending on the screen for Horizontal and ... 60.015 1280x1024 63.981 60.020 1600x1200 74.537 59.869 1920x1080 66.587 59.934 For 50/60PV400, 50/60PV430, 50/60PV450, 50/60PV450C, 50/60PV550U 29 The fixed image could become permanently imprinted on the PICTURE menu until the picture is in use. G...
... HDMI to be noise associated with the resolution, vertical pattern, contrast or brightness. G Avoid keeping a fixed image on the graphics card, some resolution settings may be positioned on the screen properly. G The synchronization input form for a long period of time. G Depending on the screen for Horizontal and ... 60.015 1280x1024 63.981 60.020 1600x1200 74.537 59.869 1920x1080 66.587 59.934 For 50/60PV400, 50/60PV430, 50/60PV450, 50/60PV450C, 50/60PV550U 29 The fixed image could become permanently imprinted on the PICTURE menu until the picture is in use. G...
Owner's Manual
Page 31
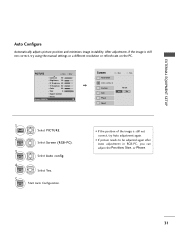
To Set Yes No 1 Home 2 ENTER Select PICTURE. EXTERNAL EQUIPMENT SETUP Auto Configure Automatically adjusts picture position and minimizes image instability. Select Screen (RGB-PC). 3 ENTER Select ... RGB-PC, you can adjust the Position, Si ze, or Phase. 31 After adjustment, if the image is still not correct, try using the manual settings or a different resolution or refresh rate on the PC. PICTURE Move E • Contrast 90 • Brightness 50 • H Sharpness 60 • V Sharpness 60 • Color...
To Set Yes No 1 Home 2 ENTER Select PICTURE. EXTERNAL EQUIPMENT SETUP Auto Configure Automatically adjusts picture position and minimizes image instability. Select Screen (RGB-PC). 3 ENTER Select ... RGB-PC, you can adjust the Position, Si ze, or Phase. 31 After adjustment, if the image is still not correct, try using the manual settings or a different resolution or refresh rate on the PC. PICTURE Move E • Contrast 90 • Brightness 50 • H Sharpness 60 • V Sharpness 60 • Color...
Owner's Manual
Page 33
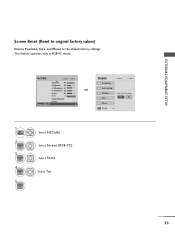
... No Phase Reset G 33 Select Reset. EXTERNAL EQUIPMENT SETUP Screen Reset (Reset to original factory values) Returns Position, S i z e, and Phase to the default factory settings. Position Size Initialize Settings. PICTURE Move E • Contrast 90 • Brightness 50 • H Sharpness 60 • V Sharpness 60 • Color 60 • Tint 0R • Expert Control...
... No Phase Reset G 33 Select Reset. EXTERNAL EQUIPMENT SETUP Screen Reset (Reset to original factory values) Returns Position, S i z e, and Phase to the default factory settings. Position Size Initialize Settings. PICTURE Move E • Contrast 90 • Brightness 50 • H Sharpness 60 • V Sharpness 60 • Color 60 • Tint 0R • Expert Control...

Owner's Manual
Page 35
... Home Displays the main menu or clears all on -screen menus and adjusts the system settings to your preference. (Up/Down/Left Right/ENTER) BACK Allows the user to apply the Picture Wizard setting. Opens the SIMPLINK menu. THUMBSTICK Navigates the on -screen displays and return to TV ...viewing from one full set of screen information to TV viewing. Use to the TV; RATIO Changes the aspect ratio...
... Home Displays the main menu or clears all on -screen menus and adjusts the system settings to your preference. (Up/Down/Left Right/ENTER) BACK Allows the user to apply the Picture Wizard setting. Opens the SIMPLINK menu. THUMBSTICK Navigates the on -screen displays and return to TV ...viewing from one full set of screen information to TV viewing. Use to the TV; RATIO Changes the aspect ratio...
Owner's Manual
Page 37
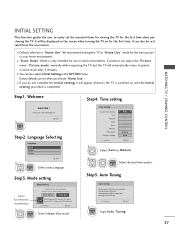
...on until the Initial setting procedure is "Home Use". I You can also adjust Initial Setting in retail environments. I "Store Demo" Mode is only intended for choosing LG Next Step2. WATCHING TV / CHANNEL CONTROL Step1. Step3. Time setting Time Setting Current Time Setting Year Month Date ... desired time option. I If you want. Thank you choose "Home Use". Previous Next Select H om e U s e mode. Factory defaults are set the essential items for viewing the TV for the best picture in -store mode after 5 minutes. Welcome 1 ENTER WELCOME ! To use this TV at...
...on until the Initial setting procedure is "Home Use". I You can also adjust Initial Setting in retail environments. I "Store Demo" Mode is only intended for choosing LG Next Step2. WATCHING TV / CHANNEL CONTROL Step1. Step3. Time setting Time Setting Current Time Setting Year Month Date ... desired time option. I If you want. Thank you choose "Home Use". Previous Next Select H om e U s e mode. Factory defaults are set the essential items for viewing the TV for the best picture in -store mode after 5 minutes. Welcome 1 ENTER WELCOME ! To use this TV at...
Owner's Manual
Page 38
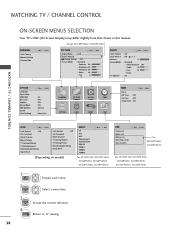
...Surround: Off • Treble 50 • Bass 50 • Reset : On OPTION Language Input Label SIMPLINK Key Lock Caption Demo Mode ISM Method Set ID Initial Setting Move Enter : On : Off : Off : Off : Normal : 1 : Home Use CHANNEL PICTURE AUDIO TIME OPTION LOCK INPUT USB TIME Clock Off... Block Lock System : Off Set Password Block Channel TV Rating-English TV Rating-French Downloadable Rating Input Block (Depending on model) INPUT TV AV1 AV2 Component1 Component2 RGB-PC HDMI1 HDMI2 HDMI3 Move Enter For 42/50PT350, 42/50PT350C, 50/60PV450, 50/60PV450C, 42/50PT250U,...
...Surround: Off • Treble 50 • Bass 50 • Reset : On OPTION Language Input Label SIMPLINK Key Lock Caption Demo Mode ISM Method Set ID Initial Setting Move Enter : On : Off : Off : Off : Normal : 1 : Home Use CHANNEL PICTURE AUDIO TIME OPTION LOCK INPUT USB TIME Clock Off... Block Lock System : Off Set Password Block Channel TV Rating-English TV Rating-French Downloadable Rating Input Block (Depending on model) INPUT TV AV1 AV2 Component1 Component2 RGB-PC HDMI1 HDMI2 HDMI3 Move Enter For 42/50PT350, 42/50PT350C, 50/60PV450, 50/60PV450C, 42/50PT250U,...
Owner's Manual
Page 40
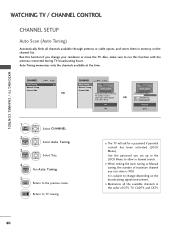
... during Auto Tuning. The previous channel information will ask for a password if parental control has been activated (LOCK Menu). Use the password you set up in memory on the broadcasting signal environment. Also, make sure to run this function if you change depending on the channel list. s When... setting the Auto tuning or Manual tuning, the number of DTV, TV, CADTV, and CATV. 40 s The TV will be updated during TV broadcasting hours...
... during Auto Tuning. The previous channel information will ask for a password if parental control has been activated (LOCK Menu). Use the password you set up in memory on the broadcasting signal environment. Also, make sure to run this function if you change depending on the channel list. s When... setting the Auto tuning or Manual tuning, the number of DTV, TV, CADTV, and CATV. 40 s The TV will be updated during TV broadcasting hours...
Owner's Manual
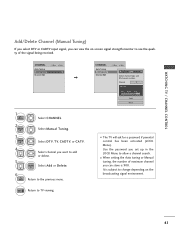
Page 41
... in the LOCK Menu to allow a channel search. s When setting the Auto tuning or Manual tuning, the number of the signal being received. Select Manual Tuning. 3 ENTER 4 5 Select D T V, T V, CADTV, or CA T V. ENTER Select A d d or D e l e t e. 6 BACK ...
... in the LOCK Menu to allow a channel search. s When setting the Auto tuning or Manual tuning, the number of the signal being received. Select Manual Tuning. 3 ENTER 4 5 Select D T V, T V, CADTV, or CA T V. ENTER Select A d d or D e l e t e. 6 BACK ...

Owner's Manual
Page 47
... with using Blue button s When new external device is connected, this ? New external device is displayed automatically. s Component: Select them to watch DVD or a Digital set-top box. Input Label Then, you want to enjoy this popup menu is connected. s A V: Select them to watch over-the-air, cable and digital cable...
... with using Blue button s When new external device is connected, this ? New external device is displayed automatically. s Component: Select them to watch DVD or a Digital set-top box. Input Label Then, you want to enjoy this popup menu is connected. s A V: Select them to watch over-the-air, cable and digital cable...


