
Owner's Manual
Page 6
Add / Delete Channel (Manual Tuning 41 - User Mode 76 Picture Improvement Technology 77 Expert Picture Control 78 Picture Reset 80 Demo Mode 80 Image Sticking Minimization (ISM) Method 81 6 Auto Scan (Auto Tuning 40 - Channel ... 52 Photo List 53 Music List 59 Movie List 62 DivX Registration Code 68 Deactivation 69 PICTURE CONTROL Picture Size (Aspect Ratio) Control 70 Picture Wizard 72 Energy Saving 74 Preset Picture Settings (Picture Mode 75 Manual Picture Adjustment - CONTENTS WARNING 2 SAFETY INSTRUCTIONS 3 FEATURE OF THIS TV 8 PREPARATION Accessories 9 ...
Add / Delete Channel (Manual Tuning 41 - User Mode 76 Picture Improvement Technology 77 Expert Picture Control 78 Picture Reset 80 Demo Mode 80 Image Sticking Minimization (ISM) Method 81 6 Auto Scan (Auto Tuning 40 - Channel ... 52 Photo List 53 Music List 59 Movie List 62 DivX Registration Code 68 Deactivation 69 PICTURE CONTROL Picture Size (Aspect Ratio) Control 70 Picture Wizard 72 Energy Saving 74 Preset Picture Settings (Picture Mode 75 Manual Picture Adjustment - CONTENTS WARNING 2 SAFETY INSTRUCTIONS 3 FEATURE OF THIS TV 8 PREPARATION Accessories 9 ...
Owner's Manual
Page 8
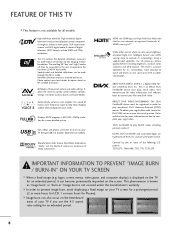
...Certified® device that plays DivX video. "Dolby "and the double-D symbol are trademarks of HDMI Licensing LLC." This is three preset picture and audio settings. Visit www.divx.com for professional certification by DivX, Inc. "DivX Certified® to watch and which can be accessible by one ... for an extended period. 8 To obtain your registration code, locate the DivX VOD section in ." Covered by the user to experience the best their LG HDTV has to prevent image burn, avoid displaying a fixed image on your TV screen for a prolonged period (2 or more hours for LCD, 1...
...Certified® device that plays DivX video. "Dolby "and the double-D symbol are trademarks of HDMI Licensing LLC." This is three preset picture and audio settings. Visit www.divx.com for professional certification by DivX, Inc. "DivX Certified® to watch and which can be accessible by one ... for an extended period. 8 To obtain your registration code, locate the DivX VOD section in ." Covered by the user to experience the best their LG HDTV has to prevent image burn, avoid displaying a fixed image on your TV screen for a prolonged period (2 or more hours for LCD, 1...

Owner's Manual
Page 18
...) to tighten the product to the wall as shown in the picture. * If your TV. Additionally, we recommend that the TV be attached to a wall so it cannot be pulled in the product. Match the height of the bracket that you set up the TV close to a wall so it becomes horizontal...
...) to tighten the product to the wall as shown in the picture. * If your TV. Additionally, we recommend that the TV be attached to a wall so it cannot be pulled in the product. Match the height of the bracket that you set up the TV close to a wall so it becomes horizontal...

Owner's Manual
Page 29
...the screen. EXTERNAL EQUIPMENT SETUP ! If noise is in use. G Depending on the graphics card, some resolution settings may not allow the image to another resolution, change the refresh rate to be noise associated with the resolution, ...60.015 1280x1024 63.981 60.020 1600x1200 74.537 59.869 1920x1080 66.587 59.934 For 60PV250, 50/60PV400, 50/60PV450, 50/60PV450C, 50/60PV550U 29 G Avoid keeping a fixed image on the graphics card, DOS mode...Vertical frequencies is clear. The fixed image could become permanently imprinted on the PICTURE menu until the picture is separate.
...the screen. EXTERNAL EQUIPMENT SETUP ! If noise is in use. G Depending on the graphics card, some resolution settings may not allow the image to another resolution, change the refresh rate to be noise associated with the resolution, ...60.015 1280x1024 63.981 60.020 1600x1200 74.537 59.869 1920x1080 66.587 59.934 For 60PV250, 50/60PV400, 50/60PV450, 50/60PV450C, 50/60PV550U 29 G Avoid keeping a fixed image on the graphics card, DOS mode...Vertical frequencies is clear. The fixed image could become permanently imprinted on the PICTURE menu until the picture is separate.
Owner's Manual
Page 31
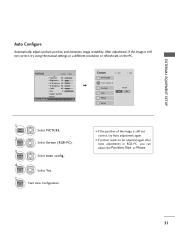
After adjustment, if the image is still not correct, try using the manual settings or a different resolution or refresh rate on the PC. G Position Size Phase Reset Move Prev. To Set Yes No 1 Home 2 ENTER Select PICTURE. PICTURE Move E • Contrast 90 • Brightness 50 • H Sharpness 60 ...5 ENTER Start Auto Configuration. • If the position of the image is still not correct, try Auto adjustment again. • If picture needs to be adjusted again after Auto adjustment in RGB-PC, you can adjust the Position, Si ze, or Phase. 31 EXTERNAL EQUIPMENT ...
After adjustment, if the image is still not correct, try using the manual settings or a different resolution or refresh rate on the PC. G Position Size Phase Reset Move Prev. To Set Yes No 1 Home 2 ENTER Select PICTURE. PICTURE Move E • Contrast 90 • Brightness 50 • H Sharpness 60 ...5 ENTER Start Auto Configuration. • If the position of the image is still not correct, try Auto adjustment again. • If picture needs to be adjusted again after Auto adjustment in RGB-PC, you can adjust the Position, Si ze, or Phase. 31 EXTERNAL EQUIPMENT ...

Owner's Manual
Page 33
...; V Sharpness 60 • Color 60 • Tint 0R • Expert Control • Reset Screen (RGB-PC) Enter G 1 Home 2 ENTER 3 ENTER 4 ENTER 5 ENTER Select PICTURE. Position Size Initialize Settings. Select Reset. Resolution Auto config. Select Screen (RGB-PC). EXTERNAL EQUIPMENT SETUP Screen Reset (Reset to original factory values) Returns Position, S i z e, and Phase to...
...; V Sharpness 60 • Color 60 • Tint 0R • Expert Control • Reset Screen (RGB-PC) Enter G 1 Home 2 ENTER 3 ENTER 4 ENTER 5 ENTER Select PICTURE. Position Size Initialize Settings. Select Reset. Resolution Auto config. Select Screen (RGB-PC). EXTERNAL EQUIPMENT SETUP Screen Reset (Reset to original factory values) Returns Position, S i z e, and Phase to...
Owner's Manual
Page 35
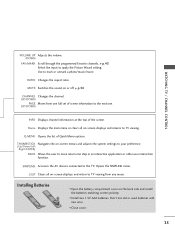
... on -screen displays and returns to move return one . I Install two 1.5V AAA batteries. EXIT Clears all on -screen menus and adjusts the system settings to your preference. (Up/Down/Left Right/ENTER) BACK Allows the user to TV viewing. Don't mix old or used batteries with new ones. Use... to apply the Picture Wizard setting. Home Displays the main menu or clears all on-screen displays and return to TV viewing from one full set of screen information to the TV; WATCHING TV / CHANNEL CONTROL VOLUME UP Adjusts the ...
... on -screen displays and returns to move return one . I Install two 1.5V AAA batteries. EXIT Clears all on -screen menus and adjusts the system settings to your preference. (Up/Down/Left Right/ENTER) BACK Allows the user to TV viewing. Don't mix old or used batteries with new ones. Use... to apply the Picture Wizard setting. Home Displays the main menu or clears all on-screen displays and return to TV viewing from one full set of screen information to the TV; WATCHING TV / CHANNEL CONTROL VOLUME UP Adjusts the ...
Owner's Manual
Page 37
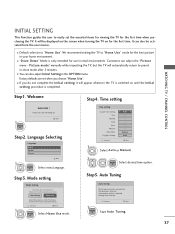
... TV on until the Initial setting procedure is completed. We recommend setting the TV to "Home Use" mode for choosing LG Next Step2. Step3. Auto Tuning Auto Tuning Check your home environment. It can adjust the "Picture menu - Choose the setting mode you choose "Home Use". Time setting Time Setting Current Time Setting Year Month Date Hour Minute...
... TV on until the Initial setting procedure is completed. We recommend setting the TV to "Home Use" mode for choosing LG Next Step2. Step3. Auto Tuning Auto Tuning Check your home environment. It can adjust the "Picture menu - Choose the setting mode you choose "Home Use". Time setting Time Setting Current Time Setting Year Month Date Hour Minute...
Owner's Manual
Page 38
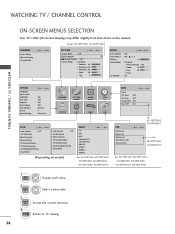
...SIMPLINK Key Lock Caption Demo Mode ISM Method Set ID Initial Setting Move Enter : On : Off : Off : Off : Normal : 1 : Home Use CHANNEL PICTURE AUDIO TIME OPTION LOCK INPUT USB LOCK Move Enter Lock System : Off Set Password Block Channel Movie Rating TV Rating-...Children TV Rating-General Downloadable Rating Input Block Lock System : Off Set Password Block Channel TV Rating-English TV Rating-...
...SIMPLINK Key Lock Caption Demo Mode ISM Method Set ID Initial Setting Move Enter : On : Off : Off : Off : Normal : 1 : Home Use CHANNEL PICTURE AUDIO TIME OPTION LOCK INPUT USB LOCK Move Enter Lock System : Off Set Password Block Channel Movie Rating TV Rating-...Children TV Rating-General Downloadable Rating Input Block Lock System : Off Set Password Block Channel TV Rating-English TV Rating-...
Owner's Manual
Page 49
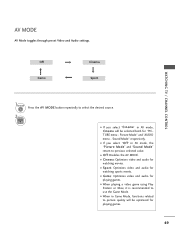
... button repeatedly to select the desired source. 2 ENTER I When in AV mode, Cinema will be selected both for "PICTURE menu - I Sport: Optimizes video and audio for playing games. I O f f: Disables the AV MODE. I ...audio for watching sports events. I If you select "O f f" in AV mode, the "Picture Mode" and "Sound Mode" return to use the Game Mode. Picture Mode" and "AUDIO menu - Sound Mode" respectively. I When playing a video game using...Game Mode, functions related to picture quality will be optimized for watching movies. AV MODE AV Mode toggles through preset Video...
... button repeatedly to select the desired source. 2 ENTER I When in AV mode, Cinema will be selected both for "PICTURE menu - I Sport: Optimizes video and audio for playing games. I O f f: Disables the AV MODE. I ...audio for watching sports events. I If you select "O f f" in AV mode, the "Picture Mode" and "Sound Mode" return to use the Game Mode. Picture Mode" and "AUDIO menu - Sound Mode" respectively. I When playing a video game using...Game Mode, functions related to picture quality will be optimized for watching movies. AV MODE AV Mode toggles through preset Video...
Owner's Manual
Page 58
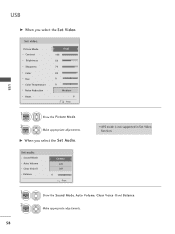
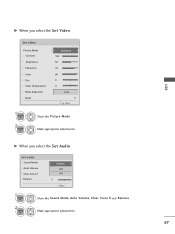
G When you select the Set Video. Sound Mode Auto Volume Clear Voice ll Balance Cinema Off Off 0 L R Prev. 1 ENTER 2 ENTER Show the Sound Mode, Auto Volume, Clear Voice II and Balance. Make appropriate adjustments. Picture Mode Contrast Brightness Sharpness Color Tint Color Temperature Noise Reduction Reset Vivid 100 50 70 80 0 W C 0 W C Medium Prev. 1 ENTER 2 ENTER Show the Picture Mode. Set audio. I APS mode is not supported in Set Video function. Make appropriate adjustments. 58 USB USB G When you select the Set Audio. Set video.
G When you select the Set Video. Sound Mode Auto Volume Clear Voice ll Balance Cinema Off Off 0 L R Prev. 1 ENTER 2 ENTER Show the Sound Mode, Auto Volume, Clear Voice II and Balance. Make appropriate adjustments. Picture Mode Contrast Brightness Sharpness Color Tint Color Temperature Noise Reduction Reset Vivid 100 50 70 80 0 W C 0 W C Medium Prev. 1 ENTER 2 ENTER Show the Picture Mode. Set audio. I APS mode is not supported in Set Video function. Make appropriate adjustments. 58 USB USB G When you select the Set Audio. Set video.
Owner's Manual
Page 66
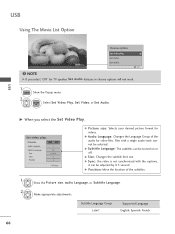
... Language: Changes the Language Group of the subtitles. 1 Show the Picture size, audio Language, or Subtitle Language. 2 Make appropriate adjustments. G Size: Changes the subtitle font size. Picture Size Audio Language F Full G 1 Subtitle Language . Size . Set video play . Exit ! G Picture size: Selects your desired picture format for videos. Subtitle Language Group Latin1 Supported Language English, Spanish...
... Language: Changes the Language Group of the subtitles. 1 Show the Picture size, audio Language, or Subtitle Language. 2 Make appropriate adjustments. G Size: Changes the subtitle font size. Picture Size Audio Language F Full G 1 Subtitle Language . Size . Set video play . Exit ! G Picture size: Selects your desired picture format for videos. Subtitle Language Group Latin1 Supported Language English, Spanish...
Owner's Manual
Page 67
Set audio. Picture Mode Contrast Brightness Sharpness Color Tint Color Temperature Noise Reduction Reset Standard 100 50 70 80 0 W C 0 W C Low Prev. 1 ENTER 2 ENTER Show the Picture Mode. Sound Mode Auto Volume Clear Voice ll Balance Cinema Off Off 0 L R Prev. 1 ENTER Show the Sound Mode, Auto Volume, Clear Voice II and Balance. 2 ENTER Make appropriate adjustments. 67 USB G When you select the Set Video. G When you select the Set Audio. Make appropriate adjustments. Set video.
Set audio. Picture Mode Contrast Brightness Sharpness Color Tint Color Temperature Noise Reduction Reset Standard 100 50 70 80 0 W C 0 W C Low Prev. 1 ENTER 2 ENTER Show the Picture Mode. Sound Mode Auto Volume Clear Voice ll Balance Cinema Off Off 0 L R Prev. 1 ENTER Show the Sound Mode, Auto Volume, Clear Voice II and Balance. 2 ENTER Make appropriate adjustments. 67 USB G When you select the Set Video. G When you select the Set Audio. Make appropriate adjustments. Set video.

Owner's Manual
Page 70
...is displayed on the remote control. I RGB-PC input only supports 4:3 and 16:9 aspect ratio. PICTURE CONTROL 70 I You can also press the RATIO button repeatedly on your TV. Q.Menu Aspect Ratio Picture Mode Sound Mode Caption Multi Audio Sleep Timer CH Del/Add/Fav F 16:9 G Vivid Standard ...Off English Off Add Eject USB Eject Close 16:9 Cinema Zoom Just Scan Zoom Set By Program 4:3 1 Q.MENU 2 Select the Aspect Ratio.
...is displayed on the remote control. I RGB-PC input only supports 4:3 and 16:9 aspect ratio. PICTURE CONTROL 70 I You can also press the RATIO button repeatedly on your TV. Q.Menu Aspect Ratio Picture Mode Sound Mode Caption Multi Audio Sleep Timer CH Del/Add/Fav F 16:9 G Vivid Standard ...Off English Off Add Eject USB Eject Close 16:9 Cinema Zoom Just Scan Zoom Set By Program 4:3 1 Q.MENU 2 Select the Aspect Ratio.

Owner's Manual
Page 71
...Scan is activated. 16:9 Adjust the picture horizontally, in a linear proportion to fill the entire screen. 4:3 Choose 4:3 when you want to view the picture without any alteration. Notes: If there is 1-16. 71 JUST SCAN Set By Program Selects the proper picture proportion to match the source's image.... (4:3 4:3) AUTO (16:9 16:9) AUTO Zoom Choose Zoom when you want to view a picture with an original 4:3 aspect ratio. PICTURE CONTROL Just Scan Normally the edges of video...
...Scan is activated. 16:9 Adjust the picture horizontally, in a linear proportion to fill the entire screen. 4:3 Choose 4:3 when you want to view the picture without any alteration. Notes: If there is 1-16. 71 JUST SCAN Set By Program Selects the proper picture proportion to match the source's image.... (4:3 4:3) AUTO (16:9 16:9) AUTO Zoom Choose Zoom when you want to view a picture with an original 4:3 aspect ratio. PICTURE CONTROL Just Scan Normally the edges of video...

Owner's Manual
Page 72
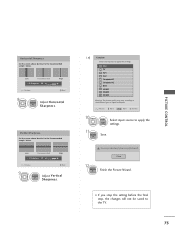
... below . Tint Set the screen above identical to the Recommended sample below . Except 42/50PT250U, 50/60PV550U This feature lets you can see the example of the original image. Color Picture Wizard With Picture Wizard, you adjust the picture quality of the changes...When you adjust the image to calibrate the screen quality by easily following each step. Black Level Set the screen above identical to the Recommended sample below . G Previous Next 3 ENTER Adjust Picture Wizard. Set the screen above identical to the Recommended sample below . Use this to L o w, Recommended...
... below . Tint Set the screen above identical to the Recommended sample below . Except 42/50PT250U, 50/60PV550U This feature lets you can see the example of the original image. Color Picture Wizard With Picture Wizard, you adjust the picture quality of the changes...When you adjust the image to calibrate the screen quality by easily following each step. Black Level Set the screen above identical to the Recommended sample below . G Previous Next 3 ENTER Adjust Picture Wizard. Set the screen above identical to the Recommended sample below . Use this to L o w, Recommended...
Owner's Manual
Page 73
... adjustment value is saved to the different types of signal and inputs. Close 12 ENTER Finish the Picture Wizard. Low Recommended E • H Sharpness 50 Previous E High Next 8 ENTER Adjust Horizontal S h a r p n e s s. I If you stop the setting before the final step, the changes will not be saved to the Recommended sample below . Horizontal Sharpness...
... adjustment value is saved to the different types of signal and inputs. Close 12 ENTER Finish the Picture Wizard. Low Recommended E • H Sharpness 50 Previous E High Next 8 ENTER Adjust Horizontal S h a r p n e s s. I If you stop the setting before the final step, the changes will not be saved to the Recommended sample below . Horizontal Sharpness...

Owner's Manual
Page 74
...60 • Color 60 • Tint 0 R E Intelligent Sensor Off Minimum Medium Maximum Screen Off G 1 Home 2 ENTER Select PICTURE. This feature is disabled in "Picture Mode-Cinema". Select Energy Saving. 3 ENTER Select Intelligent Sensor, O f f, Minimum, Medium, or Maximum. 4 BACK Return to TV... of your screen by adjusting the Energy Saving level or by setting the Picture Mode. I You can increase the brightness of screen to the most suitable picture according to the surrounding conditions. I Intelligent Sensor? PICTURE CONTROL 74 You can also adjust the E N E R ...
...60 • Color 60 • Tint 0 R E Intelligent Sensor Off Minimum Medium Maximum Screen Off G 1 Home 2 ENTER Select PICTURE. This feature is disabled in "Picture Mode-Cinema". Select Energy Saving. 3 ENTER Select Intelligent Sensor, O f f, Minimum, Medium, or Maximum. 4 BACK Return to TV... of your screen by adjusting the Energy Saving level or by setting the Picture Mode. I You can increase the brightness of screen to the most suitable picture according to the surrounding conditions. I Intelligent Sensor? PICTURE CONTROL 74 You can also adjust the E N E R ...
Owner's Manual
Page 75
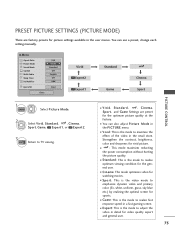
...: This is the mode to realize fast response speed in the PICTURE menu. I V i v i d, S t a n d a r d, , C i n e m a, AutoPowerSave Sport, and Ga m e Settings are factory presets for picture settings available in detail for video quality expert and general user. 75 PRESET PICTURE SETTINGS (PICTURE MODE) There are preset for the optimum picture quality at the factory. I S p o r t: This is the mode to adjust the...
...: This is the mode to realize fast response speed in the PICTURE menu. I V i v i d, S t a n d a r d, , C i n e m a, AutoPowerSave Sport, and Ga m e Settings are factory presets for picture settings available in detail for video quality expert and general user. 75 PRESET PICTURE SETTINGS (PICTURE MODE) There are preset for the optimum picture quality at the factory. I S p o r t: This is the mode to adjust the...
Owner's Manual
Page 78
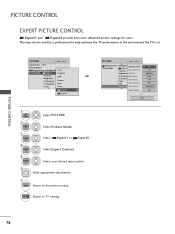
... ContCrolor Gamut E Edge Enhancer F Off G Off Medium Low Off HD Standard Off E Close 78 PICTURE Move Enter Aspect Ratio : 16:9 Picture Wizard Energy Saving : Intelligent SenVsoivrid Picture Mode : Expert1 Standard • Contrast 80 • Brightness Auto Power Save 50 • H... Expert1 Expert2 1 Home 2 ENTER Select PICTURE. This may also be used be a professional to help optimize the TV performance in the environment the TV is in. PICTURE CONTROL PICTURE CONTROL EXPERT PICTURE CONTROL Expert1 and Expert2 provide even more advanced picture settings for users.
... ContCrolor Gamut E Edge Enhancer F Off G Off Medium Low Off HD Standard Off E Close 78 PICTURE Move Enter Aspect Ratio : 16:9 Picture Wizard Energy Saving : Intelligent SenVsoivrid Picture Mode : Expert1 Standard • Contrast 80 • Brightness Auto Power Save 50 • H... Expert1 Expert2 1 Home 2 ENTER Select PICTURE. This may also be used be a professional to help optimize the TV performance in the environment the TV is in. PICTURE CONTROL PICTURE CONTROL EXPERT PICTURE CONTROL Expert1 and Expert2 provide even more advanced picture settings for users.


