

Specification (English)
Page 2
...Labeling • Quick View (Previous Channel) • Quick Setup Guide • e-Manual • Parental Control w/V-Chip • Key Lock • Closed Caption • LG SimpLink (HDMI CEC) • CONVENIENCE FEATURES Language English/Spanish/French/Korean Auto Tuning/... Output Power (Watts - Component 1080p/1080i/720p - All rights reserved. PLASMA TV 60PS60 60" Class Full HD 1080p Plasma TV (59.5" diagonal) LGusa.com PLASMA SPECIFICATION Screen Size 60" Class (59.5" diagonal) Native Display Resolution 1920 x 1080p Brightness (cd/m2) 1,500...
...Labeling • Quick View (Previous Channel) • Quick Setup Guide • e-Manual • Parental Control w/V-Chip • Key Lock • Closed Caption • LG SimpLink (HDMI CEC) • CONVENIENCE FEATURES Language English/Spanish/French/Korean Auto Tuning/... Output Power (Watts - Component 1080p/1080i/720p - All rights reserved. PLASMA TV 60PS60 60" Class Full HD 1080p Plasma TV (59.5" diagonal) LGusa.com PLASMA SPECIFICATION Screen Size 60" Class (59.5" diagonal) Native Display Resolution 1920 x 1080p Brightness (cd/m2) 1,500...

Owner's Manual (English)
Page 1
... picture setting or enabling other features will be achieved. Record it for Energy Star rating. PLASMA TV OWNER'S MANUAL 42PQ20 50PQ20 42PQ30 50PQ30 42PQ31 50PQ31 42PQ60 50PQ60 50PS30 50PS60 60PS60 42PQ30C 50PQ30C 50PS60C 60PS60C 50PS70 60PS70 50PS80 60PS80 Please read this is located on the back and...the limits necessary to quality for future reference. The model and serial number of the TV. Serial: 1-800-243-0000 USA, Consumer User 1-888-865-3026 USA, Commercial User 1-888-542-2623 CANADA LG Customer Information Center P/NO : SAC33575901(0905-REV06) www.lgusa.com / www...
... picture setting or enabling other features will be achieved. Record it for Energy Star rating. PLASMA TV OWNER'S MANUAL 42PQ20 50PQ20 42PQ30 50PQ30 42PQ31 50PQ31 42PQ60 50PQ60 50PS30 50PS60 60PS60 42PQ30C 50PQ30C 50PS60C 60PS60C 50PS70 60PS70 50PS80 60PS80 Please read this is located on the back and...the limits necessary to quality for future reference. The model and serial number of the TV. Serial: 1-800-243-0000 USA, Consumer User 1-888-865-3026 USA, Commercial User 1-888-542-2623 CANADA LG Customer Information Center P/NO : SAC33575901(0905-REV06) www.lgusa.com / www...

Owner's Manual (English)
Page 4
... the cord of your appliance, and if its appearance indicates damage or deterioration, unplug it, discontinue use a damaged or loose power cord. a TV with wet hands. The plug must be placed upon . Check the specification page of fire or electrical shock, do grasp the plug when unplugging ...such as this product to be certain. Do not pull on or over the apparatus (e.g. that is recommend that you turn off this owner's manual to rain, moisture or other liquids. Any of these conditions could result in . Pay particular attention to ground the unit by an authorized servicer...
... the cord of your appliance, and if its appearance indicates damage or deterioration, unplug it, discontinue use a damaged or loose power cord. a TV with wet hands. The plug must be placed upon . Check the specification page of fire or electrical shock, do grasp the plug when unplugging ...such as this product to be certain. Do not pull on or over the apparatus (e.g. that is recommend that you turn off this owner's manual to rain, moisture or other liquids. Any of these conditions could result in . Pay particular attention to ground the unit by an authorized servicer...
Owner's Manual (English)
Page 6
... Setup 21 Other A/V Source Setup 23 Audio Out Connection 23 USB Connection 24 PC Setup 25 WATCHING TV / CHANNEL CONTROL Remote Control Functions 30 Turning On TV 34 Channel Selection 34 Volume Adjustment 34 Initial Setting 35 On-Screen Menus Selection 37 Quick Menu 38 ... Deactivation 63 PICTURE CONTROL Picture Size (Aspect Ratio) Control 64 Picture Wizard 66 Energy Saving 68 Preset Picture Settings(Picture Mode 69 Manual Picture Adjustment - User Mode 70 Picture Improvement Technology 71 Expert Picture Control 72 Picture Reset 74 Image Sticking Minimization (ISM) Method...
... Setup 21 Other A/V Source Setup 23 Audio Out Connection 23 USB Connection 24 PC Setup 25 WATCHING TV / CHANNEL CONTROL Remote Control Functions 30 Turning On TV 34 Channel Selection 34 Volume Adjustment 34 Initial Setting 35 On-Screen Menus Selection 37 Quick Menu 38 ... Deactivation 63 PICTURE CONTROL Picture Size (Aspect Ratio) Control 64 Picture Wizard 66 Energy Saving 68 Preset Picture Settings(Picture Mode 69 Manual Picture Adjustment - User Mode 70 Picture Improvement Technology 71 Expert Picture Control 72 Picture Reset 74 Image Sticking Minimization (ISM) Method...
Owner's Manual (English)
Page 7
Auto Clock Setup 90 Manual Clock Setup 91 Auto On/Off Time Setting 92 Sleep Timer Setting 93 PARENTAL CONTROL / RATINGS Set Password & Lock System 94 Channel Blocking 97 Movie & TV Rating 98 Downloadable Rating 103 External Input Blocking 104 Key lock 105 APPENDIX Troubleshooting 106 Maintenance ... 78 Preset Sound Settings (Sound Mode) 79 Sound Setting Adjustment - Analog Broadcasting System Captions 87 - User Mode 80 Balance 81 TV Speakers On/Off Setup 82 Audio Reset 83 Stereo/SAP Broadcasts Setup 84 Audio Language 85 On-Screen Menus Language Selection 86 Caption Mode -...
Auto Clock Setup 90 Manual Clock Setup 91 Auto On/Off Time Setting 92 Sleep Timer Setting 93 PARENTAL CONTROL / RATINGS Set Password & Lock System 94 Channel Blocking 97 Movie & TV Rating 98 Downloadable Rating 103 External Input Blocking 104 Key lock 105 APPENDIX Troubleshooting 106 Maintenance ... 78 Preset Sound Settings (Sound Mode) 79 Sound Setting Adjustment - Analog Broadcasting System Captions 87 - User Mode 80 Balance 81 TV Speakers On/Off Setup 82 Audio Reset 83 Stereo/SAP Broadcasts Setup 84 Audio Language 85 On-Screen Menus Language Selection 86 Caption Mode -...
Owner's Manual (English)
Page 9
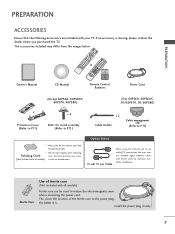
...FREEZE CH P A G ENTER E MENU Q.MENU FREEZE RATIO RETURN 1.5V 1.5V FAV MARK Owner's Manual CD Manual Remote Control, Batteries Power Cord (Except 60PS60, 60PS60C, 60PS70, 60PS80) (Only 60PS60, 60PS60C, 50/60PS70, 50/60PS80) or Protection Cover (Refer to P.11) x 4 Bolts for ...stand assembly (Refer to P.11) x 2 Cable Holder Cable management clip (Refer to the power plug, the better it is missing, please contact the dealer where you purchased the TV...
...FREEZE CH P A G ENTER E MENU Q.MENU FREEZE RATIO RETURN 1.5V 1.5V FAV MARK Owner's Manual CD Manual Remote Control, Batteries Power Cord (Except 60PS60, 60PS60C, 60PS70, 60PS80) (Only 60PS60, 60PS60C, 50/60PS70, 50/60PS80) or Protection Cover (Refer to P.11) x 4 Bolts for ...stand assembly (Refer to P.11) x 2 Cable Holder Cable management clip (Refer to the power plug, the better it is missing, please contact the dealer where you purchased the TV...
Owner's Manual (English)
Page 15
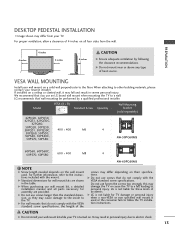
... necessary for these kinds of heat source. G LG is used . It may result in personal injury due to the TV. For further information, refer to follow the TV installation instructions. G Standard dimensions for TV damage or personal injury when a non-VESA or... shock. 13 LG is turned on their specifications. Model VESA (A * B) A Standard Screw Quantity B Wall Mounting bracket (sold separately) 42PQ20, 42PQ30, 42PQ31, 42PQ30C, 42PQ60, 50PQ20, 50PQ30, 50PQ31, 50PQ30C, 400 * 400 M6 50PQ60, 50PS30, 50PS60, 50PS60C, 50PS70, 50PS80 4 AW-50PG60MS 60PS60, 60PS60C, 60PS70...
... necessary for these kinds of heat source. G LG is used . It may result in personal injury due to the TV. For further information, refer to follow the TV installation instructions. G Standard dimensions for TV damage or personal injury when a non-VESA or... shock. 13 LG is turned on their specifications. Model VESA (A * B) A Standard Screw Quantity B Wall Mounting bracket (sold separately) 42PQ20, 42PQ30, 42PQ31, 42PQ30C, 42PQ60, 50PQ20, 50PQ30, 50PQ31, 50PQ30C, 400 * 400 M6 50PQ60, 50PS30, 50PS60, 50PS60C, 50PS70, 50PS80 4 AW-50PG60MS 60PS60, 60PS60C, 60PS70...
Owner's Manual (English)
Page 16
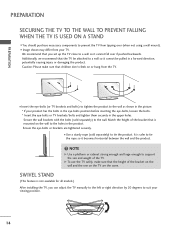
...bolts, loosen the bolts. * Insert the eye-bolts or TV brackets/bolts and tighten them securely in the product. We recommend that the TV be attached to tie the product. Additionally, we recommend that you can adjust the TV manually to the left or right direction by 20 degrees to suit... your TV. PREPARATION PREPARATION SECURING THE TV TO THE WALL TO PREVENT FALLING WHEN THE TV IS USED ON A STAND ■ You should purchase necessary components to...
...bolts, loosen the bolts. * Insert the eye-bolts or TV brackets/bolts and tighten them securely in the product. We recommend that the TV be attached to tie the product. Additionally, we recommend that you can adjust the TV manually to the left or right direction by 20 degrees to suit... your TV. PREPARATION PREPARATION SECURING THE TV TO THE WALL TO PREVENT FALLING WHEN THE TV IS USED ON A STAND ■ You should purchase necessary components to...
Owner's Manual (English)
Page 18
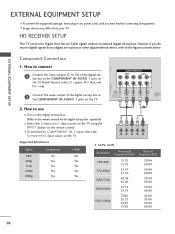
... the digital set-top box. (Refer to the owner's manual for the digital set -top box. How to COMPONENT IN 2 input, select the Component2 input source on the TV. Component Connection 1. RGB IN (PC) EXTERNAL EQUIPMENT SETUP...equipment damage, never plug in any power cords until you do receive digital signals from your TV. HD RECEIVER SETUP This TV can receive Digital Over-the-air/Cable signals without an external digital set -top box. ...33.75 27.00 33.75 67.43 67.50 59.94 60.00 59.94 60.00 59.94 60.00 59.94 60.00 24.00 30.00 59.94 60.00 16 REMOTE CONTROL IN S-VIDEO VIDEO...
... the digital set-top box. (Refer to the owner's manual for the digital set -top box. How to COMPONENT IN 2 input, select the Component2 input source on the TV. Component Connection 1. RGB IN (PC) EXTERNAL EQUIPMENT SETUP...equipment damage, never plug in any power cords until you do receive digital signals from your TV. HD RECEIVER SETUP This TV can receive Digital Over-the-air/Cable signals without an external digital set -top box. ...33.75 27.00 33.75 67.43 67.50 59.94 60.00 59.94 60.00 59.94 60.00 59.94 60.00 24.00 30.00 59.94 60.00 16 REMOTE CONTROL IN S-VIDEO VIDEO...
Owner's Manual (English)
Page 19
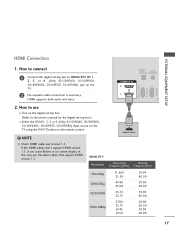
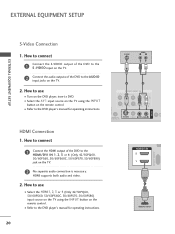
....469 31.50 44.96 45.00 33.72 33.75 27.00 33.75 67.43 67.50 59.94 60.00 59.94 60.00 59.94 60.00 24.00 30.00 59.94 60.00 17 HDMI supports both audio and video. In this case use ■ Turn on the...-top box. (Refer to the owner's manual for the digital set -top box to connect 1 Connect the digital set -top box.) ■ Select the HDMI1, 2, 3 or 4 (Only 42/50PQ60, 50/60PS60, 50/60PS60C, 50/60PS70, 50/60PS80) input source on the TV using the INPUT button on the TV. 2 No separate audio connection is...
....469 31.50 44.96 45.00 33.72 33.75 27.00 33.75 67.43 67.50 59.94 60.00 59.94 60.00 59.94 60.00 24.00 30.00 59.94 60.00 17 HDMI supports both audio and video. In this case use ■ Turn on the...-top box. (Refer to the owner's manual for the digital set -top box to connect 1 Connect the digital set -top box.) ■ Select the HDMI1, 2, 3 or 4 (Only 42/50PQ60, 50/60PS60, 50/60PS60C, 50/60PS70, 50/60PS80) input source on the TV using the INPUT button on the TV. 2 No separate audio connection is...
Owner's Manual (English)
Page 20
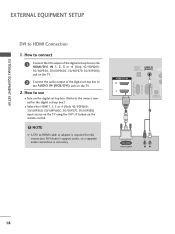
...■ Turn on the digital set -top box.) ■ Select the HDMI1, 2, 3 or 4 (Only 42/50PQ60, 50/60PS60, 50/60PS60C, 50/60PS70, 50/60PS80) input source on the TV using the INPUT button on the TV. 2. OPTICAL DIGITAL AUDIO OUT AUDIO IN (RGB/DVI) HDMI/DVI IN 2 1 REMOTE CONTROL IN 1 2 DVI-DTV OUTPUT... digital set-top box to the HDMI/DVI IN 1, 2, 3 or 4 (Only 42/50PQ60, 50/60PS60, 50/60PS60C, 50/60PS70, 50/60PS80) jack on the TV. 2 Connect the audio output of the digital set-top box to the owner's manual for this connection. NOTE G A DVI to HDMI Connection 1. RGB IN (PC) RS-232C IN...
...■ Turn on the digital set -top box.) ■ Select the HDMI1, 2, 3 or 4 (Only 42/50PQ60, 50/60PS60, 50/60PS60C, 50/60PS70, 50/60PS80) input source on the TV using the INPUT button on the TV. 2. OPTICAL DIGITAL AUDIO OUT AUDIO IN (RGB/DVI) HDMI/DVI IN 2 1 REMOTE CONTROL IN 1 2 DVI-DTV OUTPUT... digital set-top box to the HDMI/DVI IN 1, 2, 3 or 4 (Only 42/50PQ60, 50/60PS60, 50/60PS60C, 50/60PS70, 50/60PS80) jack on the TV. 2 Connect the audio output of the digital set-top box to the owner's manual for this connection. NOTE G A DVI to HDMI Connection 1. RGB IN (PC) RS-232C IN...
Owner's Manual (English)
Page 21
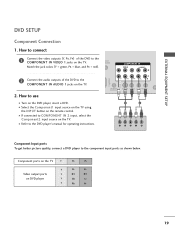
... to use ■ Turn on the DVD player, insert a DVD. ■ Select the Component1 input source on the TV using the INPUT button on the remote control. ■ If connected to the COMPONENT IN VIDEO 1 jacks on DVD player Y Y PB PR PB ... 2 Y PB PR L R Component Input ports To get better picture quality, connect a DVD player to the DVD player's manual for operating instructions. Component ports on the TV Y Y Video output ports Y on the TV. EXTERNAL EQUIPMENT SETUP RGB(PC) DVD SETUP Component Connection 1. How to connect 1 Connect the video outputs (Y, PB, PR) ...
... to use ■ Turn on the DVD player, insert a DVD. ■ Select the Component1 input source on the TV using the INPUT button on the remote control. ■ If connected to the COMPONENT IN VIDEO 1 jacks on DVD player Y Y PB PR PB ... 2 Y PB PR L R Component Input ports To get better picture quality, connect a DVD player to the DVD player's manual for operating instructions. Component ports on the TV Y Y Video output ports Y on the TV. EXTERNAL EQUIPMENT SETUP RGB(PC) DVD SETUP Component Connection 1. How to connect 1 Connect the video outputs (Y, PB, PR) ...
Owner's Manual (English)
Page 22
... ■ Select the HDMI1, 2, 3 or 4 (Only 42/50PQ60, 50/60PS60, 50/60PS60C, 50/60PS70, 50/60PS80) input source on the TV using the INPUT button on the remote control. ■ Refer to the DVD player's manual for operating instructions. HDMI supports both audio and video. 2. How to use &#...9632; Turn on the DVD player, insert a DVD. ■ Select the A V 1 input source on the TV using the INPUT button on the remote control. ■ Refer to the DVD player's manual for operating instructions. How to connect 1 Connect the S-VIDEO output of the DVD to the S -VIDEO input on...
... ■ Select the HDMI1, 2, 3 or 4 (Only 42/50PQ60, 50/60PS60, 50/60PS60C, 50/60PS70, 50/60PS80) input source on the TV using the INPUT button on the remote control. ■ Refer to the DVD player's manual for operating instructions. HDMI supports both audio and video. 2. How to use &#...9632; Turn on the DVD player, insert a DVD. ■ Select the A V 1 input source on the TV using the INPUT button on the remote control. ■ Refer to the DVD player's manual for operating instructions. How to connect 1 Connect the S-VIDEO output of the DVD to the S -VIDEO input on...
Owner's Manual (English)
Page 23
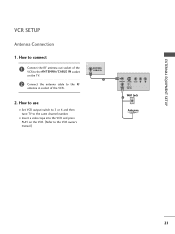
How to use ■ Set VCR output switch to 3 or 4 and then tune TV to the same channel number. ■ Insert a video tape into the VCR and press PLAY on the TV. 2 Connect the antenna cable to the RF antenna in socket of the VCR to the ANTENNA/CABLE IN socket on the VCR. (Refer to connect 1 Connect the RF antenna out socket of the VCR. 2. EXTERNAL EQUIPMENT SETUP AV IN 1 VCR SETUP Antenna Connection 1. How to the VCR owner's manual.) ANTENNA/ CABLE IN 1 ANT OUT S-VIDEO VIDEO L R ANT IN OUTPUT SWITCH Wall Jack 2 Antenna 21
How to use ■ Set VCR output switch to 3 or 4 and then tune TV to the same channel number. ■ Insert a video tape into the VCR and press PLAY on the TV. 2 Connect the antenna cable to the RF antenna in socket of the VCR to the ANTENNA/CABLE IN socket on the VCR. (Refer to connect 1 Connect the RF antenna out socket of the VCR. 2. EXTERNAL EQUIPMENT SETUP AV IN 1 VCR SETUP Antenna Connection 1. How to the VCR owner's manual.) ANTENNA/ CABLE IN 1 ANT OUT S-VIDEO VIDEO L R ANT IN OUTPUT SWITCH Wall Jack 2 Antenna 21
Owner's Manual (English)
Page 24
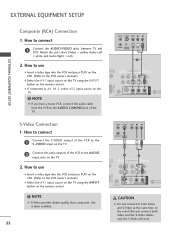
...; Insert a video tape into the VCR and press PLAY on the VCR. (Refer to the VCR owner's manual.) UDIO IN GB/DVI) COMPONENT IN VIDEO AUDIO 2 ■ Select the A V 1 input source on the TV using the INPUT button on the remote control. ! How to connect 1 Connect the S-VIDEO output of the ... not connect to the AUDIO L/MONO jack of the VCR to AV IN 2, select AV2 input source on the TV. 2. How to the VCR owner's manual.) ■ Select the A V 1 input source on the TV using the INPUT button on the remote control. 1 L R AV IN 1 RGB IN (PC) ■ If connected to the AUDIO...
...; Insert a video tape into the VCR and press PLAY on the VCR. (Refer to the VCR owner's manual.) UDIO IN GB/DVI) COMPONENT IN VIDEO AUDIO 2 ■ Select the A V 1 input source on the TV using the INPUT button on the remote control. ! How to connect 1 Connect the S-VIDEO output of the ... not connect to the AUDIO L/MONO jack of the VCR to AV IN 2, select AV2 input source on the TV. 2. How to the VCR owner's manual.) ■ Select the A V 1 input source on the TV using the INPUT button on the remote control. 1 L R AV IN 1 RGB IN (PC) ■ If connected to the AUDIO...
Owner's Manual (English)
Page 25
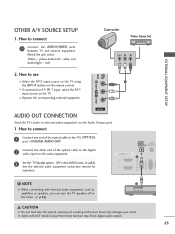
AV IN 2 AUDIO OUT CONNECTION Send the TV's audio to AV IN 1 input, select the A V 1 input source on the TV. ■ Operate the corresponding external equipment. See the external audio equipment instruction manual for operation. NOTE 2 G When connecting with ACP (Audio Copy Protection) function may damage your vision. How to use ■ Select the...
AV IN 2 AUDIO OUT CONNECTION Send the TV's audio to AV IN 1 input, select the A V 1 input source on the TV. ■ Operate the corresponding external equipment. See the external audio equipment instruction manual for operation. NOTE 2 G When connecting with ACP (Audio Copy Protection) function may damage your vision. How to use ■ Select the...
Owner's Manual (English)
Page 29
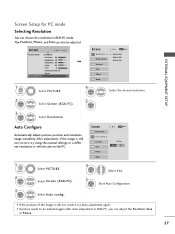
After adjustment, if the image is still not correct, try using the manual settings or a different resolution or refresh rate on the PC. G Position Size Phase Reset Move MENU Prev. Select Auto config.. 4 ENTER Select Y e s. 5 ENTER Start Auto ...
After adjustment, if the image is still not correct, try using the manual settings or a different resolution or refresh rate on the PC. G Position Size Phase Reset Move MENU Prev. Select Auto config.. 4 ENTER Select Y e s. 5 ENTER Start Auto ...

Owner's Manual (English)
Page 30
... up/down as you prefer. ■ S i z e: This function is not clear after auto adjustment and especially if characters are still trembling, adjust the picture phase manually. EXTERNAL EQUIPMENT SETUP EXTERNAL EQUIPMENT SETUP Adjustment for screen Position, Size, and Phase If the picture is to minimize any horizontal noise and clear or...
... up/down as you prefer. ■ S i z e: This function is not clear after auto adjustment and especially if characters are still trembling, adjust the picture phase manually. EXTERNAL EQUIPMENT SETUP EXTERNAL EQUIPMENT SETUP Adjustment for screen Position, Size, and Phase If the picture is to minimize any horizontal noise and clear or...
Owner's Manual (English)
Page 37
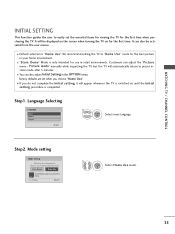
... preset instore mode after 5 minutes. ■ You can also adjust Initial Setting in retail environments. Step1. Picture mode" manually while inspecting the TV, but the TV will be activated from the user menus. ■ Default selection is only intended for the best picture in your home environment. ■ ...INITIAL SETTING This Function guides the user to use in the OPTION menu. It will automatically return to "Home Use" mode for use this TV at home. It can adjust the "Picture menu - Language Selecting Language English Español Français Next 1 ENTER Select menu ...
... preset instore mode after 5 minutes. ■ You can also adjust Initial Setting in retail environments. Step1. Picture mode" manually while inspecting the TV, but the TV will be activated from the user menus. ■ Default selection is only intended for the best picture in your home environment. ■ ...INITIAL SETTING This Function guides the user to use in the OPTION menu. It will automatically return to "Home Use" mode for use this TV at home. It can adjust the "Picture menu - Language Selecting Language English Español Français Next 1 ENTER Select menu ...
Owner's Manual (English)
Page 38
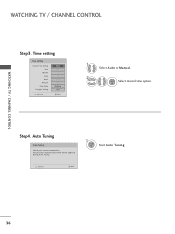
Previous Next 1 ENTER Start Auto Tuning. 36 Step4. Time setting Time Setting Current Time Setting Year Month Date Hour Minute Time Zone Daylight Saving F Auto G 2007 11 15 5 PM 52 Eastern Off Previous Next 1 Select A ut o or Manual. 2 ENTER Select desired time option. Auto Tuning Auto Tuning Check your antenna connection. The previous channel information will be updated during Auto Tuning. WATCHING TV / CHANNEL CONTROL WATCHING TV / CHANNEL CONTROL Step3.
Previous Next 1 ENTER Start Auto Tuning. 36 Step4. Time setting Time Setting Current Time Setting Year Month Date Hour Minute Time Zone Daylight Saving F Auto G 2007 11 15 5 PM 52 Eastern Off Previous Next 1 Select A ut o or Manual. 2 ENTER Select desired time option. Auto Tuning Auto Tuning Check your antenna connection. The previous channel information will be updated during Auto Tuning. WATCHING TV / CHANNEL CONTROL WATCHING TV / CHANNEL CONTROL Step3.

